
Editor’s Note: This text course is an edited transcript of a live webinar. Download supplemental course materials.
Scott Bunnell: Today we are going to talk about real-ear verification and Sonic’s Real Ear Fit system, which is embedded in the EXPRESSfit fitting software.
Learning Objectives
After this course, you should be able to describe why real-ear verification is important in hearing instrument fittings and identify which systems support Real Ear Fit in the EXPRESSfit fitting system. You should understand how to use Real Ear Fit and the steps required to do a successful first fit. Rear Ear Fit is the terminology for the system embedded in the Sonic software.
Why Does it Matter?
Real-ear verification is integral to achieving accurate hearing instrument fittings and improving patient satisfaction. I am surprised when I ask audiologists and dispensers if they are doing any type of real-ear verification and they say they are not. Either they do not have the equipment, or they have the equipment but do not use it, or they only use it on occasion. I think that real-ear verification is becoming a forgotten art for some people, although I recognize that there are professionals who faithfully do real-ear verification.
Rear-ear verification is not the only form or verification. Before real ear, functional gain was likely the most popular method of verification, by putting someone in the soundfield and doing speech and pure-tone testing with and without the hearing aids. Some people still do that, but that is a more subjective verification. We have found that objective real-ear verification gives us better information about sound pressure level at the ear drum.
You would not want to wear someone else’s glasses; that seems absurd to us. It is very unlikely that their prescription is exactly the same as yours, and the frames may not fit your face. Likewise, you would not want to wear another person’s hearing instruments to restore your hearing. If they are custom made, they will not fit your ear very well. If it is a behind-the-ear (BTE) or receiver-in-the-canal (RIC) product, the fitting is not set based on your hearing loss, needs, and wants. When you fit a hearing instrument without performing some type of real-ear measurement or verification, you are essentially fitting a hearing instrument based on an average, not the individual’s unique anatomy.
The International Hearing Society (IHS), American Academy of Audiology (AAA), and the American Speech-Language-Hearing Association (ASHA) are three prominent professional organizations. They all recommend real-ear measurements for the verification of hearing instrument fittings. Referencing the sound pressure level in the ear canal via probe tube microphone measures verifies audibility of prescription gain at soft, medium, and loud input levels. You want to make sure the soft sounds are audible and the loud sounds are not too loud.
The 2009 Consumer Report on hearing instruments found that hearing care providers incorrectly fit about two-thirds of patients due to lack of real-ear verification. Some of those people were under-fit, leaving important speech cues inaudible. Some of those people were over-fit, delivering excessive amplification in relation to their hearing loss. The title page of Hearing Review from June 2011 is about universal verification and validation. Universal verification and validation procedures would make over 500,000 repeat office visits unnecessary each year in the United States if everyone was doing verification and validation.
Today we are talking about real-ear verification only. Validation refers more to subjective measures when the person comes in for a follow-up, such as QuickSIN or Hearing in Noise (HINT) testing or questionnaires like the Abbreviated Profile of Hearing Aid Benefit (APHAB). The real-ear verification using real-ear measurements are for you to make sure that the hearing aid is providing the correct amount of amplification and that you fit the patient properly. We know that real-ear verification is the most objective and the best form of verification, yet a lot of people are not doing it.
Real-Ear Realities
The number one reason that hearing care providers do not use real ear is because of the perceived lengthy process or lack of time. Think about what is involved. We have to calibrate the probe tube, insert the probe tube into the ear canal with and without the hearing aid. Then we have to go back and forth between fitting software and real-ear software a lot of the time. You may have two different screens that you are operating on the computer; you might have two different computers completely.
The systems have improved in both size and capability since the early 90’s when I used a Frye system that was large with many buttons to operate. With from the advent of NOAH 4, systems can share the same database and use modules for real-ear and for the fitting software. Let’s look at the steps to perform a real-ear measurement.
Steps
The first thing we have to do is enter the audiogram. Depending on how you are operating, you may have to enter this only in NOAH 4, while others will need to enter it into NOAH as well as the real-ear verification system. The real-ear equipment will calculate target gain as a function of frequency according to the prescriptive formulas and will plot that on a graph. We also have to set up the real-ear equipment by calibrating the speaker and the probe tubes.
After we have entered the audiogram, we are going to insert the probe tube in the ear canal and measure the real-ear unaided response (REUR). Then we will insert the hearing instrument alongside the probe tube. Typically, that aid will already be programmed and connected to the software. With the hearing aid turned on, we will measure the real-ear aided response (REAR). Then we are going to subtract the REUR from the REAR to derive the real-ear insertion gain (REIG). After that, we will evaluate the accuracy of the REIG relative to the prescriptive target. At that time, we will likely make some adjustments to the hearing instrument to optimize the fit and match targets.
Innovations
Let’s talk about what Sonic is doing to make this procedure easier and less time consuming, but still accurate. Our innovation is the Real Ear Fit system. This is an effective, efficient, and easy-to-use verification tool embedded in the EXPRESSfit fitting software. It provides an automatic match to an individual’s unique targets, reducing the need for manual fine-tuning. You will not have to do all that back-and-forth between the fitting software and the real-ear software. That is the biggest advantage.
Compatibility
What systems are compatible with the Sonic Real Ear Fit system? Currently, there are three compatible systems from MedRx, which are Avant Speech, Avant Speech Plus, and the Avant REMsp, and two systems from Interacoustics, the Affinity and Callisto.
Advantages
Let’s talk about the advantage of this system. Real Ear Fit will provide efficiency, ease of use, and accuracy.
Efficiency
For efficiency, we are going to provide an automatic adjustment to match prescriptive targets within the EXPRESSfit fitting software, without having to switch back and forth from the real-ear measurement software. This will shorten and streamline the fitting and verification process.
Ease of Use
Real Ear Fit has easy-to-understand prompts. It takes the guesswork out of complex verification protocols. Ease of use means making this as simple as possible. That is one of Sonic’s greatest values; simplicity in everything we do is part of our 4S foundation.
Accuracy
Although we are streamlining some things and making it easier to use for you and faster in your clinic, we are still going to provide accuracy. Each individual ear canal volume is measured to create a personalized and accurate fit to target.
The Open Ear
Let’s talk a little about some of the terminology involved with real-ear measurements and the open ear. The open ear is unique to every person. The outer ear combined with the ear canal will provide a natural boost of sound in the high frequencies, known as the resonant peak. The biggest influence on the resonant peak is the ear canal itself. We also have the external ear canal resonance. The external ear canal, the pinna and the concha will create their own resonance and contribute to the resonant peak. Head diffraction is also a factor in the resonant peak.
The real ear unaided gain (REUG) is essentially the resonant peak. It is the sound pressure level of an open ear canal at the level of the tympanic membrane, which is not known until it is measured for each individual. Figure 1 shows several individual REUG curves; the red dotted line is the average ear canal resonance that we might use in the fitting algorithms. We are using an average if we are not doing real ear yet. You can see the three different curves. The blue curve has a peak at 3000 Hz and about 15 dB in gain. The green curve is similar in gain, but the peak has moved out to about 4000 Hz. The red curve has less gain with a peak around 3500 Hz. You can visually see the difference in several ear canals.
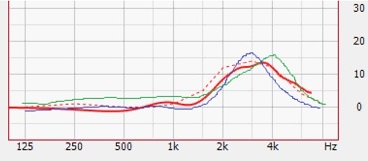
Figure 1. Individual REUG responses; the red dotted line is the average of the responses.
The Aided Ear
When we fit a person with hearing aids, the first thing we do is an audiogram. Once we identify the hearing loss, we plot air and bone thresholds, which is the starting point for calculating gain in the fitting software. Bone conduction is important, because gain changes in relation to the type of hearing loss. You should also include uncomfortable loudness levels (UCLs), as they provide information about the patient’s dynamic range, influencing targets.
In-Situ Gain
In-situ gain is the difference in sound pressure level at the tympanic versus the free field. In-situ gain targets can be influenced by electroacoustic parameters such as vent size. Our custom products take into account different vent sizes as well as characteristics of the vent, hearing instrument style, thin tube, or a BTE with an ear hook. There are different hearing instrument styles that will influence those parameters. Age and gender are other factors. In the Sonic software, target gain is influenced by age and gender. Fitting rationales can differ significantly, so the rationale you select will influence the in-situ gain targets.
Insertion Gain
Insertion gain refers mainly to custom aids or anything taking up space in the ear canal. When something is put in the ear canal, it will impede that open-ear gain. A fitting software overcomes this loss by applying the appropriate amount of insertion gain. The REAG minus the REUG equals the REIG, or the insertion gain. The insertion gain targets can be vastly different between fitting rationales for the same loss (Figure 2). Depending on what fitting algorithm we are using, there is a high degree of variability at the outset. That is why real-ear verification is important at the fitting.
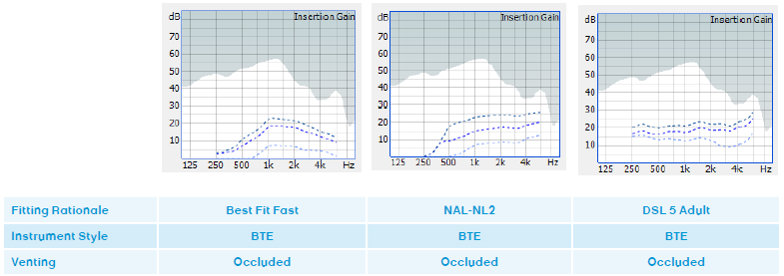
Figure 2. Differences in insertion gain targets of three fitting rationales.
REAG
The first fit on the hearing instrument is the REAG, and it remains an approximation to prescriptive targets unless real-ear measurements confirm the gain in the aided ear. Over and under amplification may be occurring across this frequency range, so manual fine-tuning is needed to match the response of the prescribed target in a typical system. However, in Sonic’s Real Ear Fit, we are going to try to make this more convenient for you.
Real Ear Convenience
The Real Ear Fit system integrates the steps in order to simplify the verification process. It will sequentially measure the REUG and REAG, and then perform an automatic tuning of the response to meet targets. In Figure 3, we show an in-situ gain target. We have 80 dB target for loud sounds, 50 dB for soft sounds, and 65 dB for average sounds. We have performed an REUG on this patient with a probe mic wide open. Then we measured the REAG, which is the solid gray line; that is the gain that is measured without any adjustments. We can see that this patient is under-amplified. The software itself is going to make the adjustments to fit this target as closely as possible, without you having to make any of these adjustments. That is what we are talking about with the REAG adjustment. The solid blue line is the adjusted real ear response after Real Ear Fit is applied.

Figure 3. REAG (solid gray line) compared to Real Ear Fit adjustment to targets (solid blue), showing that the initial real-ear response underfit the patient.
Real Ear Fit in EXPRESSfit
Let’s talk about steps involved with using Real Ear Fit in EXPRESSfit 2014. The first thing is to connect and install the real-ear measurement equipment and its software on the same computer as EXPRESSfit; that is a requirement. Once you have done that and read some hearing aids, you will see that the Real Ear Fit icon appears in the EXPRESSfit tool bar, as seen in Figure 4. If you do not have compatible Real Ear Fit systems on your computer, you will not see that icon.

Figure 4. Real Ear Fit toolbar icon.
Speaker Calibration
The next step is to calibrate the speaker. If you have a stationary speaker in the system that is not moved, calibration may not be required each time. However, for a system like MedRx REMsp, its Bluetooth speaker is easily moved and portable, so you would have to calibrate the speaker frequently. The key is to calibrate that speaker before you launch EXPRESSfit or read the devices.
Detect Instruments
Once the speaker calibration is complete, close the real-ear measurement software, as it cannot be open at the same time as EXPRESSfit. Calibrate the speaker, close out the Real Ear Fit module, and then you can open the EXPRESSfit module and detect the instruments. Once you have opened EXPRESSfit 2014 and detected the instruments, click on the top left corner where it says “use attached devices.”
The first box that will open in the software is the acoustic parameters. This is a very important step. We want to make sure that the acoustic parameters that the computer has chosen based on the audiogram are the same as those that you intend to use. As the professional, you know a lot more than the audiogram and will consider the shape of the ear canal, the patient’s own experience and desires and the appropriate style or modifications to styles of hearing aids. If the computer did not choose the exact parameters in terms of receiver size, dome type, or venting for a custom product, you can change those in the software.
Customize Real Ear Fit in Preferences
Once you have done that and detected the hearing aids, you can customize your Real Ear Fit in the Preferences menu under Tools. There is an in-situ gain view and an in-situ SPL view. The in-situ gain is the default, however, I prefer the in-situ SPL view because it easily shows all three curves (50, 65, and the 80 dB). It also shows the maximum power output (MPO) curve, because the MPO curve in the new products is integrated into the fitting algorithm. If there is additional head room, you know that it is there and exactly how much.
Another item in Preferences is the 80 and 50 dB curves. Sixty-five decibel input is required when you are measuring the REAG, but that is all you need. Once 65 dB is measured, will use those adjustments automatically to the 80 dB and 50 dB curves as well. However, if you had the desire and you wanted to measure those two curves manually, you can select that in the Preferences.
One more thing you will see on the Preferences menu is the measurement module. This will remind you which modules are compatible with the Real Ear Fit system. If you have used more than one real-ear system (e.g. Avant REM and Avant REMsp) and have not removed the previous system, you can check that in the Preferences section as well. You do not have to do this every time, just the first time that you get into the software and use this system.
There are two different places to launch the Real Ear Fit module. First is under Tools and Real Ear Fit. The second is the ear icon with the green waveform on the tool bar.
Calibrate Probe Tube
The next thing we are going to do is calibrate the probe tube. Take the probe tube and put the end in front of the reference mic. You will have to select right or left if you are using a monaural system such as the Avant REMsp. The Interacoustics Affinity system is a binaural system, so you will need to do both probe tubes. Click “next” after you have calibrated the probe tube and then you are ready to begin measurements
Measure REUG
Now we are going to measure the REUG. Otoscopy is required before you do this to ensure that the ear canal is not occluded with cerumen and is healthy. Otoscopy will also help you see the shape and bend of the ear canal before placing the probe tube.
Seat the patient about one meter (three feet) from the speaker and then insert the probe tube. For adult males, probe tube insertion should be about 30 to 31 mm past the intertragal notch. The intertragal notch is a reference point, but you can also use the opening of the ear canal as a reference if you like.
For adult females, probe tube insertion should be slightly less, about 28 mm past the intertragal notch, and for children, it is 20 to 25 mm. Most of the new probe tubes have an adjustable ring that you can move to pre-measure the distance that you want use as a reference. In general, we want to be about 5 mm from the patient’s tympanic membrane. At this point, you will measure the REUG.
Measure REAG
At this point, we keep the tube in the ear and carefully place the hearing instrument into position. This is not always the easiest thing. Sometimes that tube can get pinched when the instrument is tight in the ear canal. If there is no other option and you have a large enough vent, sometimes you can thread the probe tube through the vent. It is not ideal, because that will change your REAG somewhat without the vent open, but it can work in the event that you cannot get it placed in the ear canal at all.
After you place the hearing aid and do your REAG measurement, you will see a gray line on the software screen. That is the first fit without the adjusted real-ear measurement. Then the Real Ear Fit will automatically make adjustments to hit target, which shows up as a blue line for the left ear and a red line for the right ear.
The software will give the option to apply these adjustments or keep the predicted values. You can toggle in between the two to compare and contrast if you like. In the software, you will see that you have the ability to go back to the predicted measurements even after you have applied the automatic adjustment. Do this under Edit, Fitting Data, and Predicted.
Finish
You can see how simple the procedure is. You calibrate the probe tube, perform the REUG, put the hearing aid in, perform the REAG, and the software does the rest. Future changes to the audiogram, fitting rationale or the experience level will not require a new REAG measurement. It will memorize the ear canal resonance that you measured and it will adjust those fitting automatically based on changes in the audiogram, fitting rationale or experience level.
If you change the acoustics in an instrument, such as changing from an open dome to a tulip or closed dome, remaking a hearing aid or changing the vent size, you will need a new REAG measurement as the insertion gain targets will have changed based on the change in acoustics.
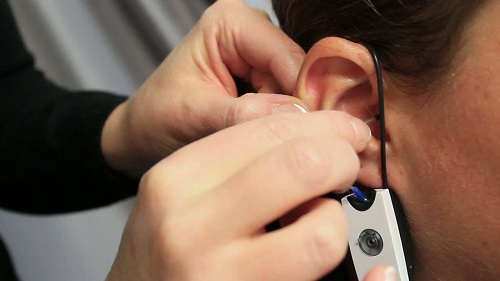
In Action
I have a video to show you Real Ear Fit in action. One thing to note in the video is that they use the opening of the ear canal as the reference measurement point, not the intertragal notch. That is a preference.
Other Software Considerations
The take home message is that we can use the Real Ear Fit system embedded in the EXPRESSfit software as part of a first-fit protocol. We recommend running the feedback manager first. By doing this, we start with an accurate feedback threshold gain limit based on the patient’s acoustic pathway. Sometimes if you are using an open fit or an instrument with a large vent or slit leaks due to a loose fit, the threshold gain limit might come down close to your high frequencies or even push those down. If you run the Real Ear Fit, it will never go above the threshold gain limits. Run the feedback manager to get an idea of how your hearing aid is fitting, and then you can always rerun it again with different acoustics.
Perform the Real Ear Fit, and then you can adjust for the patient’s own voice. If you have used Sonic in the past, you are familiar with Voice Manager. That is now embedded in EXPRESSfit 2014. You can adjust for the patient’s own voice in four different categories: volume, position, occlusion, and quality. That is a very quick procedure as well. At the follow-up, you may have fewer issues for your patient. Hopefully you can reduce your return rate as well.
The Real Ear Fit system is designed to be simple and easy. We want to improve the accuracy of first fits, and we added Real Ear Fit as a real-ear verification system. Using the patient’s ear canal resonance and ear canal volume allows more precision adjustments to fit to target. There is no manual fine-tuning involved with Real Ear Fit. The procedure takes about 5 to 10 minutes. You can reduce follow-up appointments by getting closer to a better starting gain. You will increase the satisfaction for your patient at first fit.
Reference
Consumer Reports. (2009, July). Hear well in a noisy world. Retrieved from https://www.consumerreports.org/cro/magazine-archive/july-2009/health/hearing-aids/overview/hearing-aids-ov.htm
Cite this Content as:
Bunnell, S. (2015, May). Real simple, real ear fitting tool AudiologyOnline, Article 14135. Retrieved from https://www.audiologyonline.com