
Editor's note: This article is an edited transcription of the AudiologyOnline recorded course Earmolds and More (#16407). To view the recorded course, register here.
Although it may seem like a basic concept, even the experienced audiologist may run into difficulties selecting the best type of earmold to fit a hearing loss or individual patient. You might be surprised to know that each day many professionals call in for support on selecting and fitting earmolds, whether that is due to style, material, venting, or tubing. We are in an era where earmolds go way beyond the tried-and-true full-shell style;however, each mold is inherent of certain acoustical properties to maximize a hearing aid's potential to deliver sound to the ear. In this article, we will review several earmold styles, materials, modifications, and techniques to make your molds a success for you and your patients. The terminology used is meant to be as generic as possible, understanding that there are variations of terms with respect to manufacturer and region.
Custom Fit Earmold Styles
A custom earmold is one made from a personal impression of the ear canal and concha area so it is unique to that individual's ear. Custom earmolds are likely what most people are familiar with. If you have ever looked in an earmold product manual, you have seen the many pages of custom styles and may have felt overwhelmed at what style you should choose. Let's define and discuss some of these popular styles, as well as the options available to each of the custom subsets. Each style will be described using the full shell or full concha earmold as a reference, since most professionals are well familiar with it.
Skeleton and Semi-Skeleton
Figure 1. Skeleton earmold.
(Illustration courtesy of Westone.com)
A skeleton earmold (Figure 1) is a relative of the full shell, with a small hole cut out in the concha portion to make a ring around the bowl of the ear. The semi skeleton earmold removes part of the outer ring and leaves the final mold with either a lower concha lock or a helix lock, depending on the hearing loss, ear anatomy, and dexterity of the patient.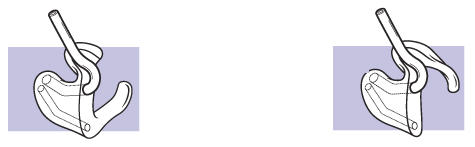
Figure 2. Semi-skeleton lock mold and helix lock.
(Illustrations courtesy of Westone.com)
A helix lock can be utilized for ear deformities, such as "cauliflower ear," because these types of ears don't have much of a concha bowl at all, but do have the helix intact. This semi-skeleton earmold is also referred to as a semi-skeleton lock mold (Figure 2).
Half shell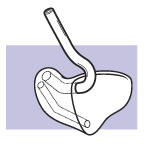
Figure 3. Half-shell earmold.
(Illustration courtesy of Westone.com)
As its name implies, the half shell is simply half of the full shell, cut horizontally across the concha and filling up the lower aspect of the concha bowl (Figure 3). Some ear labs carry different variations of the half shell, wherein the mold may take up only a quarter of the concha. Either way, this kind of mold can serve a cosmetic purpose without losing some of the benefits of a full shell.
Canal and Canal-Lock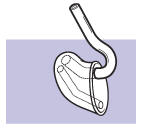
Figure 4. Canal earmold.
(Illustration courtesy of Westone.com)
The canal mold simply fills up the ear canal only, but can still be vented and tubed the same way as a full shell. A canal lock is simply a canal version earmold with a concha lock that sits in the posterior part of the concha bowl (Figure 4).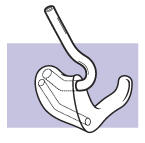
Figure 5. Canal-lock earmold.
(Illustration courtesy of Westone.com)
The lock version may be used to add a little more stability and retention, as well as aiding the patient with insertion and removal. Some dispensers and audiologists may also use the term "handle" or "lower concha lock" to also indicate a canal lock (Figure 5).
Acoustic modifier
Figure 6. Acoustic modifier.
(Illustration courtesy of Westone.com)
Acoustic modifiers are added to the earmold style, typically that of a skeleton mold, and can alter the acoustic properties (Figure 6). Examples of acoustic modifiers include shortening the canal and opening the sound bore to emphasize high frequencies, as well as adding parallel or y-vents that occupy some of the same space as the sound bore.
Open-fit Earpieces
Obviously, we have seen a surge in the open-fit hearing instrument market over the past ten years. We have also seen an opportunity to create custom molds to work with these slim tube or receiver-in-the-ear hearing instruments. A large majority of the requests for open fitting molds that we receive at Westone is for the minuscule earmolds used to hold a slim tube instrument in place. This small earmold may serve three purposes: retention;to possibly provide a small amount of occlusion to allow for higher gain and less feedback;and to help with insertion if the patient has dexterity issues or problems holding the standard dome tips that are small and flexible.
Probably the most popular custom mold for a slim tube is something that is very cosmetic and small: a micromold. A micromold is a canal style earmold with a sound bore that will fit the selected slim tube, with a very large vent area to prevent the occlusion effect. Obviously, the idea behind any open earmold is to allow the patient to use what normal hearing sensitivity they have naturally and only use the earmold as a means for directing mid- and high-frequency amplification down the ear canal.
While the small canal styles are appealing for cosmetic reasons, one earmold style does not fit all. We have to consider those people who cannot manipulate a small earmold with ease. However, we have made advances to still offer cosmetically-appealing molds with more room to hold the materials and provide better in-ear retention.
One shell mold that we are using is the open skeleton, which comes in two different models. The difference in these two models is the size of the canal.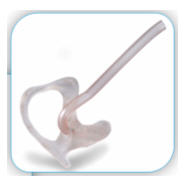
Figure 7. Skeleton 1.
Figure 7 shows an open skeleton mold with the bottom of the ear canal portion removed, so only the sound bore resides in the ear canal. There is no aspect of a canal allowing for a vent because it is completely removed in this particular earmold. This type of mold is used for a hearing loss with good low-frequency hearing, or for a CROS or BICROS fitting. The open skeleton would be used on the dead ear for retention.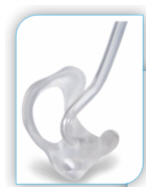
Figure 8. Skeleton 2.
The skeleton 2 earpiece (Figure 8) is essentially the same, but it allows you to use a vent plug system to modify the vent size if necessary.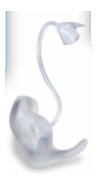
Figure 9. Slim tube canal-lock earmold.
The slim tube canal-lock mold (Figure 9) features a small foot around the concha bowl. Even for the size of this small mold, this offers quite a bit of retention coupled with comfort in the canal.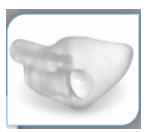
Figure 10. Half-shell earmold for a slim tube.
Although not as popular, a slim tube half shell can also be made (Figure 10), keeping the vent as large as possible. You will not likely see many full-shell slim-tube earmolds, simply due to the inherent acoustic nature of a full-shell mold, although it can be accommodated as a full shell with a large vent.
Receiver-in-the-Canal (RIC) Earpieces
Similar to a slim-tube option, we have fashioned an earmold that will accept the receiver of a RIC instrument and yet still fit into the ear canal. This can often be a challenge due to the small nature of the ear canal anatomy that we are working with.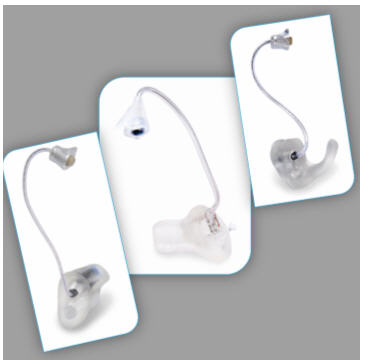
Figure 11. Several receiver-in-the-ear style earpieces, including canal and canal lock.
Again, for cosmetic reasons, the most popular version of this mold is the canal earmold.
RIC earpieces are primarily made of silicon across several manufacturers, although Westone does make some acrylic receiver-in-the-canal earpieces. Figure 11 shows a canal, canal with removal string, and canal-lock piece for RIC instruments. Occasionally, depending on the concha anatomy or the patient's preferences, a skeleton mold will be fitted for a RIC instrument. On the other side, an order requesting a canal mold may come in and, due to ear anatomy or the receiver itself, we may have to change the order from a canal style to a canal lock or to a half shell, putting more material into the outer concha so there is room to place the receiver in the earmold and down toward the eardrum. One problem with using a mold with more bulk is that if the receiver wire comes too far out into the concha, then the wire going from the receiver back up over the ear can be too short and pull the instrument away from the ear. Many of these factors- power receiver limitations, configuration of hearing loss, venting limitations, and size of the ear canal- should be considered before ordering this type of specialty earmold from an earmold lab.
Canal direction and shape should also be carefully examined before considering a RIC instrument with a custom earmold. Keep in mind that the receivers do not bend, so you may end up with a receiver against the canal wall in an ear with a sharp bend as you enter the aperture or steeply sloping canals toward the eardrum. Adding an earmold to the end of a receiver might make this situation worse for comfort. The earmold lab should use discretion when deciding if the canal anatomy really does allow for a custom mold, and if the receiver will fit as deeply into the canal as desired. The goal is to have the receiver directed toward the eardrum and not against the canal wall.
Unlocking the Mysteries of Earmold Material
Figure 12. Vinyl, acrylic, and silicone earmold examples.
Acrylic/Lucite
Many professionals are likely familiar with three standard earmold materials: acrylic or lucite, vinyl, and silicon (Figure 12). Acrylic might be considered the old standby. This hard material has been around for a long time, and while a large majority of patients with more significant degrees of hearing loss were moving to softer materials for a while, more people are actually going back to acrylic these days. One main reason for this is the advent of better digital hearing instrument signal processing technology and feedback managers. Acrylic, generally speaking, remains the most durable earmold material. It does not shrink, break down over time, or harden with time (since it is already hard). Additionally, it is the easiest of the three materials to modify or re-tube and glue. From a patient standpoint, it is easy to insert and remove, and it comes in every earmold style and color available. Acrylic material is very easy to clean with most mild cleaning agents, and is resilient no matter how many times the surface has been cleaned.
Acrylic is best suited for patients with a softer ear texture. When considering ease of insertion, if the ear is very soft and the skin has lost some elasticity, acrylic material is the easiest for that person to maneuver. The only exception is the soft, delicate ears of infants and children. It would only be in a rare case that an acrylic or hard mold would ever be recommended for a child. The greatest disadvantage of a hard earmold for a child is the potential for injury. A 12 year old who is very active in sports from baseball to soccer would have a potential risk that a ball or other player would collide with his ear, and that hard earmold would injure the delicate ear structure. Generally, soft molds are more comfortable to children with growing ears, as well. There is no magic age where a child becomes able to wear an acrylic mold;however, infants and children learning to walk and navigate should never be fitted with a hard earmold.
A general disadvantage of acrylic material is mainly that it is not flexible. Although it is generally the easiest material to insert, since the mold will not compress it can be difficult to insert into very narrow canals. A flex-canal material can address that problem to some degree, however. Secondly, acrylic earmolds are more prone to acoustic leakage when the ear canal changes shape because they don't move with the jaw. If someone with a significant loss has excessive jaw movement or the earmold does not stay tight during chewing, that user may experience feedback issues despite a good feedback manager in the hearing instrument.
Vinyl
Vinyl, also known as polyvinyl chloride (PVC), is a material that falls in between acrylic/lucite, which is the hardest earmold material, and the softest materials at ear labs. Vinyl is a softer material for soft or flaccid ears and works well for older individuals or children. It inserts fairly easily, although some argue not as easily as acrylic, and has the advantage of providing a better acoustic seal for high-gain instruments. It is easily tubed, but does require a glue to hold it in place. Some may argue that vinyl is not easily modified;however, a medium-coarse grinding stone can be used to trim and smooth edges quite nicely in the convenience of your office. The disadvantages of vinyl are that it does shrink, harden, and discolor over time. Very old vinyl earmolds that have hardened, may in fact, look and sound like an acrylic earmold as you tap it on your desk. Vinyl earmolds tend to turn a yellowish-brown with time due to individual body chemistry. Sunlight also speeds discoloration. Because of these inherent property problems, vinyl earmolds need to be replaced more often than acrylic or silicon. Most earmold labs cannot make vinyl earmolds in all of the bright multicolors or glitters, either.
Furthermore, vinyl earmolds are not generally recommended for use with patients who have allergy concerns. Many earmold labs offer a boil and saline option, which means the earmold is literally boiled, making the earmold a little more user friendly with people who may report allergies. Now, for the person seeing an allergist for airborne allergies, food allergies, and the like, they might be able to use a boiled vinyl earmold, but usually they require something more neutral such as silicon or polyethylene.
Polyethylene
Polyethylene is a semi-hard waxy material, with an appearance much like candle wax. The color resembles an older milky-colored ear hook on a hearing aid. This is the earmold material of last resort for allergic cases. Generally, we encourage you to try everything else before using polyethylene because it is not cosmetically appealing, and it is difficult to modify. It is a very safe mold for extreme allergies, but there are also no color options, and style options are somewhat limited. Keeping a tube in place has also proven to be very difficult with this material, so you may have frequent tubing problems or remakes back to the lab. But, all things considered, if you have a patient who is absolutely unable to wear anything else, consider the polyethylene earmold.
Silicone
Silicone has many advantages. It is very flexible and comfortable, tight fitting for high-gain instruments, and durable, especially when compared to acrylic. Very little change in shape or size occurs over time and it is an ideal material for allergy cases (when ordered in a neutral color or clear with no glazing or high-shine). The disadvantages of silicone include difficulty of insertion, especially when it is brand new. Because it is quite flexible, it almost has a rubbery feel when pressed to the skin and can grab the skin upon insertion. One way to address this is by ordering a matte finish instead of a glazed finish, which will slide into the ear much easier. A second way to address this is by applying a water-based lubricant to the canal portion of the earmold before insertion. Silicone is not appropriate for patients who have very soft or flaccid ears because it grabs the loose skin and pushes back, making it difficult to get the earmold in with a good fit.
While silicone is very soft and flexible, these characteristics make it difficult to modify and glue tubing. Making in-office fit changes to this earmold is more difficult than to earmolds made of acrylic or vinyl material. It takes a grinding motor with high RPM speeds (20,000 RPM or higher), which many offices do not have, to modify silicone earmolds. It is also difficult to glue tubing into the sound bore of a silicone earmold. On the original make of the earmold, the tubing is actually not glued. Most earmold laboratories use a plastic or metal/brass retention device of some sort on the tube. This type of tubing is referred to as a TRS (tubing retention system) tube or tube lock (Figure 13). There is also friction tubing, in which the tubing is tight in the sound bore where tugging does not release the tubing easily.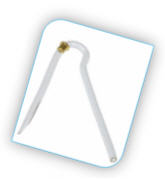
Figure 13. TRS tubing with a brass lock.
Silicone molds are available in bright colors, glitters, swirls, and DisappEar, which is a natural, flesh-looking mold. There are many children who are using silicone earmolds both for the appearance and the durability, but tube retention is a problem. For children who remove the earmolds by pulling the tube, we can make that tubing permanent in the earmold. At Westone, we call it welding the tube. We use a Loctite primer and Loctite adhesive. Loctite is commercial grade super glue, if you will. By using this product, the tubing adheres to the silicone, but if the tubing is pulled out, the entire earmold must be replaced. Only a very small amount should be used, as a little goes a long way. This process is usually fine for young children who are growing out of the earmolds and will need frequent remakes. Making the tubing more permanent tends to make Mom and the audiologist happy. You just simply replace the earmold as the child outgrows that earmold.
We see few actual allergic problems with silicone, but what some users perceive as a reaction to the earmold can actually be a tolerance problem instead. Silicone does not contain latex, and the gloves we use in our lab while processing this material do not contain latex;the silicone is medical-grade. But the tight fit these earmolds provide, while well-suited for more severe degrees of hearing loss, may cause some discomfort or rejection from the user. Rejection may also come from irritants from the ear itself that can contaminate the soft earmold if not cleaned properly and then inserted back into the ear canal. These problems do not constitute a large majority of these earmold users, however, and most children do tolerate these earmolds quite well.
What is the best choice of earmold material?
The advantages and disadvantages to each material have been addressed, but how do you choose one over another for varying types of patients and hearing losses? First and foremost, consider the age of your patient and who will most often be handling the earmold. While there are no rules set in stone, if you are fitting a pediatric patient, you want to first choose something you know they will wear, as hearing aid retention for this population in general can be daunting. Many children wear the silicone earmolds, even though they have a soft ear texture. Compliance to wear the earmolds and hearing aids is better if they can have a bright color or glitter that makes the earmold personalized. The soft texture is also more appropriate when we are considering the risk of injury, as discussed previously.
If you are working with much older patients, consider the dexterity when choosing an earmold. There may be 80-year-old patients who also want a bright red earmold to match their red hearing aid, but do weigh the advantages and disadvantages if choosing a silicone mold for this patient. Your patient may be able to insert the earmold, but with such a tight fit, will he or she be able to remove it without pulling the tubing out? Can this person tolerate an acrylic mold while chewing? Take note of lifestyle factors that may affect the choice of earmold.
Another factor that may play a role in your decision is cost. Decide ahead of time if you think you might have to modify an earmold for a patient. Think about how often you might have to replace the earmold based on patient history, use, and age. For adults, you may consider that for certain patients, once you get the fit just right, you never want to replace it because you may never get it just right again. What will re-tubing costs be?
Ultimately, the choice of earmold is a decision made between patient and audiologist. It is good to be well-versed in all types of materials and options available so you can make an educated decision together, weighing the pros and cons.
Modifying earpieces
Machines
There will be occasions when you will have to modify the canal or concha portions of an earmold. The equipment that you use varies.
Figure 14. Gold Chrome commercial bench grinder.
There are few practitioners who own the Gold Chrome motor (Figure 14). This is a high-end grinding motor typically found in earmold labs. This particular motor runs on two high speeds (12,000 to 24,000 RPM) and accomplishes this with a transmission. This multiplies the basic speed by about 5 to achieve up to 24,000 RPM. Therefore, the torque of this grinder is much higher than what you will find in everyday grinding motors. This type of grinder could be considered the luxury car of grinders.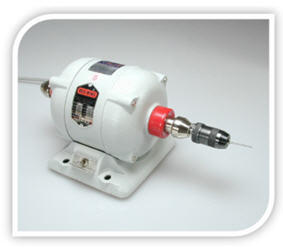
Figure 15. Red Wing professional bench grinder.
The Red Wing bench grinder may be more familiar to practicing audiologists (Figure 15). One of the largest advantages to this grinder is that is accepts any size drill bit or grinding stone on one side and has a polishing wheel on the other side. Unfortunately, this motor runs fairly slow at 2,000 to 4,000 RPM. This machine is not all that expensive and seems to be the workhorse in most dispensing offices for acrylics and vinyls. Unfortunately, it does not do well with silicone.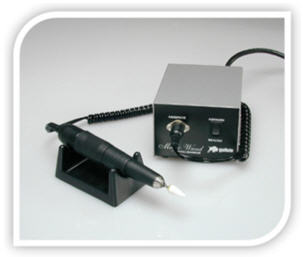
Figure 16. Buffalo Wand traditional hand-held rotary grinder.
Hand-held rotary devices typically have very light speeds. Figure 16 shows a Buffalo Wand. This particular model has a variety of RPMs and speeds, with relatively low torque. This does grind silicone very nicely. Using a hand-held instrument can be a little disconcerting if you are very used to a bench grinder, but making the adjustment takes little time at all.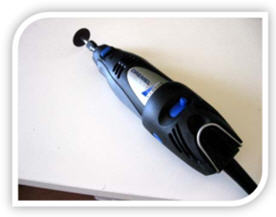
Figure 17. Dremel 300 rotary tool.
Another variation on the hand-held is a Dremel tool (Figure 17). The Dremel can provide the high RPMs needed to grind silicone (5,000 to as much as 35,000 RPMs), and is easy enough to find at a local hardware or home improvement store. These are inexpensive at less than $100 and can be invaluable tools if you only have a simple bench grinder or no specialized grinder at all.
Stones and Bits
Grinding stones are fairly industry wide as far as earmold labs are concerned.
Figure 18. White stones for modification.
Figure 18 shows two examples of white stones. The color usually refers to the coarseness of stone, and the size is designated as a number (i.e. 4 or 6). White stones are used to grind acrylic or vinyl. The different sizes are used to maneuver into the different parts of an earmold or a custom in the ear device. Consider having at least a large and a small stone for various modifications.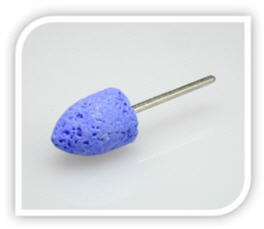
Figure 19. Blue stone for grinding.
The blue stone (Figure 19) is a porous, coarser stone. A blue stone can be used to modify silicone earpieces. As mentioned previously, you also need a high RPM grinder along with the blue stone to modify silicone earpieces.
Figure 20. The recommended way to properly hold an earmold for hand-held modifications.
Figure 20 shows the recommended example of how to best hold the hand-held grinder for ease of manipulating the earmold. Hold the grinding tool loose, and the thumb is then used to brace the earpiece. Use the opposite hand to hold and control the earpiece. For best results and control, grind the earmold in the opposite direction the stone is turning. When you grind in the direction the stone is turning, you will cut the surface but not remove the material.
Always wear eye protection when making changes to earmolds with mechanical equipment.
When using a bench grinder, turn the spindle so it faces you. This may be contrary to what many audiologists are used to. However, using this position will give you more control to maneuver the earpiece. Use both hands to turn the earpiece and brace the hands on the work surface.
If you only need to modify a very small portion of the earmold, some may choose to forgo the grinder and use sandpaper instead. Wet or dry sandpaper may be used, and is usually a grey or charcoal color. It is simple and inexpensive way to reduce a small area that may be causing mild discomfort. Additionally, sandpaper can be used to restore a brushed or velvet finish on the earmold after grinding, as long as your strokes are all in the same direction;do not use circular motions with sandpaper on acrylic earpieces. Use a buffing wheel with plastic polish on either a bench grinder or hand-held to restore high gloss finishes.
When modifying earmolds, consider the area you are trying to change. If a large portion needs to be removed such as canal length or concha portions (i.e. changing a full shell to a half shell), use scissors or a sharp blade like an X-Acto Knife or scalpel to remove the bulk of the material first, then use the correct stone (depending on the material you are modifying) to smooth and blend the edges. When using the blue stone for silicone, use at least 15 to 20,000 RPM for the best results. Use the sandpaper to finish your work with a matte finish;if you are modifying a silicone mold, know that the part you change will no longer retain the shiny finish. Earmold laboratories can re-glaze the piece if the shiny factor is of cosmetic importance for your patient.
Above all, do not be afraid to modify the earmold. At Westone, we would encourage you to try to modify earmolds, and if it does not turn out the way you would like, send them back for a remake. It is most advantageous from a time and convenience perspective to make modifications while the patient is in the office.
Impression making and materials
Convenience may be the leading factor in choosing impression materials. Some people still prefer to use a powder and liquid mixture;others use only the Silicone cartridge materials in the gun or the syringe (Figure 21).
Figure 21. Manual syringe versus impression gun.
Preference for a syringe versus a gun often boils down to the control required by the user. Many people prefer the ease of the gun for an all-in-one step impression, but some may say they lack the hand control needed to squeeze the trigger for an even flow of impression material. Those who use a syringe like the simplicity of the equipment and the speed at which they can direct the impression material. Both methods can give the same end result.
Some published literature addresses using open bites during an impression for an open-jaw impression. We recommend open bites for musician products such as custom ear protection, for people who have a chronic history of remakes, for addressing feedback problems, or for those with any ear canal troubles. Using a bite block or having the patient open their mouth during the impression can capture the features of the ear canal on the order.
To make an impression that truly resembles the ear, remove wax and trim any unwanted hair prior to the impression. Don't skimp on impression material;fill up the concha bowl as much as possible and cover the tragus, anti-tragus and helix areas very well. Make the impression as deep as the patient will comfortably allow. Allow the earmold lab do the trimming. Don't try to make an impression of a full-shell earmold. The more the lab has to see and work with, the better the final earmold will fit.
After removing the impression from the ear, look and see if there are folds, gaps or voids in important places. If you find areas that look shiny, that indicates that the impression material did not touch the skin, but cured in the air instead. Make sure your impression reflects the upper concha or the helix of the ear, the tragus at the bottom and anti tragus.
Identifying potential problems while the patient is in your office or possible call-backs from the earmold lab will cut down on the number of remakes. If you are unsure if the impression will give the lab enough to work with, your guess is probably correct, so make another impression immediately while the patient is still there.
To make sure the earmold lab is aware of what you would really like for the final product, complete the order form in full. This includes style, material, venting, patient information, and tubing information. If you are unsure about how venting might change the acoustics or feedback for your patient, order a variable vent, which is always a safe choice. Provide additional details and special instructions where necessary. Include the patient's hearing loss to help us build the earmold. Err on the side of providing too much information. And lastly, remember to write legibly so the earmold lab does not decipher something in a different way than you intended.
Conclusion
Knowing the tools and requirements for making the best possible earmold does not have to be overwhelming. A simple review of the styles, materials, and special considerations can unlock the mysteries of the earmold. Your earmold manufacturer is there to help you, so use them to your advantage if you have questions or concerns about an order. Becoming more familiar with how to take perfect impressions, how to indicate preferences on an order form, and how to evaluate your patient for the perfect style of earmold will increase your confidence and maximize patient satisfaction.
Earmolds and More: Maximizing Patient Satisfaction
September 13, 2010


Related Courses
1
https://www.audiologyonline.com/audiology-ceus/course/wireless-connectivity-for-people-with-37481
Wireless Connectivity for People with Hearing Loss, presented in partnership with Seminars in Hearing
This 4-part webinar series is focused on wireless connectivity between the listener and the talker designed to improve communication. Guest editor, Dr. Linda Thibodeau along with a team of leading experts will present on select articles from a recent issue of the journal Seminars in Hearing (Issue 04 · Volume 41 · November 2020).
auditory, textual, visual
129
USD
Subscription
Unlimited COURSE Access for $129/year
OnlineOnly
AudiologyOnline
www.audiologyonline.com
Wireless Connectivity for People with Hearing Loss, presented in partnership with Seminars in Hearing
This 4-part webinar series is focused on wireless connectivity between the listener and the talker designed to improve communication. Guest editor, Dr. Linda Thibodeau along with a team of leading experts will present on select articles from a recent issue of the journal Seminars in Hearing (Issue 04 · Volume 41 · November 2020).
37481
Online
PT240M
Wireless Connectivity for People with Hearing Loss, presented in partnership with Seminars in Hearing
Presented by Linda K. Thibodeau, PhD, CCC-A/SLP, Lori Zitelli, AuD, Grant Rauterkus, BS, Cheryl DeConde Johnson, EdD, David Maidment, PhD
Course: #37481Level: Intermediate4 Hours
AAA/0.4 Intermediate; ACAud inc HAASA/4.0; AHIP/4.0; ASHA/0.4 Intermediate, Professional; BAA/4.0; CAA/4.0; Calif. SLPAB/4.0; IACET/0.4; IHS/4.0; Kansas, LTS-S0035/4.0; NZAS/3.0; SAC/4.0; Tier 1 (ABA Certificants)/0.4
This 4-part webinar series is focused on wireless connectivity between the listener and the talker designed to improve communication. Guest editor, Dr. Linda Thibodeau along with a team of leading experts will present on select articles from a recent issue of the journal Seminars in Hearing (Issue 04 · Volume 41 · November 2020).
2
https://www.audiologyonline.com/audiology-ceus/course/ponto-5-mini-advanced-fitting-37508
Ponto 5 Mini Advanced Fitting Techniques - Adult and Pediatric Populations
This course will train clinicians on best practices and advanced fitting techniques for fitting the Ponto 5 Mini for both adults and children. This course will use case studies to illustrate examples of challenging fitting scenarios for both adults and children.
auditory, textual, visual
129
USD
Subscription
Unlimited COURSE Access for $129/year
OnlineOnly
AudiologyOnline
www.audiologyonline.com
Ponto 5 Mini Advanced Fitting Techniques - Adult and Pediatric Populations
This course will train clinicians on best practices and advanced fitting techniques for fitting the Ponto 5 Mini for both adults and children. This course will use case studies to illustrate examples of challenging fitting scenarios for both adults and children.
37508
Online
PT60M
Ponto 5 Mini Advanced Fitting Techniques - Adult and Pediatric Populations
Presented by Courtney Smith, MA, CCC-A, FAAA, J. Nicole Maxam, AuD, CCC-A
Course: #37508Level: Intermediate1 Hour
AAA/0.1 Intermediate; ACAud inc HAASA/1.0; AHIP/1.0; ASHA/0.1 Intermediate, Professional; BAA/1.0; CAA/1.0; IACET/0.1; IHS/1.0; Kansas, LTS-S0035/1.0; NZAS/1.0; SAC/1.0
This course will train clinicians on best practices and advanced fitting techniques for fitting the Ponto 5 Mini for both adults and children. This course will use case studies to illustrate examples of challenging fitting scenarios for both adults and children.
3
https://www.audiologyonline.com/audiology-ceus/course/20q-using-aided-speech-intelligibility-31978
20Q: Using the Aided Speech Intelligibility Index in Hearing Aid Fittings
This course explains the Speech Intelligibility Index (SII) and how hearing care professionals can integrate it into their hearing aid fittings. It is written in an engaging Q & A format.
textual, visual
129
USD
Subscription
Unlimited COURSE Access for $129/year
OnlineOnly
AudiologyOnline
www.audiologyonline.com
20Q: Using the Aided Speech Intelligibility Index in Hearing Aid Fittings
This course explains the Speech Intelligibility Index (SII) and how hearing care professionals can integrate it into their hearing aid fittings. It is written in an engaging Q & A format.
31978
Online
PT60M
20Q: Using the Aided Speech Intelligibility Index in Hearing Aid Fittings
Presented by Susan Scollie, PhD
Course: #31978Level: Intermediate1 Hour
AAA/0.1 Intermediate; ACAud inc HAASA/1.0; AHIP/1.0; BAA/1.0; CAA/1.0; Calif. SLPAB/1.0; IACET/0.1; IHS/1.0; Kansas, LTS-S0035/1.0; NZAS/1.0; SAC/1.0
This course explains the Speech Intelligibility Index (SII) and how hearing care professionals can integrate it into their hearing aid fittings. It is written in an engaging Q & A format.
4
https://www.audiologyonline.com/audiology-ceus/course/innovations-and-clinical-tools-with-39148
Innovations and Clinical Tools with AI from the National Acoustic Laboratories
This course delves into the challenges of identifying hearing loss in young children and introduces an artificial intelligence (AI)-based method for distinguishing speech characteristics in children with and without hearing loss, potentially enhancing screening effectiveness. Additionally, it explores the validation of AI methods to enhance speech intelligibility assessment in children. Furthermore, NALguide, a user-friendly tool from the National Acoustic Laboratories, simplifies the understanding of hearing aid features, making it accessible to both clinicians and patients and promoting informed discussions about hearing aid technologies.
auditory, textual, visual
129
USD
Subscription
Unlimited COURSE Access for $129/year
OnlineOnly
AudiologyOnline
www.audiologyonline.com
Innovations and Clinical Tools with AI from the National Acoustic Laboratories
This course delves into the challenges of identifying hearing loss in young children and introduces an artificial intelligence (AI)-based method for distinguishing speech characteristics in children with and without hearing loss, potentially enhancing screening effectiveness. Additionally, it explores the validation of AI methods to enhance speech intelligibility assessment in children. Furthermore, NALguide, a user-friendly tool from the National Acoustic Laboratories, simplifies the understanding of hearing aid features, making it accessible to both clinicians and patients and promoting informed discussions about hearing aid technologies.
39148
Online
PT90M
Innovations and Clinical Tools with AI from the National Acoustic Laboratories
Presented by Jessica Monaghan, PhD, Vicky Zhang, PhD, Matt Croteau, MS
Course: #39148Level: Intermediate1.5 Hours
AAA/0.15 Intermediate; ACAud inc HAASA/1.5; AG Bell - LSLS/1.5 Domain 2, Domain 3, Domain 7; AHIP/1.5; BAA/1.5; CAA/1.5; Calif. SLPAB/1.5; IACET/0.2; IHS/1.5; Kansas, LTS-S0035/1.5; NZAS/2.0; SAC/1.5
This course delves into the challenges of identifying hearing loss in young children and introduces an artificial intelligence (AI)-based method for distinguishing speech characteristics in children with and without hearing loss, potentially enhancing screening effectiveness. Additionally, it explores the validation of AI methods to enhance speech intelligibility assessment in children. Furthermore, NALguide, a user-friendly tool from the National Acoustic Laboratories, simplifies the understanding of hearing aid features, making it accessible to both clinicians and patients and promoting informed discussions about hearing aid technologies.
5
https://www.audiologyonline.com/audiology-ceus/course/hearing-aid-technology-to-improve-37378
Modern Hearing Aid Technology to Improve Speech Intelligibility in Noise
Different hearing aid approaches to combat problems related to environmental and wind noise using technologies that include classification, directional microphones, binaural signal processing, beamformers, motion sensors, and machine learning.
auditory, textual, visual
129
USD
Subscription
Unlimited COURSE Access for $129/year
OnlineOnly
AudiologyOnline
www.audiologyonline.com
Modern Hearing Aid Technology to Improve Speech Intelligibility in Noise
Different hearing aid approaches to combat problems related to environmental and wind noise using technologies that include classification, directional microphones, binaural signal processing, beamformers, motion sensors, and machine learning.
37378
Online
PT90M
Modern Hearing Aid Technology to Improve Speech Intelligibility in Noise
Presented by Joshua M. Alexander, PhD, CCC-A
Course: #37378Level: Intermediate1.5 Hours
AAA/0.15 Intermediate; ACAud inc HAASA/1.5; AHIP/1.5; ASHA/0.15 Intermediate, Professional; BAA/1.5; CAA/1.5; Calif. SLPAB/1.5; IACET/0.2; IHS/1.5; Kansas, LTS-S0035/1.5; NZAS/2.0; SAC/1.5
Different hearing aid approaches to combat problems related to environmental and wind noise using technologies that include classification, directional microphones, binaural signal processing, beamformers, motion sensors, and machine learning.