Editor’s Note: This text course is an edited transcript of a live webinar. Download supplemental course materials.
Learning Objectives
- After this course learners will be able to describe various counseling and fitting techniques discussed in this session.
- After this course learners will be able to provide examples of positive and motivational language that can be used with patients.
- After this course learners will be able to describe the process used to guide patients to the comfortable use of maximized aided speech audibility.
Introduction
David Smriga: Today we will explore the unique opportunities and advantages that Audioscan’s auditory mapping tool, Speechmap™, can provide you in making both the fitting and counseling experience more unique, tangible, compelling and valuable than ever before.
Although we will be depicting the various components of the counseling and fitting process with images created using the new Verifit 2 Real Ear Measurement & Verification System, the basic concepts and the procedures we will be describing today can be implemented with any Audioscan device you may currently have.
The landscape of hearing care delivery is rapidly changing. These changes are making it increasingly more important for dispensing professionals to showcase their role and their value in that delivery process.
The senior market segment that consumes the most hearing devices is growing at an unprecedented rate due to the baby boomer population reaching their retirement years. Furthermore, they will likely have a greater percentage of hearing problems than ever before due to the noisiness of modern lifestyles. However, some economic viewpoints indicate that this next generation of seniors will have significantly less savings and disposable income than the last. This means that the largest market’s ability to buy hearing instruments at traditional, bundled price structures will become increasingly more challenging.
Perhaps in response to these market forces, corporations are quickly moving into the retail distribution of hearing devices, offering easier access, a variety of new and often lower price points, and an ever increasing focus on “product” as the value proposition for hearing care. These elements are further separating the next generation of buyers from the traditional professional care delivery model.
Rapidly changing evolution in hearing instrument technology has a distinct impact on the delivery equation as well. As hearing instrument capabilities expand, there is further emphasis on “product” and “price” as key factors in consumer decision making, and further opportunities to deliver those products direct to consumers without the involvement of the traditional hearing care professional.
Perhaps more than ever before, there is a need to build a stronger interest in and demand for the professional care required to ensure that any product, regardless of its functional dazzle, is fitted correctly and can effectively address the communication problems that prompted the consumer’s original interest in purchasing the product.
So, How do You Differentiate?
Dispensing professionals have the opportunity to differentiate themselves from these newer delivery alternatives by delivering a patient care experience that is so substantially different, that the professional care itself becomes more important to the consumer than the product being used in the treatment process. It is this patient care experience that we will be describing today.
Through the Speechmap technology that Audioscan has developed you can build a unique and tangible experience, showcasing your value in the delivery process. It is a care experience that sets you apart in the way you counsel and present treatment goals and in your ability to demonstrably verify that you have achieved those treatment goals. Ultimately, this technology can change the way you effectively solve communication problems that your patient has identified. Through this process, you become the focus of value, not the product.
Speechmap: SPL Audiogram
To begin, I want to issue you a challenge. The first differentiator in defining this new fitting and counseling experience is to abandon the hearing level (HL) audiogram grid as your primary visual aid in counseling.
Figure 1 depicts an HL audiogram on the left that has been converted into a sound pressure level (SPL) audiogram on the right within the Speechmap module of the Verifit 2 system. There are several reasons why this format is preferable. First, as an SPL grid, loudness goes up the page rather than down. This intuitively makes more sense to the typical consumer. I do not know of anyone who, when they want to make their television louder, turns the volume control down. Starting with imagery that has loudness going up will automatically be more intuitive for your patients to understand.
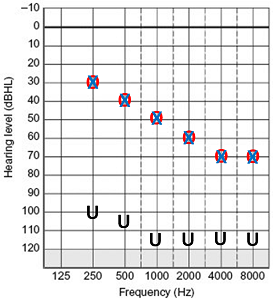
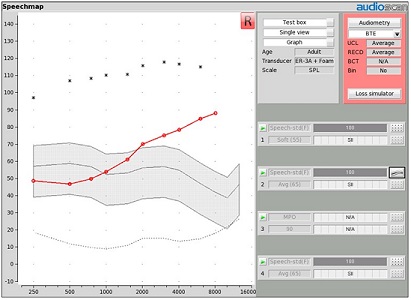
Figure 1. Basic Speechmap screen in Verifit 2.
Second, in an SPL grid, the hearing condition is being defined from the reference point of sound pressure level at the eardrum. It is this very sound level that you will be manipulating through amplification to address the communication issues associated with the hearing condition represented on this grid. There is a direct correlation between this grid and the treatment you will be implementing.
Third, through a simple procedure known as the real-ear-to-coupler difference (RECD), any HL audiogram can be converted into a patient ear-specific SPL hearing condition. In other words, the SPL audiogram (i.e., SPL-o-gram) through the RECD can be a more accurate representation of the hearing condition and the treatment needed than an HL audiogram ever could.
In this example (Figure 1), the SPL threshold values are in red and the uncomfortable loudness levels (UCL) are seen as the black asterisks. These two symbols define the borders of this patient’s listening range (i.e., dynamic range). Sounds that enter the ear canal and reach the eardrum at levels that fall between these two symbols are sounds that are both audible and tolerable.
In addition to the listening range, there is a grey shaded region representing normal conversational speech energy in the unaided condition. Through this imagery, you can clearly see and show which components of unaided normal conversational speech fall into and outside of the patient’s listening range.
The Value Proposition
This brings us to the next key differentiator, which is the value proposition you are going to suggest to your patient. When we talk about the benefits for amplification, we are going to talk about them from the perspective of bringing speech sounds back into the patient’s listening range. This value proposition, and the specific language that is being utilized here, is not only consistent with the Speechmap imagery I just showed, but also with the enabling language model that is being promoted by Curtis Alcock.
Curtis Alcock is a hearing instrument dispensing professional in the United Kingdom. For the last 12 years, he has been involved in a family-owned hearing healthcare business. Prior to that, he spent 12 years as a corporate executive in design and marketing. Curtis has been on the road for that last several years doing presentations about a new approach to counseling and counseling language that is appropriate for us to be discussing here. If you would like more information about Curtis and his message, go to www.audira.org.uk.
A key point of his message is that we are compelled by history and tradition to use certain terms within the counseling conversation that we have with any patient. Those terms include such phrases as hearing loss, hearing aids, hearing impaired, hearing impairment. Curtis points out that the noun of these two-word phrases (loss, aids, and impairment) describes a condition which most people would rather not have to admit that they have. It describes something that is less than normal or less than healthy.
As a result, the very language that we are using creates a situation where we are psychologically reinforcing the patient’s incentive to avoid doing something about their situation, because it requires accepting that they are less than how they want to see themselves. However, there is an ability here that we are also attempting to define – the current hearing situation of the patient. If we can use language that focuses more on ability than the condition, we might be able to create an environment where the patient is more interested in and willing to approach the solution to the problem than if we had used more traditional language.
Based on this concept, Curtis has suggested the following changes in lexicon (Figure 2). For example, instead of saying “test your hearing,” you might try, “We are going to baseline your current hearing ability,” or, “We are going to profile your hearing ability.” These terms have a more positive association.
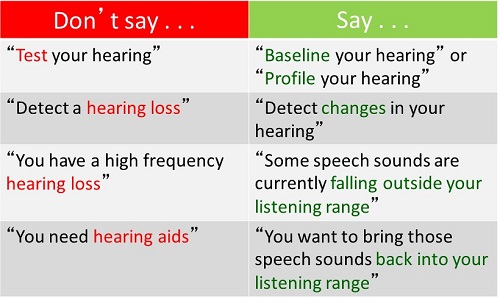
Figure 2. Language focused on ability, rather than condition (Source: Curtis Alcock, www.audira.org.uk)
Instead of saying, “The results of these tests tell us that you have a severe hearing loss,” change that language to say, “Based on the profile of your hearing, we have detected that your hearing likely has changed over the years.” Then instead of saying, “You have more hearing loss in the higher frequencies than in the lows, which makes it more difficult for you to understand speech,” perhaps we could say, “Based on the profile of your hearing, we have detected some changes, which means that some speech sounds are now falling outside of your listening range.” Then instead of saying, “To deal with this, we are going to fit you with some hearing aids,” we will say, “What we need to do is bring those speech sounds back into your listening range.” This is compelling new language.
Now, let’s apply this language to the Speechmap graphic we just talked about. The graph in Figure 3 shows a person with normal hearing. Their thresholds fall right at the minimum audible pressure line. Their UCLs are where one might expect them to be for someone with normal hearing. The normal conversational speech banana is comfortably positioned well inside the listening range for all the frequencies. This is not your patient’s situation. Your patient’s hearing has changed. They have a different hearing range, and some of the speech sounds now are falling outside of this listening range (Figure 4).
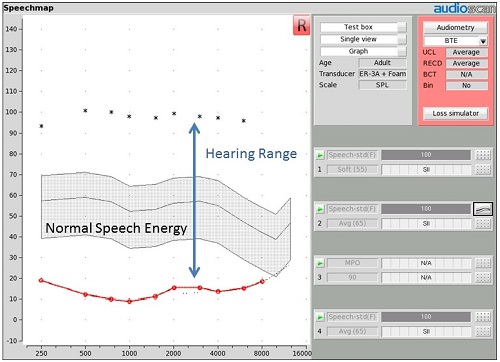
Figure 3. Example of Speechmap for a patient with a normal hearing range. Thresholds are red circles (o), UCLs are black asterisks (*), with the speech banana represented by the gray shaded region, well within the range of comfortable hearing.
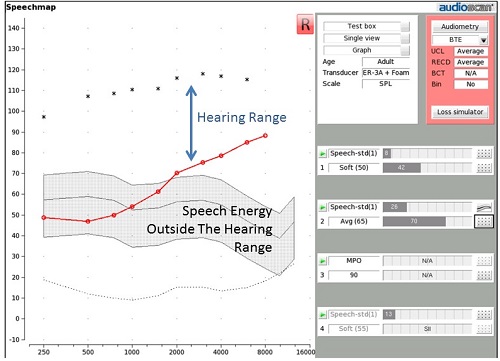
Figure 4. Speechmap where some speech energy falls outside of the hearing range.
In the initial counseling session at the diagnostic visit, you can say, “We need to fit you with devices that take these speech sounds that are falling outside of your listening range and move them back into your listening range. When you come in for your next visit, I am going to put a small tube into your ear canal. It is a microphone that allows us to measure sound that is reaching your eardrum. Then I am going to place the hearing devices in your ears and use these microphones to measure how well the devices are moving speech energy into your listening range. At your next visit, I expect to see that many of these sounds will now fall inside this listening space.”
In this way, I have set a goal and defined a value for hearing aids that is associated with their ability to bring speech sounds back into the patient’s listening range. This becomes an important way of providing a focal point on hearing aid value that has nothing to do with sound quality.
The Speech Intelligibility Index
In addition to this range expectation that you are setting, you might also want to consider talking to your patient about the speech intelligibility index (SII) score for the unaided condition that is represented on their graph. That SII score is associated with the portion of unaided speech energy that is inside the patient’s listening range. If there is only a small portion of speech energy inside of the listening range, the SII number is going to be relatively low. For example, the unaided SII for the patient in Figure 4 is 26. As more of this speech energy moves into the patient’s listening range, the SII number is going to go up. The SII number can be one factor to consider in the configuration of hearing instrument amplification. For instance, as will be described in a moment, a defensible goal may be to improve the SII number up to about 70 with amplification, especially for patients who have a hearing loss with thresholds no worse than 70 dB HL, as is the case in this example.
Killion and Mueller’s article from 2010 entitled, Twenty years later: The Count-the-Dots Method, includes a methodology useful in comparing SII scores to speech discrimination scores for various speech challenge tasks. The article includes a graph that describes SII score in percent from 0 to 100 relative to speech discrimination percent correct from 0% to 100% for various speech listening tasks (closed set number identification, target word in sentences identification, words in isolation identification). For each of these speech identification tasks, there is an area in the middle where small improvements in SII score yield big improvements in speech discrimination. However, in every case, we reach a point of diminishing returns where further increases in SII have very little impact in terms of speech discrimination improvement. For the words in isolation discrimination tests, diminishing returns begin at around a 70 SII level. In other words, it is worth your effort to try to adjust audibility and move the SII up to 70, because in doing so, any effort you make to improve SII will have big impacts on speech discrimination. However, if you have approached or exceeded 70, trying to push it further will likely not result in any dramatic changes in speech discrimination
If you want a more specific target for SII and/or you have a patient with more severe hearing loss, then I would suggest you look at the Pediatric Amplification Monitoring Tool (PedAMP) that was developed by the University of Western Ontario (Figure 5). It is available for download at www.dslio.com. Even though this data was normed on a younger population, it is something that can be used for adults as well. There are two graphs; one for a 55 dB SPL input (i.e., soft speech) and one for a 65 dB SPL input, which is average conversational speech from our Speechmap perspective.
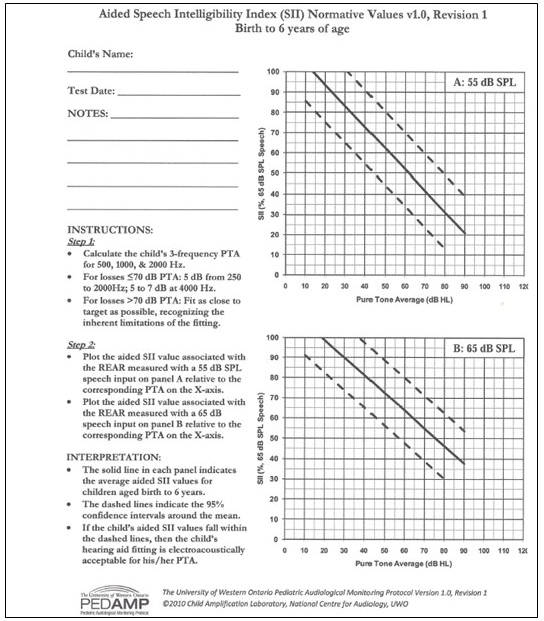
Figure 5. Aided Speech Intelligibility Index normative values from PedAMP (available at https://www.dslio.com/).
Across the bottom of this graph is the patient’s pure-tone average, which is calculated from the thresholds at frequencies 500, 1000, and 2000 Hz. Find that number on the abscissa, and then go up the graph until you reach the solid line that traverses the dashed line. That is the mean normative data line. Then you trace over to the ordinate and see what that SII number is. For example, a patient who has a pure tone average of 60 dB HL should have an SII target for aided 65 dB SPL speech at around 64. As the hearing loss becomes more severe, your SII expectation will go down. This PedAMP graph gives you an opportunity to identify what a reasonable SII target might be for that particular degree of hearing loss.
Using the Speechmap graph to define the goals of bringing speech sounds back into your patient’s listening range and having a goal SII number associated with that as an indication of the audibility and restoration of speech intelligibility you expect to deliver, you have now differentiated yourself from the more traditional counseling model.
In the historic model, subjective sound quality at the moment of initial fitting tends to dominate as the key focal point of judging hearing aid value. We know this because most fitters will often say to a patient that has just been fit for the first time with hearing instruments, “So, how does that sound?” This question says to the patient that the immediate indicator of hearing aid value is initial sound quality. In the retail model mentality, where we are focused on getting the patient comfortable with or interested in purchasing products right away, initial sound quality becomes a key focus. This is not the kind of treatment focus I am proposing.
In the model I’m outlining, the focus is on effectively bringing speech sounds back within the patient’s listening range for as broad a range of frequencies as possible in order to maximize speech intelligibility. This is a health care model mentality. This is a focus on solving the communication problems that the patient has identified.
I am sure some of you are already thinking that if you approach fittings this way then the patient’s first experience with amplification is not going to be a good one. They will be overwhelmed by hearing instruments that are fit this way. They will sound too loud. They will sound too tinny. They will not like the sound of their own voice. They will not feel that they can wear hearing aids for even a few minutes without being overwhelmed by them. You may be right. That could be the kind of commentary your patient will give you when you do this correctly, which brings up to the next key value proposition in this care process.
The Care Process Instead of Product Process
In this delivery model, you are delivering care as a process, rather than a product delivery event. You are recognizing that the brain’s wiring at the point of initial fit is not equipped to handle the audibility necessary to address the patient’s communication problem. In other words, consideration of brain plasticity and its effect on hearing healthcare must now become a part of your treatment and counseling.
We have known for years that neural reorganization at the cortical level will occur in response to stimulus deprivation including auditory stimulus deprivation. That portion of your auditory cortex that was once responsible for processing high-frequency speech cues, but has not received them for so long, is not sitting there as vacant real estate. That portion of the brain has long since been rewired to process other cues, either auditory or in some cases, even visual.
When you take hearing instruments that are programmed to restore those missing speech cues and fit them to a patient for the first time, there may be little brain wiring there to effectively process this stimuli, which is a key reason why they feel so overwhelmed. There is also evidence to suggest that if you provide a new stimulus condition to the brain for a long enough period of time, the brain will reorganize. In other words, it will rewire and build brain resources that can process the new ongoing stimulus condition. You have already seen evidence of this yourself by observing experienced hearing aid wearers who need, want, and are comfortable with more gain than first-time hearing aid wearers, even though they might have comparable hearing conditions.
Neuroplasticity and the time it takes for the brain to reprogram is not something new. Gatehouse and Killion (1993) wrote a paper that talks about the brain’s habit of rewiring itself and how it takes time, which should be an important concern in good fittings.
They studied a population of hearing-impaired patients with sloping sensorineural hearing losses who were fit with two sets of hearing instruments. One set of devices provided a flat response, where there was little overall audibility restoration of high-frequency speech cues, and the other set of hearing instruments were rising-response aids, where the aided audibility provided a broader range of speech frequencies. The patients were asked to wear these two sets of hearing aids alternately and equally through the course of each day. After each week of use, the subjects came back to the clinic and their speech discrimination scores were measured with each of the two sets of instruments.
At the point of initial fitting, the scores were basically identical. For the next four weeks, there appeared to be slightly better speech discrimination with the flat response aids than with the rising response aids. Then at around week five, something happened. From that point on, their speech understanding with the rising-response aids kept getting better. There was significant improvement from their first fit to twelve weeks later, whereas the speech understanding with the flat response aids was essentially a flat line from first fit to twelve weeks later. This study provided evidence to support the view that the brain can reorganize and “learn” how to use new sounds more effectively.
We have to communicate this concept to our patients. Part of effective treatment is not just to provide them with product, but to guide them through a process of gradually providing more and more stimulation to get them to where they can effectively and comfortably use the best solution to address their communication needs.
Relating Aided Speech Audibility to Contemporary Fitting Rules/Targets
It is useful to examine the commonly used fitting targets available today from this perspective of aided speech audibility delivery. For example, Figure 6 depicts the DSL 5.0a Child targets for an adult age patient with the hearing condition represented by the thresholds displayed. The purple dots show where this fitting formula targets the aided long-term average speech spectrum (LTASS) to be for average speech. The difference between the middle line of the unaided average speech banana in the grey shaded area and these purple dots is the gain that this fitting formula prescribes at each of the various frequencies for this input. One can adjust the gain so that the aided result in the presence of average conversational speech is at these points. In doing so, average speech is made audible, in this case, right through 6,000 Hz.

Figure 6. Speechmap of DSL 5.0 Child targets (purple dots) for an adult aged patient
Figure 7 depicts the DSL 5.0a Adult targets. It appears that each one of the target dots has dropped in level when compared to the previous graph (Figure 5). Programming an instrument to hit these targets would provide a lesser amount of aided audible speech than hitting the target depicted in Figure 6, and a lower aided SII score as well.
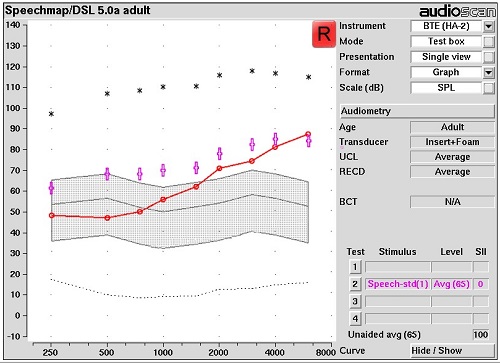
Figure 7. Speechmap of DSL 5.0 Adult targets for an adult aged patient.
Figure 8 is a more commonly-used, internationally recognized fitting target for adults, NAL-NL2. Comparing this target rule to the previous target rule, it appears that the target dots have dropped even further. The LTASS targets for average speech are falling below threshold beyond 4,000 Hz. The space between the gray line (i.e., unaided average speech) and the purple dots is more modest. For some users, this kind of aided experience may be more subjectively acceptable than the experience delivered by the DSL targets depicted earlier. However, the aided audibility result will be different as well. This needs to be taken into consideration as you select target rules. As these target dots drop and as the audibility in the higher frequencies is lessened, speech intelligibility is likely going to change as well.
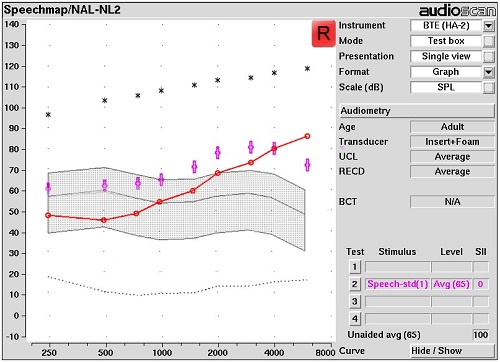
Figure 8. Speechmap of NAL-NL2 targets for an adult aged patient.
Audibility-Focused Fitting Procedure
Next, I will describe a four step fitting procedure that encompasses all of this. I am going to demonstrate this fitting procedure with two hearing instruments that have been placed inside the test box of a Verifit 2 system. One of the advantages of the Verifit 2 test box is that we can put two hearing instruments in the box at the same time. Figure 9 shows the binaural coupler microphone that has a right coupler microphone side and a left coupler microphone side. Two receiver-in-the-canal (RIC) products are attached to each of these coupler microphones, and they are suspended by stabilizer devices so that both hearing instrument microphones are facing the speaker in the back of the box that generates speech for test box testing.
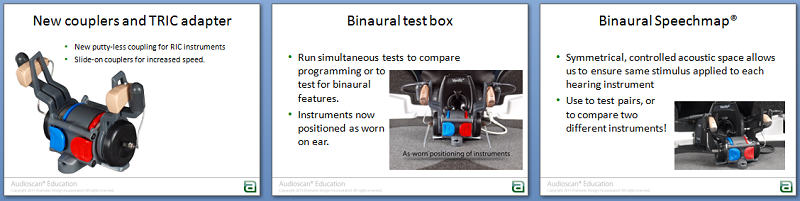
Figure 9. Test box with stabilizer and binaural coupler.
In addition to the RECD being used to make your SPL audiogram more patient-specific, the RECD measurement also defines the difference between a coupler environment and your patient’s in-ear acoustic environment. We are encouraging you to consider the RECD measurement as part of your diagnostic visit. If you have stored it into your patient’s record, you can recall that RECD, put the hearing instruments in the test box, and pre-fit when the instruments come in from the manufacturer. All the measurements you are doing using the coupler will have the RECD values applied to them before the results are displayed on the screen. The appropriate microphone location effect for the device type being fitted will also be added to the test speaker signal. As a result, what you will see on the measurement screen is a simulated on-ear result.
Another thing to point out is that the Verifit 2 is equipped to do wideband measurement out to 16 kHz. Thus, if your hearing aid has the ability to produce a response out to 10 kHz, you are going to be able to measure that high-frequency output with either the coupler microphones or with the probe microphone on the ear.
Goal Fitting and Starter Fitting
I want to reinforce that these four steps can be done either in the test box or as on-ear measurements in front of your patient.
The first step in this fitting process may be out of your current comfort zone, as you will ultimately be preparing two fittings: a goal fitting and a starter fitting. The goal fitting is the settings that are programmed into the hearing instrument that, when verified through Speechmap, have sufficiently brought speech sounds back into the patient’s listening range to deliver an acceptable SII result. That may not be the fitting with which the patient is most comfortable with at the beginning, so you may need to make some modifications later to get them to a point where they are ready to start using the hearing instruments. Such adjustments would then become the starter fitting, which will likely provide a lower SII result than originally targeted, but be more comfortable for the patient to initially wear. These are the settings with which the patient feels comfortable enough to start using the devices. The difference between the starter fitting and the goal fitting will be bridged with practice. By giving the patient’s brain increasing doses of new stimulation over time, their brain is continually being challenged to rewire. As it rewires, their ability to not only use but be comfortable with a fitting that is closer to the goal settings should occur.
In the first step of this fitting process, you are going to program the hearing instruments to what will hopefully be an acceptable goal fitting starting point. Once you have loaded the audiogram into your fitting software, select the target rule you wish to use to secure an acceptable aided SII result. If the fitting software you are using has an acclimatization feature in it, you should set it to the most experienced user setting that the software offers. Then, let the software program the hearing instruments. This will set gain, compression, and output. Finally, you put the hearing instruments in the test box and you reload the RECD that you previously saved and run a Speechmap test.
There are four tests that you can plot for each ear inside the Speechmap screen. First, in ‘Test 2’, select Speech Standard (F) as your input stimulus and an average conversational speech level of 65 dB SPL as the input level. This stimulus is a calibrated speech signal that is available from a menu of input options within Speechmap. When you hit the record button, the system will calculate and plot the long-term average output and the peaks / valleys of the aided test signal, which takes about 12 seconds.
At the end of this long term average measurement, examine your aided results and decide if you have reached your fitting target and if, in so doing, you have an acceptable SII score. Figure 10 shows an example of this using NAL-NL2.
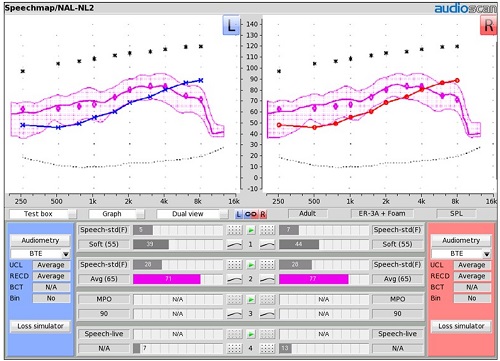
Figure 10. Initial aided audibility result for NAL-NL2 targets.
In this example (Figure 10), we have hit the NAL-NL2 targets for an average speech input across frequencies for both the right and left sides. We have resulting aided SII scores of 71 on the left side and 73 on the right side. Those scores are quite acceptable. Remember, for this degree of loss, you are targeting aided SIIs that are approaching, if not exceeding 70. At this point, you can say with confidence that this is a good goal hearing aid setting for average speech. It is delivering enough audibility for a broad enough range of frequencies to give us an acceptable SII score for the degree of hearing loss that we are trying to accommodate. (You can also see that these hearing devices have the ability to produce a frequency response out to 10 kHz, because the broadband capabilities of the Verifit 2 allow you to measure and see that result.)
Three Steps to Finalize Gain, Compression and Output
There are three additional steps to finalize the gain, compression, and output settings of your instrument. If you did not hit the target or do not have acceptable SII results in this first test, then you are definitely going to go through these three steps, but I would encourage you to do these regardless to verify that soft speech is audible, average speech is properly positioned in their listening range, and loud sounds are comfortable and will not exceed UCL.
Test 1: Soft Speech
In the first of these final three steps, go to ‘Test 1’ in your Speechmap screen. Select a soft speech input (e.g., 55 dB SPL input level) with the same speech signal that you used in ‘Test 2’. Adjust the overall gain in the hearing instrument using the fitting software if necessary, not compression. If you have several gain handles in a given band of frequencies, adjust those gain handles in unison until the middle line of the aided speech banana hits the targeted values indicated by your fitting rule (Figure 11).

Figure 11. Fitting Test 1: soft speech (55 dB SPL).
Figure 11 is an example of that result. ‘Test 1’ is a green speech banana. You can see how the LTASS line for a soft speech input is following along the targets for soft speech. We have hit the target for this input level, and the SII scores are falling in the mid 30’s to mid 40’s. That is a pretty good result for 50-55 dB SPL input. Now that we have adjusted gain to hit the target for this input level, you can go back and redo ‘Test 2’. We are going to verify that (if you had changed them) these new gain settings have now reached the target and/or have given us an acceptable SII score for average speech.
Test 2: Average Speech
Figure 12 is the ‘Test 2’ result again, showing that we have hit target and have an acceptable SII result for average conversational speech at 65 dB SPL. You might want to adjust compression in ‘Test 2’, if necessary. I look to see if the top line of the aided speech banana is occupying a position somewhere about midway between threshold and UCL. If you eyeball the halfway point between threshold and UCL, does this line occupy space that is equivalent to that? If you see that, it suggests that the compression settings are appropriate.
If the speech banana is too wide, where the peaks of the speech banana are flirting with the UCLs, even though you have hit the targets dots with this middle line, then you should consider adjusting compression to keep the gain appropriate. Compression squeezes the banana.

Figure 12. Fitting Test 2: average speech (65 dB SPL).
Test 3: MPO
Once you have completed ‘Test 2’, then the third step in the process is to set the MPO for the hearing instrument (Figure 13). Go to ‘Test 3’ and choose the MPO sweep as the stimulus. The MPO sweep stimulus is a series of 85-90 dB SPL, short duration, narrow band bursts, one-third octave apart, that are presented with enough of a time lag in between presentations to allow the compressors that have been activated with the previous tone to recover before the next beep is presented. In the fitting software, use your output controls to adjust the result that you are seeing on the screen so that it is positioned to be about 3 dB below the UCL asterisks.
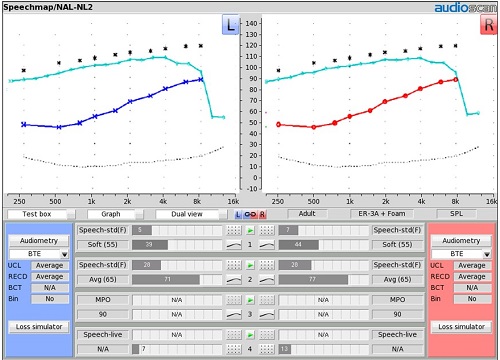
Figure 13. Fitting Test 3: MPO
Figure 14 shows the two aided LTASS results and the MPO result on the screen simultaneously. The range of these three lines mirrors the range of the audible window (i.e., dynamic range). A soft sound is going to sound soft, an average sound is going to sound comfortable, and loud sounds are going to sound loud, but not too loud. These three steps verify that we have fit the hearing instrument into the patient’s audible window effectively, and that we have an acceptable SII return on that fitting investment.
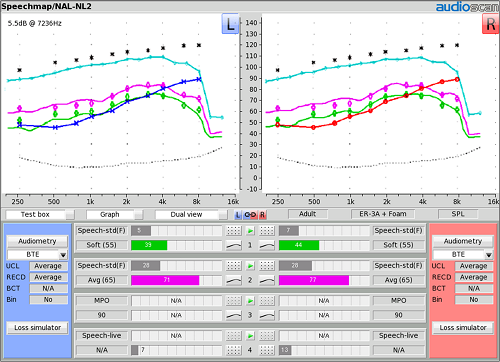
Figure 14. Final fitting summary with MPO (blue), average (purple) and soft (green) inputs.
There is a fourth test (i.e., ‘Test 4’) that can be used to run loud speech to set the gain characteristics for louder sounds. Some people use loud speech in addition to the MPO sweep to set the output limits of the hearing aid. I encourage you to use the MPO sweep to set the maximum output characteristics of the hearing aid as people will be listening to loud narrow band sounds in their real world, such as dish clangs, car horns, and sirens. We want to make sure that those do not exceed the UCL.
Other Fitting Strategies
One alternative fitting approach that you may want to consider is to use the aided speech audibility window (i.e., patient’s dynamic range) as the target itself. In this example (Figure 15), we have not chosen a fitting rule. The only thing on the screen is the patient’s listening range – the hearing thresholds and the UCLs. In ‘Test 1’ with a 50-55 dB SPL input, adjust the gain of the aid until the middle line of the aided speech banana hovers just above threshold for as broad a range of frequencies as possible. If you do that, you should see an SII score somewhere in the mid 30’s to mid 40’s. I have just used the patient’s threshold line as my guide in setting the position of the middle line of aided soft speech energy.
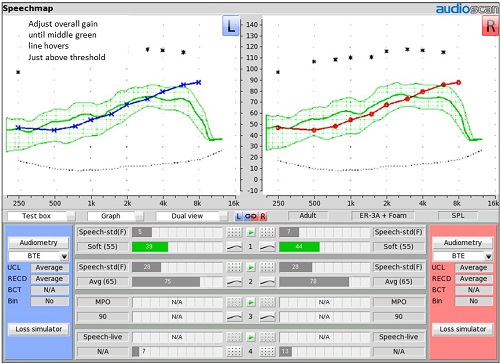
Figure 15. Soft speech fitting with no prescriptive targets selected; the LTASS for soft speech hovers above the patient’s hearing thresholds.
For ‘Test 2’ with average speech, the bottom line of the aided speech banana should now be the line that is hovering just above threshold, and once again, the top line should be midway between threshold and UCL. If you need to adjust compression in any given range or frequencies, you can do that as part of ‘Test 2’. In this example (Figure 16), I conclude that average conversational speech energy is properly positioned as I have excellent SII scores of 75 and 77 in both ears.
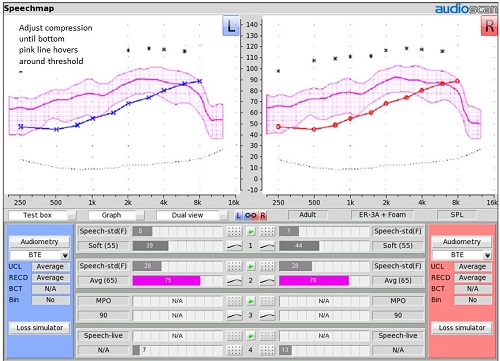
Figure 16. Measuring average speech with no prescriptive targets selected.
‘Test 3’ is the MPO sweep, and your goal is to adjust hearing aid output until the blue dots sit just below the predicted UCLs (i.e., asterisks), which are provided on the fitting screen. Following these fitting steps, you will now have three measurement lines up on your test screen that align with the patient’s listening range (Figure 17). In all likelihood, your SII scores will be better than the SII scores with the NAL-NL2 target approach, because you may end up delivering a few more high-frequency speech cues with this fitting approach than with that target rule.
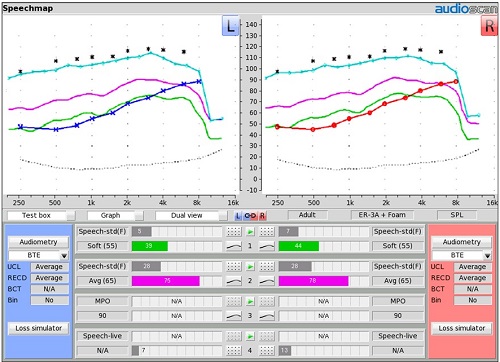
Figure 17. Final fitting summary with no prescriptive targets selected.
By comparison, Figure 18 shows where the DSL child/adult age targets would fall if we selected them. The targets from this fitting rule align closely with where I positioned my LTASS using only the patient’s listening range for this hearing loss.
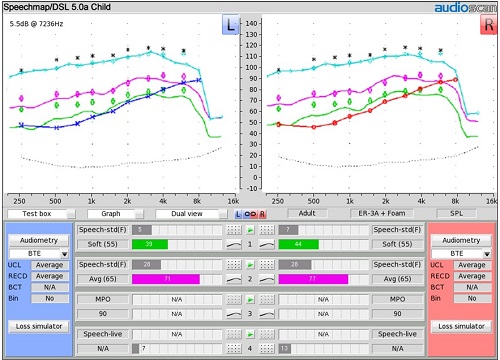
Figure 18. Final audibility with DSL Child (Adult Age) targets added.
On-Ear Verification
If you are doing this programming as a pre-fitting procedure, you would program the hearing aids in the test box as just described, set them on the shelf, and wait for the patient to show up for their fitting visit. When they come in, you will switch to on-ear verification using the probe microphones in Speechmap.
In front of the patient, repeat ‘Test 2’ as described above, but using the probe microphones on their ears instead of the test box microphones. You should get an on-ear result that is very much like the result you obtained in the test box, especially if you used a saved individually measured RECD in the pre-fitting. In Figure 19, I have added the unaided speech banana to the display. This way, the patient can see the aided average conversational speech result and the unaided average conversational speech result side by side. I can immediately show the patient that we were able to take those speech sounds that were falling outside of their listening range prior to this treatment, and moved them into their listening range. We have good SII scores associated with the result we were able to achieve.
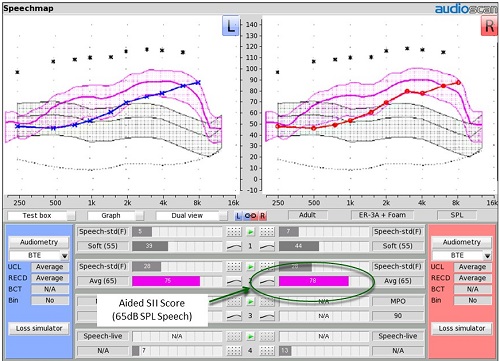
Figure 19. On-ear measurement resulting from pre-fitting test box settings. The unaided speech banana is shown to give patients a reference for their listening range versus the normal listening range.
For new users, this fitting situation becomes the first experience your patient is going to have with amplification. Then they may give you the commentary you expect. “This is really loud. I can’t stand the sound of my own voice. They sound tinny. I don’t know if I can wear these for any length of time without being very uncomfortable.” Should this occur, you will say back to them, “There is a reason for that. By restoring all of these sounds that your brain has not been exposed to for so long, your brain is not yet ready to handle them. Your brain needs some time to exercise in order to be able to process these speech cues correctly. Rather than asking you to run the whole marathon today, why don’t we make some adjustments to get you at least to the point where you are comfortable enough to start wearing these instruments?”
Remember, you have two hearing aids that are set at the most experienced user settings, so the first thing you can do is drop those hearing aids via programming to first-time user, which lowers the gain and drops some of the components of aided speech back out of the audible window.
Then you ask the patient, “With them programmed this way, do you feel comfortable enough to start using them?” If the patient says, “No, they are still overwhelming,” you should grab all of the gain handles in your fitting software and move them down in 3 dB steps. You are making a volume control adjustment at this point. Ask the patient again if they feel comfortable enough to start with them programmed that way. You want adjustment steps that you can reverse easily as you work your way back towards the goal fitting. Just keep doing this until the patient says that they are at a point where they are comfortable enough to start using them.
As soon as you reach that point, the next thing you want to do is redo ‘Test 2’. Get the aided SII scores and the new position of the aided speech banana up on the screen with the hearing instruments programmed the way the patient feels most comfortable. They will be able to see a lot of hearing aid utility that has been lost. You will be able to show them how much more of this aided speech banana is now back outside of their listening range, and how the aided SII scores have dropped to the point where they may not be that much different than the unaided numbers.
This is the magic moment. This is where your patient is going to be able to understand that what sounds good today is not the solution to their communication problems and that an element of practice has to be part of effective treatment. This concept of fitting and counseling is what will set you apart from the traditional fitting model.
“Process” Counseling
The process approach for first-time (and even experienced) hearing instrument wearers is to begin their new listening experience with settings at which the patient is comfortable. You would then discuss the need to continue to add in audibility via acceptable steps so that, through practice, their brain can learn how to process that stimulation over time.
You can even assign some homework. There are several brain training tools that you could provide to your patient that can be done either at home or at your facility. As the patient continues on their brain training journey, you are adding back measures of audibility, heading back toward the goal settings while still maintaining an overall perception of comfort, tolerance and acceptability. This process approach is unique and will distinguish you from your competitors. But even more importantly, it will guide both you and the patient toward a better long-term solution to their hearing situation – a process that requires your expertise.
Brain Training Tools
There are a variety of computer-based brain training tools available in today’s market to choose from including:.
LACE (www.neurotone.com), Listening and Communication Enhancement, was developed by Robert Sweetow and his colleagues at the University of California – San Francisco, and is distributed by Neurotone. It is one of the most well-recognized brain training tools.
Read My Quips (www.sensesynergy.com) was developed by Harry Levitt out of City University of New York, and is distributed by SenseSynergy.com. It is also a computer-based brain-training strategy that has both auditory and visual stimuli. It is designed as a crossword puzzle game, which adds an element of fun that can help with compliance.
Group AR (www.idainstitute.com) provides you all of the lesson plans, handout materials, and teacher’s guides to offer a number of one-hour Group AR sessions. Group AR is something that also can be a very effective tool for guiding your patients through this brain training process. As an added value, it includes collaboration with other patients who are experiencing similar situations and circumstances as your patient.
Conclusion
It is possible through the language you use and the strategy you outline to shift the focus in your counseling and fitting procedure from the product and how it sounds to bringing speech sounds back within your patient’s listening range. Through the Speechmap screen, you have an easy-to-understand teaching tool that helps the patient learn that “some speech sounds are currently falling outside of their listening range” and that the logical treatment goal is to “bring those speech sounds back into their listening range” as effectively as possible. More importantly, through this approach, you have shifted the focus of how hearing aid value is to be quantified away from initial sound quality and towards value propositions that are essential to treat their communication problem.
Focusing on the visual positioning of the aided speech banana and the associated aided SII score takes the focus away from initial sound quality as the goal. It facilitates a discussion about “brain training” as an essential step in building comfort and acceptance of the stimulus condition best suited to addressing the patient’s communication needs.
We have to help our patient’s understand that brain exercise is an important part of treatment. We can provide them with tools to help facilitate this process. As the patient is training their brain, the settings of the hearing devices are gradually changed, moving the patient gradually back toward the goal settings initially demonstrated. The process of changing the settings of the hearing aid to eventually reach or come closer to reaching goal settings is something that you can do through repeated visits or set automatically to occur over a period of time in many of the newer hearing aids.
Through this form of process treatment, you shift the focus of value away from the product and toward your professional care. I hope you will see the value that this particular system gives you as a professional caregiver. It is this combination of product and your guidance that is going to keep you above the fray. The value proposition you are presenting to patients is more than product; it is an effective solution to their hearing problem.
References
Alcock, C. (2012, August). How to increase hearing aid adoption by shaping attitudes. Presentation at Oticon's 5th International Conference, Copenhagen, Denmark. Available at www.audira.org.uk
Gatehouse, S., & Killion, M. (1993). HABRAT: Hearing Aid Brain Rewiring Accommodation Time. Hearing Instruments, 44(10), 29-32.
Killion, M., & Mueller, H.G. (2010). Twenty years later: The new Count-The-Dots Method. Hearing Journal, 63(1),10-15.
Palmer, C.V., Nelson, C.T., & Lindley, G.A. (1998). The functionally and physiologically plastic adult auditory system. Journal of the Acoustical Society of America, 103(4), 1705-1721.
Philibert, B., Collet, L., Vesson, J.F., & Veuillet, E. (2002). Intensity-related performances are modified by long-term hearing aid use: A functional plasticity? Hearing Research, 165(1-2), 142-151.
Philibert, B., Collet, L., Vesson, J.F., & Veuillet, E. (2005). The auditory acclimatization effect in sensorineural hearing-impaired listeners: Evidence for functional plasticity. Hearing Research, 205(1-2), 131-142.
Scollie, S., Seewald, R., Cornelisse, L., Moodie, S., Bagatto, M., Laurnagaray, D.,...Pumford, J. (2005). The Desired Sensation Level Multistage Input/Output algorithm. Trends in Amplification, 9(4), 159-197. Retrieved from https://tia.sagepub.com
Cite this Content as:
Smriga, D. (2015, May). Speechmap as a counseling and fitting tool. AudiologyOnline, Article 14232. Retrieved from https://www.audiologyonline.com.