
Editor’s Note: This text course is an edited transcript of a live seminar. Download supplemental course materials here.
Hello, and welcome to Advanced Features for Teen Patients by Phonak Pediatrics. My name is Shannon Motsett. I am the pediatric representative for Phonak in the Southeast Region of the United States. We will be talking about Phonak's portfolio of products and features. The focus is on features, but we will certainly highlight different products, as well. Today's discussion will cover the Phonak portfolio, advanced features, how to adjust and modify those features in the Phonak Target software, and wireless accessories including Dynamic FM.
If you work with pediatrics and have worked with Phonak products, you probably recognize this visual for the pediatric SPICE portfolio (Figure 1). The products that were chosen for the SPICE portfolio were selected based on the features available, the price points offered, as well as various technology levels and fitting options. The Nios S H2O – the S stands for SPICE – is for mild to moderate hearing losses. We have the most versatile fitting range, from mild to severe in sloping losses. The Nios S H20 uses a size 13 battery and offers a lot of power for a small, compact product. It does come in four technology levels: Advanced, Premium, Standard, as well as Essential. The Naída S UP (SPICE ultra power) uses a 675 battery. It comes in three technology levels, as well as having the fitting range for severe to profound hearing losses. And, last but not least, we have some receiver-in-the-canal (RIC) options with Audéo S SMART. We choose the SMART because it has a manual button if desired by the teenager. It is RIC technology, so it is typically marketed toward teen, pre-teen and adult populations. There are various technology levels for the Audéo S SMART, as well as different price points.
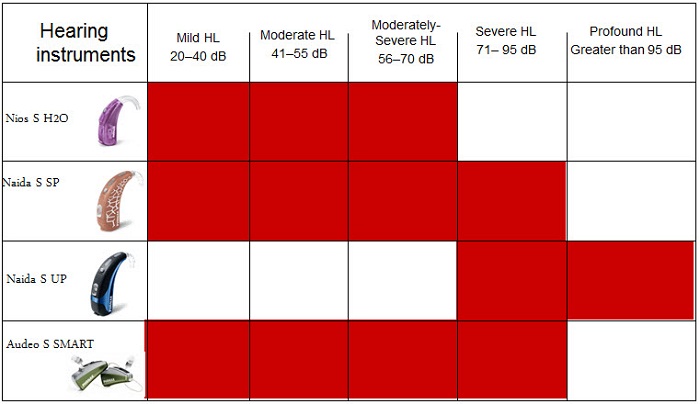
Figure 1. Phonak SPICE portfolio, including fitting ranges.
Today, however, the Phonak portfolio has expanded. If you take a look at Figure 2, you see Premium, Advanced, Standard, Essential, and Basic levels. There are different products for every listening need. The Essential line is targeted toward people with limited listening needs or limited budgets. If you look at the other three technology levels, you will see different categories. The Pediatric portfolio has not changed today, nor has the Power or the RIC line, but we are now offering new products on Phonak's new Quest platform. The Quest platform is an enhancement of the SPICE chip, so there are new features available, as well as some new form factors within the behind-the-ear (BTE) and the custom lines.
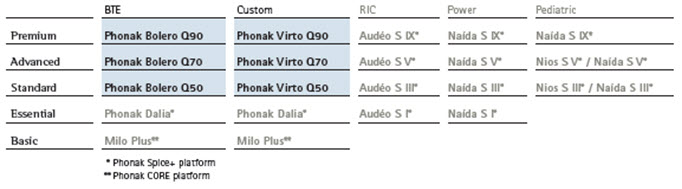
Figure 2. Phonak Quest platform and portfolio.
As we move through our discussion, we will focus mostly on features and then tie them back to the products that are available. When you look at the Quest platform, we are offering a few new features that offer binaural voice streaming technology. Speech in Wind and auto StereoZoom are two of those new features. There are other features that you will recognize, many of them from the CORE platform, and others that are enhanced on the SPICE platform. We will highlight several of those, also. You will notice that everything Phonak offers, from the Essential line to Premium line, does have SoundRecover, as we feel audibility is essential to hearing.
Binaural VoiceStream Technology
In order to understand the features and how they work, we need to understand Binaural VoiceStream Technology. You may be familiar with some of these features in the SPICE Premium products, such as ZoomControl, DuoPhone, auto ZoomControl, and StereoZoom. The two newest features are Speech in Wind and auto StereoZoom.
The inspiration for binaural voice streaming is from nature. Almost every mammal including humans have two ears, and this is for a reason. There are definite benefits from binaural listening. If we think about the anatomy of the auditory system, we know that sound is sent to the brain via binaural processing. The brain uses timing, intensity, phase, and frequency cues to process sound. So when we think about how the brain works, we can correlate it to how Phonak is using the same binaural components in different features to benefit the user.
With binaural directivity, we know that the brain extracts information from both ears and combines them to provide the best signal. The features in Phonak products that directly relate to this activity are StereoZoom and auto StereoZoom. I will expand on these in just a moment. The second component of how the brain is working is using the Better Ear Effect. With the Better Ear Effect, the brain selects the better signal and focuses on that signal. With the Phonak Voice Streaming Technology, there are several features that can simulate this effect, which are DuoPhone, ZoomControl, auto ZoomControl, and Speech in Wind. The way we do this is to have two instruments, each having two microphones. So there are two instruments, four microphones, and the ability to stream one full audio signal from one hearing instrument to the other.
auto ZoomControl
There are many times in life that we need to keep our heads straight ahead and eyes forward, but need the polar plot of the directional microphones to be focused in a different direction. Auto ZoomControl allows us to do just that and is a nice option for a teenager in the car. It is a manual solution, so the driver of the car, who is focused forward, would need to press a button to put the hearing aid into the automatic ZoomControl setting.
The hearing instrument is able to do some signal-to-noise ratio measurements to decide where the polar plot of the hearing instrument should be, based on the loudest speech source. In this case, the driver would want to hear the passenger or someone behind her. If the passenger is speaking at the time, the hearing aid would measure that speech as the prominent signal-to-noise ratio, reduce the microphone on the left side at the window, and stream the full audio signal from the right to the left, which would create this zoom feature to the right-hand side. As the sound source changes, then the hearing aid can move the polar plot and change its streaming pattern to create better speech understanding in this situation.
You do need to add an additional program set up through the fitting software for ZoomControl. ZoomControl can work outside of the automatic feature. If you choose a mid-level technology, you can have ZoomControl that is manually activated with back, left or right emphasis. If you choose a Premium product, you can choose Automatic under ZoomControl in our Program Options (Figure 3), so that the hearing instrument can change its polar plot automatically. Otherwise, you could choose Back, so if the driver always wanted to hear the person behind them, they could press the button and it would zoom backwards. Your other option would be to check the box for Enabling Direct Touch. In that case, if you press the button on the right, it would zoom to the right, and if you press the button on the left, it would zoom to the left.
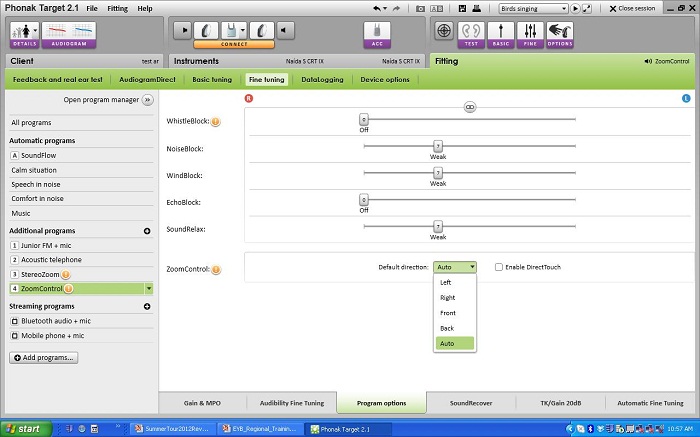
Figure 3. Enabling ZoomControl in the Phonak Target fitting software.
DuoPhone
DuoPhone uses the binaural VoiceStream technology, also. In the SPICE platform, DuoPhone has been a Premium feature. It does transfer one full audio signal to the other hearing instrument so that the user has binaural hearing on the phone. When this is set up in the hearing instrument, you can go into the Target software and designate it as an acoustic phone program or as a telecoil program.
In Figure 4, the hearing aid is set in an acoustic phone program. You can set it up for a preferred ear, right or left, or you could enable the DirectTouch so that it would work similarly to the ZoomControl where you press the button on the right to put the phone in the right ear or the left button for the left ear. Today in the new Quest line, the DuoPhone feature has moved from the Premium level to the Standard level of technology. So if you had an individual that was unable to use any type of streaming solution and one of their listening goals is to hear better on the phone, then DuoPhone would be a nice feature at a nice price point for that user.
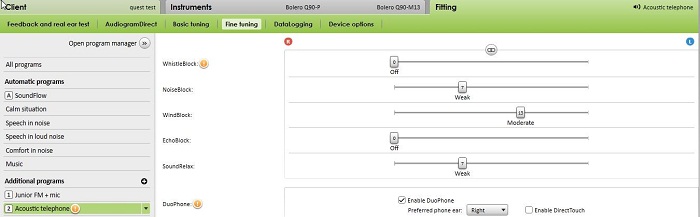
Figure 4. DuoPhone fitting settings in the Target software.
StereoZoom
The next feature related to the binaural voice streaming technology is StereoZoom. StereoZoom has been available in Premium products in SPICE, so it might be familiar to you today. The concept behind StereoZoom is increasing the signal-to-noise ratio by narrowing the directional beam of the hearing instrument. During its normal function, the directional microphones are activated. The goal is to hear one individual in a noisy crowd, so the voice streaming technology is working binaurally. It is streaming to both sides and using the directional microphoness to create a narrow beam.
We have expanded upon StereoZoom to make it automatic. Up until now, you selected StereoZoom as a manual program, and the user then decides when they would like to narrow their beam for better speech understanding in a crowd. Today we will talk about how we can automate this process with auto StereoZoom.
Auto StereoZoom has become incorporated into the SoundFlow scene analysis. SoundFlow is the automatic program in the hearing instrument that samples the environment and blends features to optimize listening in various situations. One the SPICE platform, SoundFlow had four configuration points, or sound scenes: Calm, Speech in Noise, Comfort in Noise, and Music. On the new Quest platform, there is an additional sound scene that has been integrated into SoundFlow called Speech in Loud Noise.
The way Speech in Loud Noise works is that you have two Quest hearing instruments, with four criteria that are analyzed by the hearing instruments – two criteria for each instrument. One is whether or not the hearing instrument is in speech in noise; this is the classification component. The second component is the noise floor, or how loud it is when you are in the Speech in Noise program. These are analyzed by both hearing instruments, creating four different criteria. When all four criteria are present –the noise floor is above 70 dB SPL and the classification system has decided the instruments are 85% in Speech in Noise – then the binaural timer starts and activates Speech in Loud Noise. This is when auto StereoZoom is activated to more finely tune the directional beams.
If one of these criteria drops out, then the hearing instrument kicks out of Speech in Loud Noise and the auto StereoZoom turns off. The hearing instrument goes back into Speech in Noise, unless there is a dramatic scene change where it would change into a Calm program or something of that sort. One example of this would be if you were in a loud gymnasium at a basketball game and then you walked outside where it was quiet. Your hearing instrument would completely change from Speech in Loud Noise to Calm. It does this with a slow attack time, but the attack time is faster with a dramatic change versus something like Speech in Loud Noise back to Speech in Noise.
You can make modifications to how aggressively you would like this to function. In the Target 3.0 software on the left-hand side, you see the SoundFlow criteria (Figure 5). Normally you see up to four configuration points there. You will notice the addition of the Speech in Loud Noise. If SoundFlow is highlighted and you go to Program Options, there are three ways that you can manipulate how aggressively this functions for your patients. One way is to use the sensitivity of the SoundFlow, which adjusts the reaction time of SoundFlow triggering to Speech in Noise. Another way that you can do this is through the Speech in Loud Noise section, which adjusts the noise floor level so the default is 70 dB; it ranges from 67 to 80 dB SPL. A third way is through your priority setting, or what setting you choose as a priority listening situation for SoundFlow as a whole. When you are in Speech in Loud Noise, your microphone mode is auto StereoZoom. That is how StereoZoom becomes an automatic program within your Quest hearing instruments.
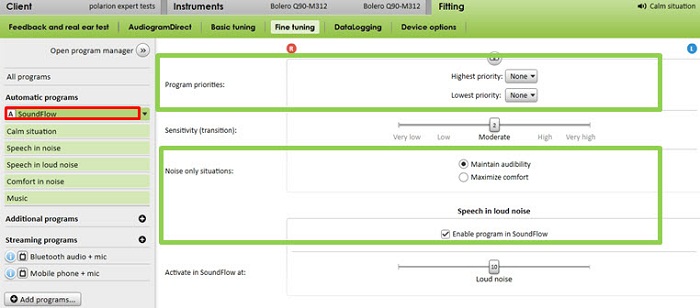
Figure 5. Access to Speech in Loud Noise settings in Target software.
Speech in Wind
The next feature that we will talk about within the binaural voice streaming technology of the Quest platform is Speech in Wind. Phonak has had WindBlock technology in both the SPICE and CORE platforms. WindBlock technology functions monaurally, and it detects and reduces low-frequency wind noise. Speech in Wind is a binaural solution that detects wind noise and uses voice streaming technology to create better speech understanding in a windy situation. For example, if a teenager was down at the beach where it is windy or riding their bike, they are probably not listening to a lot of speech. But wind is very aggravating, shearing over the microphones. The feature that activates when it is windy on both sides of the hearing instrument is WindBlock. It cancels out that low-frequency wind shearing for more comfort in that listening situation.
Speech in Wind is for a different situation when you have wind noise on one side and you can angle yourself to listen to speech on the other. In that case, where wind is blowing in the right ear of the user, then the microphone of the hearing instrument on the right side is attenuated, and then the low frequencies on the left side are streamed over to replace the low frequencies on the right. The high frequencies are not manipulated to preserve spatial cues.
You set Speech in Noise as a manual program in the software. Once you have it set up, you can look at the settings and manipulate different options as needed. The main thing you will notice is that the default microphone is Real Ear Sound. Real Ear Sound is using all four microphones with an algorithm to help with localization. If you would like, you can change it to omnidirectional for a different solution if the user desires.
There are many other features in your products that you fit, whether they are in the previous CORE generation, the SPICE line, or now integrated in Quest. Some of the features are related to comfort, such as WindBlock that we discussed, WhistleBlock, NoiseBlock for ambient low-frequency sounds, SoundRelax to help with the transient sounds, such as dishes, without reducing your full compression scheme or maximum power output (MPO), and also EchoBlock to help with reverberation.
Understanding Everything: Features for Audibility and Clarity
There are other features that are more about audibility and clarity. The first one is SoundRecover. SoundRecover is for intelligibility of speech and consistency of audibility of high-frequency sounds. UltraZoom is directional microphone technology used in all levels of Phonak technology, whether it is a fixed directional microphone or an adaptive microphone; Real Ear Sound helps with localization from front to back. Lastly, FlexControl is a volume adjustment that is not linear in nature. It is actually AI (audibility index) weighted so that the user gets more increase in frequencies where there is speech dependency.
SoundRecover
SoundRecover has been out for five years now. It was introduced with the CORE platform and remains a feature which is unique to Phonak. It was well researched before its release, but since then, there has been an abundance of research published in various peer-reviewed journals and also different case studies and field studies from Phonak. SoundRecover is non-linear frequency compression. It is patented by Phonak and was originally released in the Naída UltraPower to provide high-frequency audibility where there otherwise would be none based on the limitations of a conventional hearing aid. Today we use SoundRecover for consistency of audibility. We optimize the settings through verification as well as validation work and behavioral testing. The verification protocol for SoundRecover is published on the Phonak Web Site, as are all articles on SoundRecover.
To discuss the uses of SoundRecover and how to optimize these settings for your teenagers, we will start with Verification Settings. In the Target software, there is a tab for Verification Settings on the Fine Tuning section under Gain and MPO (Figure 6). If you put the hearing instrument in Verification Settings and turn off your SoundRecover, you will then run the hearing aid to match your Gain and MPO targets in your verification test box. You want to match your Gain and MPO targets with SoundRecover off so that you can get the most out of the conventional component of the hearing aid. This way, your SoundRecover setting will be in the least aggressive setting possible for the user.
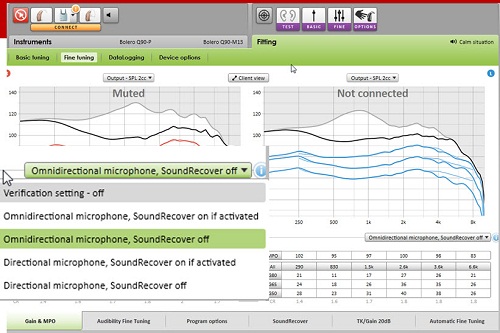
Figure 6. Verification Settings in the Target software, where SoundRecover can be turned on or off for test box verification purposes.
In the Verifit, there are some speech stimuli you can use for determining audibility of sounds. The one that directly correlates to the male production of the phoneme /s/ is the 6300 Hz curve. We will use that to determine audibility of /s/, and I will show you how to adjust that cutoff frequency. You can also use live voice productions, such as /s/and /sh/, to determine audibility, but also to make sure that there is no overlap of those two phonemes.
In the Phonak Target 3.0 under Verification Settings, you will see some new options. Historically, it said 2-cc Coupler SoundRecover Off or Real Ear SoundRecover Off. Now your options say Omnidirectional Microphone SoundRecover Off or Directional Microphone (Figure 6). You would choose the Omnidirectional Microphone SoundRecover Off for 2-cc verification, and if you were doing SoundRecover Off with real-ear verification, you can choose Directional Microphone SoundRecover Off.
If you are using the Verifit, Figure 7 would be an example of a mild to moderate hearing loss entered into the verification screen. We ran a Nios S H20 along with two other premium hearing instruments with extended bandwidths but no SoundRecover to match DSL targets for this particular loss. As you can see, we were able to match targets for each of the three hearing aids.
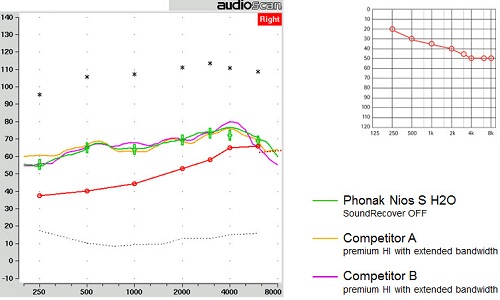
Figure 7. DSL target for a mild to moderate hearing loss with verification curves from three different hearing aids: Nios S H20 with SoundRecover off (green), Competitor A (orange) and Competitor B (purple).
Next, we can use the 6300 Hz filtered speech signal provided by Verifit. It is an LTASS (long-term average speech spectrum) signal with a notch at 1000 Hz. There are various frequency options you can choose in order to look at the peak of that frequency. The only one that directly correlates to a phoneme production is the 6300 Hz, which directly correlates to the phoneme production of /s/ by a male speaker.
In Figure 8, you see the notch where the signal falls out after 1000 Hz, and then peaks again after 5000 Hz. From this visual, you can evaluate whether or not the /s/ would be audible to this user. In order for the /s/ to be audible for this user, the peak should be above the threshold of the user. In the case where SoundRecover is off (Figure 7), it is at or below the threshold. That means in a perfect environment the threshold correlates to audibility 50% of the time, so the user would be able to hear /s/ half the time in a perfect situation. For younger kids this is important for language development because /s/ carries all the cues of plurals, possessives and pronouns. For a teenager who may have developed more language, they still use this for clarity. If we activate our SoundRecover (Figure 8), we compress and shift the /s/ signal so that it occurs at a slightly lower frequency, but has more energy for consistent audibility to this user.
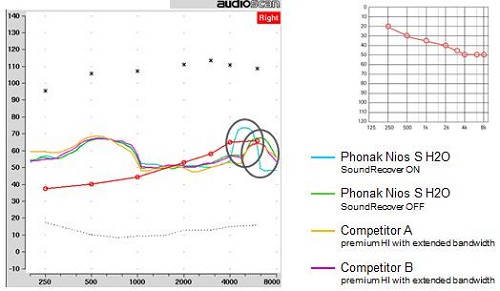
Figure 8. SoundRecover activated in the Nios S H20 hearing aid (blue) with peak energy verified above threshold using a filtered 6300 Hz signal; other conventional hearing aids and the Nios with SoundRecover off have peak energy below threshold where the listener would not have audibility of the /s/ phoneme.
If we look at a moderate to profound hearing loss, we could still use the 6300 Hz curve, but using the live production of /s/ and /sh/ might give us more information. You can see that the stimuli used for this hearing loss is Speech-live for both runs (Figure 9). The goal is to make sure that the peaks are above the threshold of the user. Sometimes you will be limited based on the degree of hearing loss and how aggressive the cutoff frequency is. But the other component to verify when using the live speech presentations of /s/ and /sh/ is if the peaks completely overlap or not. There should be some separation between the two stimuli. That lets us know that there is not likely to be phoneme confusion for the user. If the runs overlap, the user may not be able to tell the difference between /s/ and /sh/.
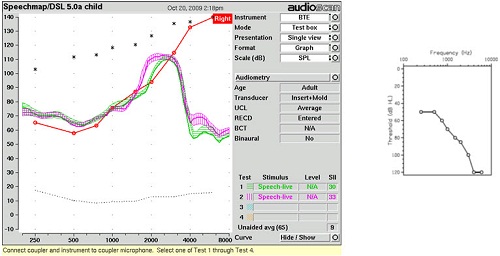
Figure 9. Live speech stimuli verification of /s/ and /sh/ for a listener with moderate sloping to profound hearing loss. The verification runs should not overlap and should be above the DSL targets.
A new component in Target 3.0 is the Real Time Display. The Real Time Display is available in the Basic Tuning and in the Fine Tuning sections of the software. You are able to look at gain output and SoundRecover relative to the thresholds of the user in real time. It can be a nice counseling tool for the teenager that you are working with, or the parent, to show what is audible and what is inaudible to the user as you speak or activate environmental sounds.
Another part of the optimization and evaluation of your teenagers and their technology would be using the UWO Plurals Test (Glista & Scollie, 2012). This is a behavioral evaluation that looks at high-frequency consonant recognition, detection and discrimination. It does measure speech perception ability. It is a comparative test, so you can compare various situations. You could look at unaided versus aided. You could look at old technology versus new technology. You can also evaluate one SoundRecover setting versus another. The individual has to point to the word that corresponds to what they hear. Words are given either in a singular or a plural form, and it is meant to be a closed-set test. You use laminated picture cards with corresponding words for the evaluation. Once you have two scores, you compare them on a critical difference chart. If there is a significant difference, it might make you choose one technology over another or one setting over another as well.
Real Ear Sound
Earlier I mentioned the feature of Real Ear Sound. The concept behind Real Ear Sound is related to the fact that, by wearing BTE hearing aids, we lose the natural component of the pinna effect. We know that if we take the microphones and place them on top of the ear, we lose back-to-front localization. There have been different publications on localization and back-to-front localization, one from Good and Gilkey (1996) and another publication from Keidser and colleagues in 2006. In a Phonak field study in 2005, we used normal-hearing adults and placed them in a sound booth with various loud speakers. As sound came out of the speaker, the individual had to select which speaker the sound came from.
The normal-hearing individuals were very accurate with their localization capability. Once a BTE with mild gain and omnidirectional microphone was placed on the ear, their localization capabilities reduced dramatically. After adding in the Real Ear Sound algorithm, we were able to improve the localization ability with the BTE – not back to normal– but much improved over the alternative.
Today we have talked mostly about binaural voice streaming and features available in the Quest platform (Figure 10). Speech in Wind, auto StereoZoom and auto ZoomControl are the new features that are applied in the Premium products. In the Advanced technology level for the Quest platform, you still have the manual StereoZoom, manual ZoomControl and DuoPhone. In the Standard level of technology, the binaural voice streaming component available there is the DuoPhone option.
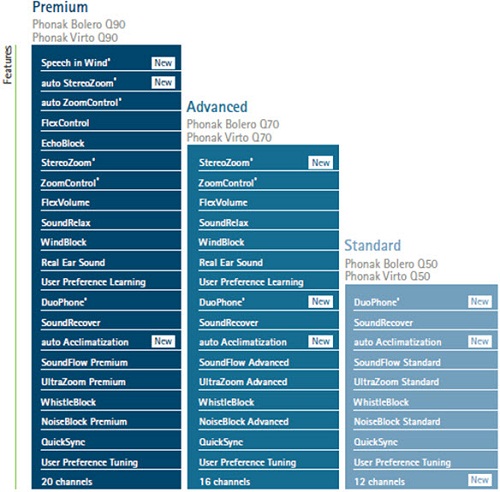
Figure 10. Features of the Quest platform, broken down into Premium, Advanced and Standard technology levels.
So, how do you get these options? You have to have particular BTEs. What you will notice is that the nomenclature for the BTEs and ITEs have changed within the Quest platform to something similar to the Pediatric portfolio. In the Pediatric portfolio, you have Naída and Nios with three levels of technology: III, V and IX. On the Quest platform, the BTEs are named Bolero. They are also labeled with a Q for Quest. Then, just after that, there is an indicator related to the power: mild, moderate, power or super power. In the micro products you will see the battery size indicator as well. So the micro BTE Quest product is the Phonak Bolero Q M312. You will see the Phonak Bolero Q M13 (Figure 11). This has the Phonak H2O casing. It meets the same IP67 rating as your other H2O products such as the Nios S H2O and the Naída CRT (canal receiver technology). You will also notice two other BTEs to choose from (Figure 11). One is the Bolero Q-P. It does have two manual controls: a button and a volume control. Then there is the Bolero Q-SP, which is a full-size BTE with two manual controls as well.
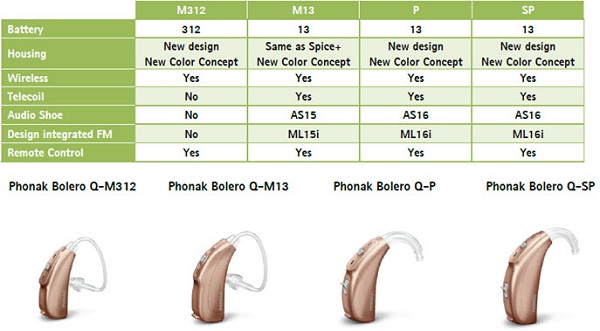
Figure 11. Phonak Bolero Q BTE line.
Wireless Accessories
As far as wireless accessories go, this is one way to reel in your teen population. By the time you have a teenager, they are trying to wiggle out of their hearing aids and maybe just wear one, stop using FM, or whatever they think makes them seem more likely to acclimate to their environment with their peers. Today, using wireless accessories can actually give them an advantage over their normal-hearing peers, or at least allow them participate in the same activities as their peers do.
In Figure 12, you see four different devices. The small device on the bottom right is the PilotOne. I will not talk about the PilotOne remote today, but it is a small, easy-to-use remote. You can change programs and volume with no screens; it is just a simple option. If we move over to what you see in the center, there is the TVLink, which also serves as a charging cradle for the ComPilot streamer. The ComPilot serves a dual function: a remote and giving streaming capabilities. Then you see a new part of the wireless family on the left, which is the Remote Microphone from Phonak.
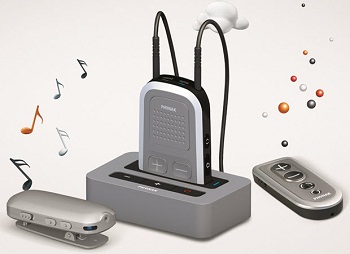
Figure 12. Wireless accessories from Phonak (l to r): Remote Microphone, TV Link and ComPilot, and PilotOne.
We know that teenagers and preteens, especially, want to connect to various electronic devices. With the ComPilot you are able to do just that. You can connect via Bluetooth to your cell phone for binaural hearing on the phone. You can connect by Bluetooth to your global position system (GPS), so if you are just learning to drive and you wanted to use a GPS, you would have a full signal through your hearing instruments. You can also use an auxiliary cable to directly couple to anything with a headphone jack. The last component of the ComPilot is that you can plug a universal FM receiver into the bottom and receive an FM signal to both hearing aids from a transmitter. You can use a transmitter, like the SmartLink, separate from streamers and still get Bluetooth and remote capability.
ComPilot
The ComPilot acts as a remote control for your Phonak SPICE or Quest hearing aids and a streamer to all CORE, SPICE, and Quest products. It is not the same as the iCom. ComPilot has eight hours of streaming, which is a long battery life, and it has some voice alerts, so it will prompt you to incoming calls and audio connectivity via voice alerts. One nice thing about the ComPilot for the teenage population is that you can choose the neck loop. The neck loop comes in a long or short loop. It does detach on both sides, so you could have two loops if you preferred. The main use for that would be when you are connected to your phone via Bluetooth. There is a microphone onboard the ComPilot that sends the user's voice to the person on the other line. With the shorter loop, it brings the microphone closer to the mouth of the user for a better signal transfer.
If you ordered a ComPilot today, you could take it out of the box and it would stream music, FM, and Bluetooth signals to the phone without any programming to any CORE, SPICE, or Quest instrument. However, if you would like it to be a remote control for your SPICE or Quest product, it does need to be linked to the hearing aids in the software. The ComPilot has several different buttons for function (Figure 13). The main button is what is right on the front. It accepts and dismisses calls, toggles between streaming programs to pause or resume play, and it can also change your hearing aid programs via remote function. The plus and minus are volume adjustments either to the signal being streamed or to the hearing instruments themselves. There is also a Home button on the side, so once you have toggled around and changed lots of programs, if you just want to go back to your normal startup program, you can hit the Home key and do so.
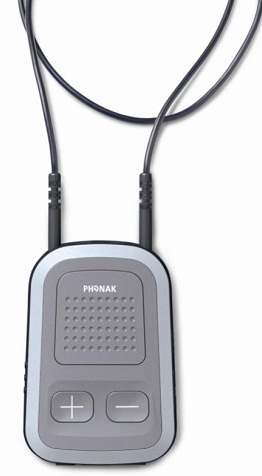
Figure 13. Phonak ComPilot wireless streaming device.
There are ways to optimize this for the user that you fit. The first way is to decide if you want it to be streaming only or if you want it to have remote control capability. Secondly, you can turn the voice alerts off if they are distracting or not understandable to the user. You can also change the language of the voice alert. In the third section, you can reset your Bluetooth and get some assistance with Bluetooth pairing, and the fourth component can be more for advanced options such as voice dialing, caller ID for the voice alerts that come into your phone while they are connected. You have an automatic display in your software as to what you set up, and you can print user guides and instructions for the individual. You can also save those instructions and guides to your computer and e-mail them over to your teenager's smartphone so that they have the electronic version.
One way to add to your ComPilot options would be to add a Remote Microphone. The Remote Microphone is optimally named because it is similar to your hearing aid microphone, but placed in a different, remote position. Remote microphone technology pairs the Remote Microphone to the ComPilot for one-to-one conversations. You can only pair one Remote Microphone to one ComPilot. It is very small and lightweight. It can be clipped on the shirt or the pocket of the user or laid on a table. It has a transmission range of 6 to 60 feet. If you are less than six feet in a close proximity, it would be better to use your directional microphone options on your hearing aids. It does have a full audio bandwidth of 8000 Hz and eight hours of continuous streaming, just like the ComPilot.
The Remote Microphone has a different function than FM, even though it is a similar concept. The user wears their hearing instrument with the ComPilot, and the speaker wears the Remote Microphone, which has a 60-foot range. With the technology that we are using at Phonak, there is very little body baffle or drop-off of the signal. In the software, if you set up a particular program for the Remote Microphone or want to optimize the settings, the default for using the Remote Microphone via the ComPilot is that the hearing aid microphones are attenuated. The default is 6 dB; this can be adjusted. The way you improve the signal-to-noise ratio by using a Remote Microphone is to reduce your hearing instrument microphone as opposed to increasing the gain on the transmitter microphone side. This differs from FM.
Dynamic FM
Dynamic FM is the biggest improvement in signal-to-noise ratio in the industry. It has a very different function. The hearing aid itself is matched to a DSL target. The FM signal comes in at 10 dB above that level of gain. With Dynamic FM, the transmitter can sample the environment in the room. Once the noise level increases, it can increase the FM gain of the receiver to maintain a steady signal-to-noise ratio. It also is a different solution for the classroom because there can be multiple receivers and one transmitter. Dynamic FM also allows multiple microphones in the network so that you could have more than one talker or instructor in the setting. There are several features to Dynamic FM, but these are the main differences when we talk about case scenarios. Many of your teens have used FM for many years, and they might be able to tell quite a difference between the Remote Microphone and their Dynamic FM products.
If you want to choose an FM solution for your teens for connectivity purposes, there are different options at different price points. The SmartLink transmitter is probably the one we think about most for teenage use, partly because it can be used in a similar way as the Remote Microphone. We can change the microphone position from omnidirectional to zoom or super zoom. Use it for group work. The desired speaker can wear the microphone. We receive an adaptive FM advantage for optimal listening in noise. It has Bluetooth connectivity to any Bluetooth device. It works as a remote control for your Phonak hearing aids, and it also has an option for coupling to anything with a headphone jack such as a computer, portable DVD, iPad, MP3 player, et cetera.
It allows for a different style setup than the ComPilot. Instead of wearing something around the neck or on the body, the user can just attach an integrated FM receiver to their hearing instrument for more cosmetic appeal. RIC instruments are popular with teenagers now; they get enough power but with a cosmetic appeal. The Naída CRT has a dedicated receiver option, the ML15i. The hearing aid and the receiver have an IP rating of 67, which means they are very water resistant and reliable. All Phonak BTEs that have at least a size 13 battery have a dedicated receiver option. We do offer universal receivers with audio shoe connectivity, and there is also an option of the MyLink receiver, which works via the telecoil and is worn around the neck. Soon you will see another member of the Dynamic FM family, which will be the ML16i, the dedicated receiver for the Bolero Q-P and the Bolero Q-SP.
If we think about all our features and options in a full portfolio, we can choose from different categories. You can stay with the Pediatric portfolio if you like, with Nios and Naída. You could choose from the RIC family, which includes Naída CRT or any of the Audéo products, particularly Audéo SMART, so that you have a manual control. If you want the most power in a small BTE, the Naída is the solution available. All of these are still in your SPICE portfolio. The newest addition within the Quest platform would be the Bolero BTE, and the custom line would be the Virto.
You might notice different numbers associated with the Standard, Advanced, and Premium options. The Standard for Bolero and Virto has a 50 instead of the III that was previously tied. The Advanced is a 70, which would take place of the V. The Premium has a 90 tied to it. So, although this nomenclature is sensible to anyone who has already conquered the Pediatric portfolio and nomenclature, it might take a little bit of getting used to. There are order forms and literature pieces and reference guides available to you on the Phonak Web site. I would encourage you to take a look at that. Contact your Phonak representative for any detailed training, literature, and dummy hearing aid display options.
Summary
We will quickly summarize what we went over today. The Phonak SPICE and Quest portfolio does provide hearing solutions for all degrees of hearing loss, budgets, and listening needs. SoundRecover is in everything from the Essential line to the latest Quest Premium products for consistent audibility and is optimizable for all degrees of hearing loss. Wireless connectivity now includes the ComPilot, TVLink, RemoteMic, and the PilotOne remote control that allows you to connect to different sound sources.
Within the Target 3.0 software, the Junior mode is available, so any time you fit a patient you always want to put in the birthday. You will get the option of using the Junior mode, which has evidenced-based defaults, but they are all purely customizable to meet the need of the individual that you are fitting. It does help expedite your fitting process. And, of course, Dynamic FM is available to your teen users with different options for cosmetic appeal and for different listening and budget needs. It is the best signal-to-noise ratio available in the industry today.
With that said, I did mention the Web site resources that are available to you. They are on https://www.phonakpro.com. There you can find various product information about the new Quest products, the SPICE portfolio, as well as the CROS (contralateral routing of signal) system from Phonak. And also, under FM, do not forget about the Configurator, so that if you are fitting FM with your teens, you can get setup tips and a user guide specific to the fitting that you are working on.
There is one other thing on the Web that I would like to point out, and it is the Web-based program for the Guide to Access Planning. Since we talking about teenagers, the Guide to Access Planning, or the GAP project, was set up by a lead educational audiologist. It is meant to be a transition tool so that if you are working with your teenagers and they are transitioning to an upper-education environment or the workforce, you are able to provide them with information regarding laws and regulations and different resources so that they have the tools they need to be successful in different environments. In many cases, the kids have always had their pediatric audiologist and their educational audiologist advocate for them, and this helps the parents and the kids have the tools they need to be advocates for themselves.
I am right at the end of today's presentation, and I have two minutes for questions and answers. Oh, I see a question. Can you briefly discuss the TVLink S? The TVLink S came out with the SPICE platform. The TVLink was available with the CORE platform. And the S just has some different time latencies, so it should have improved the correspondence with the TVLink and the ComPilot, as well as your iCom. There were some things that were fine tuned with the latencies and the signal. The other thing is the TVLink S, where you saw it as a charging cradle (Figure 12), is set up to charge the ComPilot; whereas the TVLink’s cradle was set up to charge the iCom. The way their charging port is positioned on the bottom is slightly different. Those are the main differences between the two units.
That completes our hour of the session. Thank you for joining me to learn about Phonak’s pediatric/teen solutions and advanced features. If you have any questions, feel free to contact Phonak directly or your Phonak representative.
References
Glista, D., & Scollie, S. (2012). Development and evaluation of an English language measure of detection of word-final plurality markers: The University of Western Ontario plurals test. American Journal of Audiology, 21, 76-81.
Good, M. D., & Gilkey, R. H. (1996). Sound localization in noise: the effect of signal-to-noise ratio. Journal of the Acoustical Society of America, 99(2), 1108-1117.
Keidser, G., Rohrseitz, K., Dillon, H., Hamacher, V., Carter, L., Rass, U., & Convery, E. (2006). The effect of multi-channel wide dynamic range compression, noise reduction, and the directional microphone on horizontal localization performance in hearing aid wearers. International Journal of Audiology, 45(10), 563-579.
Cite this content as:
Motsett, S. (2013, January). Advanced features for teen patients. AudiologyOnline, Article 11610. Retrieved from https://www.audiologyonline.com/
