Today we are going to learn about the new micro completely-in-the-canal (CIC) device from Sonic Innovations, Groove. We will discuss its unique features, candidacy, and steps to obtaining an appropriate ear impression for such a device. We will also explore the EXPRESSfit 6.4 software for programming.
Groove Style: Out of Sight
Groove is a microCIC device that is custom-molded to sit deep into the ear beyond the second bend of the ear canal. This is a cosmetically-appealing feature for those patients who want to be more discreet about the appearance of a hearing aid. Because of its small size, Groove does not have any extraneous hardware, making it an easy, automatic hearing device.
Figure 1 is a photo of the Groove microCIC worn in the ear. Figure 2 shows the size as compared to a standard pencil (Figure 2). The dark brown shell and faceplate is the color of the natural shadow of an ear canal, so the device is truly out of sight when worn. The device is well-seated deeply in the canal for high fidelity and optimal comfort.
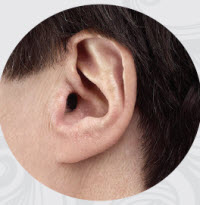
Figure 1. Groove microCIC hearing aid; the small size fits completely down into the ear, blending with the shadow of the ear canal.
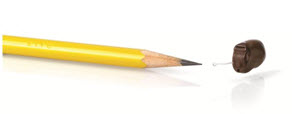
Figure 2. Size comparison of the Groove microCIC with the tip of a pencil.
Advantages of Deep Placement
In addition to its cosmetic appeal, Groove was designed for a custom fit and natural sound. Its deep placement within the ear canal means there should be no difficulty using the telephone because of feedback. In addition, with Groove's microphone seated deep within the canal, the pinna will serve as a natural shield to wind noise.
With regard to hearing on the telephone, Groove has an M4 rating. The Federal Communications Commission (FCC) issues standards for wireless compatibility that ensure that interference to hearing devices is minimal. The scale is rated from 1 to 4, with M3 meeting the FCC standard and M4 exceeding it. The "M" is for microphone, while "T" ratings are for telecoil. There is no telecoil in this device, but the M4 rating provides excellent fidelity when listening either through compatible cell phones or landline phones.
Groove is a state-of-the-art hearing device with advanced features designed to provide a comfortable, genuine hearing experience. Sonic Innovations has a clinically-proven noise reduction algorithm (Ghent, Nilsson & Bray, 2007) that has been beneficial in many of our products. With our Sonic Sound™ signal processing, there are 24 compression channels to create a robust listening experience for the patient.
Candidacy
Most adult patients want a practically invisible hearing solution like Groove; however, the very nature of a microCIC may not be suitable for all patients. The first thing to look at when choosing a hearing instrument is the degree and configuration of the hearing loss. The Groove microCIC is ideal for patients with mild to moderate sensorineural hearing loss. The recommended fitting range based on audiometric thresholds extends to a maximum of 70 dB HL across the frequency range.
Dexterity is another factor that weighs in on optimal patient candidacy. Groove is very, very small. If your patient has dexterity or tactile issues, Groove might not be the best solution. Insertion and removal can be difficult if the patient has issues with fine-motor coordination. We do offer optional handling accessories, including a longer retrieval cord and a larger retrieval ball. When I was fitting hearing instruments clinically, I would give one of my demo devices to my patient to see if they were able to manipulate the battery door and a size 10 battery. I looked to see if they were able to put their fingers up into their ears.
Body chemistry is another factor that may be overlooked, but it is important to consider when selecting a hearing aid. Groove is practically invisible because it sits deeply into the ear canal. Because Groove fits so deep, the microphones can be more susceptible to cerumen and moisture than other custom products. Patients who naturally produce excess cerumen may not be good candidates for Groove. Groove devices come standard with a mic screen that covers the microphone for additional protection. For patients that may be borderline excess wax producers, consider ordering the optional wind hood, which is custom-made for that particular device. If you order it and find that the wind hood is not working out, you can just take a thin razor blade and pop it right off. We found in our market preference study, however, that the wind hood did help patients that were struggling with cerumen build-up on the mic screen.
Use your clinical judgment when it comes to cerumen. Sonic Innovations offers other excellent products for patients who may require a device that can handle excess cerumen. Options include the Velocity 24 mini behind-the-ear (BTE), which has the option of a thin tube or a standard ear hook with a regular earmold. We also have standard BTE options that are very flexible.
Impression Techniques
A comfortable out-of-sight Groove product starts with a great impression. Because of Groove's size and the way it sits in the ear canal, it is critical that the impression you make extends beyond the second bend of the ear canal. Here are a few basic guidelines that will help ensure a great impression.
Step 1: Perform a thorough otoscopic exam.
Use an otoscope to verify a healthy tympanic membrane and that the ear is cerumen-free. If there is earwax protruding anywhere in the ear canal, we would ask that cerumen removal be performed prior to the impression. This may mean that you have to refer to a physician if this is not something routinely performed in your office. Having a clear canal will make all the difference when making an ear impression for such a precise device.
Step 2: Place the otoblock.
Place a flattened cotton otoblock just beyond the second bend of the ear canal. You always want to make sure there are no gaps or edges around the otoblock. I would ask that you use caution if using a foam block, as they take up more space in the ear canal, making it difficult to obtain impressions that go beyond the second bend. A lot of clinicians are very comfortable using the foam block, so consider using a foam slim stop and make sure that the block is placed beyond the second bend. When we receive the impressions, we look to see that the impression is five millimeters beyond the second bend. When placing that block, you can use Arnold's cough reflex as a good indicator that you have placed the otoblock deep enough. This happens in a small percentage of patients when the vagus nerve is stimulated against the ear canal wall. Some patients also experience this when cleaning their ears or inserting a hearing aid. Even if the patient coughs, verify with the otoscope that the block is beyond that second bend.
So often, we get ear impressions that extend only to the first bend, but we really do not know where the sound continues on to the eardrum. We have all seen very crazy ear canals that have sharp bends and go up and go down. The best thing to do is for every ear impression is to make sure we have a good view of that second bend, when especially when fitting a Groove.
Step 3: Inject the impression material.
When you insert the impression syringe into the canal, slowly release the material, filling the ear, while simultaneously withdrawing the tip still embedded in the silicone. It does not matter what silicone or syringe you use, as long as it is something with which you are comfortable and can handle. We see all kinds of material come in to our manufacturing facility. Our preference is always for silicone material. Some offices still use the liquid and powder method. We will always accept an impression made with a liquid and powder, but we are finding that the liquid and powder do not seem to form around the second bend as well as does silicone.
When it comes to viscosity, it depends upon the ear and the hearing loss, as well as what you as a clinician are comfortable using. Regardless of material or delivery method, whether you prefer the two-piece plastic syringe, manual crank gun, or the electric gun, the most important thing, is to make sure that the tip stays embedded in the material as you are fill the ear. This ensures that you are not creating air holes or gaps in the material.
Step 4: Removing the cured impression.
After the material has fully cured, have the patient break the seal with a jaw movement to aid in the removal. Pull up and back on the pinna and rotate the mold forward to pull the impression straight out of the ear. This is a standard process for removing the cured impression. It is very important to make sure that seal is broken when you go and pull the impression out. Make sure your patient is comfortable during this entire process.
Step 5: Inspect the impression.
Visually inspect the impression for any gaps, voids, or other blemishes that make it unusable. You will also look to make sure certain landmarks of the ear are visible and well-formed on the earmold impression.
Figure 3 shows a cured earmold impression with all the necessary landmarks for an acceptable earmold impression. Here you can identify the helix, anti-helix, tragus, anti-tragus, concha bowl, ear canal, and the second bend of the ear canal. This earmold impression is a good example of obtaining a deep impression at least five millimeters beyond the second bend.
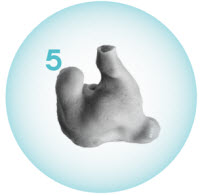
Figure 3. Completed earmold impression, showing prominent features such as the helix, concha bowl, and ear canal.
The earmold impression must have a very smooth surface with no fold marks, gaps, bubbles, or other blemishes on it. If the impression does not meet these criteria, the lab may request you make a new one. When in doubt, you can take a new impression and send both impressions to manufacturing. The more anatomical information we have on that impression, the better the final custom product can be.
Measuring the Impression
After the impression is made and has passed your inspection, verify the size to ensure that the person is a candidate for Groove. These measurements are for the minimum criteria necessary to build a microCIC Groove.
When ordering Groove, use the measurement gauge provided by Sonic Innovations (Figure 4) to see how your impression measures up. The gauge makes it easy to verify that impressions meet the minimum size criteria. The gauge is easy to use - simply use the color-coded notches to measure the corresponding parts on the earmold impression.
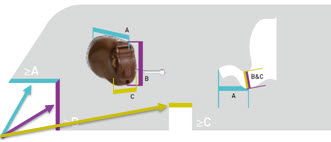
Figure 4. Measurement gauge tool provided to ensure appropriate dimensions of the earmold for a candidate who is considering a Groove microCIC.
There are color-coded notches on the measurement gauge that help you to visualize the size of the hearing aid. There is a pictorial representation of Groove on the gauge so you can see exactly where the device would fit. Dimension A (Figure 4), which is in the blue writing, represents the overall length of the canal. This dimension is going to define proper receiver placement and recession into the ear canal. The length of the canal should be longer than or equal to the blue A measurement. If the impression is not suitable, make another one. Some patients' ear canals are just not long enough or have sharp bends that make fitting a comfortable hearing aid more difficult. If the length cannot be achieved, you may have to consider other amplification alternatives.
Dimension B (Figure 4), which is in purple, references the minimum height needed for the faceplate. The height of the canal at the first bend should be equal to or taller than the purple B measurement. Figure 5 illustrates the differences between an ear canal that is plenty wide at the first bend and one that is too small and not suitable for manufacturing.
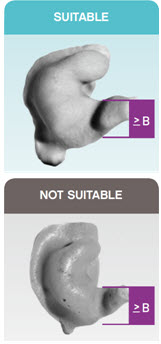
Figure 5. Measurement of width of the ear canal using Dimension B of the measurement gauge.
Dimension C (Figure 4) defines the minimum width of a 10A faceplate. The canal width at the first bend of the ear canal should be equal to or wider than the C measurement. Tiny ear canals that are very narrow unfortunately will not accommodate Groove very well. If the patient is really set on having similar technology and they do not produce a lot of cerumen, you may consider the Touch instrument, which is a receiver-in-the-canal product.
Out of the impressions we have received, we are showing an 85%build rate. We are delighted with this data and are very excited about the candidacy options for Groove that we have been able to fulfill.
Features and Specifications
When looking at the Groove (Figure 6), you will notice the faceplate of the hearing instrument, with indicators corresponding with numbers 1 through 8. Number 1 is the top orientation indicator or, as I refer to it, the top dot. I cannot stress enough the importance of the top dot when seating the hearing instrument in a patient's ear. Because of its deep placement, it is easy to confuse a right microCIC for a left one. The top dot will orient the patient to the proper placement (with the dot at the top of the ear canal), especially when dexterity is problematic. You also see a large "R" or "L" on the canal portion of the hearing aid, which is a large visual reminder as to which ear the hearing aid is for.
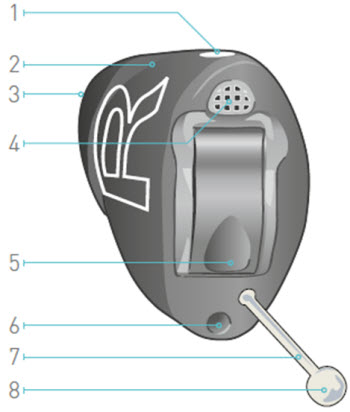
Figure 6. Rendering of Groove microCIC features and components.
The removal cord (number 8). For the most part, removal cords are going to be placed near the bottom of the faceplate. We have the removal cord and the removal cord ball. They come in a standard length and size, but as an option, you can order a longer cord or larger retrieval ball for those who have some dexterity issues.
Number 3 is the sound outlet with No-Wax protection, which is the default selection. From the time that we introduced the No-Wax on our custom products, we have seen wax-related failures decrease, because the patients are able to change it out in most cases. Otherwise, we see the audiologists change them when the patients come in for regular cleanings and check-ups. The No-Wax is really going to do a great job in protecting the hearing aid components.
Number 4 is the microphone covered by a windscreen. Remember that the custom wind hood is also an option here for your patients with excess cerumen. This is something that is listed directly on the order form.
Number 5 is the battery door, and Number 6 is the vent. Not all Groove instruments will come with a vent. If size permits on the canal portion of the hearing aid, we are usually able to add a small pressure vent. I am sure some people have some concerns regarding occlusion with such a small device and small vent, however, this has not been a common problem. Once we get sound that deep into the ear, closer to the tympanic membrane, the concern of occlusion decreases for many users.
In addition, EXPRESSfit 6.4 software has the Voice Manager feature to help you manage any occlusion or voice issues in the case that they do arise.
Features and Fitting Range
As mentioned previously, Groove has a fitting range up to 70 dB HL. This is the maximum range that is appropriate for quality listening with the Groove. Groove uses Sonic Sound™ signal processing with 24 independent compression channels and nine programming handles. You have the option of selecting standard fitting strategies including DSL m[i/o] or NAL-NL1. You can set specific prescriptive methods as the default target in the software if you know you use primarily one strategy. Standard in the software is Best Fit Fast, which is our proprietary algorithm.
The standard noise management feature includes our soft noise management, adaptive noise reduction, and feedback canceller. We have four levels of clinically-proven adaptive noise reduction to improve speech understanding in background noise. Soft noise management works as expansion in our hearing aids. It is there to suppress low-level noise to maximize speech intelligibility. A complement we frequently hear is that our expansion algorithm keeps our products quiet in quiet environments. This noise management system does not increase or decrease overall gain in noise and quiet; it works with the signal to improve communication, which is a great feature to offer your patients.
By default, Groove ships with the Universal program that is pre-configured for hands-free operation. This is an automatic program that adjusts to various listening scenarios. We have a very sophisticated adaptive feedback canceller to remove any whistle and squeal from feedback. Groove takes a size 10A battery with an estimated battery life of anywhere between 74 and 103 hours.
Groove also features voice alerts that notify the patient when the battery needs to be changed. There are a variety of different languages, and you can also choose a male or female voice. This is convenient and very easy for patients to understand; they do not have to decipher the code of beeps that they hear internally. The hearing aid will simply say, "Low battery," when that battery needs to be changed. This is a feature that can be turned off or made louder or softer in the software, depending on the patient's needs and preference.
The specifications in the 2cc coupler indicate that Groove has a maximum output of 111 dB SPL and a peak gain of 31 dB SPL. It has very low total harmonic distortion under 2 percent with only 29 dB SPL equivalent input noise. Those are very low values compared to other hearing instruments.
Groove Programming Using EXPRESSfit
Grove is programmed with EXPRESSfit 6.4 using either the EXPRESSlink or NOAHlink programming interface. It should be noted that the HI-PRO interface is not recommended for programming a Groove microCIC. When you send the patient's audiogram in with your custom order, the hearing aid is pre-programmed with the first fit settings prior to shipping to you. We provide that service to help save the audiologist time before the initial fitting
If there is feedback present after the first fit, you should run the feedback manager before making any other adjustments. If there is no feedback or after running feedback manager, follow these two simple steps for a successful first fit.
Step 1: Use the paper-crinkle test to determine the correct fitting level.
This test may be unfamiliar to you, but you will be amazed by how great this trick is at helping to set a starting fitting level. Give the patient a sheet of paper and tell them to crinkle the paper in front of them. Then ask, "When you crinkle the paper, does it sound like paper, plastic, or foil?" If the patient responds that it sounds like paper, increase by one fitting level, i.e., move from Level 1 to Level 2 (Figure 7). Have them crinkle the paper again and ask the same question. If they say it still sounds like paper, increase by another fitting level up to Level 3; if it sounds like plastic or foil, then take it back down one level. The goal is to get to the highest fitting level where it still sounds like paper.
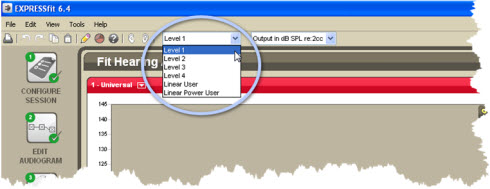
Figure 7. Screen shot of the EXPRESSfit 6.4 software indicating the fitting levels.
Step 2: Use the Voice Manager to address any issues the patient has with their own voice.
Begin with a dialogue with your patient. I ask questions like, "What are your plans for the weekend?"or "What did you have for lunch" to get them talking about things with which they are comfortable so they can hear themselves in normal conversation. They will quickly realize if their voice sounds unnatural and comment about it. If the sound is not to their liking, use the Voice Manager to make adjustments (Figure 8).
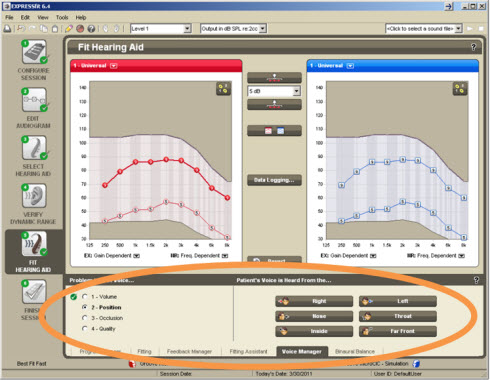
Figure 8. Screen shot of Voice Manager in EXPRESSfit 6.4.
For best results, work through problems in the order of volume, position, occlusion, and quality, just as they are listed on the screen. Ask the patient to verbalize things like their address or the vowels a-e-i-o-u, or a phrase like "Baby Jeannie is teeny tiny." Make sure the volume is comfortable, or adjust the volume to the correct position based on patient report.
"Baby Jeannie is teeny tiny" is a great phrase to use when you are working with the location of a patient's voice. While saying that phrase, you can have the patient point to where they hear the phrase. Ideally, you would like them to point to their mouth. If they are occluded, they tend to point at their throat or nose. Click the Voice Manager button that corresponds to their complaint to apply the proper correction. From here, you would then move into occlusion and then quality adjustments.
Verify Dynamic Range is a tool in our software that is available for you to use with patients that have recruitment or tolerance concerns. It is not a process that needs to be done with every patient; it is meant to be used on an as-needed basis for those with tolerance issues. With that being said, we recommend that the maximum adjustment does not exceed two to three dB.
The goal of the fitting is for soft sounds to be soft, but audible, and for loud sounds to be loud, but not uncomfortable. When one sound is perceived as louder or softer than another of similar intensity, an adjustment is needed.
As you navigate through each step in the fitting, you will see a green checkmark indicating that the step has been successfully completed. Our hearing aids run in real-time with the software, so as soon as you make an adjustment in the software, the adjustment is made in the hearing aid. When the fitting is complete, select "Finish Session" and then "Save and Close" to ensure the data is saved accurately to the database.
Conclusion
Thank you for participating in this course today. If you have any questions about Groove or you would like or a visit from your Sonic Innovations sales representative, please contact our Customer Care Team at 888-423-7834 and we will be happy to assist you.
References
Ghent, R., Nilsson, M., & Bray, V. (2007, June). Validation of the Noise Reduction Index (NRI). Paper presented at the 153rd Meeting of the Acoustical Society of America, Salt Lake City, UT.
