This text-based course is a transcript of the live webinar. Download supplemental course materials.
Introduction
I would like to welcome you to Step up with Pep. Pep is the newest product that we are introducing to the Sonic family. My name is Erin Reichert, and I am the manager of the Audiology Services team. Today we are going to talk about the features with our Pep product. There are different models available, and we are going to walk through the software a bit and go through our first-fit protocol. Without further ado, let’s step up with Pep!
Your first question may be, “What is Pep?” It is a little word that definitely invokes an emotion. It is an energetic feeling you get when life is great and you are ready to take on the world. We feel that our Pep product is a great way to get your patients towards their first step to better hearing. They are going to feel like they can take on the world. Pep is a feeling or emotion that you convey, and that your patients will experience when they are listening with their new hearing instrument.
Pep is an entry-level product, ideal for the first-time user and patients with basic hearing needs. There are a lot of patients that are not in very demanding listening environments. Some of our patients in nursing homes and assisted-living centers just need something more so they can enjoy their television, conversations that are not in very challenging environments, or to enjoy the theater. Pep is going to be an excellent product for that patient. It provides a processing feature essential to improved listening comfort and overall hearing ability. It includes some nice features for patient convenience. If you want something to ease your patients into technology and amplification, this entry-level product does a good job. There are five models available for this product, both in behind-the-ears (BTEs) and customs.
Features
Let’s get into the features of Pep. One thing about Sonic is that we really have embraced our 4S foundation. In the 4S foundation, we have sound that is natural, speech understanding in noise, simplicity in everything that we do and style that stands out. Pep encompasses all of those 4S foundation components.
Keeping Sound Natural: Speech Variable Processing
Pep employs Speech Variable Processing (SVP). Our SVP is a fast-acting wide dynamic-range compression (WDRC) system designed to replicate the functions of a healthy cochlea. Sonic’s inspiration has always been the cochlear amplifier. With SVP employed in Pep, we further our goal of trying to imitate that healthy cochlea. The benefit here is that we are going to preserve the subtle nuances of speech. Subtlety is what makes speech speech. It is what makes things clear and natural. The SVP does a wonderful job of keeping that intelligibility pure with a natural sound quality.
A word about speech. We all understand that speech is incredibly complex and dynamic. There are different patterns and components to speech, and it is consistently in flux. There are different levels of energy, phonemes and inflections such as rise and fall indicating a question. Speech is consistently in motion. In a healthy amplifier, your ear can translate and tell your brain exactly what is a consonant, what is a vowel, a question, and emotions such as happy or sad. Your healthy ear is able to pull all of this input together and determine what the message is. That being said, a hearing device requires sophisticated technology to try to mimic what is going on in the cochlea.
Speech differs in intensity. As you take a look at the graphic in Figure 1, we have the phrase, “In the batter’s box,” which I am sure many of you have seen in previous Sonic presentations. You can see the energy in the /b/ sound versus the /s/ sound. It is a drastic difference when you take a look at the speech waveform.
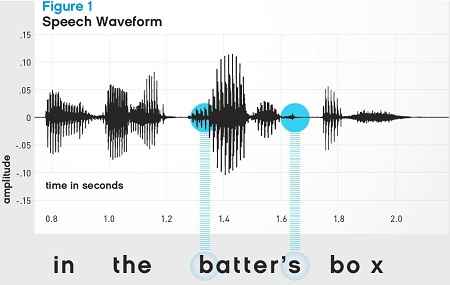
Figure1. Speech waveform of “In the batter’s box.”
With that vowel carrying in, you can see a lot of energy in the /a/ of “batter’s”, but the /b/ itself has a lot more intensity than the /s/. Speech consists of vowels and consonants. Vowels are our energy carriers. They have a lot of intensity. Consonants are soft with a short duration, especially the /s/. In Figure 1 you can see the /a/ from “batter’s” carrying energy to the /s/, where there is a difference in intensity with the consonant. That is what is going on in a healthy ear. The ear is able to determine what is a consonant and what is a vowel, and it is able to do it naturally.
You can truly think of SVP as a supercomputer in a little hearing instrument. The goal of SVP is to preserve the fine details of speech, because nuances and subtleties are what make speech different from other sounds. White noise, for example, is constant. Speech is different, and it has inflection. The goal of SVP is to make conversations clear in a natural form. We want our patients to be able to hear in a variety of listening environments, but still preserve the nuances of speech.
SVP has three components when you break it down: speed, frequency contrast, and precision in frequency shaping. We will first start off with speed. Speed equals accuracy. The healthy cochlea is going to analyze and adjust amplification of sound incredibly quickly. The speed of how quickly it can process speech variables is the key to maintaining the natural sound quality. We are going to replicate the healthy cochlear amplifier in two different ways using SVP.
First, we are going to quickly and accurately measure the input level of the incoming signal. As soon as that signal comes in, it gets measured, and it is specifically determined what that input is. We need to apply the correct amount of amplification in just the right amount of time, at just the right frequencies. The technology is analyzing the input so quickly that every component of speech is going to receive the correct amount of gain. The key, again, with SVP is speed. This is all happening at 20,000 times per second. Every speech component, every signal, every phoneme, whether it be a consonant or a vowel, is going to be getting a snapshot of the correct amount of amplification.
Traditional multi-channel systems are commonly slow-acting systems. They are not fast enough to detect the differences in intensity and then apply the correct amount of gain for each speech sound. They look at inputs in more of a broad response. Because of that, the application of gain is really homogeneous. It does not necessarily get each specific signal of speech. Therefore it is often incorrect, especially for the very soft speech sounds. How often have we had patients who are missing consonant sounds, plurals, /s/ or /t/? The gain application is a homogeneous application. It is not hitting a specific consonant or vowel.
The next aspect of SVP that is a key component is the frequency contrast. Again, a healthy cochlea is going to amplify sound at a natural level, and it is going to distinguish differences across frequencies and preserve them. Therefore, frequency contrast is maintained. What is frequency contrast good for? It is the key to clarity. When we hear patients say, “Things are sounding all muddled. Nothing is crisp. Nothing is clear,” this is because their cochlea is not able to determine or perceive the contrast in sound. Clarity is the key, and the shaping and signature of that sound is what is going to provide that clarity. Frequency contrast in a healthy cochlea tells us the difference between /t/ and /f/. Just like a cochlea, SVP is going to preserve that frequency contrast. We are going to measure and apply gain to the broadband acoustic signal. The nice thing here with the SVP is that the signal is never measured and adjusted in a separate frequency region. It is independent. It is happening consistently. Instead of chunking everything up into little pieces, it is going to analyze and preserve everything.
Think if we had a two-channel instrument. With a traditional multi-channel system, gain is applied in an individual band and then is recombined. Say the patient has a precipitously sloping hearing loss. If we divide the gain into two chunks, we have low and high frequencies. Realistically we understand that the audiogram is plotted, affecting multiple frequencies. SVP provides varying gain at varying frequencies, not in chunks, so as to provide the clarification between your phonemes. It is going to keep and preserve that contrast so that your brain is able to understand what is happening in the letters that make up the sentence that form a meaning. A consequence of applying gain in separate bands is your spectrum can be flat, and that eliminates the contrast. You are getting a wider, homogeneous type of amplification because it is not specified for each frequency.
The final component of the SVP is the precision frequency shaping. In the precision frequency shaping, independent application of gain is applied at any frequency; it is not just within a specified channel. The result here is continuously variable compression ratio across all frequencies. This is going to be a high-fidelity, high-quality, natural sound. I am sure as we have been fitting hearing instruments that we have all noticed that as you manipulate the frequency response, it also affects the compression. That is where you can hear some patient reports of clarity concerns. Because of our belief in natural sound, we go ahead and look at the full picture. We are not just breaking things up into little chunks where the gain is fixed in each channel. We are looking at each input independently.
In conclusion, SVP is going to be an incredibly fast analysis of the input signal. It can accurately detect rapid intensity changes, and it is going to apply the correct amount of gain to each speech sound. Your traditional system is going to be much slower. It cannot accurately detect the intensity differences, and it is going to apply a global amount of gain. Overall, speed gives us better speech understanding.
In frequency contrast, the wideband acoustic signal is measured and gain is applied to the entire signal, not just a segment, and the contrast within the signal is maintained. In traditional systems, the gain is adjusted in chunks of frequency regions, but that does is flattens the speech spectrum because it is not taking a look at the entire signal. The benefit with the frequency contrast here is we get improved speech clarity.
Finally with frequency shaping, gain is not applied within a channel; there is independent application of gain at each and every frequency. There is continuously variable compression ratio across all frequencies because we are not fixed in any channel architecture. Traditional systems result in less-than-optimal sound quality. The benefit with Pep is improved speech clarity. When you put it all together with the SVP, the speed, the frequency contrast, and the frequency shaping, that is where you get a natural sound quality. This is a lot to offer your patients as an entry-level device with just the sound processing alone.
Directionality
Switching gears a little bit, we are going to get into some more features of the device. Pep features a fixed, hypercardioid directional response, in an attempt to reduce sounds coming from the sides and the behind. The benefit here is going to be increased focus on the sounds from the front, typically where our sound source is coming from, relative to 0 degrees azimuth. This is offered in our BTE and in-the-canal-directional (ITCD) models.
Comfort in Noise
Sonic looks at comfort in noise in two different areas: soft noise reduction and adaptive noise reduction. The soft noise reduction uses expansion to manage amplification of the low-level input sounds. The key here is preserving the input of frequencies where speech is dominant. Speech is usually dominant in the 50 to 65 dB range, and the nice thing here is that expansion is going to really give a pleasing sound quality. Listeners are not going to be struggling with the refrigerator running or the air conditioning system, or whatever low-level sounds are difficult. The benefit is that the hearing aid is going to reduce the soft low-level sounds without touching the amplification of the speech signal.
As with the directionality, our comfort-in-noise strategy really goes back to our 4S foundation of speech understanding in noise. We want to make sure that noise, no matter if it is at a party or in the home, is not bothersome. It is a really nice application using the soft noise reduction. The adaptive noise reduction is going to reduce gain only in the frequencies where speech is not present. Here we are preserving speech clarity while providing comfort. It is a very clever system. We have two systems working at the same time to provide comfort in noise. In an entry-level product, that is a lot of value.
Feedback Management
No one likes a hearing aid whistling. At the end of the day, everyone wants to be able to give their family member a hug and not have a hearing aid squealing back at them. The Pep product is definitely going to stop the whistle and squeal. It has a standard adaptive feedback canceller. It is going to listen for the offending signal, detect it, and create the opposite-phase signal to cancel it out. The benefit here is that it is going to cancel feedback without reducing gain. There are still some adaptive cancellers out there that will sacrifice the patient’s overall gain, and this adaptive system’s intent is to not affect your gain. We are going to be able to get more gain, more benefit, more sound for your patient and still be able to stop the whistle and squeal.
Listening Programs
We have three configurable listening programs. If you are fitting our BTE or Power BTE, you also have a fourth memory option which is for your DAI/FM (Direct Audio Input/FM) system. The three configurable programs are universal, telephone, and television. The universal program is what we consider your hands-free program that patients are going to do well in 98 or 99% of the time. It is going to be able to handle things to make sure there is comfort as well as good sound quality for your patient. In the universal and the telephone programs, the adaptive noise reduction is set at medium by default, and in the television program it is turned off. Directionality for the BTE or the ITCD is omni-directional or fixed directional for the universal program. For the in-the-canal (ITC) or completely-in-the-canal (CIC) where the ear is too small to have directional microphones, it uses an omni-directional program. In a Power BTE we have dual omni-directional configuration. The dual-omni configuration is to accommodate the higher output that we need from that power BTE.
The telephone program is an omni-directional configuration. In the television, what you are listening to right in front of you, so you will want to have that omni-directional configuration. One thing to know about the telephone program is that you do have the configurable microphone or telecoil available in the BTE model. Depending on how you order the ITC configuration, you are able to select microphone-telecoil (MT).
Models
I have hinted along the way as to which models are available. Figure 2 shows our feature summary. We have our Power BTE, BTE, the ITCD, ITC and CIC models.
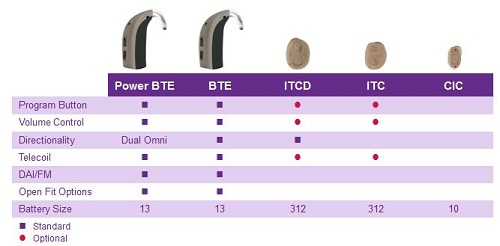
Figure 2. Feature summary for Pep instrument line.
You can see the Power BTE and BTE have a program button and a volume control as a standard feature (Figure 2). That is actually a multi-channel control where you can determine in the programming how you want the hearing instrument to behave based on a longer touch or shorter touch. If you only want a volume or a program button, we give you, as the clinician, the option to configure that. Because of the size constraints on a CIC, that push button is not available. Directionality is available is on BTE and ITCD models. Telecoil is available on all models except the CIC, and is standard on the BTE and Power BTE. DAI/FM is available on the BTE and Power BTE. In Figure 2, you see that both BTEs have ear hooks. There is a thin tube configuration for open fittings also available on these BTE models. The BTES offer a standard size 13 battery. The ITC and ITCD use a size 312, and the CIC uses a size 10.
There are color options available. With the BTE, you have beige, dark brown, black, and grey. One thing to note here is that the inner shell on all four of those BTE products is black. So when it is beige, dark brown or grey, or black for that matter, we are really referencing the top half of the hearing instrument and not the inner part that sits against the back of the ear. With the custom models, we have beige, light brown, medium brown, and dark brown. Anytime you select a brown faceplate, you are going to get a clear shell. The beige faceplate will give you a beige shell, but any of the browns are made with a clear shell material.
Acoustic options for the BTE include the earhook and the thin tube configuration, as I mentioned. If you intend to use the thin tube, there is a thin tube adapter to use instead of the earhook. We offer two sizes for the thin tubes with five different dome options, and you still have the opportunity to have a custom mold made. For those of you who are not aware, our Sonic manufacturing facility in Minnesota manufactures custom molds. Not only can you get your hearing instrument from us, but you can also receive your ear mold, whether it is for standard tubing or a thin tube configuration.
Having two different options for tubing offers further flexibility. We want to make sure, as an organization, that we are giving you all the tools you need to have a successful fitting. We feel that offering these two different sizes of tubing is part of that commitment to you. The 0.9 mm is the standard size thin tubing out there. The nice thing is that it is incredibly discrete. It is very difficult to see in the ear, it fits nice and snug to the ear, and fits deep into the ear canal. We do also offer a larger 1.3 mm size, which we have started seeing in more and more fittings. The nice thing about this size is that you are going to be able to get a little bit more gain in the lows and the mids. Perhaps you have a patient that is on the border of needing a standard size 13 tubing. They really just need more gain, but they are just absolutely turned off by the concept of having an ear mold or a 13 tube. The 1.3 mm is going to be a nice transitional option to encourage them to use the amplification. They do not necessarily have to go from nothing into an ear hook with a big 13 tube.
Say you sell Pep today for your patient and they are wearing a 0.9 mm, but a year and a half from now they have some further hearing loss in the lows. The 1.3 mm tubing is going to be a nice alternative to keep them within that slim-tube product, while still being able to meet their amplification needs. It is a nice, flexible option.
The domes include the open dome, which is available in extra small, small, and medium, the one-size tulip dome, and then the power dome which is available in extra small, small, and medium. The new domes that we are offering with Pep are the dome with the small vent and the large vent. These are available in three sizes each: small, medium, and large. You can really think of them as a kind of cross between the tulip and the power dome. The small vent, small in terms of size of the dome, is going to be able to provide just a little bit of release of any kind of occlusion issues. Say the patient that you are fitting needs a lot of gain and a power dome, but within that fitting the patient is struggling with occlusion. By moving them to either the small vent or large vent dome, you are still able to preserve a lot of that gain, but offer a little bit of release from occlusion. It is a nice option, and we are excited to release it for this product.
The fitting ranges are illustrated in Figure 3. You can see the Power BTE goes out to 100 dB HL, and the standard BTE goes from 85 dB HL in the lows and out to 100 dB HL in the highs. The ITC and ITCD have a maximum fitting range out to 75 dB HL across all frequencies, and the CIC is stated as 70 dB HL.
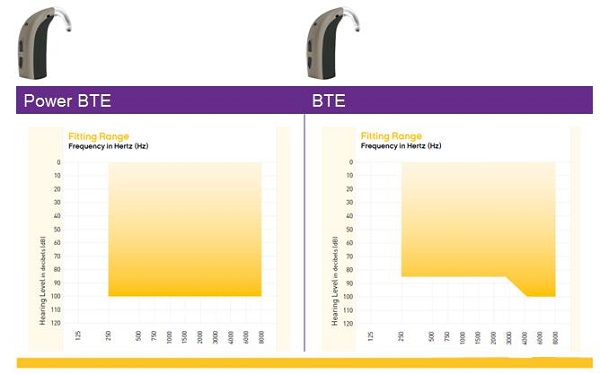
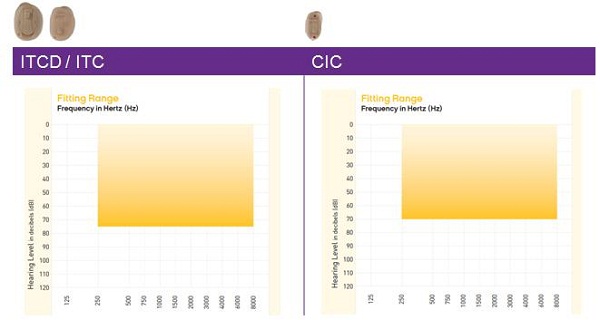
Figure 3. Fitting ranges for Pep hearing instruments.
Even with an entry-level product, Pep is a feature-rich product. Again, SVP is standard in all of the models. Frequency bandwidth goes out to 8 kHz in all models. You have adaptive noise reduction, the soft noise reduction, and the adaptive feedback canceller in all of the models that we are offering. You have directionality in all products but the ITC and CIC. There is a universal program option in every model. You have three program memories in all models except for the CIC because there is no push button to change programs. There are technically four program options in your Power BTE and standard BTE, and then your ITC, ITCD, and CIC have three different programs to choose from to really give your patients the best bang for their buck. It really is a feature-rich, entry-level product.
Programming
To program Pep you will need EXPRESSfit 2012.1 or later. You can program through HI-PRO, NoahLink, or EXPRESSlink3. With any of those products, you will be using the #2 programming cables that you can receive from our Sonic customer service team. For the BTEs you will need to have a programming adapter. It looks like a boot. For the custom products, you are going to need two different options, depending on which custom product you are working with. The ITCD will have a flex strip that has a programming pill built in. The ITC and the CIC will require a flex strip. It is important to note that it is not the same flex strip used with our Sonic Legacy products. If you have a flex strip that was used for our Sonic Velocity 24 customs, that flex strip will not be used with the Pep 20 ITC. It is a different flex strip. All of these programming supplies you can get through our customer service team.
For a BTE, you will need to connect the programming adapter, which is very easy. You open the battery door and slide the programming adapter into the slot until it lines up with the instrument, then you close the battery door. An important thing to know for programming any of the Pep products that are going to need a battery, which would be the ITC, CIC, and BTE, is that it is imperative to have a fresh battery. The best thing to do is to pull the tab off a battery. If it is mercury-free battery, you will want to give it a little extra time to power up before putting the battery in.
With the ITCD, you can use a flex strip with the battery pill. You will insert the battery pill with the red indicator pointing to the plus sign (Figure 4). Close the battery door and go ahead at the bottom where you would expect to plug in the cable, the cable just plugs right in. The device will then power up once connected to the cable and you will be good to go.
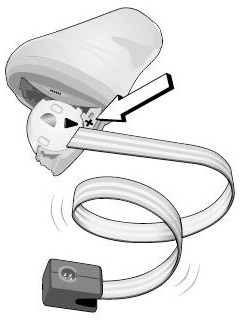
Figure 4. Flex strip with battery pill for ITCD.
With the ITC and CIC, you want to use a fresh battery. You will open the battery door slightly with the black dot on the strip facing up or facing away from the battery would sit. Insert the flex strip into this space between the door and the hinge until the black dot touches the face plate (Figure 5). It looks similar to our old flex strip, but there is a different contact configuration. Close the battery door, and you are good to go.
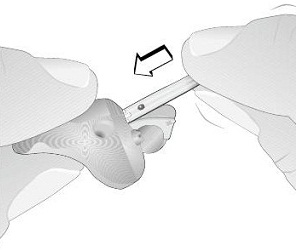
Figure 5. Flex strip for ITC and CIC.
First Fit
We at Sonic feel that success with the hearing instrument largely depends on the time you have for counseling. If you use our First Fit protocol, you will have more time with your patient to truly ensure success from the get-go. Our First Fit should not take more than 10 minutes. If you schedule an hour for your first fit with your patient, that leaves you with 50 minutes of counseling. We really feel that that is what is important. We have made a commitment that our software is something you will be able to navigate easily and intuitively. This again goes back to our 4S foundation in simplicity in everything we do. We want to make things simple for you to be able to counsel and more spend time with your patient.
In my opinion, our software is pretty stylish, which is our final 4S of the day. It is very clean and clear. It is broken down into just a few steps. Step 1 is simply to detect the instrument. You can see in Figure 6 that there is a detect button in the lower left-hand corner, presuming that you have hearing instruments connected. As you can see, we have EXPRESSLink3 as the set programmer. If you are using NoahLink or HI-PRO, you can click on the little arrow to the right of detect and change your programming interface. Then it will automatically detect the instrument.
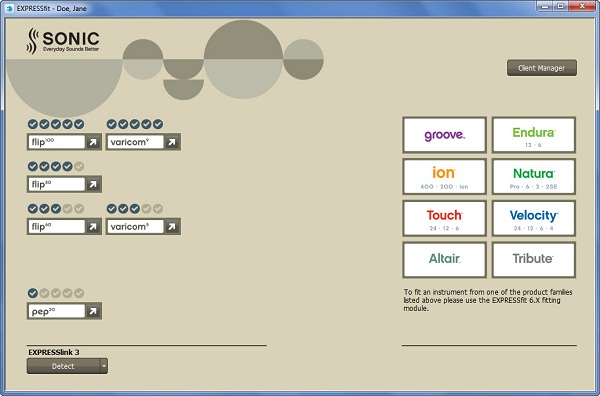
Figure 6. Screen shot to detect instruments in EXPRESSfit 2012 software.
Step 2 is to verify the acoustics. You can see in Figure 7 that there are different acoustic selections. For today’s purposes, we are simulating a Pep BTE model. The configuration is based on the hearing loss. For this loss, we have the adult dampened ear hook with standard 13 tubing and open venting. You can see the little red or blue bull’s eyes next to the choices. That is what is recommended based on the patient’s audiogram. This is a nice feature if you are not sure which tubing or what venting you should be using; the software can help you make that selection. If you want, you can definitely go ahead and change what recommendation is provided.
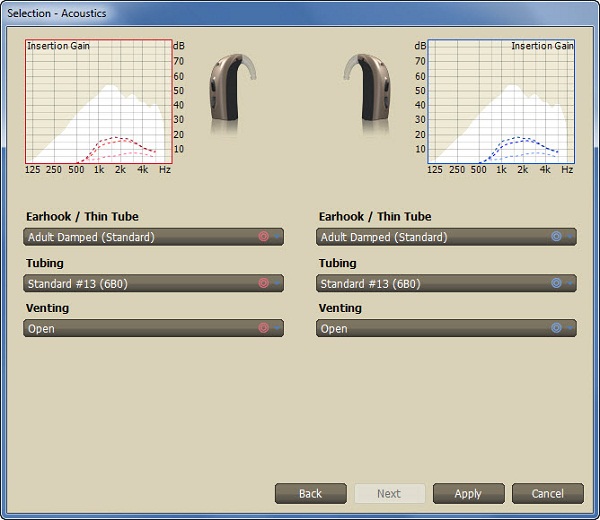
Figure 7. Acoustics screen in EXPRESSfit 2012 software.
The one thing that I want to point out is the graph at the top (Figure 7) shows the patient’s insertion gain in relation to the selected device. You can see there is a grey shaded region and a white region. The goal is to have your insertion gain in the white region. If you are outside of that and into the grey area, you are going to want to think about changing your acoustics. Maybe it would be changing from a 0.9 to a 1.3 mm tubing, or if you are fitting a CIC you can go ahead and possibly counsel them into a ITCD or even a BTE. The other thing on this screen is that you want to ensure that the acoustics on the device physically match the acoustics that are programmed here in the software. You always want to make sure that all matches up.
Step 3 is to verify client info (Figure 8). The gender and date of birth will pull in if you have entered that information into Noah. If you have not, you are going to make sure you enter than information manually. By selecting female, it is going set up a little less overall gain based on research we have done that tells us that women like their hearing instruments about 3 dB less than a male fitting at the first fit. So gender is something important to consider, as well as the age group. You can see that 18-70 is a pretty wide span, but it is important to select the correct age group to make sure the processing is correct for your patient.
You can also select the patient’s experience level. For this particular patient, we selected new user (Figure 8). The recommend fitting rationale is our proprietary algorithm Best Fit Fast. If you do have RECD or REUG values, you can go ahead and enter them right in this screen (Figure 8).
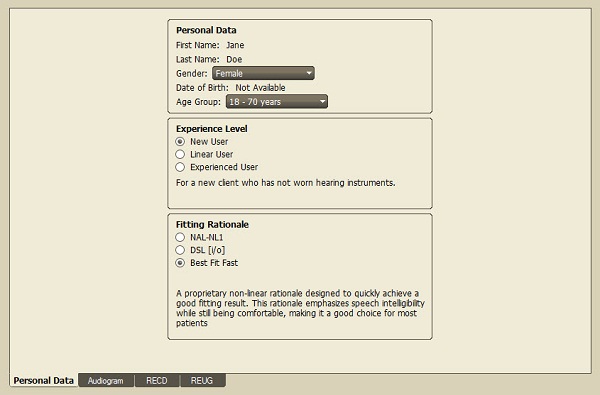
Figure 8. Personal data and client information screen in EXPRESSfit 2012 software.
Step 4 is to manage the programs. You are able to adjust the programs as you need. With the Pep product, you have up to three memories available. One thing to note, however, is that the universal program is only accessible in P1. You cannot have universal P1, P2, and P3. Universal is only available in that first position. You could possibly give your patient a television program in P1, but you would not have access to the universal program in the other positions. You can adjust the features of each program on the Features tab (Figure 9). For example, in the telephone program, you can see it is in MT. If you wanted to adjust that and mix in the telephone program or maybe adjust the noise reduction in the universal program, you would access that through the Features tab.
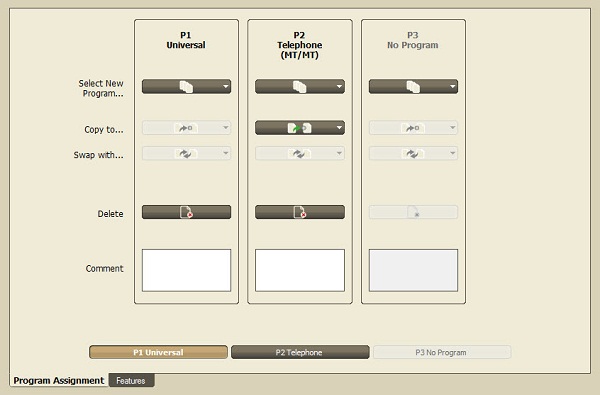
Figure 9. Program assignment screen in EXPRESSfit 2012 software.
Now for our famous paper crinkle test. If you have not done this, I strongly encourage you to start doing this in your practice. It is successful. We have seen wonderful fittings by using the paper crinkle test. The first thing you want to do is go into the Simplified screen in the software (Figure 10), because adjustments are easier in that screen for the paper crinkle test. The next thing you do is to make sure that the link button is selected, so that both the right and the left ear are linked together. Finally you want to make sure that the chain icon is also connected so that when you make an adjustment in program 1, it will carry through to your other programs.
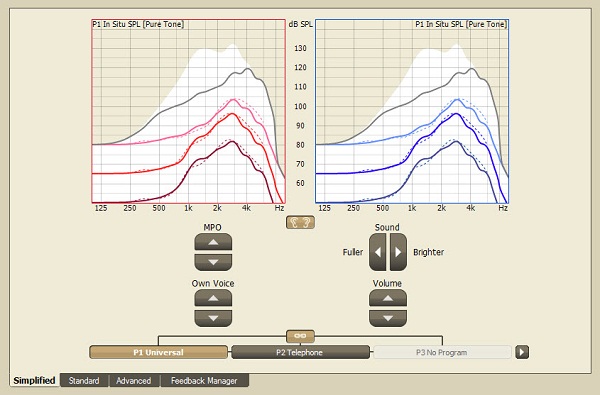
Figure 10. Simplified fitting screen in EXPRESSfit 2012 software.
The steps for the paper crinkle are easy. You are going to hand the patient a piece of paper and ask them to crinkle it. It does not matter if it is newspaper, copy paper or card stock. We just want them to be able to feel it and crinkle it. You will then ask the patient if it sounds like paper, plastic or foil. If it sounds like paper, you are going to hit the volume up button, which will increase the overall volume by 2 dB in this Simplified screen. You will repeat this process, crinkling the paper and asking if it sounds like paper, plastic, or foil until the patient responds that it does not sound like paper anymore, or a maximum of four increases, which would be 8 dB total. As soon as the patient says it does not sound like paper, you then hit the down button one step. The goal is that the optimal gain, the highest level of gain, is where paper still sounds like paper. This will set the patient’s expectation and the correct amount of gain right from the get-go. If you have not been doing this paper crinkle test and you want more information about it, please call our audiology services team. We have seen incredibly successful fittings following this simple step.
Step 7 is to measure the feedback, which is located at the bottom in the Feedback Manager tab (Figure 11). It is very simple. You will follow the on-screen instructions, and you hit the measure button.
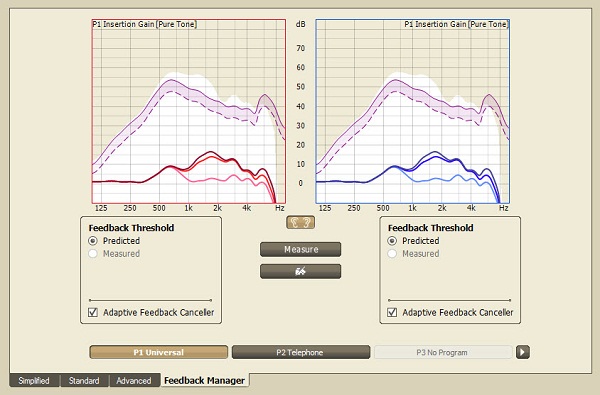
Figure 11. Feedback Measurement in EXPRESSfit 2012 software.
Step 8 is to finish the session. There are different options on the tabs at the bottom (Figure 12). There is an Options tab, Audible Indicators, and then Save and Quit. You can configure the controls as needed. If you want to demonstrate the Audible Indicators for your patient, you are welcome to. A nice feature is the Session Comment, where you can type any comments that you would like to save and reference at a later date. Then you go ahead and save, and leave EXPRESSfit.
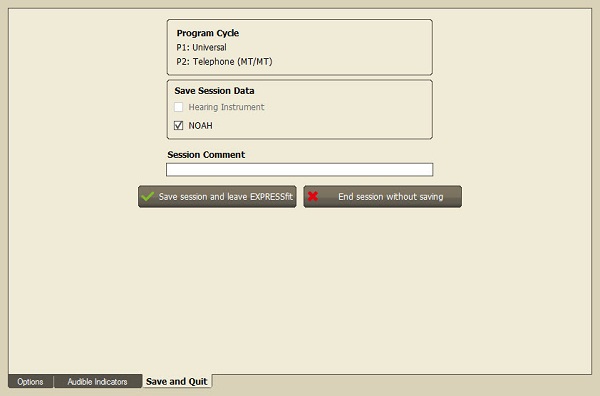
Figure 12. Save and Quit tab in EXPRESSfit 2012 software.
The purpose of the Save and Close is to save to your database. Whether you are using a standalone or a Noah version, you always want to save to your database. If for some reason you disconnect during programming and your patient leaves and you later realize you have not saved, there is no reason to panic. When the patient comes back in, you can read all settings in their hearing instrument. But it is important to save all that content in your database in case something happens to the instrument or it has to be repaired and the settings cannot be retrieved.
Conclusion
Thank you all for taking the time to learn about our new entry-level product, Pep. We are excited about this product and feel that is going to offer your patients an excellent introduction to hearing instruments. We want to add a little Pep into their step, as well as to yours. If you have any questions about this product, I would strongly encourage you to contact our customer care team at 888-423-7834. Whether it is someone in customer service, inside sales, or audiology support, we are all really excited about this product and will be able to answer your questions for you.
Cite this content as:
Reichert, E. (2013, January). Step up with Pep - An introduction to Sonic's entry-level product. AudiologyOnline, Article #11546. Retrieved from https://www.audiologyonline.com.