
Question
Can verification techniques be used to tell whether an open fitting is truly open?
Answer
Yes, verification techniques can help determine whether or not a given hearing instrument and its associated coupling occludes the ear or not. For this evaluation, there are a couple of options. The first option involves the use of probe microphone equipment and Audioscan's Speechmap® screen to compare the patient’s real-ear unaided response (REUR) to the real-ear occluded response (REOR). The second option is to use Audioscan’s Occlusion Effect Test. Here is a description of each of these procedures step-by-step.
REUR-REOR Test
Whenever you use a probe microphone, it's important to ensure that the probe tube is correctly inserted into the patient's ear canal. More information on proper probe tube placement can be found in this video.
Once the probe tube has been properly inserted into your patient's ear canal, select the Speechmap test in the On-ear menu of the Verifit's main test selection menu (Figure 1).
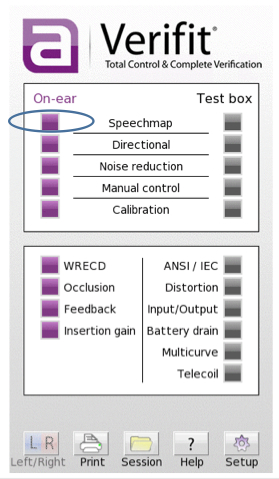
Figure 1. Select Speechmap in Verifit’s test selection menu.
(NOTE: This choice is available using any Audioscan device.) This selection brings you to the Speechmap screen. Make sure that the ear, left or right, matches the probe microphone you wish to use. Then, press the play button for Test 1, which is identified in Figure 2 by the red arrow.
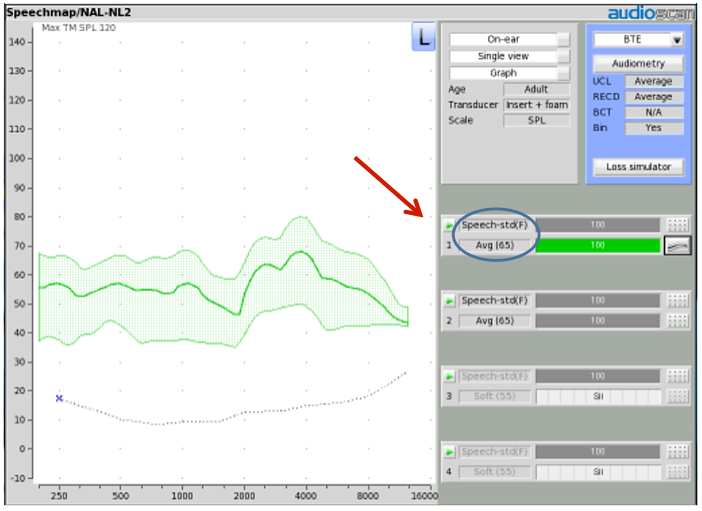
Figure 2. REUR: On-ear result obtained when only the probe tube is in the ear canal.
Make sure your stimulus type is a calibrated signal such as Speech Standard (F) or Speech Standard (1), and that the level you have selected is 65 dB. Then, press the record button. This will execute a recording of the long-term average of the speech energy present in the ear canal. Upon completion of this measurement, the resulting green-shaded area that appears on the SPL-o-gram(as seen here in Figure 2) represents the speech energy present in the ear canal when nothing else is in the ear canal other than the probe tube. In other words, this is a broad-spectrum representation of your patient's real-ear unaided response, or REUR.
Next, place the hearing instrument and its associated coupling (dome or ear mold) into the patient's ear canal along with the probe tube that's already there. Make sure not to push the probe tube in further than your previous measurement. Either mute the hearing instrument or turn it off. In Figure 3, the hearing instrument being measured is a RIC device with an open dome attached to the receiver that has been placed in the ear canal alongside the probe tube. Using the same stimulus type and level used in Test 1, press the record button for Test 2 to obtain a second recording of the long-term average of speech energy in the ear canal under this new test condition. The result of this measurement will appear as a pink-shaded area on your SPL-o-gram. This is a representation of the patient's real-ear occluded response, or REOR, when the aid plus coupling device is present in the ear canal and turned off.
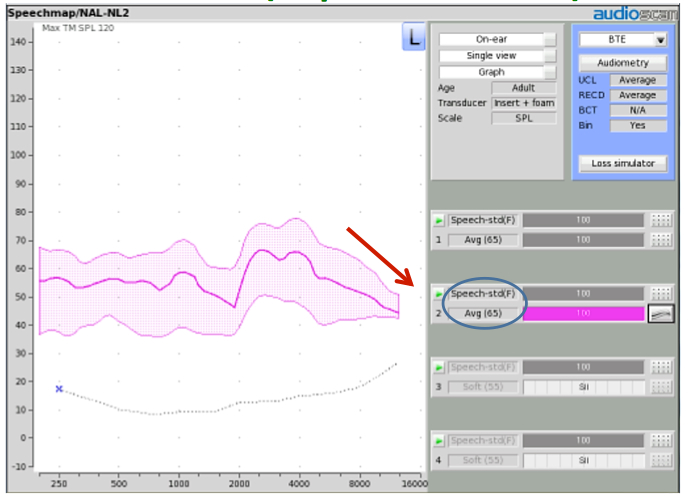
Figure 3. REOR (open dome): On-Ear result obtained when the probe tube and a muted open-dome RIC instrument is in the ear canal.
You can use the hide-show icons associated with each of the tests to display both test results on the SPL-o-gram at the same time, as can be seen in Figure 4. If the two results are virtually identical, as is the case in this example, then you have confirmed that the fitting is indeed open. In this case, the physical presence of the hearing instrument and open dome has not changed the unoccluded acoustic properties of the patient's ear canal.
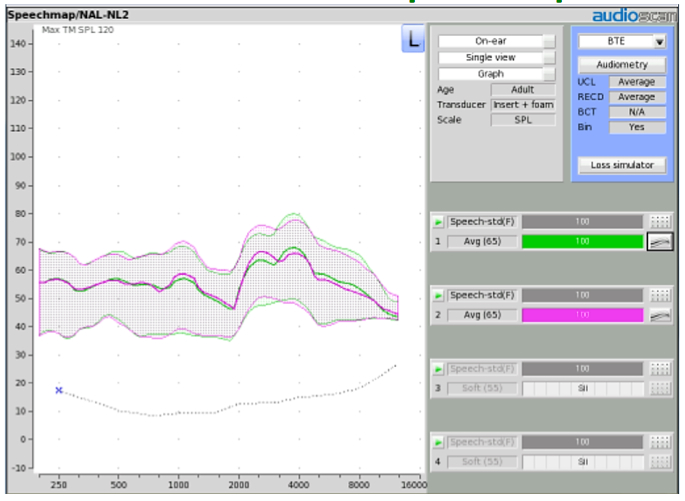
Figure 4. REUR and REOR superimposed – open fitting: Note that the two measurements are virtually identical, indicating that this is indeed an open fitting.
In Figure 5, the same RIC product was used, but with a single-wall closed dome attached to the receiver instead of an open dome. The REUR was measured as described previously, and as can be seen in this result, the long-term averaged speech energy reaching the probe tube with the hearing aid in place and turned off has been modified.
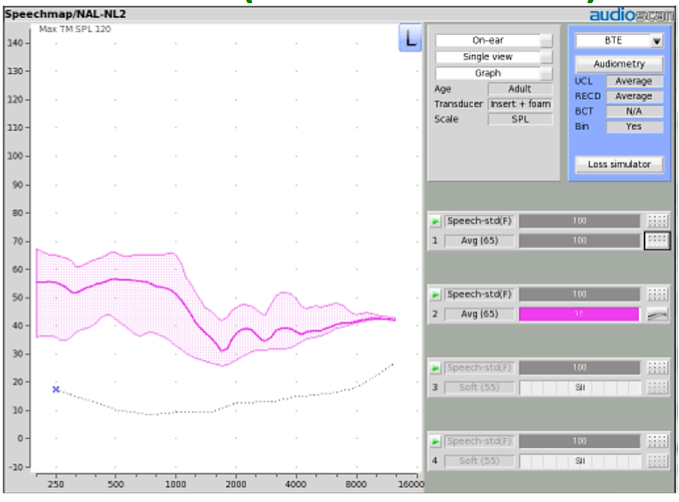
Figure 5. REOR (closed dome): On-ear result obtained when the probe tube and a muted RIC instrument is in the ear canal.
This change is particularly evident when superimposing the REUR and this second REOR on the screen (Figure 6). The low frequency energy below 1000 Hz is reaching the probe tip virtually unaltered, but the high frequency energy is significantly less intense in the new REOR condition. This, at a minimum, is due to the loss of ear canal resonance created by the presence of a more occluded tip. The result also reflects the occlusion of the ear canal caused by the closed dome, which attenuates some amount of high frequency energy traveling directly down the ear canal to the probe tube tip. This result indicates that this is not an open fitting.
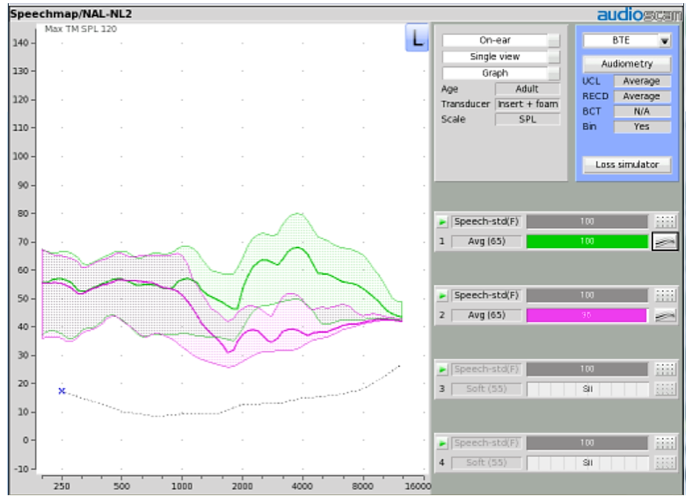
Figure 6. REUR and REOR superimposed – closed fitting. The two measurements are not identical, indicating that the presence of the hearing instrument/plumbing changes the ear acoustics.
In this next example, a double-walled power dome was attached to the RIC device prior to measuring the REOR. Further reduction of the speech energy reaching the probe tube is evident (Figure 7, pink response), and this further reduction becomes even more obvious when this REOR is superimposed with the REUR (Figure 7, green response). Energy across virtually the entire spectrum is being suppressed at the probe tube tip due to this much more occluded ear canal condition. Once again, this verification test confirms that this is not an open fitting. Such a result is also likely to be obtained when conducting this test using a micro-mold, of course, with the vent plugged.
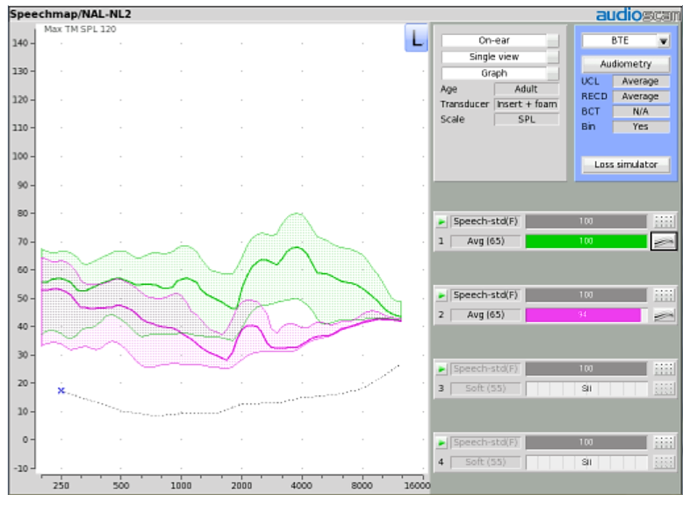
Figure 7. REUR and REOR superimposed – double-wall power dome. Note the significant difference between the two measures when this magnitude of occlusion is present.
Test results such as these can and do vary. For example, sometimes the perimeter of a closed dome doesn't seal the ear canal all the way around, creating some venting during this test that would modify the result obtained. Sometimes, the thinness of the dome material easily allows sound energy to pass through it, creating more of an open result than you might expect, even with a reasonable perimeter seal. There have even been some cases observed where an open dome REOR shows clear evidence that it is occluding the ear canal.
Therefore, you cannot assume that a fitting is open or closed simply based on your dome or tip choice. Rather, you must determine what is actually happening in the ear canal of your patient. A verification procedure, such as this REUR-REOR test, can be very informative. The bottom line is this: If there is no difference between the REUR and REOR, then by definition, it is an open fitting.
Occlusion Effect Test
Another method for determining whether or not the instrument and coupling you intend to use delivers an open fit condition is to use the Occlusion Effect Test, also available with Audioscan instrumentation.
The Occlusion Effect Test is located in the Verifit On-ear menu (Figure 8, left). When this test is selected, it opens up the Occlusion Effect test screen (Figure 8, right).
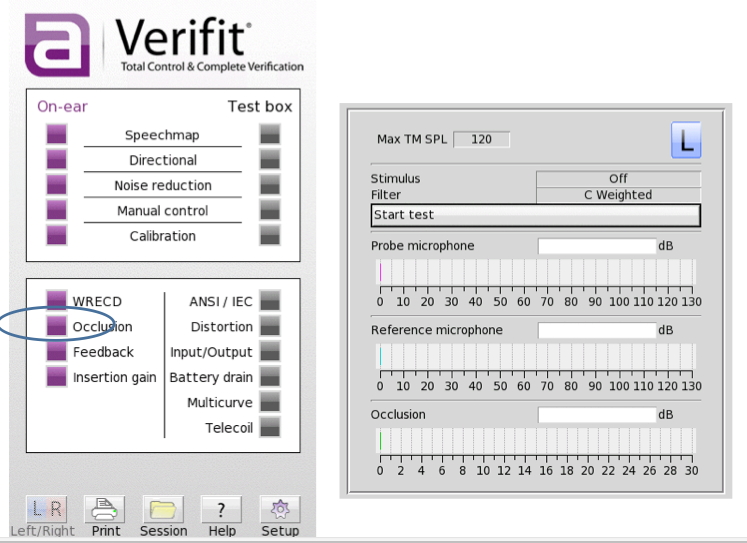
Figure 8. Selecting the Occlusion Effect Test.
There are three sound level meter scales displayed on this screen. The top scale is associated with the sound pressure that reached the probe microphone of the probe assembly being used; the middle scale is associated with the sound pressure that reached the reference microphone of the probe assembly being used; and the lower scale is used to display the difference between the levels measured in the first two scales.
To conduct the Occlusion Effect Test, insert the probe tube into the ear canal, followed by the hearing aid, which should be muted or turned off to create the REOR condition described previously. Then, click the ‘Start Test’ bar, which will then turn into a ‘Stop Test’ bar. This activity will activate the probe and reference microphones. Then, ask your patient to vocalize the sound “eeeee” at a moderate level vocal effort. As your patient creates this input condition, the sound pressure that is reaching each of the measurement microphones is simultaneously being recorded, and the difference between these two measurements is being displayed on the bottom scale. Once you press on the stop test bar, this measurement data will be captured.
Figure 9 shows the Occlusion Effect Test result obtained when an open-dome RIC device is in the ear and turned off. Notice that because the hearing instrument and open dome did nothing to change the acoustic properties of the ear canal, the SPL reaching the probe mic (pink bar), and the SPL reaching the reference mic (blue bar), are essentially the same. This is because the bone conducted energy of that vocal utterance is easily escaping from this non-occluded ear canal. This results in a very small difference bar on the bottom scale. Since there's little difference, there is no occlusion, and the difference bar is colored green. A green result indicates the fitting is open.

Figure 9. Occlusion Effect Test: Open dome.
Figure 10 shows the same test using a closed-dome condition. Because of this more closed canal condition, some of the bone-conducted energy of the vocal utterance is unable to escape from the ear canal, which results in more SPL reaching the probe microphone than the reference microphone. The difference in this example is approximately +10 dB, which causes the difference bar to be colored yellow to caution the fitter that there is likely an occlusion effect. A yellow result indicates that it is not an open fitting.
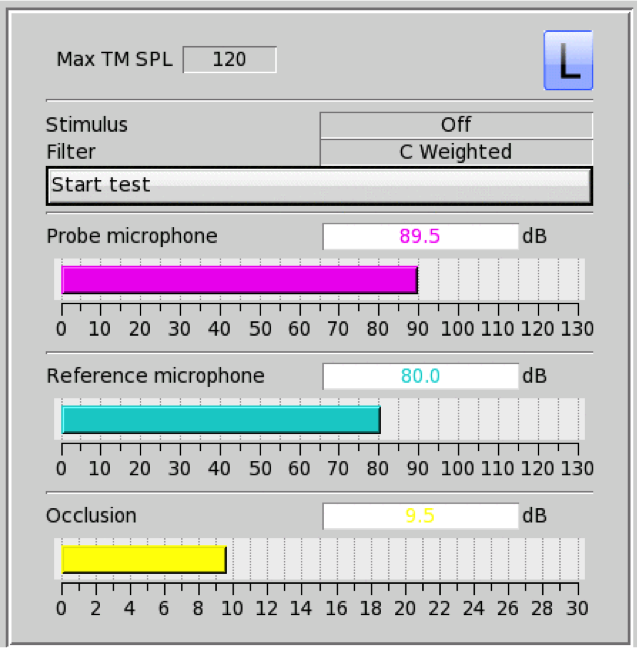
Figure 10. Occlusion Effect Test: Closed dome.
The next example shows the Occlusion Effect Test results of a fitting using a power dome. In this case, there is a difference measure of +14 dB, and the difference bar is colored red. This indicates that there is indeed an occluded ear canal. A red result means that the fitting is not open.
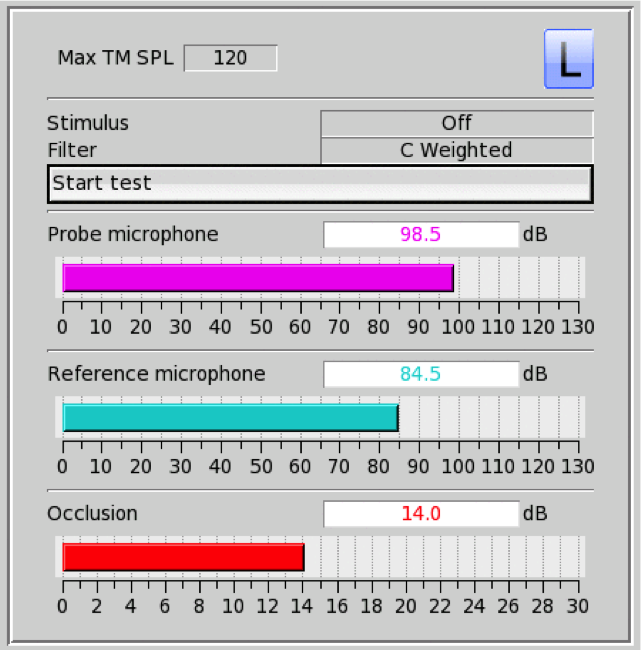
Figure 11. Occlusion Effect Test: Power dome.
In summary, if the Occlusion Effect Test yields a green difference bar, then you have an open fitting; if the result is either red or yellow, it is not an open fitting. Although the Occlusion Effect Test does not provide the frequency-specific indications of occlusion that the REUR-REOR test provides, it is a relatively quick and effective way to determine the potential presence of occlusion, and thus the potential openness of the fitting.
For more information on verifying open fittings, view the Audioscan CEU course, On Ear Verification of Open Fittings. Learn more about Audioscan on the Audioscan Expo Page on AudiologyOnline.
Continued and its subsidiaries provide professional education authored by qualified Subject Matter Experts for continuing education purposes. These materials are intended for educational purposes and do not constitute medical advice or a substitute for individual clinical judgment. Continued is not a clinical healthcare provider; the licensed professional is solely responsible for ensuring that the application of any techniques or information presented is within their legal scope of practice and jurisdictional requirements.