Question
Can you review the steps for verifying an open fitting using real-ear measurements in Verifit2?
Answer
To verify an open fitting with real-ear measurements using the Verifit 2, we recommended recording the real-ear aided response (REAR) within Speechmap®.
To do this, select the Speechmap option in the On-ear section of the test selection menu. (This choice is available in all Audioscan devices.)
Next enter your patient's HL audiogram by clicking on the “Audiometry” button on the Speechmap screen. In this example, we’ll be conducting an open-fit verification of the left ear for a patient with the HL audiogram shown in Figure 1.
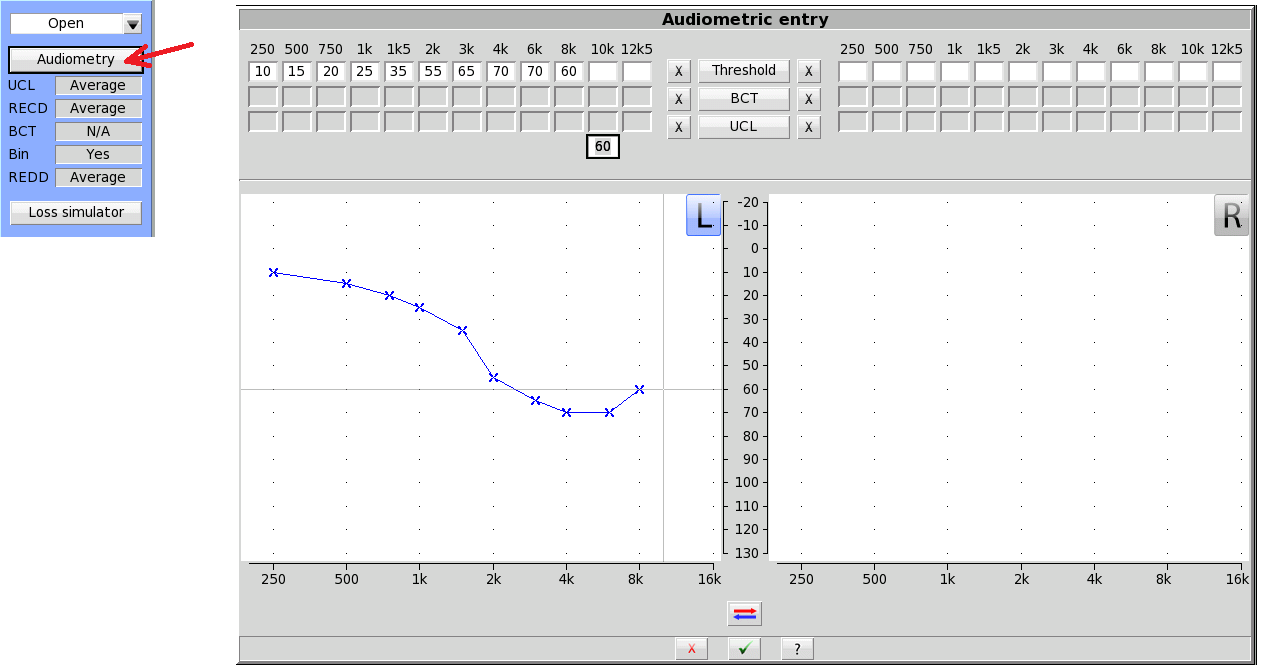
Figure 1. Verifying aided performance on-ear: Entering the dB HL audiogram into Speechmap.
Once the HL audiogram is entered, you will next see the SPL version of this audiogram on the Speechmap screen (Figure 2).
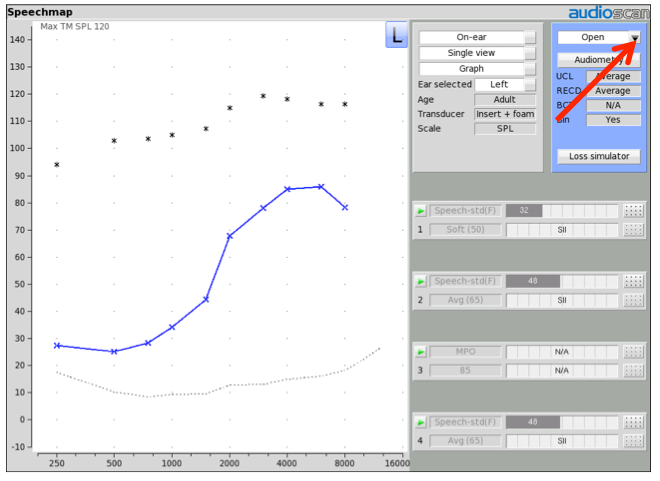
Figure 2. Verifying aided performance on-ear: Speechmap screen.
Once you see the SPL audiogram on the Speechmap screen, be sure to select “Open” in the “Instrument” pull-down menu (identified in Figure 2 with a red arrow.) This choice of instrument is important, as choosing “Open” uniquely reconfigures the subsequent testing sequence.
Next, position the patient and equipment using standard manufacturer recommendations. For instance, choose a quiet location and position the sound field speaker away from reflective surfaces. Place your patient directly in front of and facing the verification system sound-field speaker at a distance of ~ 45 – 90 cm (~18 to 36 inches) and insert the probe tube into the patient’s ear canal within approximately 3 - 5 mm of the eardrum using recommended techniques.
Once the probe tube is positioned, place the hearing instrument on your patient's ear, making sure to mute the hearing instrument or turn it off.
Because you have selected “Open” in the instrument menu, when you select the “Play” button to start a Speechmap test, you will be prompted to conduct a separate sound field “equalization” procedure (Figure 3). This equalization step is to be completed with the hearing instrument muted. Once the equalization is completed, the hearing aid must be unmuted prior to continuing the test.
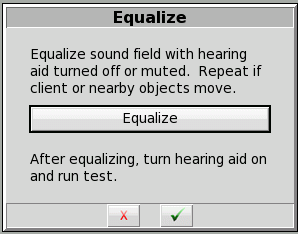
Figure 3. Equalize poster.
(NOTE: The disadvantage of this stored equalization procedure is that the equipment cannot modify stimulus level or spectrum on an ongoing basis to account for any changes in the sound field around the patient. If the patient moves, or other changes in the immediate area around the ear happen, the equalization process must be repeated. When the open instrument type is selected, all running Speechmap tests will feature an EQ button, which allows the user to interrupt the test, temporarily, mute the hearing instrument, and store a new equalization. After this is completed, the test will continue as before. Remember that this EQ button is only visible while the test is running.)
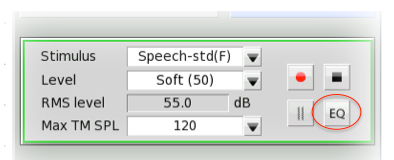
Figure 4. Re-equalizing sound field button.
Once the equalization step has been completed, you can collect and store the following sequence of REAR’s.
Run Test 1: Calibrated Soft Speech
Select 50-55 dB as the speech input level. Using one of the calibrated input stimulus options (e.g., Speech-std(F)), adjust the gain of the hearing instrument until the green thick line aligns with the target dots as shown in Figure 5. Then hit the record button to secure the long term average aided result. In this example, the gain has been adjusted so that the thick green line is meeting the target for soft speech.
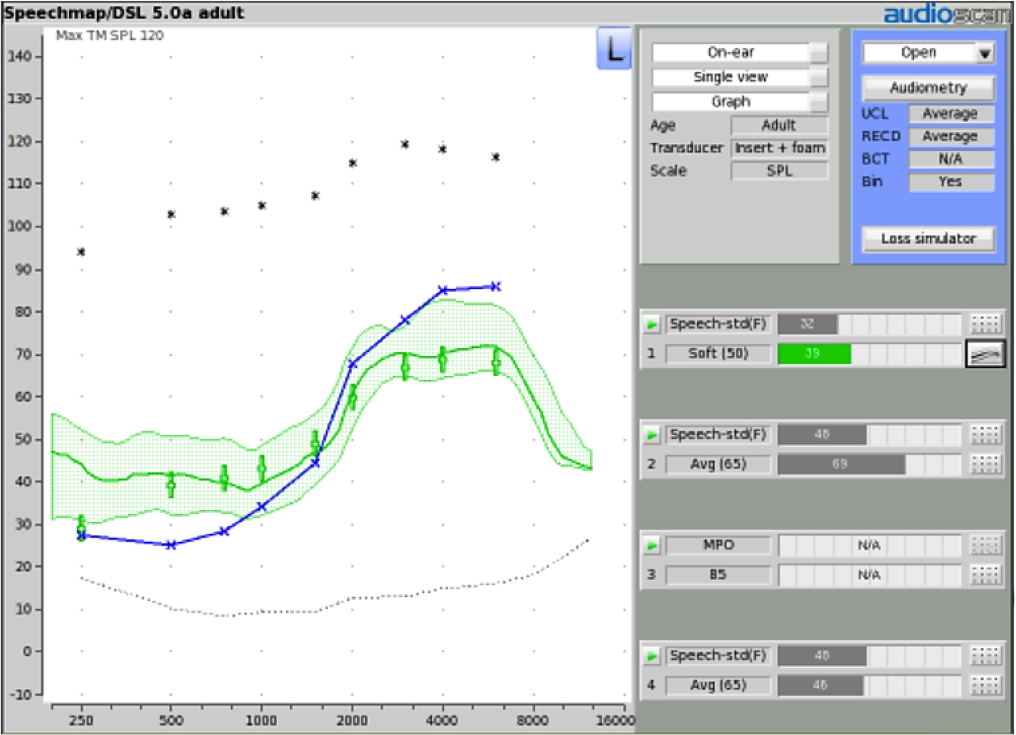
Figure 5. Test 1: Calibrated soft speech.
Run Test 2: Calibrated Average Speech
Next, click on the Play button for Test 2, and change the stimulus level to 65 dB using the same calibrated stimulus that you used in Test 1. You can immediately hit the record button of Test 2 to capture the long term average as shown in Figure 6. With the gain settings programmed into the instrument during Test 1, you now want to ensure that the thick pink line of Test 2 is also hitting the target dots for this input level across the widest frequency range possible. If not, you would need to adjust the hearing aid gain settings specific to this input condition.
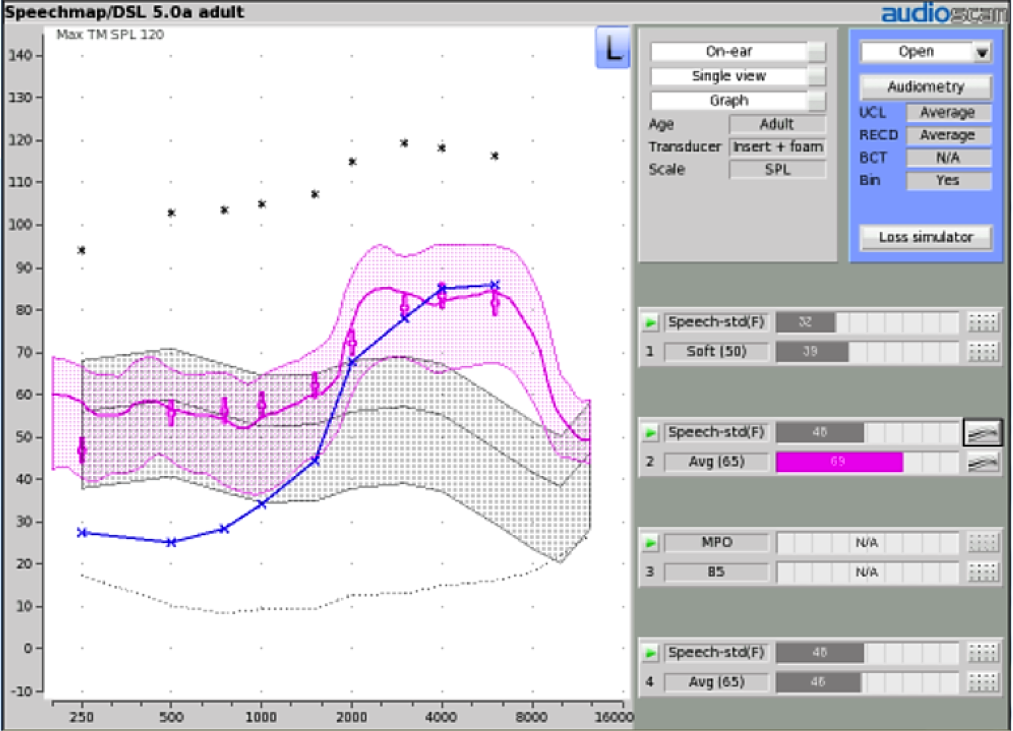
Figure 6. Test 2: Calibrated average speech.
In this example, the hide-show buttons or icons associated with Test 2 have been configured to display both the aided and unaided speech bananas for 65 dB speech. A comparison of these two curves clearly depicts what the hearing instrument has done to change the audibility of average conversational speech. A lot more high frequency energy is above threshold in the aided condition compared to the unaided condition. In addition, there is clear evidence that the aided sound level in the lower frequencies is the same as the unaided sound level. This indicates that the hearing aid is not delivering gain in the lower frequencies, as expected in an open-fit condition. The final element to consider on this Speechmap screen is the unaided versus aided speech intelligibility index (SII) scores for this input level. You can see those scores represented on the right hand side of the Speechmap screen in Figure 6. In the aided condition, the SII is 69; in the unaided condition, the SII is 45.
Run Test 3: MPO
Next click on the Play button for test 3 and change the stimulus type to MPO (maximum power output). When conducted on ear, the MPO signal consists of a single sweep of short-duration pure tone beeps, one-third octave apart, presented at 85 dB SPL. Through adjustment of the MPO settings within the hearing aid's fitting software, make sure that the blue line that is displayed on the Speechmap screen is close to, but does not exceed, the UCL (uncomfortable level) targets which are indicated as asterisks (Figure 7). If you select the DSL fitting rule, it provides target dots for MPO. In that case, make sure that the blue line approximates the targets without exceeding them. Given the signal levels used in this test, it is advisable to counsel the patient regarding the upcoming presentation of loud sounds and ask them to indicate if any signal becomes too loud. You can also pre-set the MaxTM SPL value in the stimulus window to a level that is at or below the patient’s plotted UCL values. This feature will stop the test should the measured level at the eardrum exceed the selected value.
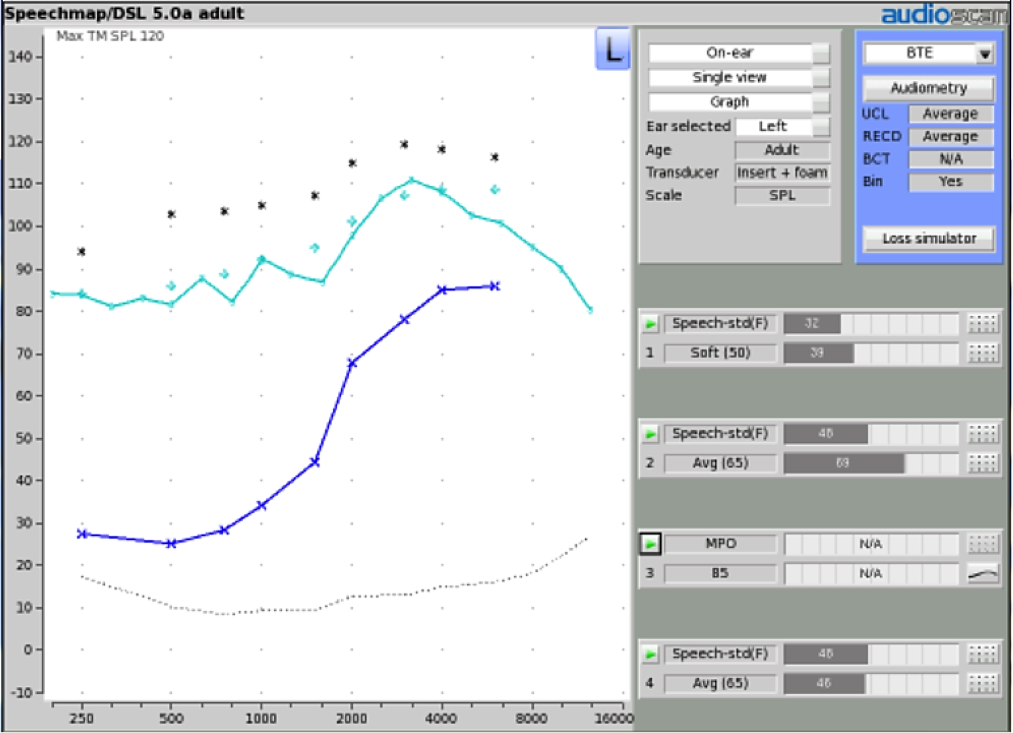
Figure 7. Test 3: MPO.
Optional Steps
You can collect an REAR for Loud Speech in Test 4 and can adjust the gain settings to approximate the targets generated for this input level, as was done for other speech inputs. Alternatively, you could collect a real ear unaided response (REUR) in Test 4. To do this, you simply record a long term average result for 65 dB speech input with only the probe tube in the ear canal. The resulting REUR can be used instead of the gray shaded image to represent the unaided ear canal condition for that ear. As an example, the REUR in Figure 8 (the gold shaded area) looks a lot like the gray shaded area, with the only exception being the ear canal resonance peaks in the actual REUR.
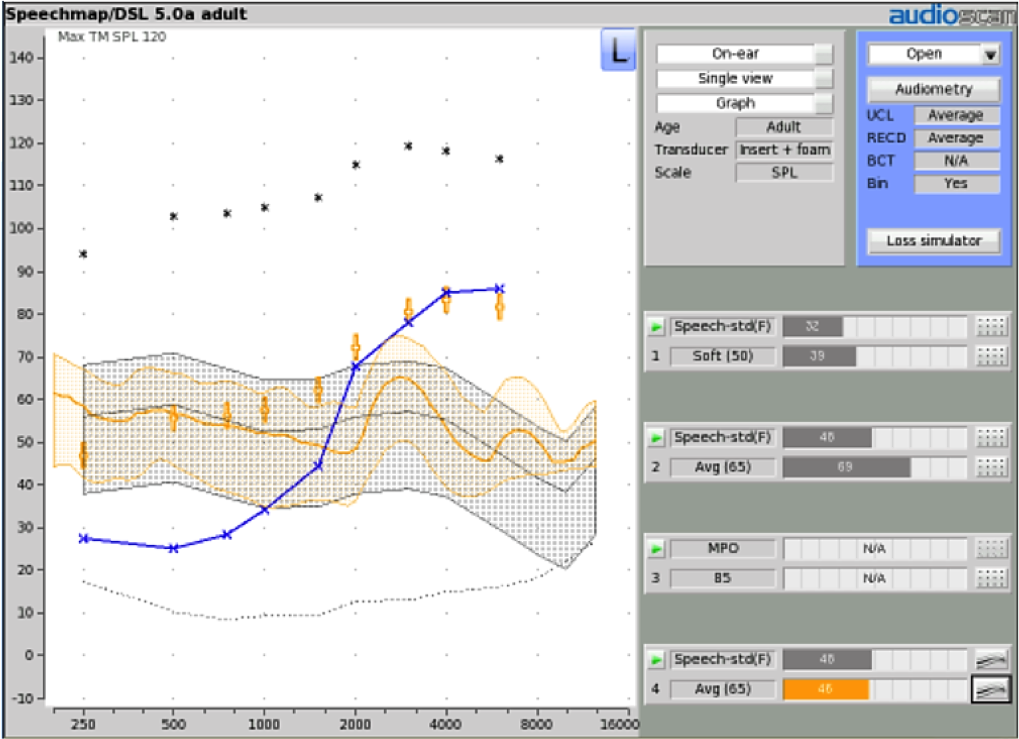
Figure 8. Optional: Run REUR in Test 4.
Comparing this unaided eardrum SPL response to the aided eardrum SPL response obtained in Test 2 for the same input stimulus and level condition may offer an even more understandable demonstration of what the hearing aid has done to improve speech audibility (Figure 9).
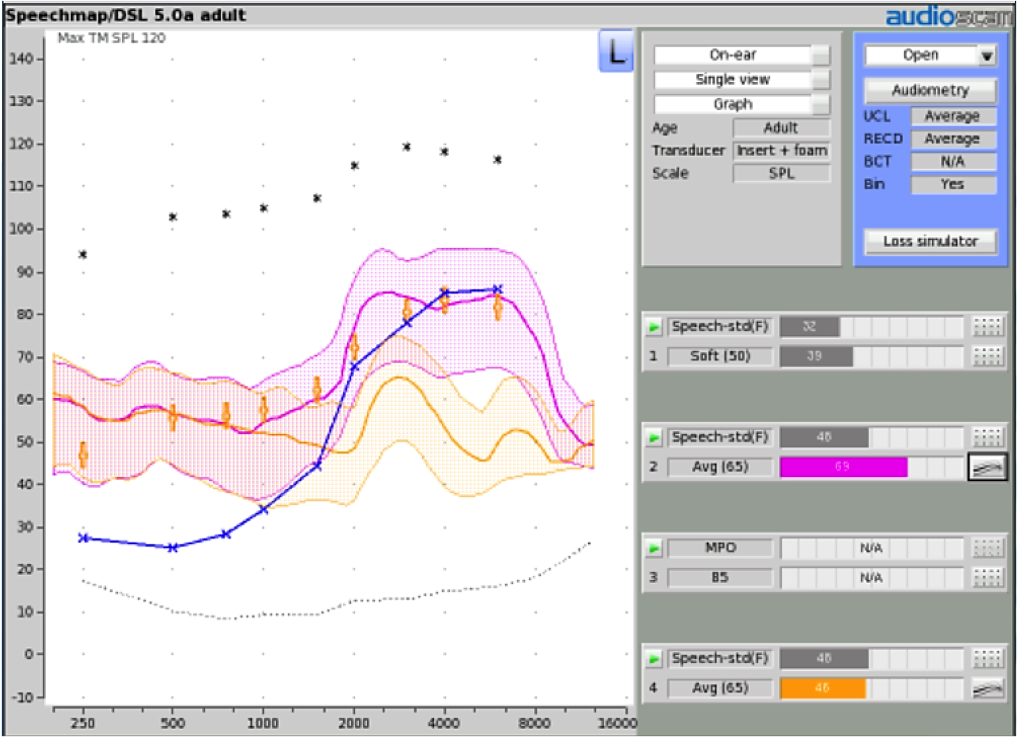
Figure 9. Measured real-ear unaided response (REUR) (gold curve) and real-ear aided response (REAR) (pink curve) for average conversational speech.
For more information about how Speechmap results can be obtained and used as a fitting and counseling tool, please refer to the Audioscan CEU course, Speechmapping As A Fitting and Counseling Tool, on AudiologyOnline. For more resources from Audioscan, visit the Audioscan Expo Page on AudiologyOnline.
For more information on verifying open fittings, view the Audioscan CEU course, On Ear Verification of Open Fittings. Learn more about Audioscan on the Audioscan Expo Page on AudiologyOnline.
Continued and its subsidiaries provide professional education authored by qualified Subject Matter Experts for continuing education purposes. These materials are intended for educational purposes and do not constitute medical advice or a substitute for individual clinical judgment. Continued is not a clinical healthcare provider; the licensed professional is solely responsible for ensuring that the application of any techniques or information presented is within their legal scope of practice and jurisdictional requirements.