Learning Outcomes
After this course, participants will be able to:
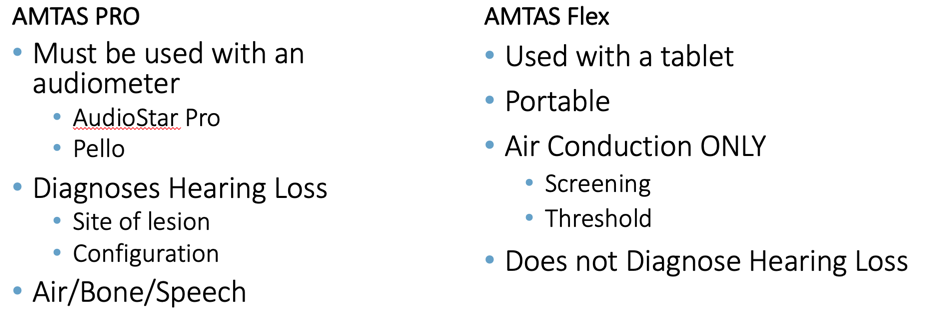
- Describe the differences between tests available in AMTAS Flex and AMTAS Pro.
- Explain how to transfer tests from both the AMTAS Pro and Flex into GSI Suite.
- Define 2 scenarios for AMTAS Pro and 2 scenarios for AMTAS Flex.
Introduction
Today's agenda will include:
- Review of AMTAS
- Introduction of AMTAS Pro and AMTAS Flex
- Compare and contrast AMTAS Pro and AMTAS Flex operation
- Compare and contrast AMTAS Pro and AMTAS Flex integration
Audiology is a rapidly changing profession with many changes ahead. There is a shortfall in the number of audiologists which was stated in The Coming Crisis in Audiology (Freeman, 2009). Over the years this has continued to become more evident. We know the incidence of hearing loss globally and in the United States continues to rise. We are not able to meet the needs of our hearing healthcare patients because we have essentially a flat profession (Windmill & Freeman, 2013). The solution would be to increase the number of audiologists or increase the productivity and efficiency of our audiologists that are currently practicing. Other factors that influence this change in audiology include telehealth, PSAPS, over the counter hearing aids, and demands for efficiency. We are seeing some hearing aid delivery models changing and also, we are discovering that the internet and big box store sales of hearing aids are impacting the way that audiologists are practicing.
AMTAS
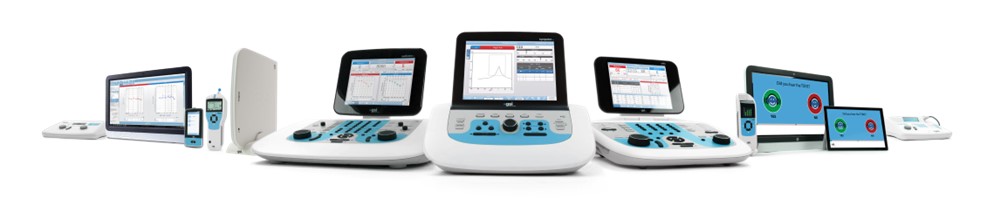
How are we going to address the changing climate in audiology? Grason-Stadler has introduced a product called AMTAS, which is the Automated Method for Testing Auditory Sensitivity. AMTAS is a software program which is used with a GSI audiometer (GSI AudioStar Pro or Pello) or loaded onto a Windows tablet. AMTAS guides the patient through a self-directed test at a pace set by the patient. The patient goes through the process of an automated hearing test, moving at a pace comfortable to them. We can obtain basic auditory information without having to sit in front of the audiometer. The GSI AMTAS uses patented algorithms to ensure the quality and reliability of the evaluations. Grason Stadler has introduced two products: AMTAS Pro and AMTAS Flex.
AMTAS Pro
AMTAS Pro was originally developed for the VA and telehealth. This software is mainly for clinical use and includes masked air and bone conduction thresholds. You can also obtain masked speech reception thresholds and word recognition scores from the AMTAS Pro software. A requirement for AMTAS Pro is a GSI audiometer (i.e., AudioStar Pro, GSI Pello) that is licensed for use with this software. A computer will be needed to load the software, GSI recommends one with a touchscreen monitor. You could use the telehealth camera with an otoscope attachment if you wanted to include otoscopy. Since AMTAS utilizes the DD450 circumaural headphones, traditionally used for high frequency testing the sound attenuation is excellent, and a booth is not required.
Required for AMTAS Pro:
- GSI Audiometer (AudioStar Pro or Pello with AMTAS License)
- PC with AMTAS Software and a telehealth software
- Telehealth camera with otoscope attachment
- Quiet testing area
AMTAS Flex
AMTAS Flex is a tablet-based hearing evaluation with two modes: screening, and threshold.
Screening mode: The screening mode is limited to evaluating four frequencies (500, 1000, 2000 and 4000 Hz). The AMTAS Flex screening mode will require a Windows tablet with AMTAS software, calibrated headphones, and a quiet room. We are still using circumaural headphones with this product, so you do not need a booth4.
Threshold mode: The second way that we use AMTAS Flex, is the threshold mode. All of the requirements are the same as screening mode but what we obtain is a pure tone air conduction threshold test for all octaves between 250-8k. Masking is used by default with every tone presentation for air conduction in threshold mode.
Key Differences Between AMTAS Pro and Flex:
Operation
To determine which AMTAS software is right for your practice we will discuss the operation of the Pro and the Flex. Several things are similar between the two, including the release versions. Currently, the release version is 1.3. We have strict security options because this product was designed for the VA, and just like all of our other GSI products, AMTAS comes with a Config App so that you can set up your defaults before testing.
Config App
When you look at the configuration application, in Figure 1 is AMTAS Pro, and Figure 2 shows AMTAS Flex. You can see that they are almost identical and there is just one key difference between these two Config Apps, and that is the menu bar.
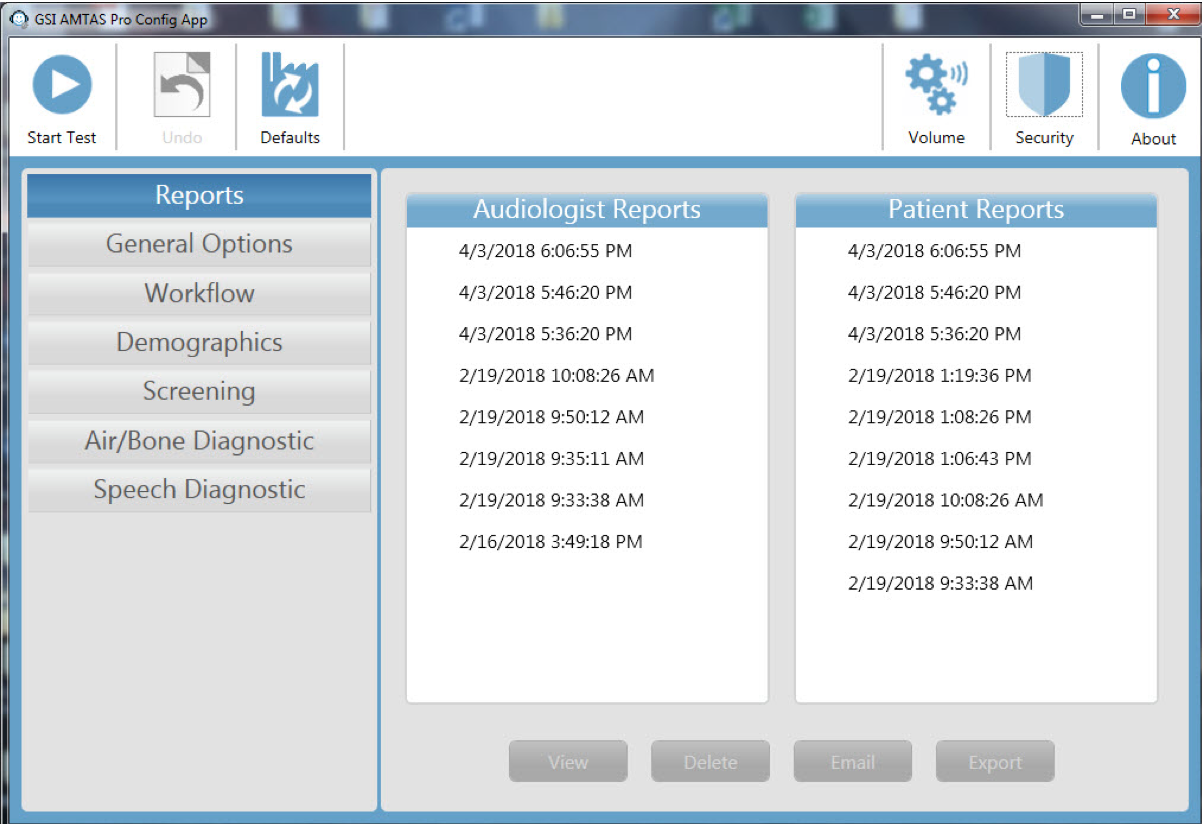
Figure 1. AMTAS Pro Config App.
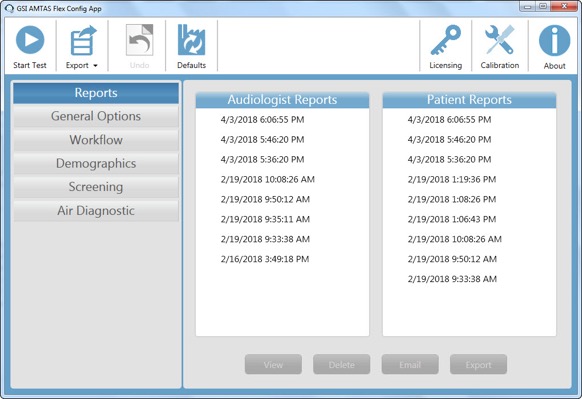
Figure 2. AMTAS Flex Config App.
Reports: Flex and Pro
When you have completed the evaluation, you can decide what to do with the test reports that land in the Config App. There are two types of reports, one for the patient that has general language for the results of the evaluation and an audiologist report. The audiologist report is where you do all of your interpretation for the evaluation. If you were not present for the test, this report with the audiologist detail will give you the information required in order to interpret accurately.
General Options: Flex and Pro
Under the General Options, you have language options and can also insert a logo to be included in your report.
Workflow: Flex and Pro
Workflow is where you choose preferences how AMTAS runs a test. You can see in Figure 3 there are Before Test, During Test and After Test options.
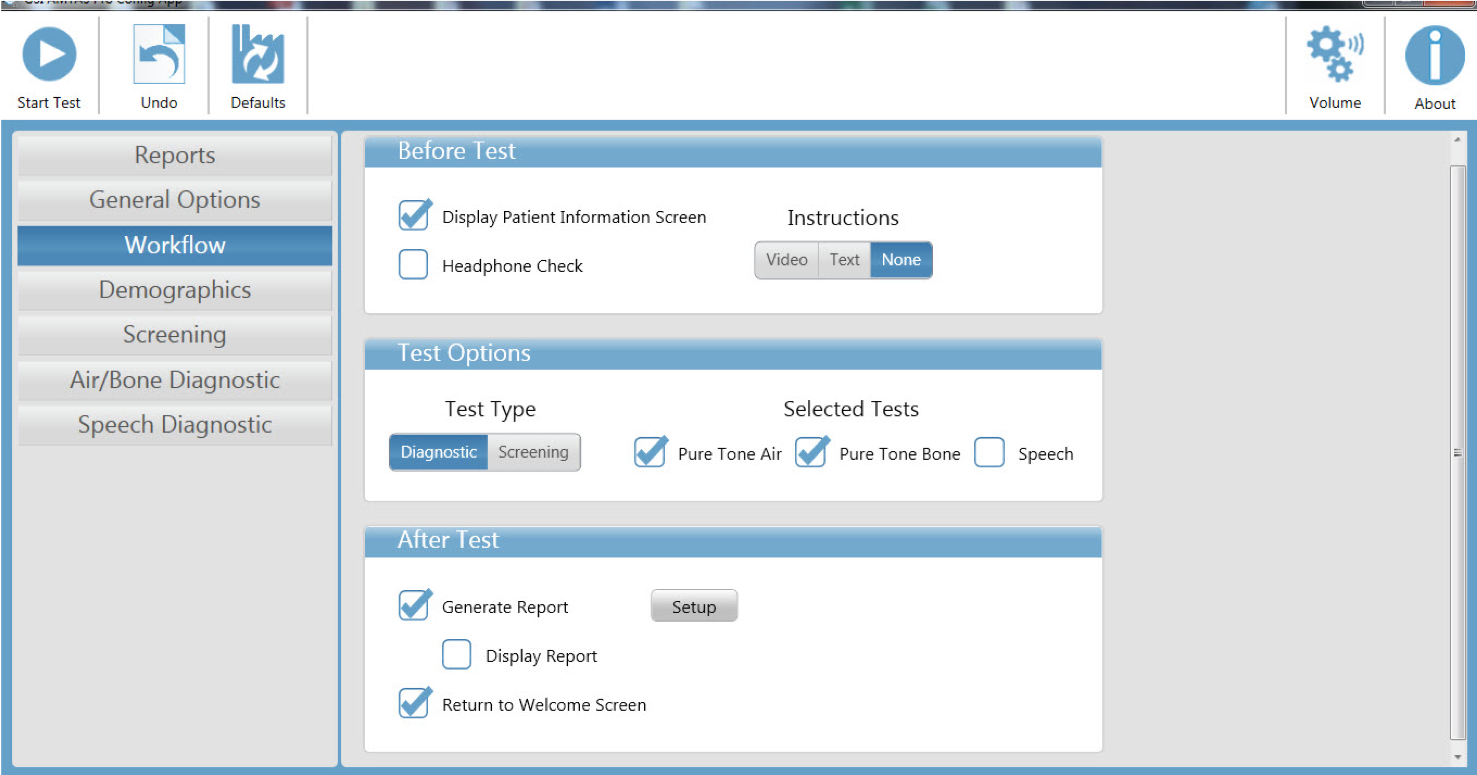
Figure 3. Workflow for both AMTAS Flex and Pro.
Before Test: These options are very similar for both AMTAS Flex and AMTAS Pro. You can decide to display the patient information screen and which demographics will be included. A headphone check can be done here as well. You can also determine how you want the patient instructions to be given (e.g., video, text, no instructions). If no instructions are selected, the patient should be instructed before testing. The headphone check is a new feature that we recently added. We do have text instructions that you can choose to display instead of video instructions. These test instructions were validated to make sure that it doesn’t alter the effectiveness of the self-administered evaluation. The Config App for both the GSI AMTAS Flex and AMTAS Pro have these demographics.
Test Options: This is where you will notice a bigger difference between AMTAS Pro and AMTAS Flex. Remember, AMTAS Pro has both diagnostic and screening modes. You can perform pure tone air, pure tone bone, or speech and can select any combination of those for the evaluation. For the AMTAS Flex, you only diagnostic and screening modes.
After Test: AMTAS Pro and AMTAS Flex both have several options when the patient completes their evaluation. AMTAS will generate a report for the practitioner, which is used for interpretation and counseling. AMTAS will also generate a patient report, and you may choose to have that come up immediately following the test, or it can be accessed in the Configuration Application. You can export the report into a specifically defined folder or keep it within the GSI AMTAS Pro config app. You can choose automatic naming with these reports as well from the patient demographics. If you have a patient ID that is required or patient name, you can make those the name of the actual report.
Screening Mode
When you are in the screening mode, you have to select at least three of the four available frequencies for the evaluation. You can choose your intensity, presentation level and set your pass criteria for both the Flex and Pro.
Diagnostic Mode
Air Diagnostic - AMTAS Flex: You can choose to test all interoctaves or disable masking. With AMTAS you can also set up the software to only test the interoctaves if there is a big difference in the octave frequencies.
Air & Bone Diagnostic - AMTAS Pro: With AMTAS Pro, you have the option for bone conduction testing as well. If bone conduction testing is selected, 500, 100, 2000, and 4000 Hz will be tested. In the configuration for the bone conduction testing, we have an option to apply 15 dB to the 4000 Hz bone conduction threshold. This is something that lessens the air-bone gaps that have recently been reported in journals.
Speech diagnostic - AMTAS Pro: When you are using AMTAS Pro, you have speech diagnostic testing as an option and can decide if you would like to include the SRT, word recognition or both. One of the things that's unique about AMTAS Pro is that word recognition is a forced choice test. Because it is not a closed set, we are not running this at MCL. The test is presented at a level that is based on either the pure tone average or the speech reception threshold, which is generally below MCL.
Patient Set Up & Test Sequence
Bone Oscillator & Headphone Placement
After the configuration is set up, it is time to look at the differences in preparing the patient for testing. GSI AMTAS Pro allows us to evaluate air, bone, and speech. To ensure that the clinician has maximum efficiency to keep requirements for the patient during testing, we are going to optimize patient set up.
Forehead Bone Oscillator Placement: The AMBAND, an elastic band that goes around the forehead and holds the bone conduction oscillator in place, is used for the AMTAS Pro only.
Headphone Placement: For both the AMTAS Flex and Pro, whether you are performing a screening or threshold test, the DD450 circumaural headphones are used. These headphones will eliminate the occlusion effect that you might find if you have the super aural or the inserts. As an extra convenience, the circumaural headphones stay out of the way of that bone oscillator. The other nice thing about these headphones is they have a lot of sound attenuation, and a booth is not required for testing. The evaluation can be conducted in a quiet room. The background noise information per ANSI standards can be found in the manual.
Start of Test
Once the patient is all set up, you will begin the GSI AMTAS application by clicking "Get Started." In the configuration application, you decided how you wanted the instructions to be displayed (e.g., video, text, none). After the instructions are complete, it will move into a screen that says "Listen for a tone," followed by "Did you hear a tone?". The patient will touch or click "yes" or "no." Yes, they heard the tone. No, they didn't hear the tone. This process is the same for both AMTAS Flex and AMTAS Pro. In Figures 4 and 5 we have the man taking the AMTAS Flex test, and we have the woman inside of the booth performing the AMTAS Pro evaluation.

Figure 4. Example of a patient taking AMTAS Pro evaluation.
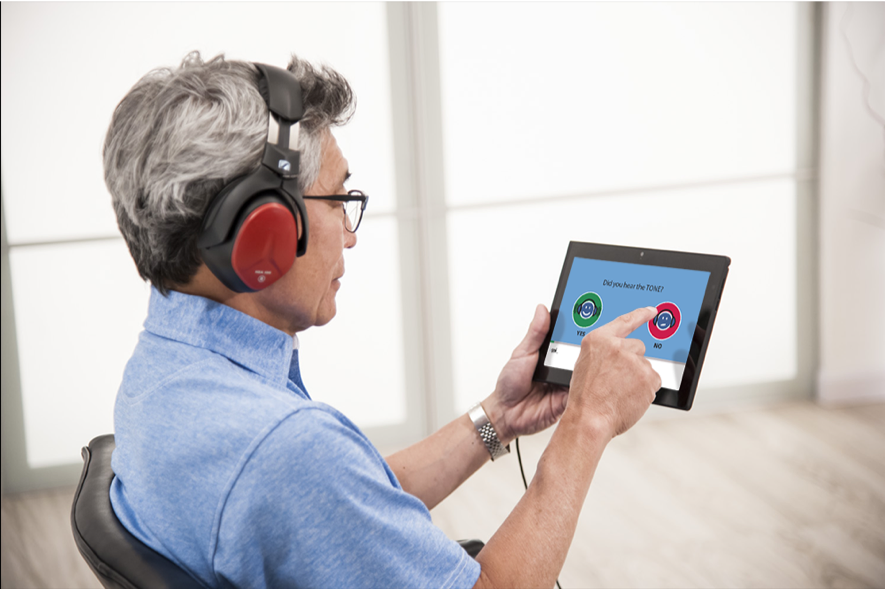
Figure 5. Example of a patient taking AMTAS Flex evaluation.
Test False Positives: A patient can get into a routine during manual testing as well as with AMTAS. It can be because they are trying so hard to listen for the actual tone. If you were testing the patient, you would turn the volume up, give them a moderately intense tone so they remember what they are listening for and would then we would resume the test. With AMTAS, if they have a false response, they will get a message. Similar to a clinician turning up the volume suprathreshold and re-instructing. GSI has taken this into account with the AMTAS software to catch, record and utilize those false responses in the interpretation and the quality indicators at the completion of the evaluation.
Speech Testing for AMTAS Pro
Once pure tone testing is complete, speech testing will begin if you are using AMTAS Pro and you have included that with your protocol. Speech testing is a closed set. The test will begin with a prompt, "Listen for a word." followed by "What word did you hear?". The software will be conducted in this manner with both SRT and word recognition using a modified NU 6 list.
End of Test
Once the evaluation is completed, the patient will receive a prompt of "Thank you for completing the test. Please press the button to conclude the test." GSI has added another prompt that says "contact your administrator," and so it gives them an opportunity to know that they are done. If for some reason a patient cannot perform AMTAS, the test will complete early. The clinician will receive a message, and you will not have a completed audiogram. Additionally, if they are very unreliable, it will give you this message early so that you will know to proceed with the manual audiometry. Research indicates that about 85% of patients can successfully complete AMTAS.
Integration
Thus far, we discussed how to perform the test and set up the patient. We reviewed the options and differences in operation of the AMTAS Pro and AMTAS Flex. In this next part, we will cover the actual integration. Perhaps you have decided that you are going to introduce this automated audiometry because it is going to save you time and add efficiency to your practice. Now you have this data, what are you going to do with it? How are you going to use this in your actual practice?
Automated Report
When the patient has completed their evaluation, AMTAS will automatically generate a report. On the audiologist report, there is a quality assessment, audiogram classification, and speech recognition tables.
Full Evaluation Report: Air, bone, and speech are included in the full report. All symbols will be masked since AMTAS utilizes masking with all time and speech presentations. Figure 6 shows an example of the audiologist report for both AMTAS Pro (left) and AMTAS Flex (right). Down below is the masking table, AMCLASS classifications, and your speech results.
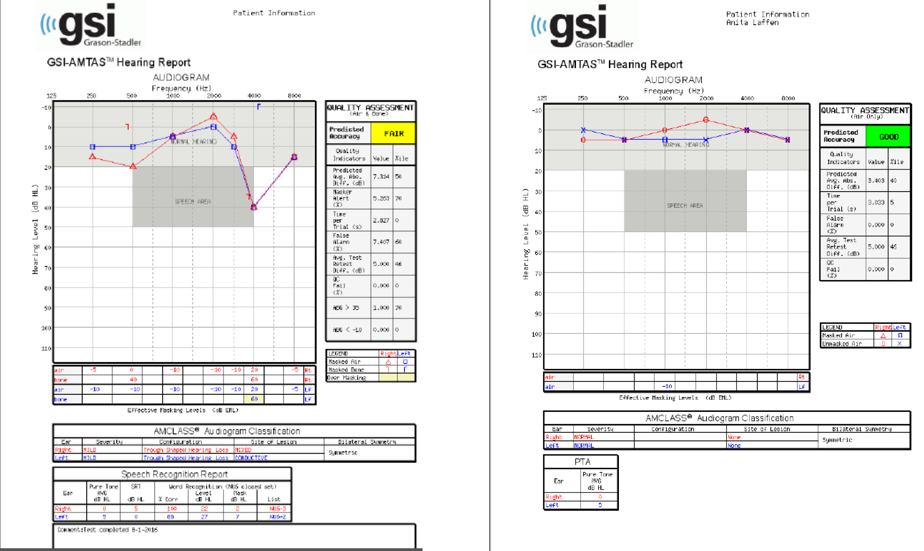
Figure 6. AMTAS full evaluation report.
AMTAS Flex or Pro Screening Report: For screening, a report will be generated to indicate if the patient did or did not pass. If you have chosen in the configuration application that you are going to create and display the report, the below example is what it will look like.
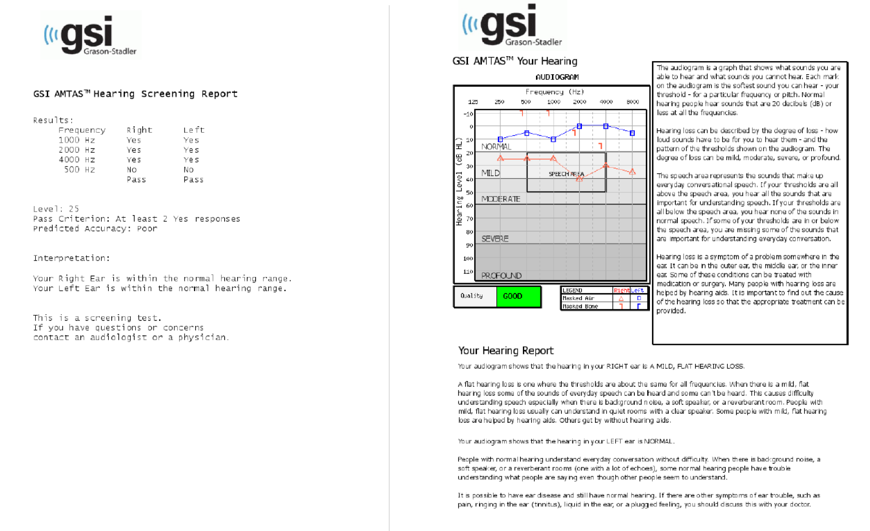
Figure 7. AMTAS screening reports.
Quality Assessment: Qualind
An impressive feature which gives AMTAS credibility is the quality assessment report. We call these the quality indicators. The patented name for these quality indicators is Qualind, and this is the interpretation that helps us determine the accuracy of the evaluation. Qualind is patented and is based on data collected at three sites from a wide range of settings, demographics, and hearing loss characteristics - a large subject sample in collecting this data. There were over 120 subjects and a strong relationship between predicted accuracy and measured accuracy. Researchers compared how the patient did with the automated testing to how that same patient did with manual testing. They were able to then take certain criteria or certain data points from the actual AMTAS test and put those into the quality indicators.
Predicted Accuracy: When assessing different quality indicators, having an idea of how the patient was acting in the booth when a clinician is not present is important. The predicted accuracy tests reliability (i.e., good, fair, poor).
Predicted Average Absolute Difference: This quality indicator is predicting how different the results would be if I used a manual method of obtaining audiometry thresholds.
Masker Alerts: If there is masking required and there are thresholds where the masking may have been too high or too low, you will receive a masker alert.
Time Per Trial: At times, patients respond very quickly to the stimuli. With Time per Trial, you can see if they are on the longer or shorter end of this response time.
False Alarm Rate: This leads to our false alarm rate. The reinforcement message will alert the patient of the false positive. We measure these because if there is someone who may be trying to malinger, maybe they did not understand the task at hand, then these false alarm rates will increase substantially. When you are interpreting the results using the quality indicators, this is one of those things that you can get a good idea of how the patient was attending to the task inside of the actual booth.
Average Test-Retest Difference: AMTAS does do a re-test of 1000 Hz bilaterally. This will give you a number for the average test re-test differences. If the difference between the two is significant, the software will provide you with an alert. That is something that you can look for in your interpretation on the report.
Quality Check Fail Rate: AMTAS establishes a threshold using the modified Houghson-Westlake. We know, audiologically, that patients should hear it every time if it is a true threshold. The quality check fail rate will help determine that the patient hears the tone and is paying attention. If the patient does not pass this quality check, then that will certainly be indicated in a red flag in the quality indicators.
Number of Air / Bone Gap > 35 dB: The number of air-bone gaps that exceed 35 dB.
Number of Air / Bone Gap < -10 dB: The number of air-bone gaps that are less than 10 dB.
Interpretation Features: AMTAS Pro
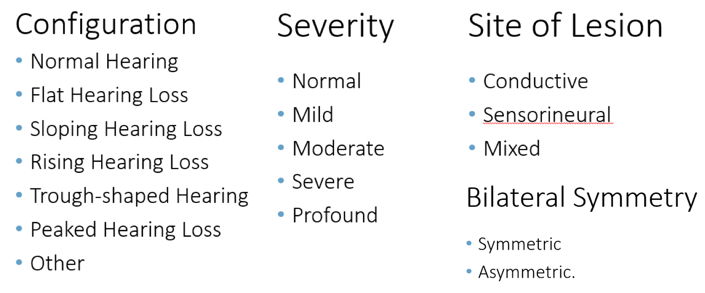
There are a few other metrics that ensure you are obtaining a valid and usable audiometric data with AMTAS Pro. The classification table is called AMCLASS. As we started learning more about AMTAS, we realized that audiologists use various words to describe different hearing losses. AMCLASS narrowed down the hearing loss configurations to seven groups. If it does not fit into one of these different categories, it will be classified as other. The next thing that they did was find a consensus on the severity and decided on these five different severities for the hearing loss. Then, of course, the symmetry of the hearing loss. By combining or coming to a consensus to narrow down some of the descriptions that the different audiologists were using, they were able to standardize and assign a classification to the audiograms that they were receiving from the AMTAS software.
Additional Data Management
If you are familiar with GSI Suite, test data can be incorporated into the basic audiometry tab for reporting. If you are performing screening audiometry, you can transfer that data into the GSI Suite and create a screening report. The benefit is, you have the predicted accuracy from the AMCLASS, and it will give you your result. In the template editor, we have the components available so that you can make a report that looks nice and incorporates your brand.
Flex Data Transfer Options
This feature comes with our newest release of GSI Suite (Version 2.5). You can transfer AMTAS Flex data in three different ways. If you have GSI Suite loaded onto your Windows tablet, you can use a local import or transfer. If you do not have a wireless network or Bluetooth availability, then you can use what GSI calls import. You are going to save the data from the AMTAS Flex onto a USB drive. Then when you are in GSI Suite, you will select the import and drag all of those different tests from the USB drive into GSI Suite. The third way that you can transfer the AMTAS Flex data is within a wireless connection. You would set up a Bluetooth connection between your GSI Suite and your tablet and then transfer wirelessly into the GSI Suite.
- Local- Available if AMTAS Flex is on the same PC as GSI Suite
- Import- Used to import data from a USB drive
- Wireless- Used to transfer data from the AMTAS Flex tablet to Suite PC via Bluetooth
Batch transfer - AMTAS Flex: With AMTAS Flex, you are likely to gather a few tests and then transfer them all at the same time. What we do with the AMTAS Flex is called a batch transfer. If you are familiar with GSI Suite and our other products, this is how we transfer the OAE data as well. It comes over in a group, and you have a window that's called "Assigned Tests". All of the different tests that you have transferred are available here. Then you can just drag them to the appropriate patient to assign it.
Import
So, again, this is in the configuration application of AMTAS Flex. You have that export button, and that's how you would determine where you are going to or how you are going to export that data. One other important thing to remember with AMTAS Flex is after you export the data, the data inside that software program will be marked for deletion. And again, this is just like our other batch transfer products, such as the GSI Corti. So after you have managed that data by exporting it, it is still there until you run the next test and then it is gone. You can restore it one time. If you accidentally mark it and delete it, you can restore it one time.
Transferring AMTAS Pro Data
- Locate or create a patient in GSI Suite
- Select the Patient button on the audiometer.
- Select the Transfer Session menu option.
- Select the AMTAS Pro data session for transfer. (AMTAS Pro data is listed in the Session List with an “A”_Name_Date Time”)
Once you transfer the AMTAS Pro data into the GSI Suite, you will see that it will put in the audiogram but the difference is you now have the audiogram classification.
Summary & Conclusion
How does AMTAS fit in with your current practice? One of the biggest questions that we get at Grason-Stadler is "Is this going to replace the audiologist?" The answer is no. AMTAS is just the hearing test. AMTAS is only obtaining your air conduction, speech tests and perhaps bone conduction. Audiologists do so much more than just hearing tests. We are counseling, recommending and fitting hearing aids, and performing other necessary tests (e.g., middle ear evaluations, otoacoustic emission).
AMTAS Implementation
AMTAS Pro
- Basic Diagnostics at ENT office
- Basic Diagnostics at a satellite office
- Annual Evaluation
AMTAS Flex
- Screen – hearing aid retail to get referrals
- Threshold – before the patient moves to the booth for further testing
Advantages of Automation
- Optimize use of audiologists’ time
- Standardization
- Quantitative quality assessment
- Decrease errors
- Decrease cost
- Increase access
- Telemedicine
What Patients Would Benefit?
- Originally designed for Veterans Administration (VA)
- Busy audiology departments
- Busy ENT practices with limited staff
- School systems
- Satellite clinics
- Community outreach
References
Freeman, B. A. (2009). The coming crisis in audiology. Audiology Today, 21(6), 46-53.
Windmill, I. M., & Freeman, B. A. (2013). Demand for audiology services: 30-yr projections and impact on academic programs. Journal of the American Academy of Audiology, 24(5), 407-416.
Citation
Prigge, L. (2018). AMTAS Pro vs Flex: operation and integration. AudiologyOnline, Article 24091. Retrieved from www.audiologyonline.com