
Learning Outcomes
After this course learners will be able to:
- Identify the benefits of the Tempus platform, including features to help patients in challenging listening environments.
- Identify the patient benefits of the rechargeable hearing instrument solutions.
- Describe the features and benefits of the MoxiTM , Stride and Insera product families along with identifying suitable patient profiles for each style option.
- Explain how to navigate through the Unitron TrueFit version 3.5 programming software to complete an initial fitting and subsequent follow-up adjustments.
Introduction
We introduced our new Tempus platform in March 2017. At the foundation of Tempus is the SoundCore technology, which features improved accuracy and speed when it comes to detecting and localizing speech around the patient. Tempus is 50% more accurate and 36% faster when it comes to the ability to detect and localize speech than the previous platform. Because of its speed and accuracy, we were able to introduce new features with Tempus that made it a game changer in conversations and in different types of listening situations for patients.
We introduced our Moxi RIC and Stride BTE products on the new Tempus platform this past spring. A fun little fact that we like to share, is that Unitron's patient-centric design philosophy has garnered five Red Dot Design Awards over the past four years, most recently being recognized Best of the Best in 2017 for the design of the Moxi Now.
Not only are they great looking, they're also very robust instruments. All of the Moxi RICs and the Stride BTEs (with the exception of the Moxi Kiss), have been tested and received an IP68 rating for moisture and debris resistance. In addition to being attractive, our instruments have proven to be durable for patients in their day-to-day lives.
Insera Joins the Tempus Platform
In addition to Stride and Moxi, we're proud to have Insera join the product line on the Tempus platform. Insera lets our customers find out what is inside the best conversations.
Why Custom Products?
Back in the late 1980s and early 1990s, the U.S. hearing aid market was roughly 80% custom products and about 20% BTEs. Back then, the question was "Why would someone wear a BTE instrument?" The marketplace started to change with the introduction of slim tube BTEs, and eventually the RIC. There are still a number of reasons why people may have a preference for custom hearing aids.
- Cosmetics: For some patients, the lower profile in the ear is perceived as more cosmetically appealing.
- Dexterity: Some patients have difficulty handling a RIC or a BTE. The whole idea of trying to be able to get an ear mold or a receiver into the ear canal, and being able to get the piece over the back of the ear can be tricky for some patients.
- Personalization: By definition, ordering a custom product is the ultimate in creating a personalized solution for your patients.
- Wind Management: From a performance benefit perspective, the placement of the microphone into the concha of the ear does provide some additional shielding by the pinna, which can help to reduce issues with wind noise for some patients.
- Natural Sound Quality: Like RIC hearing instruments, because the receiver is positioned closer to the ear drum, this can translate into a more natural sound quality than perhaps a delivery of sound down the length of tubing through an ear mold or through a slim tube.
- Increased Max Stable Gain: In the case of a deep fitting CIC or an IIC instrument, we also have the phenomenon that there is a smaller residual volume in the ear canal, between the tip of the hearing aid and the ear drum. This provides us some additional usable gain beyond what we would be able to achieve with that same receiver in a device that doesn't fit as deep into the ear canal.
- Cutting Edge Technology: When it comes to custom product manufacturing, Unitron's facility in Plymouth, Minnesota is Sonova's leading custom manufacturing lab. We use state of the art, rapid shell modeling technology to ensure that your patients are getting a solution that is specifically crafted for their unique needs.
- Differentiation: Being able to offer custom products to your patients is another way that you can differentiate your practice from others, including the disruptions being created by the entrance of things like the OTC products into the market recently.
Why Insera?
With the introduction of Insera, patients can get the technology they want in their preference of hearing instrument model or style. We have a full range of models in Insera, from the full shell all the way down to the IIC (Figure 1). Insera is available in five levels of technology, which will help us to make sure that we can make great conversations accessible to everyone.
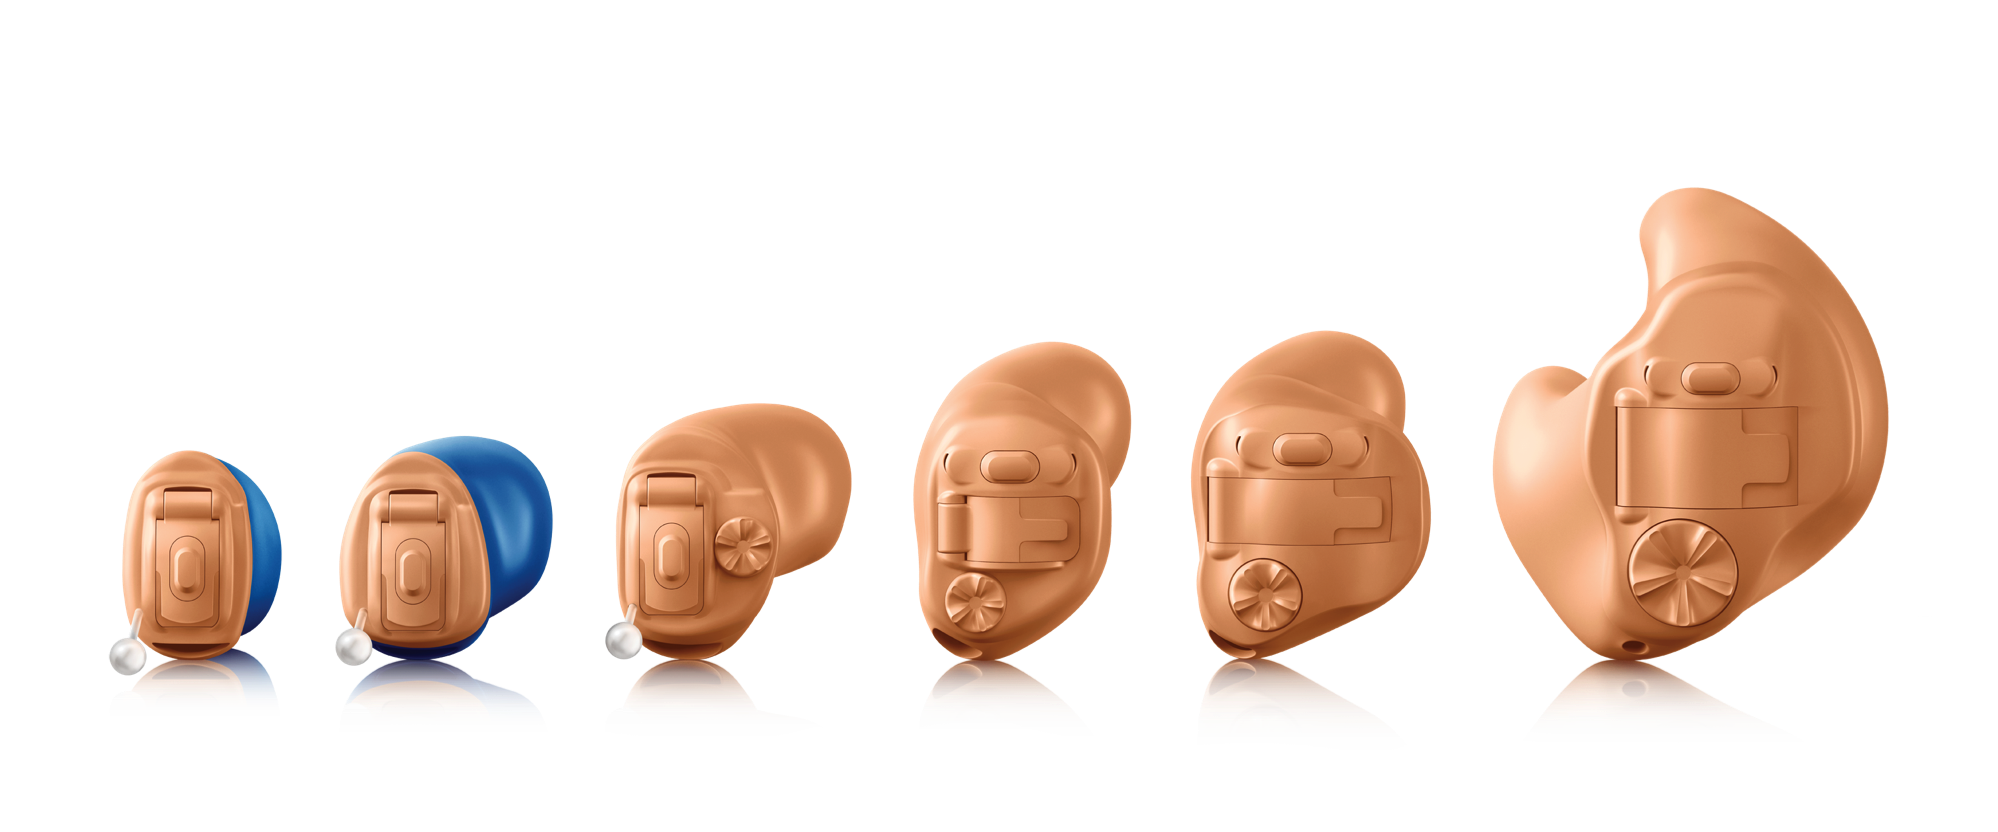
Figure 1. Insera models with Tempus technology.
In order to make that best in conversation technology of Tempus available in a custom product, there are a few things that we need to consider when we're building custom hearing instruments for patients. Hearing instrument wearers are individuals. We can offer an improved solution when we take their individual ear anatomy into account when making their custom products. Years ago, before digital shell making technology was in place, the shells were manually poured by technicians in the lab and we would lower the shell so that when the faceplate was added, it would look good and be comfortable in the ear. However, at that time, we didn't do anything to adjust the hearing aid performance or the directional microphone characteristics based on the position or angle at which the faceplate sat in the ear canal. Later, as technology evolved, and with the introduction of digital shell modeling, we started to incorporate an average mic location effect (MLE) offset, so that we could provide better directional response and better frequency performance of the instruments. That average MLE data would look at the distance between the microphones from the ear drum; it was predicted for a particular shell style, based on what the average location of the microphones would be from the ear drum for each particular shell style. Ultimately, as technology evolved with digital shell making, we are now able to incorporate an offset for all the different models of instrument, but it's still based on average KEMAR data, and it doesn't take into account the individual anatomical variations of each patient.
EarMatch. With the launch of Insera, we're excited to introduce EarMatch: a new technology that allows us to customize the performance of the custom hearing aids to the specific, anatomical characteristics of your patient's ears. The EarMatch process optimizes the directional performance by compensating for the individual variations or differences in the patient's external ear geometry. In other words, it's able to take into account the specific details of how that patient's external ear anatomy varies from the "average" ear canal of KEMAR.
EarMatch is based on a multitude of attributes related to how it fits in the individual's ear. There are three distinct phases to the process of EarMatch:
- Characterize: It starts with the 3D model of the individual's ear, generated from the impression that you take. EarMatch analyzes the scanned 3D impression, specifically looking at 1600 data points to describe the anatomical parameters of the ear.
- Recognize: Then, using those 1600 data points, our recognition algorithm analyzes the ear's unique features and searches our comparative database to select a match. We are able to look at all 1600 of those data points, and see how they compare to "average," and match them up against our database of other ear impressions and ear modeling scans.
- Customize: Once we have all this data about how the patient's ear differs from the average KEMAR data, our modeling process then customizes the beamformer calibration to create a directional response that's optimized for that individual's ears.
The EarMatch process is an automatic process that is performed as part of the manufacturer production of the hearing instruments. It's not a software feature that you have to turn on or off. The one thing that we do require is a full impression of the patient's ear. We want to make sure that we're getting as long a canal as possible, but also that you're making sure to fill the entire concha bowl, so we can get the best information possible for your patients. In some circumstances, such as when clinicians are making a mini canal instrument, they may think that they don't need to fill in the entire concha of the ear, because they are going to be fitting a smaller device. Because of the EarMatch ability to exactly locate the microphone positions in a patient's ears, as well as how their ear anatomy varies from KEMAR, we need a full impression. An impression that includes the entire concha of the ear and as much of the canal as possible will allow us to have the most data to work with in the optimization of the performance.
Why do we go to all this trouble? What's the benefit of looking at all of this additional data? It's all about using EarMatch to create the optimal directional performance, so that your patients can get the maximum possible benefit from the features that we introduced with the Tempus platform. We take extra steps so that advanced features like Spatial Awareness can provide the most realistic sound quality possible.
Spatial Awareness Technology
The Spatial Awareness technology in Tempus is a new technology that we introduced when we launched the Tempus platform in the spring of 2017. It's designed to create a more realistic, natural listening experience. One of the most significant factors that contribute to a realistic sound quality for patients, is our ability to localize where sounds are coming from. The brain uses two primary cues to localize sound: interaural level differences and interaural timing differences. In very simple terms, if someone is speaking from my left side, my brain can figure out that they're coming from the left side because their voice is going to reach my left ear first and it's going to be a little bit louder on my left side than on my right side.
The ear itself is a significant contributor to our localization ability by funneling sound into the ear canal. With RIC or BTE instruments, the microphone is capturing sound from on top of the ear, removing the benefits of being able to use the pinna to help collect and funnel the sound down to the ear drum. With a custom instrument, we do manage to retain some of the benefit of the pinna, but we do not get the same localization cues that a person with normal hearing with an open ear canal would have. The magic is in restoring the cues for the brain to be able to localize where sounds are coming from. In other words, we want the microphone system of the hearing aids to be able to restore the natural head-related transfer function (HRTF), as it would occur at the ear drum for someone with normal hearing. We do this with Spatial Awareness by using our advanced beamforming technology. It creates an elegant solution by mimicking the natural impact of the head and ear on the level of sound at each ear. In the lower frequencies, we stay in an omnidirectional mode; as we move into the mid frequencies, we begin to point our directional beam. For the right instrument, the beam increases sensitivity for sounds coming from the front and the right side; the left instrument increases sensitivity to sounds coming from the front and off to the left-hand side. As we move into the higher frequencies, that directional beamforming system becomes even more aggressive. It uses a 33-band system to model what the head-related transfer function would be across the entire range of frequencies for that particular patient's ears.
Because the brain requires the correct cues from both ears to localize sounds, our Spatial Awareness solution is a binaural feature. It must be a binaural fitting in order for the Spatial Awareness feature to work. By using Spatial Awareness, we're able to create a more natural depth and awareness of where sounds are coming from in space. For example, if your patient is waiting for a friend at a quiet outdoor cafe, they can easily determine where sounds are coming from in that environment. They can tell that the bird is over on the canopy to their side, and that the barking dog is behind them. Your patient can hear the people chatting a few tables away, and get a sense of depth as to where they are on the patio. The benefit of Spatial Awareness is enhanced and optimized for your patients with custom products through the use of EarMatch technology.
SpeechPro
The optimal directional performance created by EarMatch also provides better speech understanding in noisy environments by further enhancing the speech-in-noise technology of SpeechPro (the new speech-in-noise technology that we introduced with the Tempus platform this past spring). SpeechPro is a sophisticated system that works in the more challenging environments for the patient. When the patient is in an environment that the system would recognize as either conversation in a crowd or conversation in noise, the SpeechPro technology comes into play and starts to work to help "put speech in its place." It's going to help to ensure that speech is audible for the patient while suppressing the background noise, but still allowing the patient to be able to tell where sounds are coming from in space and have those localization cues. SpeechPro works in a three-step process:
Step 1: Know the Location of Speech: Speech Locator
It all starts from the system working to identify the location of where speech is coming from. When the patient is in a challenging environment, when the hearing aids would recognize that they're in conversation in a crowd, or conversation in noise, SpeechPro starts to work by first trying to identify where speech is coming from around the patient. Tempus employs a new Speech Locator algorithm that's used to identify and localize speech, in a way that's more accurate and faster than what was previously possible. The Speech Locator is able to track speech signal around the patient in a full 360 degrees, to know whether speech is coming from the front or behind the patient, from the right or left sides.
Step 2: Separate Speech from Noise: Speech Focus
Once SpeechPro knows the details from Speech Locator about where speech is coming from, the next step is to separate that speech from the noise. We do this with the part two of SpeechPro, which is Speech Focus. This is the intelligent steering of the beamforming system. Choosing where to focus the target area of the directional microphone system based on that analysis by Speech Locator about where speech is coming from.
Step 3: Keep it Real: Dynamic Spatial Awareness
The third and final step of the process in SpeechPro is Dynamic Spatial Awareness. Dynamic Spatial Awareness is designed to help recreate the most realistic sound quality possible while still allowing the patients to benefit from the directional microphone technology. Directional microphone technology has been used in hearing aids for decades. Directional microphones have been proven to be able to help improve speech intelligibility in noise. However, because of the way directional microphones work, the challenge becomes being able to amplify sounds from a particular direction and then reduce sensitivity to sounds from an off-target area. In other words, the nature of directional microphone technology tends to interfere with the patient's ability to able to tell where sounds are coming from. You may have had patients tell you that with their hearing aids, they can hear speech in noise that they couldn't hear before, but they can't always tell who's talking or where the speech is coming from. That's one of the unintended consequences of the directional technology. With the Dynamic Spatial Awareness feature, we're able to restore those localization cues so the patient is also able to tell where sounds are coming from.
Listening Scenarios
Let's get a complete picture of how SpeechPro responds when speech is coming from various directions. In Figure 2, a gentleman is sitting in a cafe, waiting for his friend. As the cafe gets noisier, the SpeechPro feature engages. It moves into a "conversation in crowd" analysis of the environment. Once that happens, Speech Locator looks for a dominant signal. Until it's able to find the dominant speech signal, Speech Focus starts in a wide front-facing beam, in order to make sure that the patient can hear what's happening in front of them. Once Speech Locator is able to identify that his friend is sitting across the table, and is the dominant signal, then both hearing instruments will go into a narrower, front-facing directional pattern to provide additional emphasis. In addition, Dynamic Spatial Awareness will shape the frequency response of the hearing aids to restore the natural localization cues.
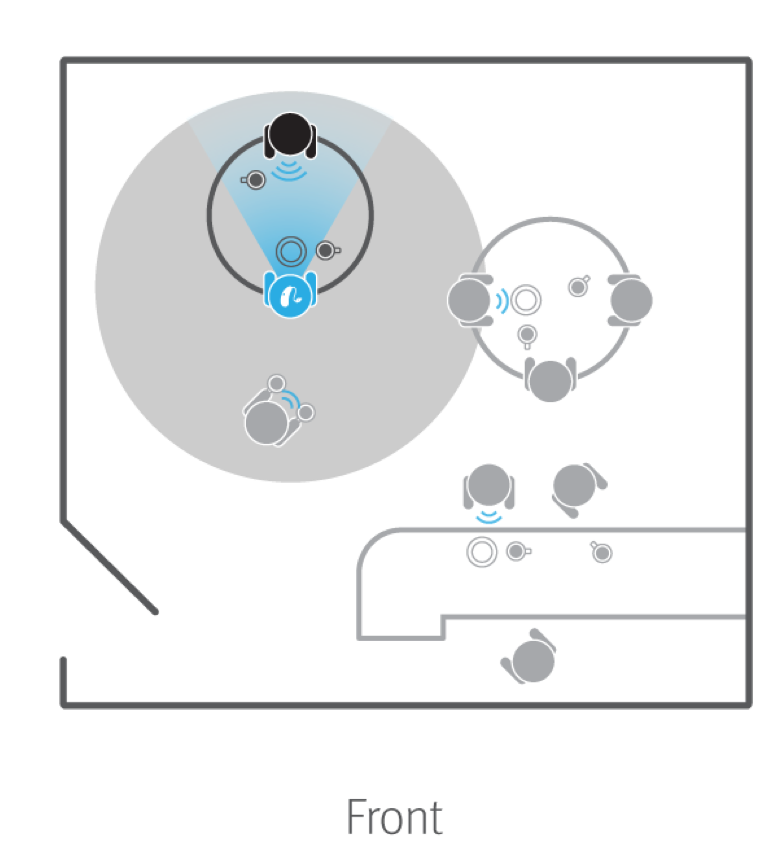
Figure 2. Illustration of how SpeechPro works: speech from front.
If the waiter then comes up and starts talking from behind, Speech Focus will recognize that the dominant speech is coming from behind the patient (Figure 3). In response, Speech Focus will put both hearing aids into a reverse directional pattern. Dynamic Spatial Awareness will again shape the frequency response of the instruments to mimic the natural localization cues that a person with normal hearing would have in that situation.
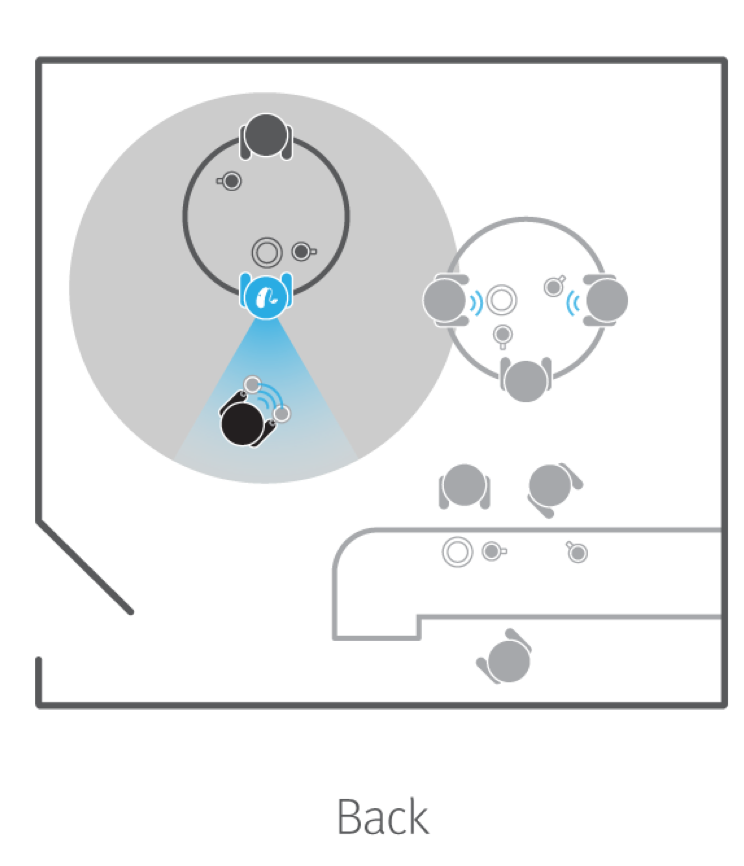
Figure 3. Illustration of how SpeechPro works: speech from back.
I want to point out something about the polar patterns for Speech Focus. The reverse beam of Speech Focus is designed to give emphasis to sounds that are coming from the back. At the same time, it will not eliminate sounds or speech coming from the front. One of the shortcomings of using a traditional rear-facing directional microphone in a noisy environment, is hearing sounds from the front. If someone begins talking from behind, patients wearing a traditional rear-facing directional microphone will tell you they can hear the person behind them, but they can no longer hear the person sitting across the table from them. With Speech Focus, the reverse-facing beam works in such a way that it will help make sure the patient can hear what's happening behind them, without impacting their ability to hear the speech coming from the front.
Going back to the restaurant scenario (Figure 4), an old friend of the patient ends up sitting at the table next to the patient. The patient's friend starts talking to get the patient's attention. Speech Locator will recognize that speech is coming from the right-hand side. The right hearing instrument will move into "side beam" (the target area of the directional beam for the right instrument will pivot to the right). The left instrument is going to remain in a front-facing adaptive beam to make sure that the patient can still hear the person in front of them. In addition, the Dynamic Spatial Awareness feature will shape the frequency response by increasing the gain in the right instrument, and decreasing the gain in the left instrument. In this way, the patient can hear and understand the speech, but they can also localize the speech sounds accordingly.
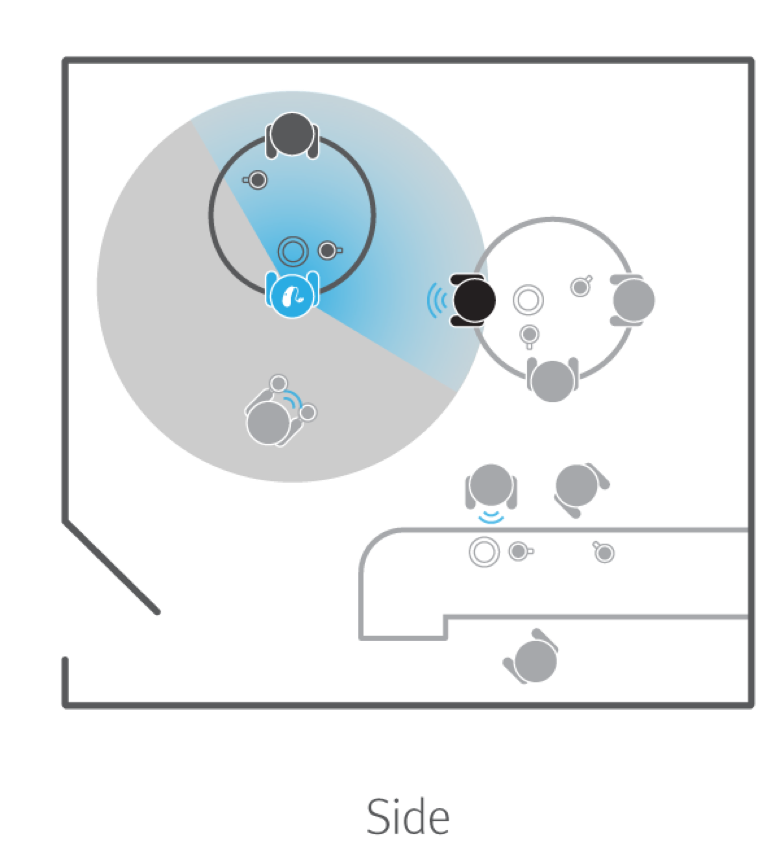
Figure 4. Speech Locator detects speech from the side.
If the patient is sitting in an outdoor cafe, which becomes more crowded and noisier, SpeechPro will start to engage, allowing the patient to still clearly hear the person that they want to hear. If the waiter comes up to the side, or if there are any other speakers, the patient can locate where the other speech sounds are coming from.
Design Updates
In addition to using the EarMatch technology to allow your patients who wear custom hearing instruments to get the most benefit possible from the Tempus technology, we've also made a number of updates to the physical design of the products, to expand the customization options and possibilities for your patients.
Figure 5 shows the 13 wireless directional in a full shell. We can also use the 13 wireless directional faceplate for half shell or canal styles as well, assuming that the ear is large enough to allow for a 13 battery size. When we're using the size 13 battery, the volume control and the integrated push button come with the product by default. One of the new things about the Insera custom products is that the push button is now an optional feature. Our previous wireless directional models always had a push button; we didn't have the ability to build them without a push button. Now with Insera custom products that have the directional microphone, you can choose to have no push button on the instrument. I'll talk more about that in just a moment. The 13 wireless directional also includes a telecoil and easy-t as standard features. You can order it without those upon request. The available receiver options for the 13 wireless directional include the moderate (M), the power (P), the high power (HP), and the super power (SP) receivers. You have your choice of either 40, 50, 60, or 70 dB gain receiver options for the 13 battery.
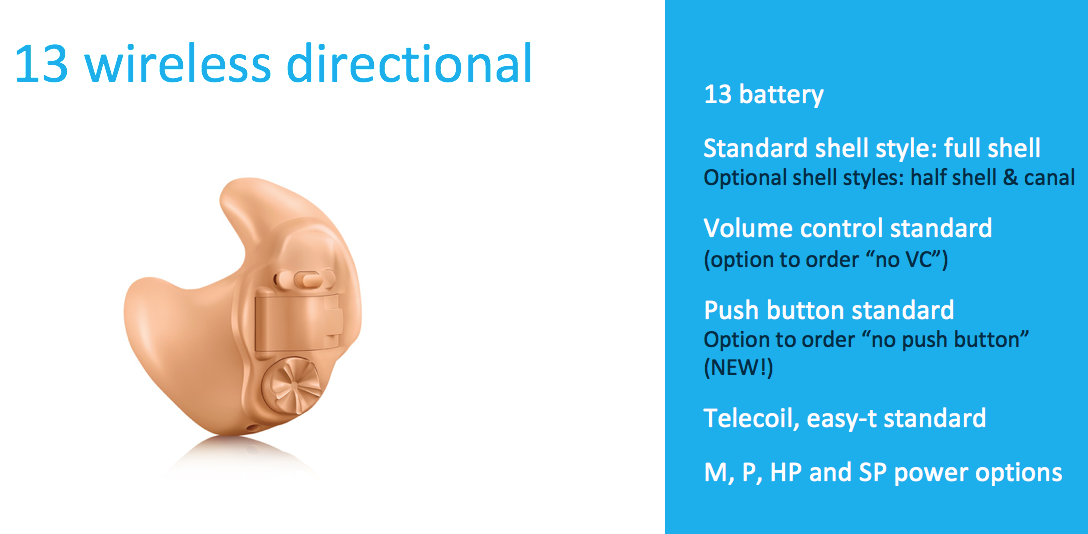
Figure 5. 13 wireless directional.
Next, we have the 312 wireless directional. It's shown in Figure 6 as a canal instrument. The 312 battery faceplate can also be used for a half shell model or full shell model. If you have a patient with a small ear and the size 13 battery doesn't fit, we could also build a full shell or half shell with the 312 battery. It also has the volume control and integrated push button by default, but you can order the instrument without either of those features if desired. The 312 model includes the easy-t as a standard feature, but the telecoil is an optional feature (therefore it will not be included unless you specify that you want it on the order form). All four power options are available (M, P, HP and SP).
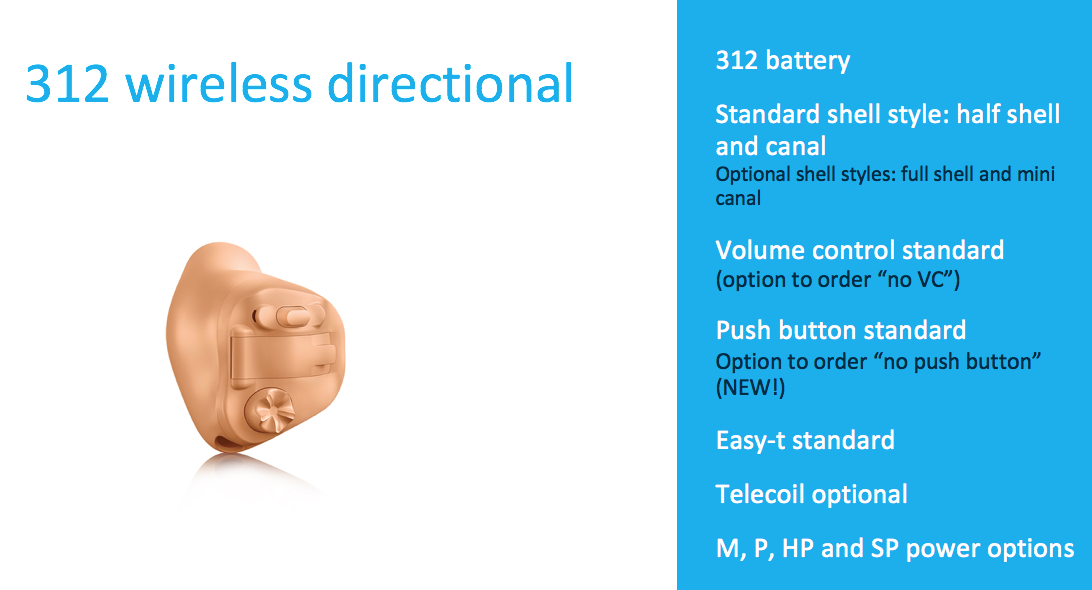
Figure 6. 312 wireless directional.
The wireless and directional capability are available using a 10A battery, which allows us the ability to offer a wireless directional mini canal instrument (Figure 7). If you have a patient where ear size is a challenge, we can also use this 10A faceplate for a canal, half shell or full shell model. You have wireless and directional capability with the 10A battery. It has all of the directional and wireless functionality of the 312 and 13 models. It also has the volume control and integrated push button as standard features, but both of those can be left off upon request. The easy-t is a standard feature. The telecoil is not included, unless you specify that you want a telecoil at the time of the order. When we go to the smaller 10A battery size, the 70 dB super power receiver is no longer an option. For the 10A, your three power options are the 40, 50, and 60 dB gain receivers (M, P and HP).
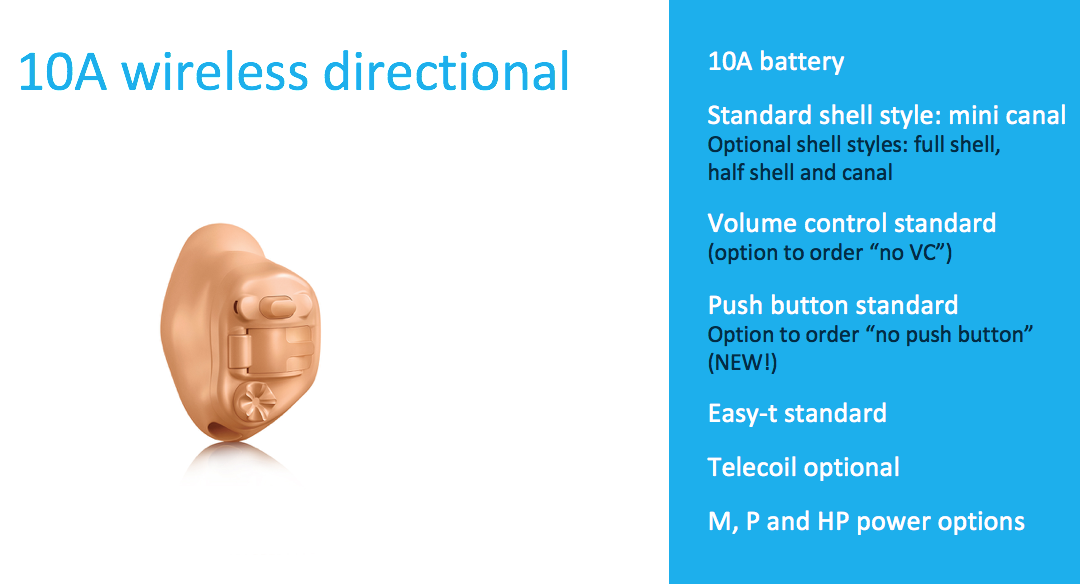
Figure 7. 10A wireless directional.
With Insera, we also offer wireless capability in a 10A omni faceplate (Figure 8); this is the default for a CIC style. We could also use it for a mini canal style, or a larger instrument, if desired. The faceplate of the 10A omni has been redesigned. The most visible change is the removal of the traditional microphone port, which has been replaced with the slit above the battery door. This new design also features a sealed battery compartment boot. For the 10A wireless omni, the easy-t feature continues to be a standard feature. Again, if you want a telecoil, you need to request it, as the size of a telecoil will increase the size of these little hearing aids. Because it's the 10A battery, we don't have the ability to use the 70 dB super power receiver option. We can use the 40, 50, or 60 (M, P and HP).
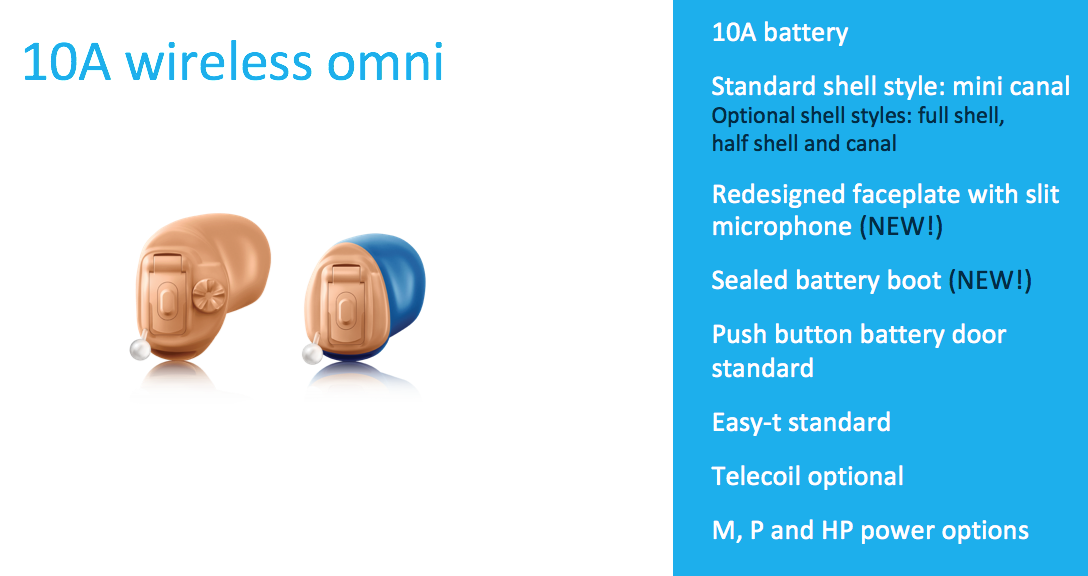
Figure 8. 10A wireless omni.
We also have a non-wireless version of the 10A omni faceplate (Figure 9). It can be used for patients who want a CIC, but have smaller ears, which can't accommodate the wireless capability. It features that same redesigned faceplate as the wireless 10A, but it also uses a new non-wireless hybrid that is 60% smaller than the non-wireless hybrid we used in our previous Stride custom products.
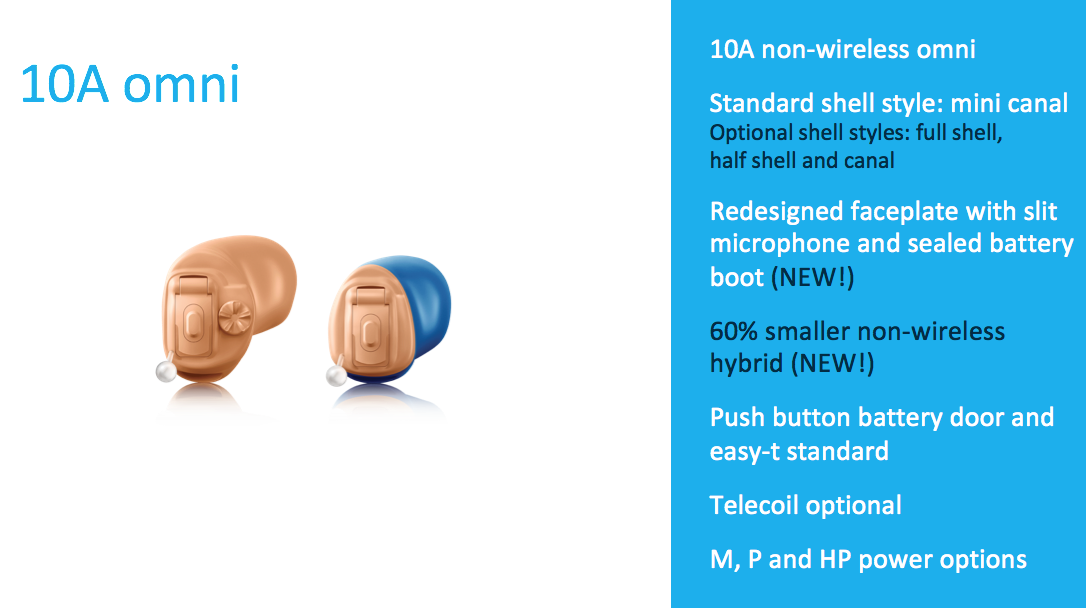
Figure 9. 10A omni.
Finally, for patients seeking the ultimate in discretion in a custom product, the 10A IIC takes advantage of all of these technological improvements to allow the smallest possible IIC (Figure 10). Also because of these advancements, we have the flexibility to build the IIC with a high power receiver, in addition to the 40 dB moderate power receiver.
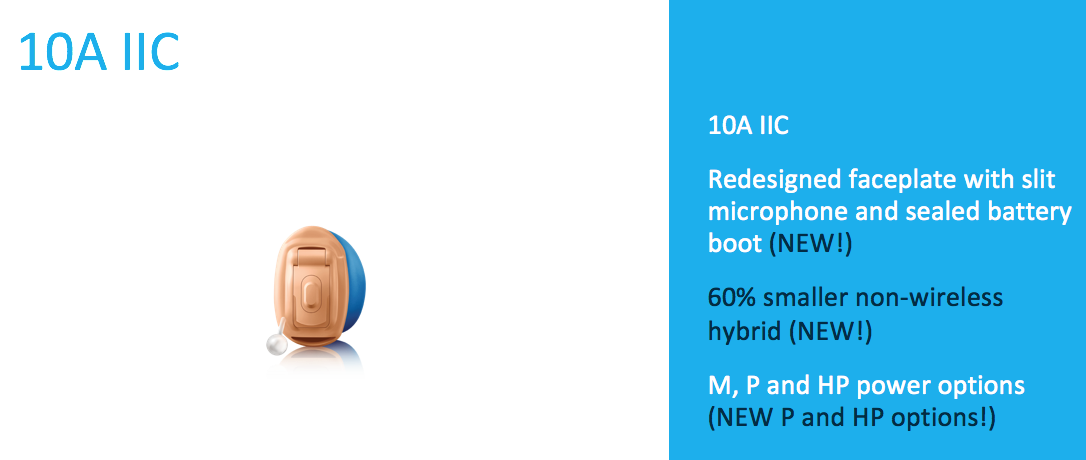
Figure 10. 10A IIC.
Insera 10A Omni Non-Wireless Enhancements
Let’s take a closer look at some of the improvements we have made to the Insera 10a omni non-wireless products that will make Insera a great solution for your patients who are concerned about discretion. The three main areas of improvement include:
- Smaller devices
- Improved battery life
- Greater flexibility
Smaller Devices
Figure 11 shows the changes that pertain to the 10A omni, both the wireless and non-wireless versions. Earlier, I mentioned the use of this sealed battery boot compartment. The sealed battery boot compartment provides a better moisture and debris protection. Also, the microphone and the easy-t sensor are integrated into the battery boot, which helps improve stability and performance reliability. The integrated microphone also means that we no longer need a traditional spout to get from the microphone up to the faceplate of the hearing aid. The 10A omni products that are part of the Insera family use this slit microphone protection above the battery door. There is no mic shield or any other protective screen that has to be cleaned or replaced. You can simply open the battery door, and use a soft bristled brush to remove any debris accumulation. The overall integration of these various components to the battery boot compartment means that we need less space inside the instrument. This will give us more space for the flexibility to do things such as providing larger venting options, or to be able to use a larger receiver for a greater fitting range than what we could have before. We also pick up additional space inside the instrument because we have a new dedicated hybrid for our non-wireless products. With Insera, the non-wireless models now use a new hybrid or chip set, which is 60% smaller than the hybrid we used in our non-wireless Stride devices. With this smaller hybrid, we're able to build smaller CICs and IICs, which provide a more discreet solution for more ears and improve the overall cosmetic appeal of these tiny solutions.
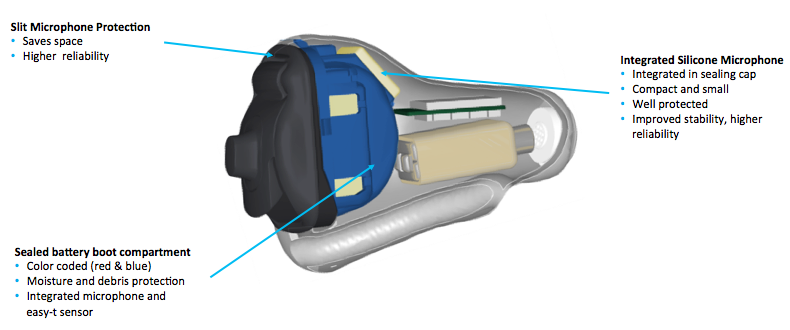
Figure 11. Insera 10A Omni.
Improved Battery Life
This new non-wireless hybrid has 20% less current consumption. That 20% reduction in battery drain is going to translate into roughly a 16-hour improvement in battery life for patients. This means less hassle for the patient as they will not have to change the batteries as often. In the long run, it might translate into a couple of dollars of savings in terms of battery costs, but the bigger advantage is the decreased hassle of not having to change the batteries as often over the course of a year.
Greater Flexibility
Because of the smaller components, we have flexibility advantages by having more leftover space in the ear. As such, we can offer more options to meet your patients' needs. Furthermore, we can fit a greater range of losses, because we now have the option to use either the power or high power receivers in our IICs, whereas previously only the moderate receiver was available.
Expanded Fitting Range
Because we have the choice of the three different receiver options (moderate, power, and high power), we have an expanded fitting range for the Insera IIC, compared to the previous Stride IIC (Figure 12).
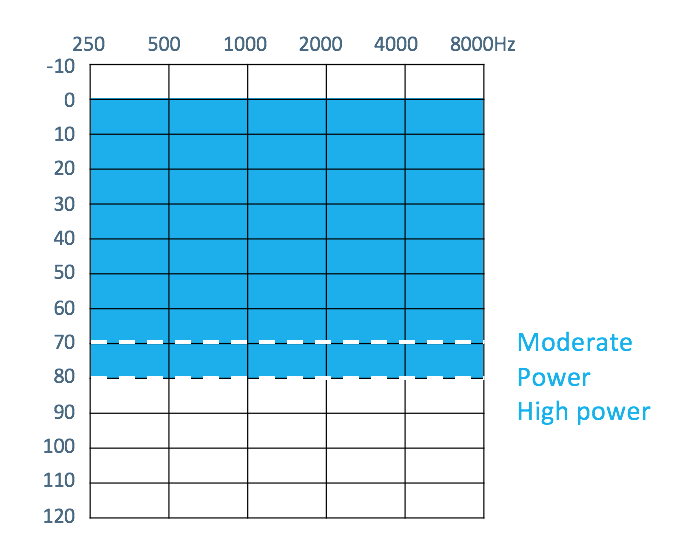
Figure 12. Expanded fitting range.
Other Updates
There have been some updates made for the codification markers on the battery doors for our 13 and 312 faceplates (Figure 13). When we look on the bottom of the battery door, you will notice that a color ring has been added (either red or blue). This provides easier visibility to be able to look at the battery door and know whether the instrument is for the right or left ear. This ease of visibility will benefit not only the patients, but also the clinicians.
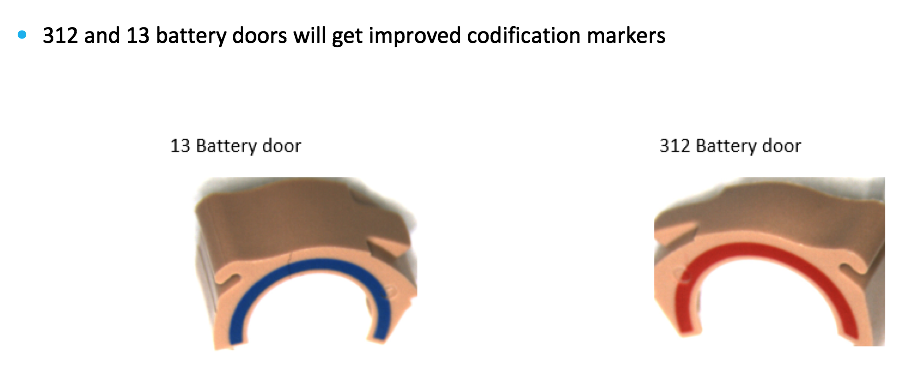
Figure 13. New codification markers for 312 and 13.
Coming soon, there will also be an updated design for the 10A battery door that does not have the integrated push button. In Figure 14, you'll notice that the finger catch on the door runs a little bit further down the length of the door and also now runs the full width of the door. The newly designed catch is intended to make it easier for handling by patients. The interior of the battery tray will now be color-coded either red or blue. Again, this will benefit the patient and clinician by helping to identify which are for the right or left instrument.
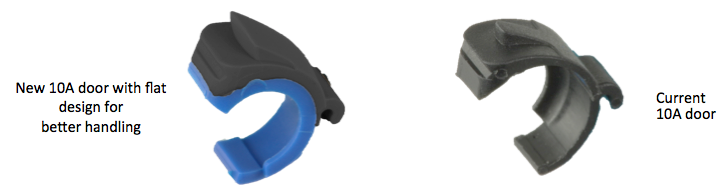
Figure 14. New 10A battery door without push button.
Insera Performance Profile
Let's look at some additional information about Insera's performance profile. We offer the same five color options that we did with the Stride custom products: beige, brown, cocoa, tan, and also the black faceplate option. The black faceplate is only available for the 10A faceplate, intended for the IICs that are going to sit further down into the ear canal (Figure 15).
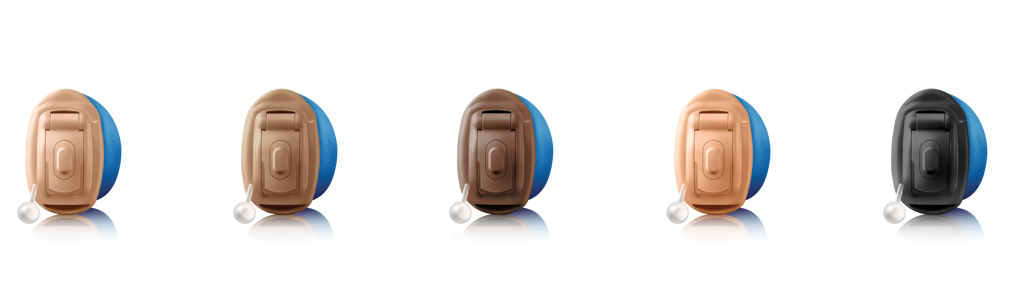
Figure 15. Insera color options.
The fitting ranges for the four different receiver options are shown in Figure 16. There is a slight change to the output of the receivers compared to the previous Stride custom products, but the fitting ranges remain unchanged.
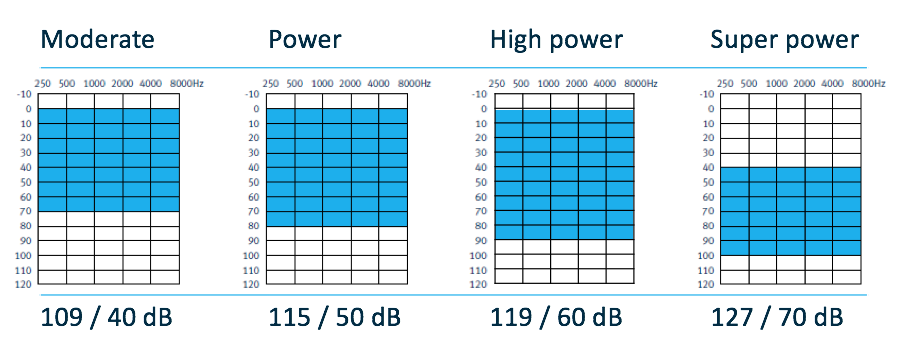
Figure 16. Fitting ranges for the four receiver options.
In terms of performance and configuration options, they're much the same as it was for the Stride custom products, with a couple of notable changes. The most significant one is that the 10A IIC now has the power and high power receiver options.
When it comes to accessory compatibility, there are no changes to our accessory portfolio. All of the wireless models are compatible with all of our current wireless accessories (iCube II, Remote Control 2, uDirect 3, uTV 3, uMic, uStream, uControl). For the 10A IIC, we'll continue to offer the option of the magnetic wand IIC remote.
The feature set at each technology level of Insera is the same as those we introduced with the Moxi and RIC BTEs in the spring of 2017 (Figure 17). The Pro and the 800 level both have all seven environments as part of the automatic program. The 700 has six environments. The only one that's not part of the automatic is the Music environment. The 600 technology level has three environments in the automatic program. The 500 has our AutoMic feature; it can automatically switch from omni to directional, but otherwise it's a single-base memory within the 500.
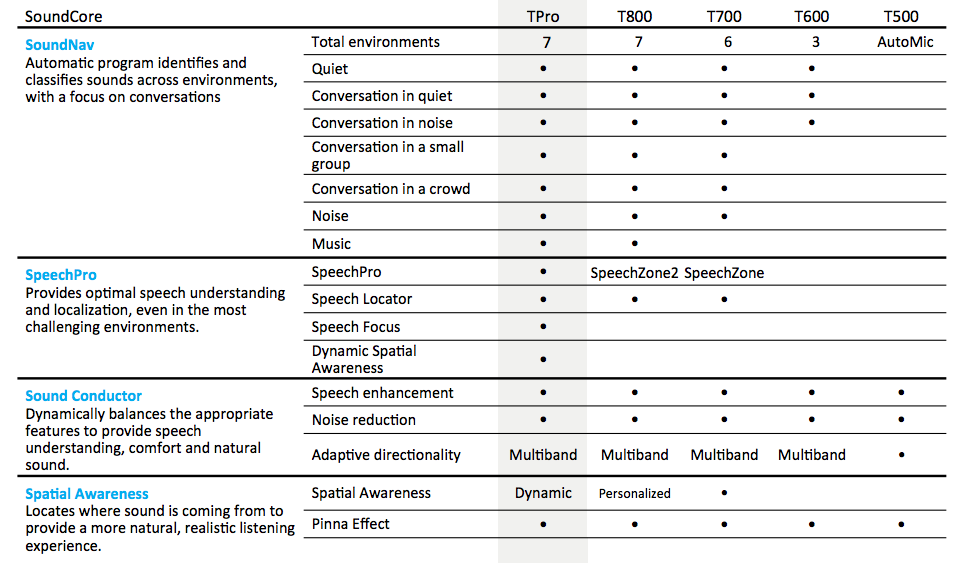
Figure 17. Feature set at each technology level of Insera.
When we look at the Pro and 800 technology levels on the Tempus platform, the difference between these two levels is due to features based on having directional microphone technology (Figure 18). The SpeechPro feature, which includes Dynamic Spatial awareness, is based on having directional microphones in the devices. With the omnidirectional custom instruments, there would be no difference between the 800 and Pro in those models. Therefore, in Insera, there is no “Pro” technology level in the non-wireless or omnidirectional styles. Pro will be available in the full shell, half shell, canal and mini-canal models. The 800 will be the highest technology level available for the IIC, CIC and omnidirectional mini canal models.
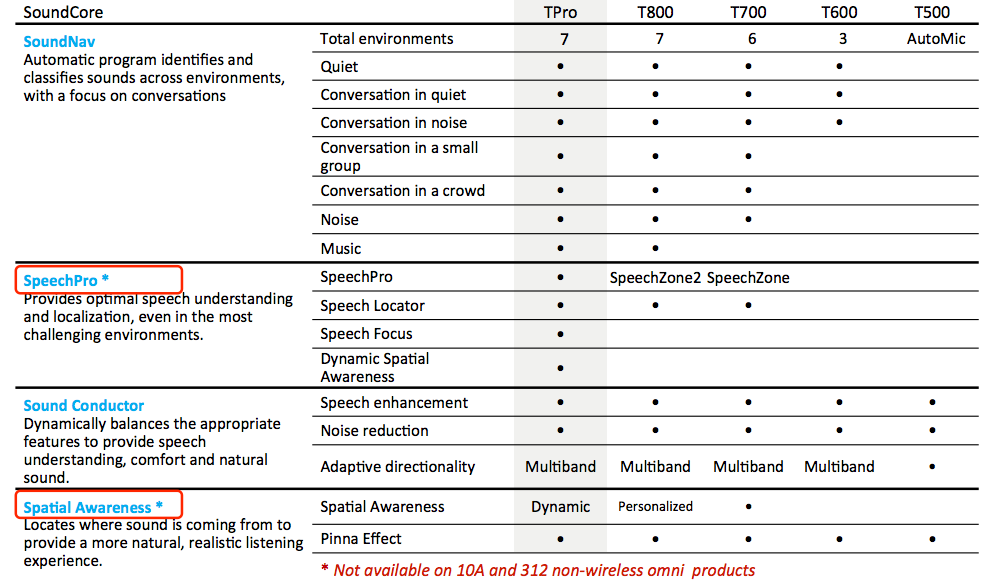
Figure 18. Difference between Pro and 800 technology levels.
To reiterate, thanks to Unitron's sophisticated EarMatch technology, your patients who need or prefer custom solutions are going to be able to take full advantage of all of the great technology that makes our Tempus platform the best in conversations.
Unitron's Rechargeable Solution
The next topic today is the expansion of our rechargeable technology portfolio. We launched our first rechargeable hearing instrument in the spring of 2017, and it represented our commitment to bringing products and innovations to the market that patients want and need. A survey conducted of over 500 hearing instrument wearers on hearingtracker.com found that 70% of patients would prefer to have hearing aids that are rechargeable. Additionally, two out of three patients surveyed expressed a desire for rechargeable instruments that would also be able to use disposable batteries. It was clear that we needed to provide a solution to ensure our patients never run out of charge. Patients want a backup plan in case something happens and they're not able to charge their instruments.
Since its launch, our rechargeable solution has been well received by healthcare professionals around the world. One comment that we received from a clinician (Lynne, UK) is that our rechargeable solution “frees [her] clients from the worry of their batteries going dead at the most inconvenient times.” Another customer proclaimed, “Make all my Moxi Fit orders rechargeable? Why wouldn’t I?” This particular customer switched over all of her Moxi Fit RIC patients to the rechargeable option, because she appreciates the convenience and ease of use for her patients.
As part the product launch for the fall of 2017, we are able to bring an award-winning BTE design into our portfolio of rechargeable technology, joining the world's smallest rechargeable hearing instrument. We are pleased to introduce the rechargeable version of the Stride M BTE: the Stride M R. This expands our rechargeable options to now include our BTE line. We'll have two rechargeable styles based on our award-winning design that feature that seamless integration of the rechargeable battery door into the design of the shell. The Stride M R gives an option for BTE wearers who not only want a small instrument, but also want rechargeable capability.
For some patients with certain ear conditions, BTEs are a more suitable solution. BTEs can also be easier to clean and maintain than RICs, especially for patients with dexterity issues. Furthermore, a BTE can also mean a slightly lower cost of ownership over the life of the hearing aid, because you're not having to replace receivers. You can simply pop off the slim tube and replace it with a new slim tube. There are also circumstances where BTEs may offer a bit more flexibility. Being able to use the slim tube or ear hook gives clinicians an option for patients that have a small, narrow ear or a sharp bend in the canal; in those cases a receiver may not fit comfortably. Our rechargeable BTE is an alternative for patients where RICs aren't a good option.
Moxi Fit R allows the clinician to make the hearing instruments rechargeable from the beginning, or to retrofit and add rechargeability at a later point in time. The rechargeable solution is backwards compatible through the use of a rechargeable kit. If you have a patient wearing either an existing Moxi Fit instrument or is wearing the Stride M BTE, you can order a rechargeable kit.
Our rechargeable kit contains everything needed to convert a pair of existing Moxi Fit or Stride M into rechargeable hearing instruments:
- Charging base
- 2 rechargeable battery doors
- 2 silver zinc rechargeable batteries
- 2 battery door hinge pins
- 1 pin removal tool
- An instruction card
The charging base is specific to either Stride M R or Moxi Fit R and is marked accordingly with a label. The charging base uses a USB charging cable that can either be plugged into a traditional power outlet or into any USB power source, including laptops and portable power banks. The inlay ports, where the instrument plugs into the charger base, are shaped differently for the two different devices. When you order a rechargeable kit, customer service will confirm whether you want the rechargeable kit for the Moxi Fit or for the Stride M. Then, it is as simple as replacing the battery door. Remove the battery door pin, swap out the battery door, and replace the pin.
When we introduced the Moxi Fit Rechargeable, we introduced it in the six most common color options. The Stride M Rechargeable is also available in those same six colors (Figure 19). From left to right we have beige, espresso, platinum, pewter, pewter shine, and amber suede. These six color choices make up approximately 80 to 85% of the colors that we sell in our RIC and BTE products today, and should be able to provide solutions for nearly all of your patients.
Figure 19. Moxi Fit R color options.
With this expansion, we can now offer the silver zinc rechargeable technology option not just for the Moxi RICs, but also for the Stride BTEs.
What's New in TrueFit 3.5?
What’s new in TrueFit 3.5? There are 5 key items that we will walk through today:
- Insera support
- Stride M rechargeable support
- Online update improvements (automatic software updates)
- Lifestyle screen improvements
- Technology Change screen improvements
Insera Support
The new version of TrueFit is required to program the Insera products. Within the software, the new Insera products show up as their own product family on the left-hand side of the screen (Figure 20). Even though it is the newest of the products introduced, it does appear as the third one down on the list, because they are ranked by popularity (industry-wide, RICs are the most popular of the shell styles, followed by BTEs and then by custom). The T at the front of each grouping represents that it's on the Tempus platform.
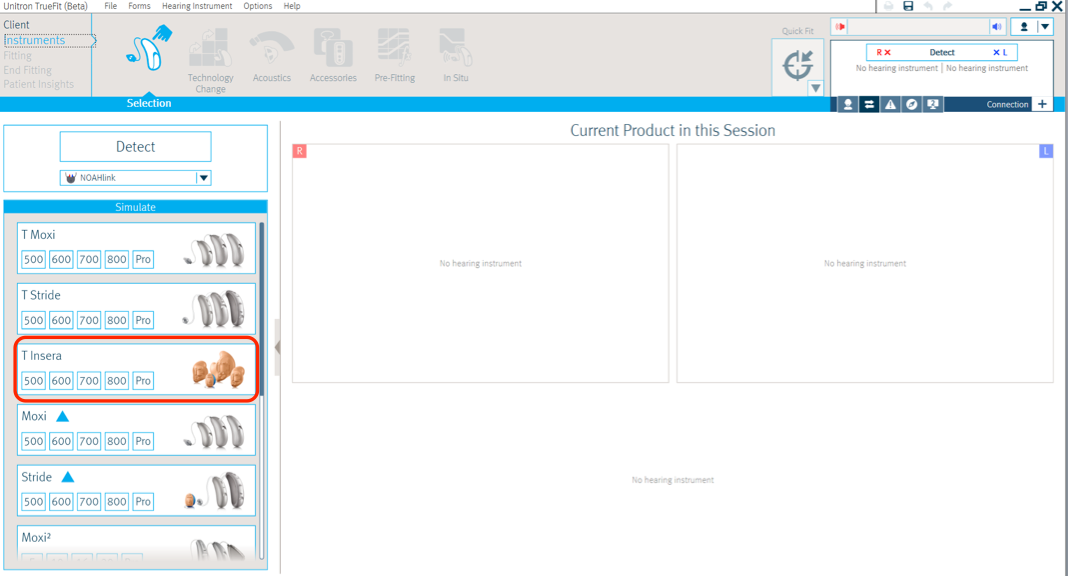
Figure 20. Insera support.
With the previous line of Stride ITE products, Custom Non-Wireless 10A IIC was available as a dedicated Style option. With the launch of Insera, we have changed this and made the Custom Non-Wireless IIC an option within the “Shell” dropdown menu (Figure 21).
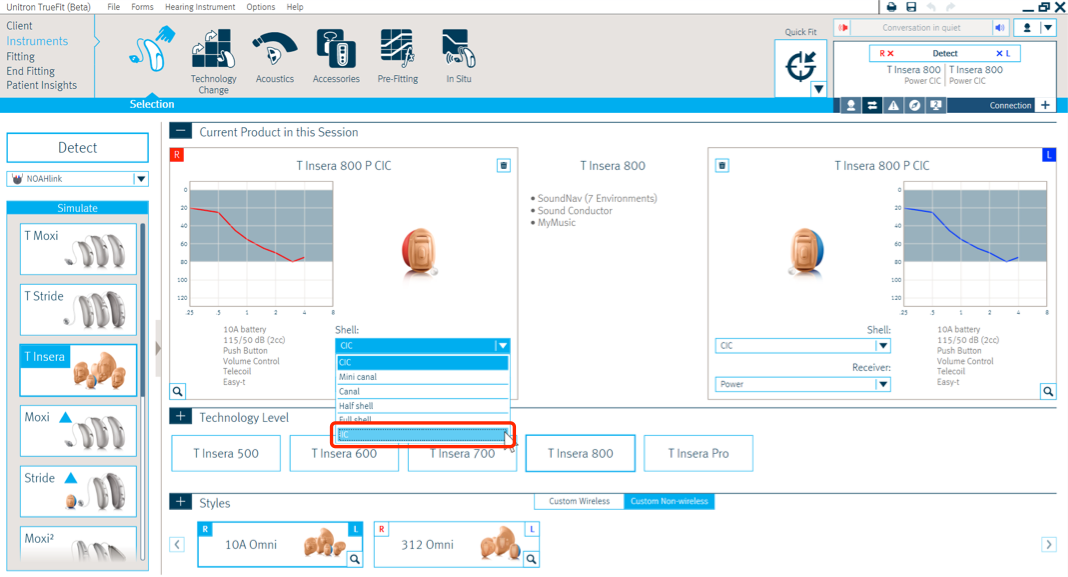
Figure 21. Custom Non-Wireless IIC.
Stride M Rechargeable Support
In TrueFit 3.5, to add the rechargeable kit to a Stride M fitting, simply go to the accessories screen, select "rechargeable kit," and then click "include rechargeable kit in the fitting" (Figure 22). Including the kit in the fitting doesn't change anything about the hearing aids. However, by adding it in the software, information about the charging unit is included when you send the patient an email with the links to their personalized care and cleaning videos (or if they access the tutorial videos through the uControl app).
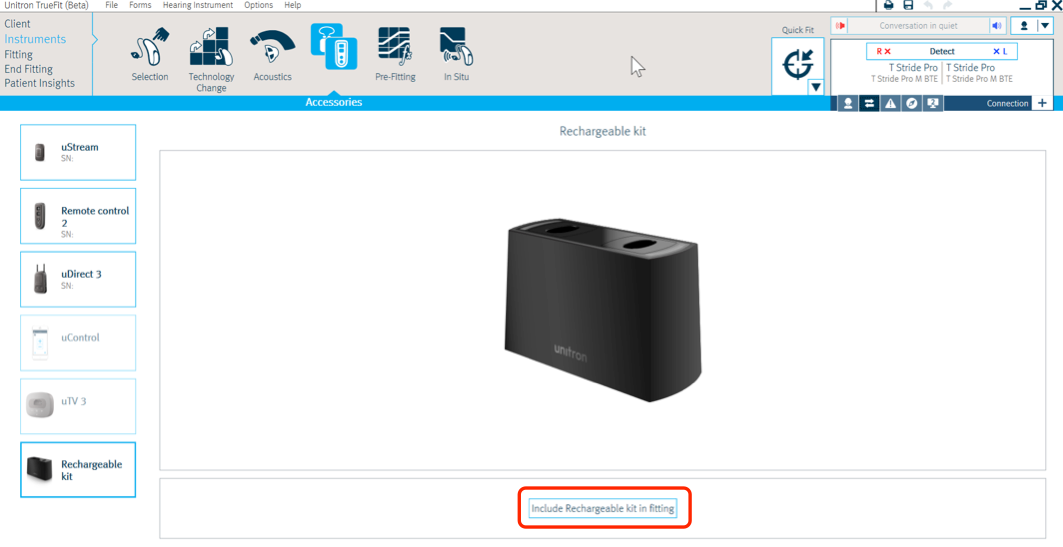
Figure 22. Rechargeable kit information.
Online Software Update Improvements
In previous versions of TrueFit (3.4 and 3.3), when an online software update was available, you would see an orange-yellow cloud icon appear in the upper right hand corner of the screen. Over time, we found that because it's rather small, it wasn't very noticeable and clinicians would miss it. Even if they did see the cloud icon, they still needed to manually click on it to start downloading the software. Conveniently, once TrueFit 3.5 has been installed on a computer, any future online update will be downloaded in the background automatically. You don't have to manually begin the download process. Once the download is complete, you can click the cloud icon to start the installation of the update; or, when TrueFit is closed, you'll see a dialog box (Figure 23) notifying you that there is an update ready to be installed. At that point, you will have three options:
- Install now: Updates will be installed immediately.
- Ignore: You will need to manually install the updates later.
- Close Unitron TrueFit: You will see the dialog reminder box again next time you use TrueFit.
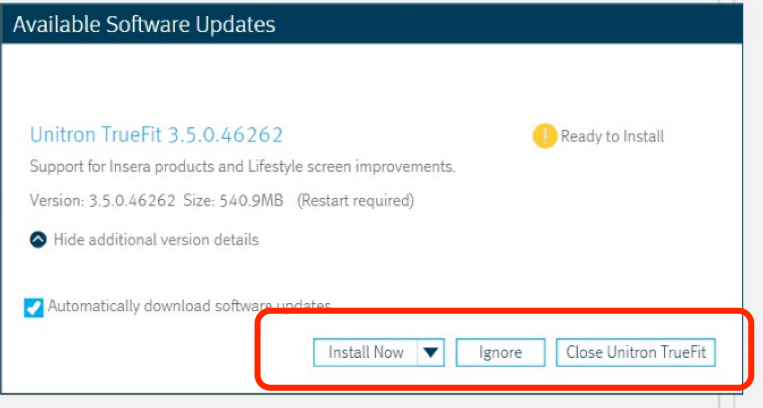
Figure 23. Installing software updates.
Lifestyle Screen Improvements
Based on feedback from clinicians, we made some improvements in TrueFit 3.5 in how we display the information in the lifestyle screen with patient insights. When we launched Tempus, we found that using the environment coverage of SoundNav alone was not enough to differentiate the technology level performance. We had to increase our focus on other performance aspects and features that we offer in the higher technology levels. Another issue was the order of the environments. In 3.4, the order of these seven environments was dynamic: it would always be arranged from high to low, based on the usage percentage in each environment. This arrangement made it easy to show which environments the patient spent the most time in, however it wasn't consistent from patient to patient or across different fitting sessions for the same patient. As such, it was difficult for clinicians to figure out if there was any particular pattern, or to see what was changing. The Pro Key feature list to help explain the features between the different technology was a plain list. It lacked any visual cues to highlight the differences between technology levels. It wasn't very useful to be able to help demonstrate the benefits of upgrading to a higher technology level.
In Figure 24, you can see the new lifestyle screen in TrueFit 3.5. The environments are now grouped according to conversation, non-conversation, and music. All of the environments are in a fixed order, in a manner consistent with other screens (e.g., the input selection screen or the configure feature screen). They will always appear in the order shown here: conversation in quiet, in small group, in a crowd, in noise, quiet with no speech, noise with no speech, and music. Furthermore, we've introduced weekly average usage hours. In addition to having the percentage information for each environment, we've added an extrapolation of what that would mean in terms of hours on a weekly basis, to help facilitate a more meaningful conversation with the patient. As in the previous version of TrueFit, the blue bars indicate the SoundNav environments in which the patient spent time, and that are supported by the technology level of the patient. The white bars indicate environments in which the patient spent time, but were not supported by the technology level of their instruments.
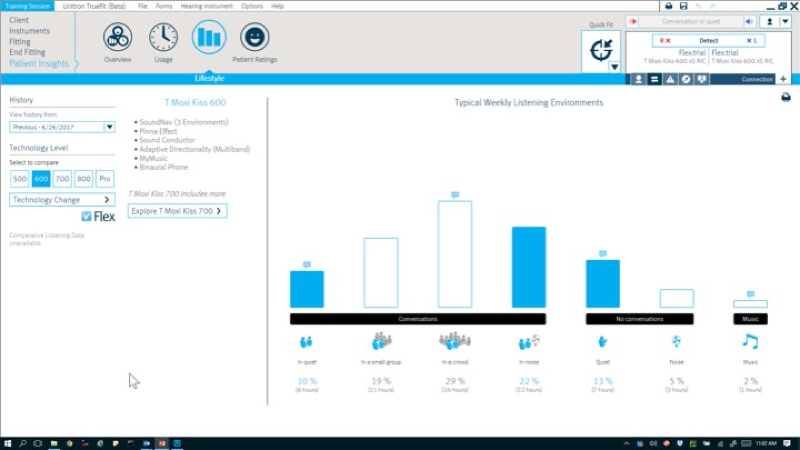
Figure 24. TrueFit v.3.5 Lifestyle screen.
Another improvement is the printer icon in the upper right hand corner of the lifestyle summary screen. Clicking this icon will allow you to print a copy of the current lifestyle data. You may want to print a copy so you can write notes to send home with the patient, if you're considering different technology levels. You may want to print a copy to keep in the patient's file for your records. Finally, on the left side of Figure 25, we show a complete list of the key features of the patient's current technology level (e.g., T Moxi Kiss 600). This summary is convenient to be able to review with your patient. Below the feature list, we've also added a button to take you to the next higher technology level, so you can see in more detail what the patient would gain by moving up in technology. We've tried to create a better visual representation so that's it's easier to see the list of technologies the patient will gain by moving to a higher technology level.
We've also added a usage percentage next to their SpeechPro, SpeechZone 2 or SpeechZone, depending on their technology level (Figure 25). In this particular example, the percentage next to SpeechPro (51%) means that the patient would have benefited from SpeechPro in 51% of their listening times, if they had upgraded from the 600 or something lower. That percentage is calculated by TrueFit by adding up the amount of time that the patient spends in conversation in crowd and conversation in noise. These are the two environments where either the SpeechZone, SpeechZone 2, or SpeechPro feature would be active for the patient. The more time the patient spends in these two environments, the more likely they are to be able to appreciate the enhanced speech in noise performance of the 700, 800, or Pro technology levels.
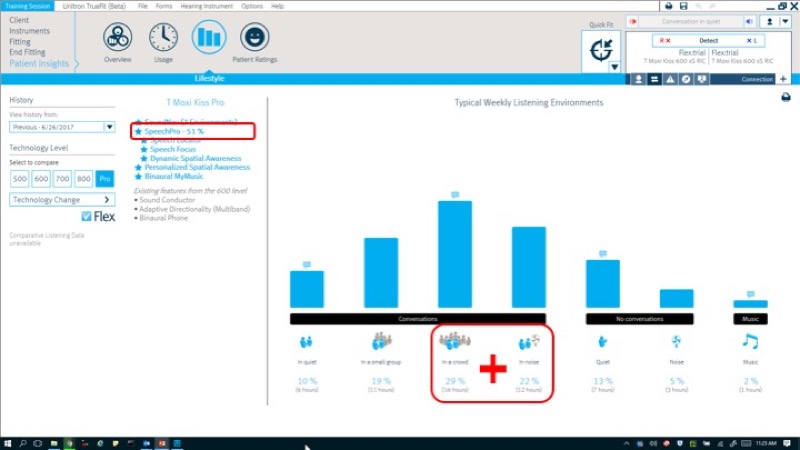
Figure 25. Usage percentage.
One of the benefits of using Flex:trial instruments is they allow you to evaluate the performance for any of the various technology levels against the patient's actual listening environments. Not only do we show the features that a patient would gain if they moved up to a higher technology level, we'll also show a list of features that the patient would lose if they went down to a lower technology level from what they've been wearing in their Flex:trial devices (Figure 26). In this case, if we went from a T Moxi Kiss 600 down to the 500, the patient would lose the three-environment SoundNav automatic program, the multi-band adaptive directional microphones, and they would lose the binaural phone feature.
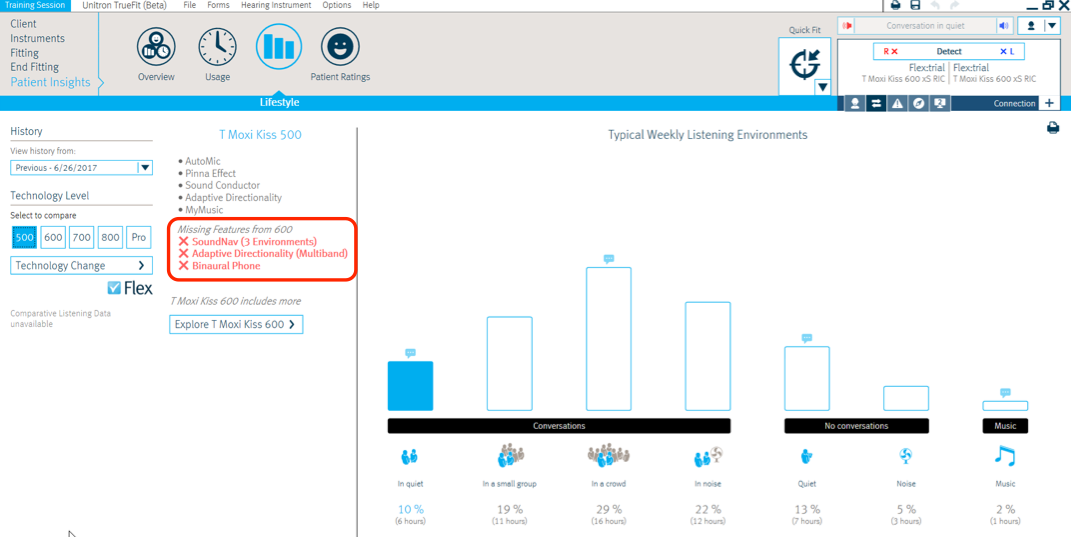
Figure 26. Technology level comparison.
Additionally TrueFit will no longer show the 500-technology level as having no coverage for the patient's listening environments. With TrueFit 3.5, we now show that the conversation in quiet environment is covered by the 500-technology level, since the AutoMic program is optimized for the conversation in quiet situation.
Technology Change Screen Improvements
Prior to TrueFit 3.5, the technology change screen was a simple bullet point list of the features at each technology level, but it was hard to quickly distinguish the differences between technology levels.
In the new technology change screen, the technology level is represented as a ladder (Figure 27). Compared to previous versions, the ladder gives a stronger visual cue implying that the higher level of technology is going to outperform the lower level (similar to the stair step image that we've used in other marketing support materials). We have also reversed the order of the technology levels. They now go left to right, from lowest to highest. Prior versions started with the Pro level of technology on the left and moved to the lower levels as we went to the right. To try and reinforce this stair step/ladder approach that we're moving up in technology, on any screen where we list the technology levels, they will now be presented from the lowest technology level on the left to the highest technology level on the right. We borrowed that same element from the lifestyle screen to highlight what the patient would gain by moving up to a level. For example, at the 600 level, as indicated by the blue font and stars, it shows what we would gain by going up from the 500 level. At the 700 level, it contains the new features that would be available in the 700, as well as what's coming up from the 600.
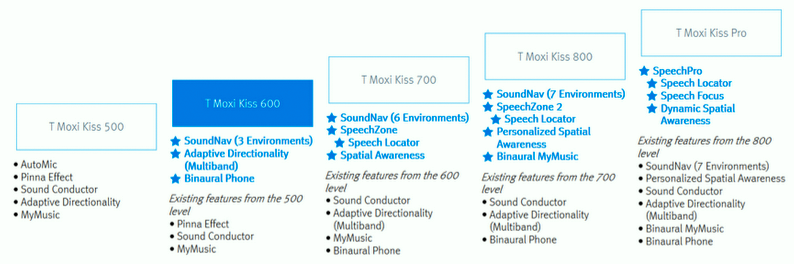
Figure 27. Technology change screen TrueFit v.3.5.
In closing, these are the updates and improvements that are launching in the fall of 2017. Please feel free to reach out to your Unitron inside or outside sales representative for any additional details.
Citation
Carls, S., Petraitis, K., & Christman, B. (2017, October). Fall 2017 - Introduction to Tempus. AudiologyOnline, Article 21311. Retrieved from www.audiologyonline.com