Learning Outcomes
After this course learners will be able to:
- Identify how simulation technology can help training within audiology
- Explain specific use cases of how to implement patient simulators into existing lesson plans
- Implement CARL into your lessons and explain the advantages to using the patient simulator
Introduction
Clinical training programs for hearing healthcare professionals aim to develop a wide range of competencies, including not only the scientific and theoretical knowledge of our field, but also hands-on literacy in clinical procedures. An emerging tool in the broader healthcare professional training literature is the use of patient simulators, such as manikins, to help students develop their competency in using equipment and performing specific procedures before entering clinic. The evidence clearly supports the use of simulators and establishes them as a tool to enhance student knowledge and performance as well as the students’ perceptions of their own competence.
In the audiological literature, some authors have written about the advantages of simulation for specific procedures (Brown, 2017; Dzulkarnain et al., 2015; Stiles, 2019). This previous literature and developments within simulation has primarily been focused on clinical procedures that have significant hands-on components. Particularly when the clinical scenario cannot be performed by practicing on other students, simulation allows for hands-on experience with procedures in a training environment before affecting the care of patients in a clinical setting. Examples of this type of procedure include fitting and verification of hearing aids (especially those with moderate to high gain), cerumen management, and procedures with surgically altered or congenitally malformed ear anatomies (see Brown, 2017 for a review). For some of these procedures, the risks imposed by novice practitioners may be higher; use of a simulator in the early stages of training may help to avoid procedural errors made on a practice partner by allowing students to practice on a manikin in the earliest stages of training.
For hearing healthcare students, manikin-based simulation has a potentially broad range of applications if a patient is simulated and appropriate for student practice of procedures that are performed on and in the ear. Recognizing this need while looking to accommodate a growing class-size, we collaborated to develop a manikin-based simulator that could provide a head, neck, pinna, and ear canal that would be suitable for use with on-head, on-ear procedures (Koch, et al., 2019a). We began by developing a simulator for training probe-tube microphone placement, and found that it improved student probe tube placement accuracy and self-confidence (Koch et al., 2019b). Anecdotally, students commented on the convenience of a simulation manikin, most often that they were able to practice on their own without needing to recruit a practice partner.
There were several key design requirements for a realistic patient simulator: the pinna and ear canal needed to have realistic anatomy, good mobility and texture, and be mounted on a realistic head and shoulders. These components allow us to set up equipment on the manikin in the same placements and orientations that would be used on an actual patient. Options for either an opaque or clear ear canal allowed use of the simulator in the context of either realistic otoscopy with the opaque ear, or a view-from-inside option using the clear ear with an in-head camera plus dedicated software. For example, the in-head camera can be used to measure the probe tube placement distance from the eardrum, and can allow students to practice with visualization of the placement of the tube both externally (with an otoscope) and internally (with the camera). Instructors can also use the system to test competency, with objective indicators such as time taken to perform the procedure, number of contacts with the eardrum, and absolute distance from the eardrum in millimeters. Although this system was originally developed for training the details of probe-tube placement only, we found that the realism and utility of the manikin was also effective in training other areas of practice. In this article, we will discuss a few such applications, with a focus on amplification coursework.
The Amplification Curriculum: When Might We Use a Manikin?
As discussed above, simulators in teaching provide a safe early training “sandbox” in which novice clinicians can walk through a new procedure and master a set of micro-skills within complex tasks including equipment setup, procedural steps, and response interpretation. In this section we will review usage of the CARL manikin in the earliest stages of a first course on hearing aids, with a focus on creating learning activities that incorporate several learning goals into each week of the course.
At Western, our first hearing aids course is held in the 2ndsemester, after students have completed coursework on the basic adult audiometric battery and are able to complete a case history, otoscopy, tympanometry, and audiometry on one another and/or a compliant lab partner. The course co-occurs with their first part-time onsite placement in our in-house Audiology clinic, where they participate in appointments for a broad range of patients including those who use hearing aids. The course combines traditional lecture-style learning and student-directed and experiential learning activities. The experiential learning activities are provided in a structured workbook format that progresses from basic skills such as identifying physical features of hearing aids, and has a final outcome expectation that students will be able to perform a complete hearing aid fitting with on-ear or coupler-based verification, fitting to either DSLv5 or NAL-NL2 targets across multiple input levels, and interpretation of the unaided versus aided Speech Intelligibility Index (SII) values. This set of skills requires mastery of probe-tube placement, on-ear hearing aid setups and sizing, use of software for programming hearing aids including connections, use and selection of prescriptive targets, and use of hearing aid analyzers for both fitting and quality control testing. Many of these skills can be performed on a simulated head with pinnae, so we have begun incorporation of the CARL manikin into lab activities. Selected lab activities are outlined below.
Lesson 1: Physical Features and Sizing of Hearing Aids
Knowledge of the physical features of hearing aids is a seemingly simple issue, requiring students to be able to identify the style and parts of the main categories of hearing aids. It is possible to cover this in a traditional lecture style with textbook readings, but in this course we have developed an experiential learning module that allows students to learn the names and parts with hands-on learning (Table 1). We integrate textbook readings to cover advantages and disadvantages of varying battery sizes, of custom-made versus modular instruments, and other topics related to physical features. Instructor preparation for this learning activity includes finding or ordering several examples of each hearing aid style: two or three each of receiver-in-the canal (RIC), behind-the-ear (BTE) with both slimtubes and earmolds; in-the-ear (ITE) and/or in-the-canal (ITC) and some examples of canal-worn devices such as completely-in-the-canal (CIC) or invisible-in-the-canal (IIC). We chose multiple different brands and ears of each style (Figure 1). This activity was designed to use hearing aids that fit the ears of the CARL manikin. We achieved this by making earmolds for CARL, choosing some RIC and BTEs with slimtubes of the appropriate sizes, and sorting through some inventory of donated older hearing aids to find custom devices that (approximately) fit CARL’s ears. We’ve more recently obtained a larger set of teaching custom earmolds and devices for CARL. This takes advantage of CARL’s known ear canal anatomies. One advantage of using older donated custom hearing aids is that not all of them fit CARL’s ears equally well, which allowed student evaluation of which ones fit well versus poorly. Another is that older donated (and sometimes already malfunctioning) devices were a low-cost solution. These are great examples of a main advantage of a simulator: the freedom to do things incorrectly to let them experience what “wrong” looks like. While we may be (rightly) reluctant to do things wrong on purpose when teaching with lab partners or with patients, it is perfectly fine to do things wrong on purpose with CARL.
Learning Mode | Concrete Experience |
Learning goals | Students will learn the physical parts and names of hearing aids. |
Students will learn how to insert and remove hearing aids and to appraise the physical fit and tightness. | |
Students will learn to power up a hearing aid, experience feedback and feedback cancellation. | |
Students will learn to distinguish between a slimtube and a RIC. | |
Lesson design | Rotating stations (one for BTEs with earmolds, one for custom shell products, one for slimtubes and RICs). Each station has a guidance sheet with photos and prompts (e.g., Find 2 ITE hearing aids; how can you figure out which is right and left? Hint: there are multiple ways). Rotate stations after 15 to 20 minutes. |
Instructor role | Answer questions, help resolve problems, confirm when correct. |
Student deliverables | Complete all stations and activities. |
Evaluative or formative? | Formative, primary focus was to experience all three stations, no homework is handed in or graded. |
Impact | Rapid acquisition of vocabulary and acronyms at the beginning of the course with high retention rates. |
Table 1. Lesson 1 Design and Summary
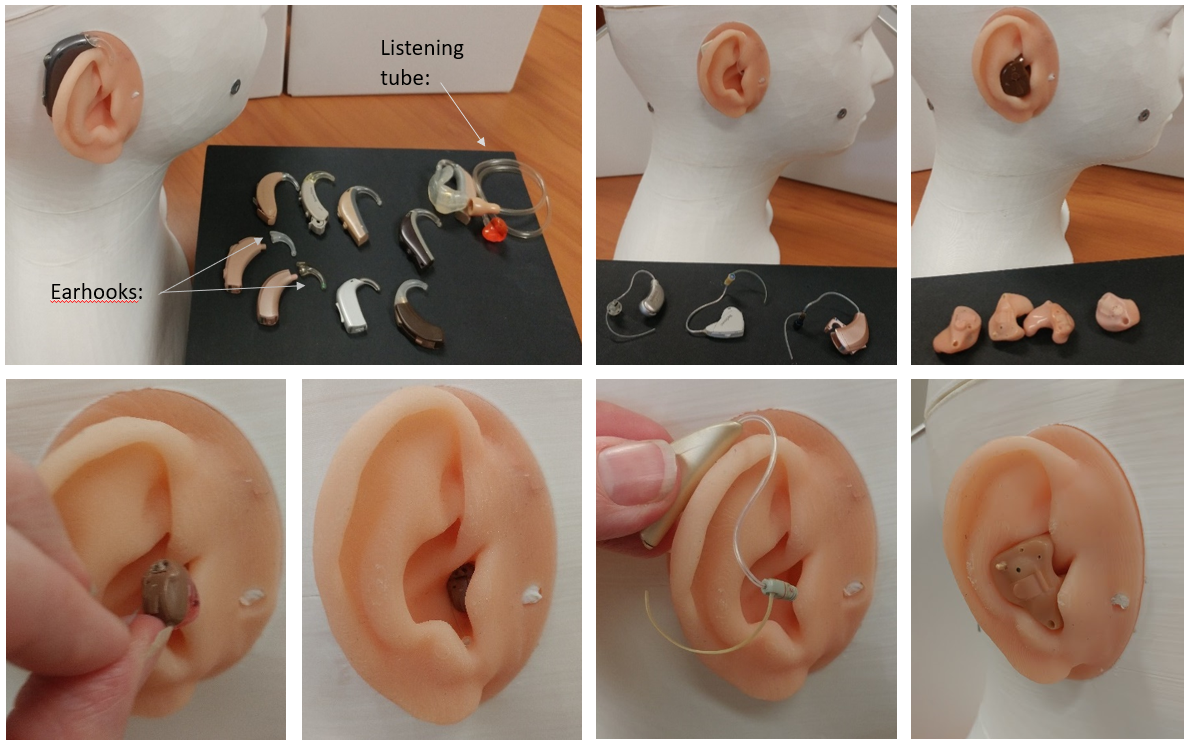
Figure 1. Teaching set-ups for a lab activity to introduce styles of hearing aids, with insertion/removal.
A hands-on activity sheet and multiple stations were set up and the students were split into groups. One hearing aid style was assigned to each station, and the students were instructed to practice battery insertion/removal, insertion/removal of the devices in CARL’s ears, and given checklists of parts and pieces of equipment to identify. This included microphones, volume controls, programming ports, earhooks, filters, domes, listening tubes, battery testers, earpieces, and noting the difference between slimtubes and RIC wires. Relevant pages of the course textbook (e.g., 242-245, 248-249 and summary on page 271for Ricketts, Bentler, and Mueller (2019)) were provided along with exploration prompts (Table 1) as part of the required assignment. Students were also provided with a short online consumer-directed video that explains hearing aid insertion and handling (C2Hear Online in Youtube). This activity was designed to promote student engagement with the textbook, and to bootstrap their vocabulary and technical knowledge on physical features of hearing aids. Overall, this set of activities was scheduled into a two-hour time slot with three stations (RIC, BTEs, custom). Students rotated through these stations in groups of two to three. Competency goals for this experiential lab integrate across device handling, terminology, candidacy, and orientation as outlined in Table 2.
Competency Categories for Teaching Physical Features of Hearing Aids with CARL | ||
Hands-on Competencies | Terminology Competencies | Candidacy/Orientation Competencies |
Insertion and removal of aid | Style: BTE/ITE/etc. | Physical handling of the aid |
Identification of left/right | Microphone ports | Physical handling of the battery |
Finding the battery door | Earmold/eartip/vent | Instruction necessary for insertion/removal |
Battery insertion/removal including finding +/- markings | Discriminating between RIC and Slimtube | Candidacy for pediatric versus adult earhook on BTE |
Comparing devices that fit well versus poorly | Battery sizes & numbers/colours | Candidacy for waxguards and frequency of replacement |
Finding user controls | Accessories (battery tester, listening tube) | Online resources for hearing aid orientation |
Table 2. Practical skills list for learning physical features of hearing aids with a patient simulator.
In contrast to teaching these topic areas with a traditional lecture style approach, the main difference for the instructor is that rather than pulling together photos of different types of hearing aids and showing them to the students, the preparation time is spent finding enough hearing aids to set up multiple stations. This avoids a rather dry lecture while allowing a higher level of student engagement, involving the “student as actor” using “concrete experience” as described by Stiles (2013).
A later lesson used instructional videos to: (1) teach students how to use manufacturer-provided rulers to select the correct wire size for a RIC hearing aid, using CARL as the test ear, and (2) the steps in retubing an earmold and cutting the new tubing to the correct size. Students were asked to complete both activities on CARL and to contrast CARL’s ear size with the sizes of several classmates. One component of the assignment was to provide a photo of a correctly fitted earmold with new tubing (Figure 2).
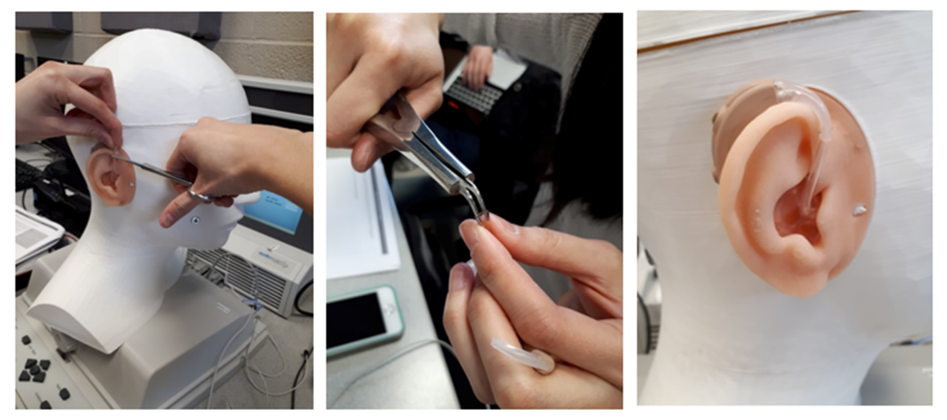
Figure 2. Homework assignment submitted to show knowledge of the correct procedures for retubing, sizing, and fitting an earmold (photo courtesy of Krystal Beh).
Lesson 2: Probe Tube Placement and Measuring the Real Ear Unaided Response
The impact of student usage of CARL for learning probe tube placement in the ear have been reported elsewhere (Koch et al., 2019b). However, those studies were focused on a prototype Camera CARL with translucent ear canals while the current CARL system includes opaque ear canals with several different infant and adult anatomies as another training option (base CARL). In our most recent usage of a lab equipped with both systems, we were able to make effective use of both Camera CARL providing specific quantitative feedback during probe insertions, and several base CARLs providing simulation of a real ear in which we cannot see inside the patient’s head.
This lesson began with a traditional lecture containing theoretical information about standing waves in the ear canal, correct procedures for placing the probe tube, and the impact of deep versus shallow placement on the acoustics of real ear measurement. The lecture provided instruction on using pre-marked recommended insertion depths, along with the anatomical landmarks to find and use while performing a placement. Our method at Western recommends 30 mm for an adult male, and placement of the marker in the inter-tragal notch with the probe tube laid flat on the floor of the ear canal whenever possible. This procedure relies upon the use of otoscopy during placement and is therefore a good opportunity for the students to hone their skills in this related competency. The end result should “park” the end of the probe tube on the 3rdbend of the ear canal, which typically appears as a “hill” formation just in front of the eardrum. We use the phrase “park it on the hill” to describe this end result.
In order to apply these concepts taught in the lecture-portion of the lesson, an experiential learning lab (Table 3) allowed students to practice these skills on CARL’s standardized ear. An online video illustrating correct placement procedures was reviewed in class and provided for reference. Students were allowed to step through a lab worksheet to do a probe placement at one of several CARL-equipped stations, with enough time for each student to walk through the process. They were then given several weeks to practice with CARL (within OR outside of class time) until they felt confident enough to make three measures of the Real Ear Unaided Response (REUR): (1) with the probe tube bumped onto CARL’s eardrum; (2) with the probe tube at a clinically-appropriate 5 mm distance from the eardrum in CARL’s ear; and (3) with the probe tube at any distance that the student deemed “too shallow”. An example of this measurement sequence is shown in Figure 3.
Learning mode | Concrete Experience and Active experimentation |
Learning goals | Students will learn recommended insertion depths for pre-marking probe tubes. |
Students will learn how to physically configure real ear measurement equipment with the reference microphone correctly oriented and retention systems engaged. | |
Students will learn to place a probe tube to the recommended insertion depth, while using otoscopy and anatomical landmarks to cross-check the placement to 5 mm from the eardrum. | |
Students will learn to create and interpret patterns of standing waves in the ear canal, and use these to help troubleshoot for shallow placement. | |
Lesson design | Hands-on stations each with one CARL and one real-ear measurement system, a probe tube, and an otoscope. Two to three students per station. Step-by-step written instructions and a demo video to watch, read and follow. |
Instructor role | Answer questions, help resolve problems, confirm correct results. |
Student deliverables | Complete all stations and activities including questions that relate lab results to specific course and textbook readings. |
Evaluative or formative? | Formative, primary focus was to complete the activity with feedback. A practical examination was completed at a later time (to allow several weeks to practice). |
Impact | All students acquired competency in placing probe tubes on the standard ear and could generate clear examples of poor versus good placement (Figure 3); next steps include measurements on one another to generalize these skills to real ears. |
Table 3. Lesson 2 Design and Summary.
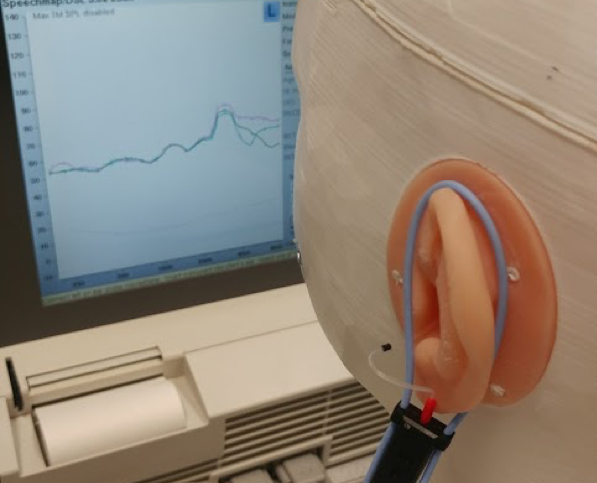
Figure 3. Three Real Ear Unaided Responses (REUR) measured at three probe tube insertion depths. The probe tube is shown here at the "too shallow" position as judged by the student. The corresponding curves are too shallow (blue), recommended (green), and at the eardrum (pink).
Consistent with the curves shown in their textbook (Ricketts et al., 2019; Figure 16-18), CARL’s ears show a clear standing wave pattern across these three measurements, with the best measurement being on the eardrum itself (pink curve). Knowledge builder questions referred them back to their textbook to interpret their findings in the context of published data on standing waves in ear canals. This activity set provides a second example of the advantages of using a simulator to do things wrong on purpose: what does a bump-and-pull measurement look like? We typically don’t intentionally measure this when practicing on a human lab partner, but it’s a very instructive experience when learning the rationale, advantages, and disadvantages of the clinically-recommended procedures for probe tube placement. Overall, this activity set involves the “student as actor” using “active experimentation” as described by Stiles (2013). There is ample opportunity to replicate the textbook’s discussion of percentile analyses (Ricketts et al., 2019; Figure 16-12), the impact of noise in measurements (Ricketts et al., Figure 16-16), and the importance of correct orientation of the patient to the loudspeaker. Once students complete this activity, they move on to measures on one another, and have opportunities to experience the feeling of probe placement, see anatomical differences between ears, and measure unaided ear acoustics on one another. Response interpretation questions ask them to relate measures of the Real Ear Unaided Response on CARL and one another to the textbook examples (Ricketts et al., Figure 17-2).
Lesson 3: Measuring the Real Ear to Coupler Difference (RECD)
Early studies with the CARL manikin revealed that students valued the ability to practice RECD measurement in a safe way, on their own, and that the feedback from the camera-equipped system was helpful in troubleshooting their early attempts (Koch et al., in press). Encouraged by these early results, we have continued to implement CARL-based learning for RECD measurement in our introductory coursework. Key learning goals are summarized in Table 4, and are facilitated by providing students a video of how to measure RECD on CARL’s ear. They can step through the video and check that they are getting similar results as those shown on screen. This video, with multiple CARL stations, has supported us in managing effective hands-on learning of the correct steps, equipment setup, and response interpretation with a large class size. Because the ears are standardized, instructors are well-equipped to detect errors in measurement by observing the student measures and appraising them against the expected result. Once the basic steps are mastered, students can carry on to more advanced learning activities that explore the differences between coupling to the ear with either foam tips or earmolds (Moodie et al., 2016), interpretation of the measured result against age-specific normative data (Bagatto et al., 2005), and response troubleshooting for slit leak venting or shallow probe tube placement.
Student role | Concrete Experience, Reflective Observation |
Learning goals | Students will learn to place a foam tip or earmold along with a probe tube in the ear canal without pushing the probe tube in further. |
Students will learn modified strategies for use when measuring RECDs on infants and children. | |
Students will learn how to physically configure real ear measurement and test box equipment for RECD measurement. | |
Students will learn to evaluate a measured RECD against age-appropriate average values. | |
Students will learn to troubleshoot a measured RECD for problems such as shallow probe tube placement, slit leak venting, and for expected differences between foam tip and earmold configurations. | |
Lesson design | Hands-on stations each with one CARL and one real-ear measurement system, a probe tube, an otoscope, a foam tip and an earmold. Two to three students per station. Step-by-step written instructions and a demo video to watch, read and follow. |
Instructor role | Answer questions, help resolve problems, confirm correct results. |
Student deliverables | Complete all stations and activities including questions that relate lab results to specific course and textbook readings. |
Evaluative or formative? | Formative and evaluative: opportunity for practice with a follow-up assignment that includes written questions to answer from course readings. A practical examination was scheduled at a later time. |
Impact | All students acquired competency in performing this measurement in a simulated ear; adequate preparation for follow-up measures in human ears. |
Table 4. Lesson 3 Design and Summary.
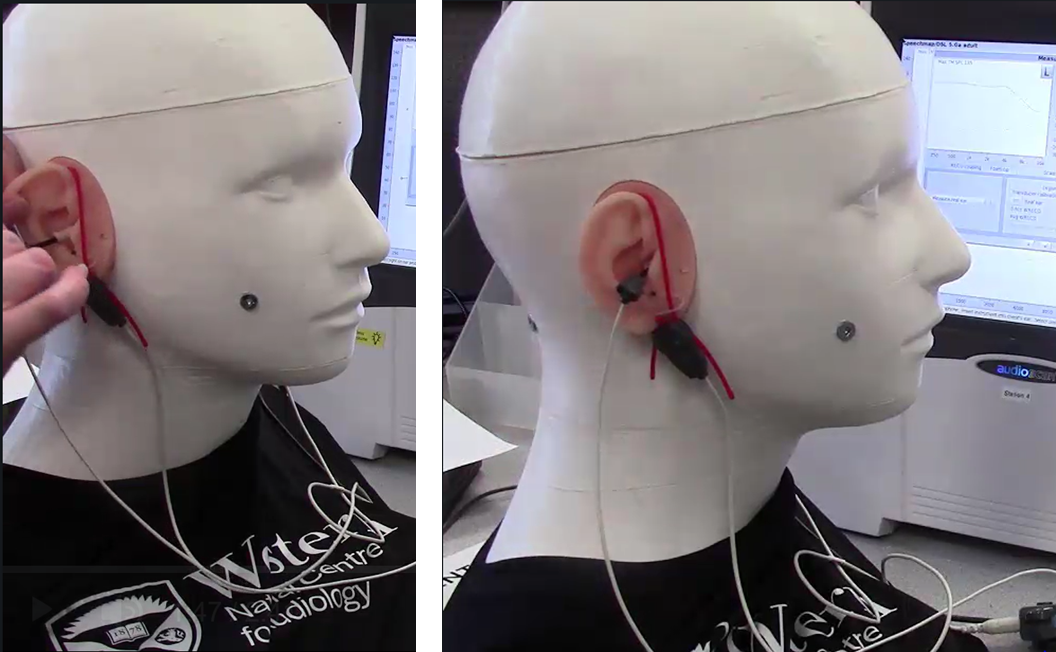
Figure 4. Example of lab activity to step through measurement of the Real Ear to Coupler Difference (RECD) using a CARL manikin.
Lesson 4: Fitting Hearing Aids and Adjusting On-ear
One of the biggest practical challenges in teaching hearing aid fitting with verification and fine tuning is the lack of real patients in the lab session. Students are not encouraged to practice fitting moderate to high gain devices on one another, leading to a lack of practical exposure to the additional challenges (e.g., fitting range, bandwidth, feedback) associated with most hearing aid fittings. One proposed solution is to recruit a volunteer patient who is fitted in the context of the course (Palmer, 1998). Other options include simulation of a wide range of hearing losses using coupler-based verification with simulation of real ear responses (Figure 5).
The CARL manikin supports a third option: fitting commercially-available hearing aids to any degree of hearing loss on the manikin’s ears. Using pre-made custom earmolds or shells, or using modular fitting kits with either slimtube or RIC devices, students can complete realistic fittings. Simulated cases can be assigned by providing CARL an age, audiogram, and cursory history, and allowing the students to work on fitting. The hearing losses can be varied to span a range of clinical scenarios, or the hearing loss can be held constant and the brand of hearing aid can be varied to explore differences in fitting ranges or signal processing. A standardized ear supports the creation of multiple equivalent stations, so that between-brand comparisons are valid and efficient. Cases can be structured to be either introductory or advanced by changing the case scenario. Our coursework so far includes variations on Lesson 4 for either introductory or advanced stages of our curriculum (Table 5), and includes the use of CARL in practical examinations. One advantage of using the CARL manikin rather than a live patient is the option of allowing slow, repeated, or erroneous work when students are learning something new. For example, a hearing aid may be left with sustained feedback or an over-fitted aided response during a discussion of these problems. This allows a discussion that is not rushed and allows a detailed exploration of why the problem is occurring. We likely would not wish to subject a patient to this, but a simulated patient facilitates exploration of problems.
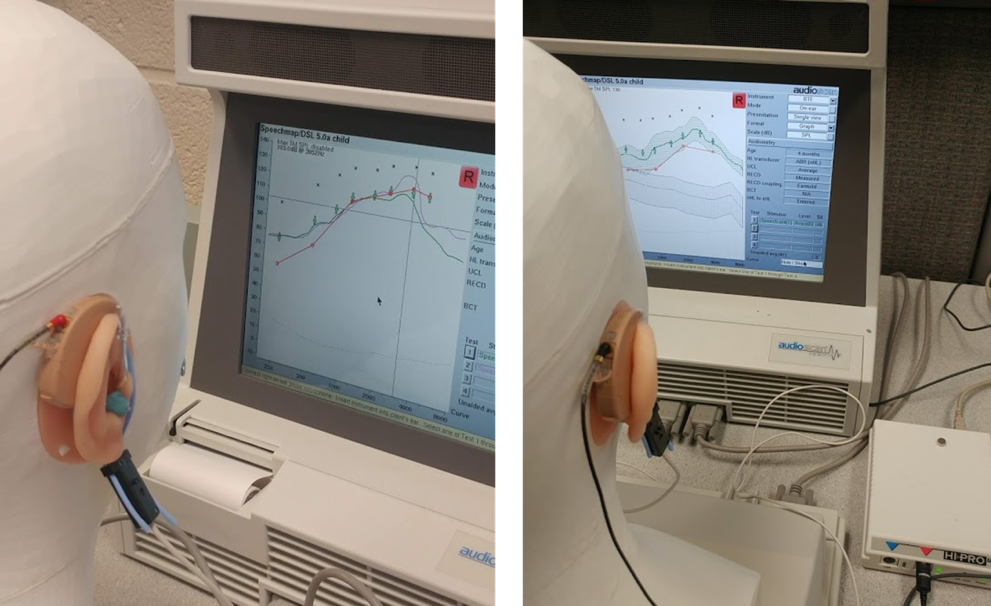
Figure 5. Two examples of high-gain hearing aid fittings in progress. For the fitting on the left, the students encountered feedback (pink curve) and resolved it with earmold modifications (they placed putty on the vent) and software-based feedback management (green). For the fitting on the right, the students have completed one fit to targets and are comparing unaided to aided speech responses and SII.
Student role | Concrete Experience, Reflective Observation, Active Experimentation |
Learning goals | Students will learn to connect hearing aids to the ear and to programming and verification equipment simultaneously. |
Students will learn to interpret fitting ranges for specific hearing aids and select an appropriately-powered instrument with an appropriate physical coupling to the ear. | |
Students will learn to configure a fitting file using Noah and hearing aid fitting modules, and pre-fit a hearing aid. | |
Students will learn to select either concurrent or stored equalization (see Ricketts et al., pg. 631) based on hearing aid configuration. | |
Students will learn to verify the real-ear aided response (REAR) and interpret fit to targets and aided SII values. | |
Students will learn to fine tune and troubleshoot a fitted hearing aid to optimize fit to targets, minimize feedback, and assess signal processing for feedback management, frequency lowering, and directionality. | |
Lesson design | Hands-on stations each with one CARL and one real-ear measurement system, and a range of hearing aids with tips and/or earmold. Case descriptions for use in creating simulated patient scenarios. |
Instructor role | For novices: guidance on equipment configuration, workflow steps, and response interpretation. For advanced students: Provide specific and challenging case scenarios and access to appropriate hearing aids; answer questions, help resolve problems, confirm correct results. |
Student deliverables | Complete all stations and activities. Hand in a clinical report interpreting the fitting and integrating with course readings for questions that prompt reflective observation. |
Evaluative or formative? | Formative and evaluative: opportunity for practice with a follow-up assignment that includes written questions to answer from course readings. A practical examination was scheduled at a later time. |
Impact | Students in the introductory course acquired the basic competencies of performing REAR measurements and fine tuning to target, SII interpretation, and gained experience with several brands of hearing aids. Students in the advanced course completed a wide range of fitting scenarios including fitting for severe to profound hearing losses, fitting frequency lowering, and managing challenging feedback issues. |
Table 5. Lesson 4 Design and Summary.
Summary
The few lessons presented here illustrate a wide range of applications of manikin-based simulation in amplification coursework. In the first few years of implementation of this strategy, several advantages have stood out. The most significant is the enhanced realism of fitting with hearing aids worn on-ear rather than in the coupler. Students are able to practice the equipment configuration requirements for on-ear verification more often, and to experience the challenges of on-ear feedback, in ways that are were not previously possible when we relied heavily on coupler simulation for practice in labs. Another significant advantage is the ability to make mistakes, either spontaneously or on purpose, and explore why they happened, what they mean, and how to fix them. Much of this is not appropriate or feasible in the clinic; lab activities on a manikin facilitate student exploration of problematic scenarios and help deepen their understanding and competency. Finally, the availability of a manikin with consistent ear canal acoustics has practical advantages for instructors who need to develop instructional photos or videos, or standardized practical examination tasks. A manikin can be set up for such activities (and left set up) without any scheduling or movement, and facilitates making examples that students can follow and replicate. Similarly, students can practice on their own without needing a lab partner. Overall, the incorporation of the CARL manikin in our amplification coursework has increased the range of teaching activities that are possible, improved standardization and access to pre-learning clinical skills, and enhanced the face validity of lab activities.
References
Bagatto, M., Moodie, S., Scollie, S., Seewald, R., Moodie, S., Pumford, J., & Liu, K. P. R. (2005). Clinical protocols for hearing instrument fitting in the desired sensation level method. Trends in Amplification, 9(4). https://doi.org/10.1177/108471380500900404
Dzulkarnain, A., Pandi, W., Rahmat, S., & Zakaria, N. ’Azzah. (2015). Simulated learning environment (SLE) in audiology education : A systematic review. 54(12), 881–888. https://doi.org/10.3109/14992027.2015.1055840
Koch RW, Moodie S, Folkeard P, Scollie S, Janeteas C, Agrawal SK, Ladak HM. (2019a). Face and Content Validity of a Probe Tube Placement Training Simulator. Journal of the American Academy of Audiology, 30(3):227-34.
Koch RW, Saleh H, Folkeard P, Moodie S, Janeteas C, Agrawal SK, Ladak HM, Scollie S. (2019b). Skill Transference of a Probe-Tube Placement Training Simulator. Journal of the American Academy of Audiology. Retrieved from: https://aaa.publisher.ingentaconnect.com/content/aaa/jaaa/pre-prints/content-aaa-jaaa-18-054
Moodie, S., Pietrobon, J., Rall, E., Lindley, G., Eiten, L., Gordey, D., … Scollie, S. (2016). Using the real-ear-to-coupler difference within the American Academy of audiology pediatric amplification guideline: Protocols for applying and predicting earmold RECDs. Journal of the American Academy of Audiology, 27(3). https://doi.org/10.3766/jaaa.15086
Ricketts, T.A., Bentler, R.A., & Mueller, H.G. (2019). Essentials of modern hearing aids. San Diego: Plural Publishing.
Palmer, C. V. (1998). Curriculum for Graduate Courses in Amplification. https://doi.org/10.1177/108471389800300102
Stiles, D. J. (2019). Applying Experiential Learning to Audiology Curricula, 371(2013), 365–371. https://doi.org/10.3766/jaaa.24.5.4
Citation
Scollie, S. & Koch, R. (2019). Learning amplification with CARL: a new patient simulator. AudiologyOnline, Article 25840. Retrieved from https://www.audiologyonline.com