
Top Ten Impression Tips:
What single activity must every dispenser participate in to complete a hearing instrument fitting (sale), regardless of the choice of instrument or manufacturer? That's right - it's the act of making an impression of the ear. The ear impression is the template the manufacturer must work with. It has to come from you. The hearing aid and the ear mold can be no better than the ear impression.
Unfortunately, if you don't take the time, or use your talents to their utmost, in making a perfect impression of the ear, the fitting is destined to failure. Frankly, it's pretty silly to let about $1.00 worth of consumable items and 15 minutes of your time blow an opportunity to provide your patient with better hearing. With that in mind, here are our top ten tips to help you make a great impression every time, thereby increasing your success rate with hearing instrument fittings.
10. Take your time. The quality of the ear impression can easily make, or break, your sale.
9. Use only quality impression materials, you can't make a silk purse out of a sow's ear.
8. Use vented ear dams, otherwise your patients will feel "pressured."
7. Don't relegate this critical procedure to someone else. You need to know your patients ear, inside and out.
6. Don't mess with Mother Nature. Pulling, or pushing, on the external ear is not natural and you will distort the finished impression.
5. Keep your hands to yourself. With proper technique, there is no need to use any hand, finger, or thumb pressure during any part of the process.
4. Always take deep impressions. It's a good habit to develop. The manufacturer can remove canal length, but they can not add it!
3. Don't "cheap out" and try to get two ear impressions out of one pre-measured unit. In an effort to save a buck - you will create delays, unhappy patients and you'll still have to go back and make the impression properly.
2. Don't use the ventilation tube (or thread) to assist in removing the cured impression from the ear. This will distort the canal and you'll have to do it again.
1. Understand - the manufacturers gain nothing by refusing to use your bad impressions. They only ask for new impressions when it will benefit you and your patient.
Horns O'Plenty:
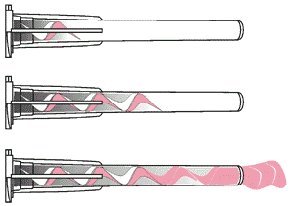
There is still some confusion out there about what is available in the realm of 'horn tubes'. Basically, the "horn effect" provides greater amplification in the 2-6KHz frequency range. Horn tubes are preformed earmold tubes with a specific flare manufactured into them. The end of the tube that slips over the earhook has an inside diameter of 2mm. The other end (that is inserted into the custom earmold) has an inside diameter of either 3mm or 4mm. Between the two ends, the tubing is flared to change the inside diameter. Remember, when we're dealing with tubing diameters, we are speaking about inside diameters of the sound transmission plumbing.
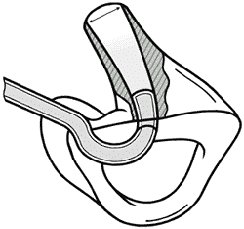
In an earmold, it is best to use the horn tube in its entirety. The tubes are manufactured with specific dimensions to maximize the horn effect. However, in some ears, there is simply no way to put a horn tube inside the ear canal. For example, we just can't put a 4mm tube inside a 3.5mm ear canal. To address that issue, laboratories have the option of using the sound bore of the earmold as the continuation of the horn tube. This is depicted in the drawing below. Note that the inside diameter of the sound bore remains true to the 'horn effect', even though the tubing terminates partially inside the earmold. This method has allowed the laboratories to create the horn effect in many fittings that would otherwise go "unhorned."
Today, we (Westone) offer 3mm and 4mm horn tubes in both standard and moisture resistant varieties, and in two tubing sizes. The 3mm is available in both standard and thick wall, but the 4mm is available only in standard wall. Remember, it is the tapered inside diameter that makes a horn tube what it is. The wall thickness of the tubing(the difference between inside and outside diameters) is a preventative measure against acoustic feedback in higher gain fittings.
Available Sizes of Horn Tubes:
It Mix A Difference:
Anyone using any of the dual cartridge impression materials can benefit from this tip. One of the advantages of the two-part cartridge impression materials is that the mixing is done for you. This is accomplished by pushing equal amounts of the two components through a mixing tip just prior to the material entering the ear. You only mix the amount you need, there is no waste. Because the material is being mixed as it is being used, there is no problem with mixing time. However, if the two parts don't mix equally - you have a problem. To avoid problems, we recommend the following steps, prior to making an ear impression with any dual cartridge materials:
1. Always remove the old tip, or cap, and replace it with a new mixing tip. Do not attempt to clean out
an old tip and reuse it. Tips are cheap.
2. With a squeeze of the trigger, initiate flow through the mixing tip.
3. Visually inspect the mixing process, the flow and the final product exiting the tips. Both components must be flowing evenly and the color should represent even and thorough mixing.
4. Allow the first bit of material that exits the mixing tip to flow onto a disposable surface.
5. Wipe the tip and carefully continue the process of making the ear impression.
Slick Products:
Our really slick product, OtoEase#174, is something no office should be without. It is very useful for making ear impressions and for fitting custom products in the ear.
If you haven't tried this, please do. Spread a drop of OtoEase on the ear dam (foam or cotton) prior to inserting it into your patient's ear canal. This greatly reduces friction and allows placement of the ear dam with the utmost of ease and comfort. This is particularly useful for patients who have never experienced the ear impression process. Another great use for this product is to assist in inserting the earpiece into the ear, whether it be a custom earmold or a hearing instrument.
Spread a drop or two around the canal portion of the earpiece just before it is placed in the ear. This does two things. First, it allows the custom fit product to slide into the ear, despite tight or long canal portions. This is really great when the fitting is snug. Second, the chemical makeup of OtoEase is quickly and safely absorbed into the ear tissue and softens it. This allows the earmold or hearing instrument to snuggle in and seat very, very well. The result of this is a better fitting that greatly reduces the likelihood of feedback and sore ears.
We recommend the use of OtoEase for all fittings and suggest that you provide your patients with OtoEase for their own use in the daily insertion of the earmolds or hearing instruments. This will reduce patient complaints about fit and insertion problems. The cost is minimal and the benefits are huge.

Moisture & Hearing Instruments:
Recently, we improved our Hearing Aid Saver™ product line. We changed the packaging of the drying agent (desiccant) to make it easier for everyone involved. Now, the reusable desiccant is contained in its own pillow instead of the metal tin we were all accustomed to. No more spilled crystals or hot ovens to deal with. Instead, the desiccant can be rejuvenated by simply placing the pillow in a microwave oven.
Here's how it works. When the Hearing Aid Saver begins to lose its effectiveness, place the pillow in a microwave oven for 1-2 minutes on the high power setting. This will dry out the crystals and restore the Hearing Aid Saver to nearly 100% of its original strength. What could be easier?
Here's the caution, the really "hot" part of this tip...
Don't put the hearing instrument in the microwave . . . the hearing not microwave safe! This may sound silly, but it has happened. Really. While there may be some specific times when your patient wants their hearing instrument to be thermonically gifted (for a heated discussion, while on a hot date, when trying to warm up to somebody, etc.) putting it in the microwave isn't the answer! Please give your patients some quick instructions regarding the proper use of the Hearing Aid Saver so that they don't come back in to see you . . . all fired up!

Kid Proof Tubes:
Somewhere there must be an adhesive that is safe, cost-effective, and whenit is used, it walks that fine line between "the kids pull the tubing out of their earmolds" and "I can't get the tubing out of this earmold." But, we have yet to find such a perfect adhesive.
In the meantime, we have adhesives that are on either side of the line. As standard procedure for all applications, we use the adhesive that will allow the tubing to be removed and replaced without enormous effort or specialized tools and/or techniques. This works well most of the time.
However, there are some patients who just won't stop pulling on the tubing and ultimately succeed in breaking the earmold/tubing bond. For these folks, we offer a welded tubing option. At your specific request, and only at your request, we can use an adhesive product that literally welds the tubing to the earmold. Your patient will not come between the earmold and its tubing when we use this method.
Please note: The "welded tubing option" is only available for vinyl earmolds (Formula II, Formula II Clear, Superflex, and Rx). We will not remake earmolds at no charge due to damage occurring when attempting to remove welded tubing. Use this option carefully (perhaps only on fast growing infants and young children).
From Hair to Returnity:
As the fall colors come into full array here in Colorado, the temperatures have begun to drop a bit. We've even had ice in the dog's water bowl already! A few of the brothers (Rusty, Robin, and myself) all ganged up at Rick's house one weekend to give him a hand building his log home. It was a pretty cool day and we found ourselves reaching for the wool beanies to keep our heads warm.
Have you ever noticed that with some folks, those wool beanies have a way of working themselves right off the top of the head? Typically, it happens to those who have plenty of hair. The beanie can't get a good seal around the head because the hair allows it to slip out of place. With winter approaching and hair growth being what it is, watch out for how this could affect your practice!
Some of us have become quite adept at growing hair in our ears. I'm not talking about the few wild hairs that stick out from the side of the head like curb feelers on a '65 Buick Electra. I'm referring to the full-on 'Oh my gosh, I just lost my ear dam somewhere in my patient's ear' kind of ear hair. You've all seen it, and likely, just tried to work around it. But you can't. It is impossible to take a good impression of an ear that resembles a long abandoned Christmas tree farm.
If you are successful in getting impression material into the ear, your patient will scream bloody murder when you attempt to remove it. Even if you are successful in making the impression and you can talk the lab into using it, the fit will be poor. You won't be furnishing the lab with an accurate portrayal of your patient's ear (sans hair) and there will be no way that a proper seal can be formed in that ear to prevent feedback.
Remember the wool cap that works its way off the top of the head due to lots of hair? The earmold will react in the ear much the same way. The layer of hair will cause the earmold to fit loosely and will essentially squirt the earmold out of the ear. The patient gets frustrated with the feedback and the loose fitting earmold, and you have to deal with it.
What's the answer? Either send the patient away to have their ear hair trimmed, or do it yourself. A good tool for hair removal is the Wahl#174; hair trimmer (Part No. 20241, $16.95). It was designed for nose hair. Pre-impression hair removal is going to have to be done for some folks, it's really just a matter of who does it and when. We suggest - don't waste your time trying to get an impression on a very hairy ear canal.
If you encounter the patient wearing those very unique ear muffs, or doing a comb-over of their bald spots using hair growing out of their ears, please don't attempt to take the impression and forge ahead without removing the hair. It's a little funky, and probably wasn't covered in your formal schooling, but it's a fact. Earmolds are most comfortable when allowed to rest directly against that 'epidermal tissue' in the ear, they don't need a thermal blanket!
Need something else to cell?
Everybody has ears, but not everybody has hearing loss. Would you like to greatly increase the size of your potential market? We are a land full of cell phones. Cell phone users all over the country want to use their cell phone 'hands-free'. This is accomplished by using an earpiece with a microphone attached, so the cell phone doesn't have to be held next to the head while in use. So what's the problem? The same problem as with every other generic fit product. Nobody has a generic ear and the fit just isn't great.
Of course, we have the solution. Our custom earmold Style No. 26 is custom made to fit not only your patient, but also to couple properly to their cell phone. This earmold provides security for the earpiece and remains comfortable in the ear. Generic fit pieces just can't match up to custom fit in any category. Even the sound quality is greatly enhanced with a custom fit product (ambient noise is reduced, deeper fit, sound directed towards the ear drum etc. ).
Many people have found this cell phone earmold is a great way to stay on the telephone while maintaining mobility and driving more safely.
We encourage everyone to step beyond the traditional role of the audiologist and the dispenser and make yourself available to the thousands and thousands of folks out there that want custom fit products for their cell phones, but they don't need hearing instruments. At least, not yet!
In this information age, it doesn't take long for word to spread about what is available to improve the quality of life. There is more disposable income in America than ever before and people purchases things that will make them more comfortable, or make things easier, or quicker, or fancier, or whatever. The hard part is getting the products and services in front of people so that they can make the decision to acquire, or not. But, once they walk in the door, it's up to you to be knowledgeable about the product lines and be able to satisfy their needs on that first visit! It's good business now, and will most likely create great business for you later.
