This text course is an edited transcript of an Oticon Medical webinar on AudiologyOnline. It is recommended to download the course handout as it provides further information and resources.
Learning Outcomes
After this course learners will be able to:
- Explain the process of the A/D conversion of the audio signal and describe the different wireless technology being utilized in current hearing devices to share data.
- Describe the functionality of the Oticon Medical Streamer and how to connect to the Ponto device.
- Explain how easy FM use can be with the Streamer and the Ponto device.
Understanding Wireless Technology
What exactly is wireless technology? Digital sound processing has opened up innovative ways for us to manipulate an audio signal. This flexibility allows for the development of logarithms to improve the sound quality of the audio signal, and ways in which those signals can be stored and transmitted. When we're talking about wireless, we're talking about information being transmitted from one location to another. This isn't something new in the industry. In fact, this type of wireless transmission has been available for many years in the form of FM technology. FM technology is an analog transmission, and we still continue to use it to transmit the signal. However, as technology has evolved, so has the way in which we're transmitting it. With digital technology, the norms for wireless transmission have changed.
Converting the Signal
Let's review what happens when converting the analog signal to digital within a hearing instrument. The input signal is generated, it hits the microphones, and then is sent to the A/D converter. The A/D converter takes the signal and converts it to a digital signal, which is a series of zeroes and ones. DSP, or digital signal processing, processes the signal. Once the signal has been processed, it has to be turned back into an analog signal because our brains do not decipher digitized signals. The digital to analog converter (D/A converter) converts the digital signal to an analog signal, and then the signal is sent to the receiver and routed into the ear. The A/D converter is a very important part of this process because it deciphers what we're sending to the patient. The A/D converter is part of the hardware of the device. Its task is to convert the continuous analog signal into a digital bitstream that can be processed by the DSP. The digital bitstream is a sample base, which means that the digital representation is square-like instead of smooth. In converting the signal, distortion is added because it is now a square-like signal. The more bits that you have, the more concise that converted signal is going to be. The digital representation of the analog signal is going to be incorrect and distorted. If something is not captured as the signal is converted, we can't provide it to the patient when the processed signal reaches the patient's ear. So, it is important to know what's being picked up by the microphones and going through the A/D converter. If you don't have a good sound quality or good signal going in, you can't have a good signal going out.
There are many parameters that can introduce error to this signal, such as input dynamic range, sampling frequency, bit depth, and internal noise. These parameters are taken into consideration when developing an amplification platform. We also take these factors into consideration when we're developing technologies to send and receive signals from other sources. Sending a signal involves coding and the decoding of the signal. Information from sources like a TV or a stereo (or even a hearing device) goes through a very similar process. In all cases, an analog signal has to be converted to digital, and the sample data is coded in a specific way. This is what we call the audio codec. Codec refers to coding and decoding of the information in a wireless transmission going from one antenna, which is typically the transmitter, to another antenna, which is typically the receiver. It's using electromagnetic energy or waves, often referred to as EM waves, to transmit that signal. They have to be paired together so that they can detect the transmitted signal. The signal is then decoded and sent to the hearing device for processing. The signal has to be converted back to analog before it goes to the output of the hearing device.
Each of these steps is significant because they can impact how much power is being used and what is being delayed in the sound. If you remember first generation Bluetooth, there was significant delay in the time that the signal reached the receiver, and that can affect the overall sound quality.
What is Wireless Technology?
There are many options for wireless technology to use with hearing aids and amplification devices, including 900 MHz, 2.4 GHz, near-field magnetic, and Bluetooth. It can get confusing to decipher the terms and technology in order to determine what is most appropriate for our patients.
Wireless technology, by definition, refers to electronic products and systems that interact by using electromagnetic energy to carry information between them, thus enabling communication. Electromagnetic energy is used to carry information between two different devices. Wireless hearing devices, in general, use electromagnetic energy, or EM energy. Wireless technology requires a transmitter and a receiver, and not all transmitters and receivers are the same. Electromagnetic energy can be transmitted in two ways: it can be transmitted as a signal (acoustic information), and it can also be transmitted as data. Transmission of information uses acoustic information, not data. With hearing devices, electromagnetic information can be carried via analog or digital technology. Telecoils and FM systems are examples of analog technology, and they are very simply constructed. They don't need a lot of energy, and they tend to work relatively well. T-coils are near-field, while FM has more capabilities for distance, which is referred to as far-field. Hearing aids are now digital, so we're dealing more with the EM energy.
EM waves are electric and magnetic signals merged together to make up the transition so that we can convert some of the signal into sound waves. Wireless transmission is achieved through the use of electromagnetic waves. This is a type of transverse wave, which has both an electric component and a magnetic component.
The EM waves by themselves are not audible unless they are converted into a longitudinal wave. One property of an EM wave is its ease of being modified by another signal. This makes EM waves excellent carriers of data. EM waves cover a wide range of transmission of frequencies, which is what we refer to as the carrier frequency. Everything that travels wirelessly is on a frequency. The choice of the carrier frequency depends on how much information needs to be sent, how much power is available, the transmission distance, and how many other devices are using that frequency. Local laws and regulations may also determine carrier frequencies. You also have to take into account the path of transmission, and things such as mountains or buildings that may be in that path.
Higher carrier frequencies can carry more information. For example, a 2000 Hz carrier frequency can carry more data in the same amount of time than a lower carrier frequency like 200 Hz. On the other hand, lower frequencies require less power for transmission.
When developing wireless technology applications, there is always a give and take. You have to consider how much energy and how much information you need, and where you are going, in order to determine the best way to transmit that information. When companies come out with more satellites, they come out with more power to transmit a signal further and further, which is why we can now transmit radio all over the world. With hearing devices, power is an important consideration because we want to ensure patients have access to sound at all times.
Radio Frequency
What is radio frequency? Every manufacturer uses some type of radio frequency; the carrier frequencies that carry the information are radio frequencies. We use carrier frequencies to share information wirelessly. We allocated carrier frequencies between 3000 Hz and 300 GHz for wireless transmission. There are also designated frequencies for travel over space, which makes them far-field. Examples of far-field are infrared, which has one of the largest transmission distances, microwave, Bluetooth, as well as radar, TV broadcasting, satellite, and cell phone.
Traveling Trio
Here is an analogy to help explain radio frequency. There are three co-workers that have been tasked to go on a business trip for seven days. All three of them are given the same exact suitcase, and they are going for the same exact time on the same exact plane. They're going from Boston to California and they're told that they have to bring the same amount of clothing: two pairs of black pants, three white shirts, etc. Everything that they have will be exactly the same. Traveler A is a very efficient traveler. She travels a lot, she takes a lot of pride in packing, and she gets ready weeks before her trip. When she packs all of the things into her suitcase, she's able to get everything in there and have extra space. If she needed to put other things in the suitcase or she wanted to take things out, she'd have that capability. Traveler B is also a pretty good traveler, but she's not as good as Traveler A. When Traveler B gets all of her things together and she puts them inside of her suitcase, she can just fit all of those things that she's asked to bring with her. She doesn't have the capability to put anything else in unless she makes the suitcase larger, or she'd have to get another suitcase. Traveler C is not really good at traveling. She did her laundry at the last minute before her trip, and it wasn't dry, so she just threw everything in the suitcase. She had to expand her suitcase because she wasn't able to get all of the articles in there that she was asked to bring. All three travelers have the same suitcase and all have the same things packed in them, but it's the inside that looks different. They get to the airport, and now Travelers A and B are able to put their belongings up in the overhead bin. Traveler C has to now check her bag because it's too big. The same articles are going to the same place, but now Traveler C is going take a little bit longer. They go on the plane, they get to California, they get off. Now all three of the cases are the same. It's just that one takes a little bit longer to get there. The suitcases look the same, but what's on the inside looks very different.
With wireless technology, think about what's on the inside, not the package itself. How it is packaged on the inside and the capabilities of it will give you the functionality when it is coding, decoding and sending information.
Wireless Technology Today
Near-Field Magnetic Induction (NFMI)
Near-field magnetic induction (NFMI) is not new to the industry. It was one of the first ways that wireless technology was used within hearing devices. It is a short range (also called near-field) wireless so you need a gateway or intermediary device, such as a Streamer or similar accessory, to communicate with the hearing instrument. NFMI transmits only to about one meter, but it has very low power consumption. You save about 10 times the battery life with an NFMI system versus a device using 2.4 GHz or Bluetooth because there's less battery drain. It's typically a very fast connection. It is nearly instantaneous and there is less interference or nulls, which is a drop out of sound. It provides a more consistent signal. People choose to use NFMI because of the lower battery consumption and better consistency of the signal. It is typically used in combination with Bluetooth. For example, the audio source sends the signal via Bluetooth to the gateway device (for example, the Streamer), and the gateway device uses NFMI to send the signal to the hearing instrument.
In summary, the advantage of NFMI is that there is no delay, low battery drain, and you can transmit through almost anything. Oticon uses NFMI because it uses less power and allows for binaural hearing. Some of the drawbacks are that it has a short transmission distance (one meter) and you have to use a gateway device to connect to anything that is further than one meter. Sound quality can be affected by the orientation of the gateway device and hearing aid receiver coil. Although you can occasionally get some interference with NFMI from magnetic sources such as old computer monitors or fluorescent lights (just like you can with a cellular phone), overall it will provide a more consistent signal.
2.4 GHz
The hearing industry also uses 2.4 GHz. 2.4 GHz is simply the carrier frequency; it's not a type of energy or a type of data. It is used to transmit directly to iPhones. Almost anything that's wireless is using some type of 2.4 GHz carrier frequency, such as Bluetooth, cordless landline phones, car alarms, microwaves, video/security systems, wireless data networks, and remote control cars/droids. It has 79 channels, which allows for better transmission of the signal. Bluetooth is a 2.4 GHz transmission. 2.4 GHz is exactly the same from manufacturer to manufacturer. The difference between manufacturers comes down to the implementation; that is, how everything is being converted and what is happening with the signal along the way. The difference in implementation will make a difference in terms of how the signal is going to sound.
The advantages of 2.4 GHz include a longer distance signal transmission, therefore a gateway device is not needed. It can be a very robust and reliable connection. There is a high transmission of data and a wide bandwidth. It supports stereo and tends to have low distortion. There's a low delay from the source to the listener, and you have no echo problems or issues with lip synchronization. Lip synchronization refers to how well the audio signal matches a character's lip movements. You may have seen old Spaghetti Westerns where the audio track was out of sync and therefore the sound didn't match up with the character's lip movements. In terms of drawbacks, 2.4 GHz has high battery consumption; it uses approximately 10 times more battery power than NFMI. You also can't share information between ears well with this technology as it can't go through the skull. Sometimes it can have an inconsistent connection; the signal can easily drop. I'm sure most of you have dealt with patients who have 2.4 GHz devices and connection issues. Many patient issues with 2.4 GHz are related to connection issues.
900 MHz
There is some technology still in the hearing industry that uses 900 MHz. 900 MHz has only four channels in the US. As mentioned, 2.4 GHz has 79 channels. Comparing 79 channels to 4 channels is analogous to taking a road trip with a choice of highways; one route includes a highway with 79 lanes and the other route includes a highway with 4 lanes. To get to the destination quickest, you would choose the 79 lane highway because, all things being equal, the likelihood of sitting in traffic is going to be less. 900 MHz is not applicable worldwide. There are places that you cannot use 900 MHz. You get more distance (no gateway device is needed), and it has low power consumption, but the fidelity is not as good. There's a low delay so there is no issue with lip synchronization. As mentioned earlier, higher frequencies enable you to send more information, so it would make sense that 2.4 GHz would enable you to send more information than you could with 900 MHz.
Bluetooth (Traditional)
Bluetooth is a radio frequency signal that has become a standard. The wireless protocol for exchanging data is up to 100 meters, thus making it far-field. It uses the EM waves to carry data at the carrier frequency of 2.4 GHz with the bandwidth of 1 MHz. It has 79 channels. It uses a lot of power because it is always on. When Bluetooth was first introduced, you would constantly have to charge any devices utilizing Bluetooth because the Bluetooth was constantly on. Examples of devices using traditional Bluetooth are garage door openers, baby monitors, and wireless headsets. The drawbacks include it is expensive, it has a high current drain, and there's a delay in the sound, which can cause a mismatch between audio and visual signals. It is also expensive to use in devices.
Bluetooth Low Energy (BLE)
Today, most devices are using Bluetooth Low Energy, which is also called Bluetooth Smart or Bluetooth 4.0, which was introduced in 2011. Bluetooth was originally designed to transfer information from computers to printers and fax machines. It was never meant to send audio waves, which is why it had high power consumption. Bluetooth Low Energy still has the 2.4 GHz carrier frequency, but it has a much lower power consumption now because it only will exchange small amounts of data periodically. Bluetooth Low Energy also goes into a sleep mode so it uses less energy. It will run when it needs to. The connection time is quick, just a few milliseconds as compared to more than 100 milliseconds for traditional Bluetooth. The codec was rewritten to allow for this nearly instantaneous transmission. It is used in many devices such as Fitbits, blood pressure monitors, and a host of other devices.
The advantages of BLE are:
- Better battery consumption than traditional Bluetooth.
- Simplicity: the radio is based on the familiar Classic Bluetooth radio, and its simple mode of operation can be managed by a small protocol stack.
- Robust radio: designers can target a line-of-sight range of as much as 100m. A frequency-hopping scheme makes a Bluetooth LE radio highly resistant to interference.
- Real-time operation: a connection between devices can be made, data transferred and the connection shut down, in just 3ms
- Compatibility: Bluetooth is by far the best known personal area networking technology in the world, and is backed by all the main manufacturers of consumer devices
The drawbacks are that streaming BLE connections use less of the actual original signal due to the connection. In addition, it is not backward compatible with traditional Bluetooth devices. That can be frustrating for consumers.
Wireless Connection with the Ponto: Ponto Streamer
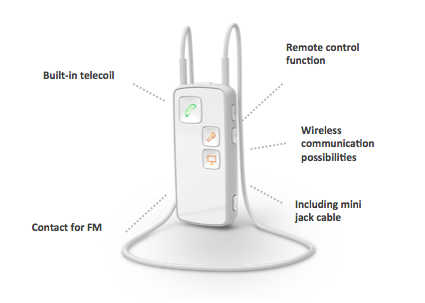
Figure 1 provides an overview of the Ponto Streamer.
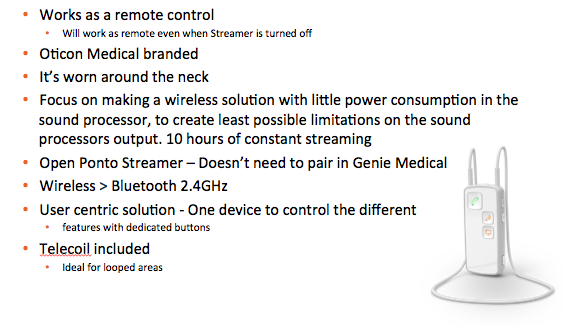
Figure 1. Ponto Streamer features and facts.
The Ponto Streamer allows patients to connect to different accessories for situations when just using the hearing device isn't enough. It's very easy to use. It uses NFMI to the Ponto device, and 2.4 GHz Bluetooth from the audio source to the Streamer.
The Ponto Streamer is very similar to the Oticon Streamer. At its most basic function, the Streamer is a remote control. Even if the Streamer is off, the patient can use it as a remote control. If it has a full charge, it will work for six months for program and volume changes.
The Ponto Streamer will only work with the Ponto Plus and the new Ponto 3 devices. It looks very much like the Oticon Streamer, but they are not interchangeable. The neck loop is an integral part of the system and should always be used for the best possible performance. However, the neck loop doesn't have to be used around your neck.
The Streamer has up to 10 hours of constant use and does not use power at all from the Ponto device. We leave the Ponto Streamer open, which means it doesn't have to be linked to a sound processor before it is used. When shipped from the factory, every Streamer will send signals to every Ponto instrument within one meter (three feet). If you want to link it specifically, you can do so in the Genie Medical software, but it is not necessary. By shipping it open, it will work with any device. That way it will work with any device that is replaced or can be used with any device in a school system, for example. The Streamer has a built-in telecoil, as well as an auxiliary to allow for all kinds of connections.
Demo Streamers cannot be linked; they have to stay open. When a Streamer is open, it must be used with a neck loop. If a Streamer is linked, you can use it with or without a neck loop. The reason for linking a Streamer is to enable the patient to use it without a neck loop. The Streamer can be worn on the belt using a belt clip accessory. However, keep in mind that without the neck loop, it can't work as a remote control, and streaming sound from a TV or phone call may not be the best option unless the audio source is within one meter of the sound processor. The closer the Streamer is to the device, the better the signal. The antenna is in the neck loop. You could also keep the neck loop attached to the Streamer. When using the Ponto Streamer without the neck loop, more power will be used, consequently, maximum streaming time is reduced to 5 hours on one full charge. Again, if you use the Ponto Streamer without the neck loop, it should be linked to give access to all Ponto Streamer functions.
In the Oticon Medical Genie software, you will have the option to link the Oticon Medical Streamer. Attach the Ponto Streamer to the PC ConnectLine, go to the Settings tool, and when you see Streamer Mode, click Linked. Then you can enter the Streamer serial number and link the Streamer to the patient's device.
The battery of the Ponto will last about two years if fully charged once a day. The battery can be replaced; you can order a replacement battery from Oticon Medical.
Because the Oticon Medical Ponto Streamer and the Oticon Streamer Pro are different, the Oticon Streamer cannot be used with the Ponto and you can't use the Oticon Medical Streamer with most of the devices available through Oticon. Currently, there are six Oticon models that can be used in a bimodal mode with the Ponto Streamer:
- Sensei SP: Sensei SP, Sensei SP Pro
- Dynamo: Dynamo SP4, Dynamo SP6, Dynamo SP8, Dynamo SP10
Therefore, an adult or a child that has a Ponto 3 on one side, has the option of the Sensei Super Power and Super Power Pro, as well as all Dynamo devices on the opposite ear, and the patient can use one Streamer. Keep that in mind if your patients using Ponto are thinking about getting a second device or a hearing device and you want it to be able to work in conjunction with the Streamer.
The Ponto Streamer will enable your patients to connect to their cell phones. The Streamer has a telecoil in it, so it can be used with loop systems. You can use the 3.5mm jack and plug into a device to listen to music, or you can stream it wirelessly, and you can connect to computers. It is also a remote control. If you want to connect the Streamer to pair it to a cell phone, the Streamer code would be 0000.
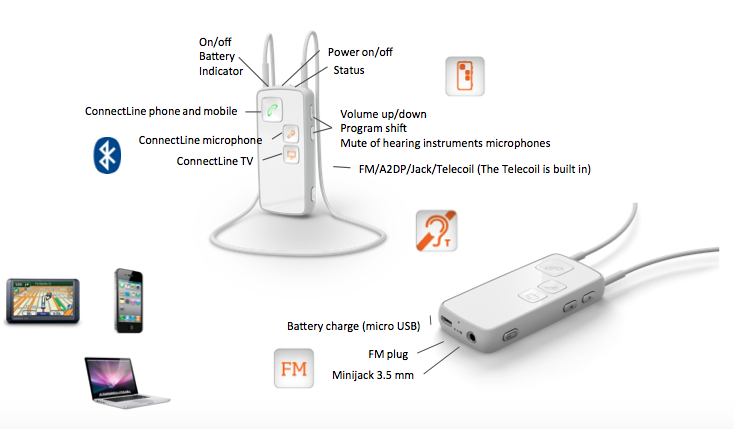
Figure 2 shows the Ponto Streamer. Again, it is easy to use and intuitive. Additional accessories include a TV box, a telephone box, and a remote mic. The Streamer can be used with FM systems, and with office phones.
Figure 2. Ponto Streamer.
On the front of the Streamer Pro are pictures of a phone, a microphone, and a TV, so it is clear for the patient how to connect to those devices. There is a connection for the FM on the bottom. There's also a mini mic cable. An auxiliary button is on the side, and on/off is on the top.
Figure 3 shows the Ponto Streamer and some of the functions of the buttons and plugs.
Figure 3. Ponto Streamer button/plugs.
By holding the on/off button, you can pair the Streamer to a cell phone or to any of the accessories. There are two lights on the top: one is the battery and the other is the status indicator. The status indicator may be either green or orange. When it's blinking orange, it's looking for an auxiliary device. If it's a solid orange, it is connected. For example, to connect to music on your phone, you would turn it on, and press the auxiliary button. When the music is playing, it would turn to a solid orange.
On the side is a + and - control for volume, which can also be used to mute the microphone. To mute the microphone, you press the + and - at the same time. On the bottom is the charging port, FM plug, and a 3.5mm minijack port. The T-coil is built-in; to access the T-coil, you press and hold the auxiliary button for approximately two seconds. It's important to know that the auxiliary button is also the T-coil. Depending on how they press and hold that button they can either connect to a device or access the T-coil, so be sure to review that with your patients.
You have the option of three different neck loops: short (51 cm), medium (66 cm) and long (81 cm). There is also a charging base, and as mentioned, a belt clip available.
Ponto Streamer and FM/Ponto 3 - Step by Step
The FM receiver plugs into the bottom of the Streamer Pro. It is a universal Europin receiver. It is universally compatible with all the FM receivers that have a Europin. Only one FM receiver is needed. To use FM, follow these steps.
Step 1. Turn on the hearing instruments and place them on the headband or abutment. Then, place the Streamer neck loop around the neck.
Step 2. For the Oticon Medical Streamer, press the on/off button on the top of the Streamer for approximately two seconds until the lights on the front and top flash - that will indicate that it is powering on. Release the on/off button. Then, the power indicator on the top of the Streamer will fade to green - that indicates that it is connected.
Step 3. Plug in the FM receiver.
Step 4. For Oticon Amigo FM receivers, set the receiver to the 00 position. The LED light on the FM receiver should be on. Remember that this is universally compatible with all FM receivers that have a Europin.
Step 5. Turn on the FM transmitter. The LED light on the FM receiver should be indicating FM transmission between the transmitter and the receiver. If the light is not on, give a short quick press to the auxiliary select on the side of the Streamer.
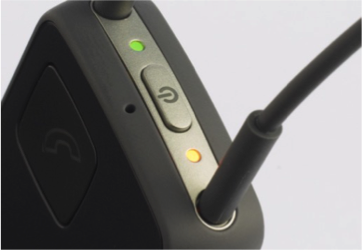
Step 6. If you have successfully connected, the orange light will be on as shown in Figure 4. Again, that orange light always indicates something is connected. Sound will now be received from the FM transmitter microphone and sent to the hearing instrument through the Streamer itself.
Figure 4. The orange light indicates something is connected.
Whenever you're trying to connect, always check the orange light; if the orange light is not one, then it is not connected. If you are having an issue with the connection, try to determine where the breakdown is occurring. Check to see if the devices are synced; press the channel seek button on the FM receiver.
You have the option of using a protective skin over the Streamer to ensure the settings on the receiver are not changed. The skin also provides increased protection if the Streamer is accidentally dropped.
Connecting an FM Receiver to Ponto Plus/Ponto Plus Power. Connecting the Ponto Plus and Ponto Plus Power is the same as with the Ponto 3. With these devices, there is not a connection socket on the sound processor. Instead, you connect the FM to the connection socket on the bottom of the Ponto Streamer. FM receivers that can be used together with Ponto Plus and Ponto Plus Power are:
- Oticon Amigo R2 & Oticon Amigo R1
- Phonak MLxi universal receiver & Phonak Roger X universal receiver
- Widex universal receiver
- Comfort Audio DT-20
Connecting an FM Receiver to Ponto/Ponto Pro/Ponto Pro Power. With Ponto, Ponto Pro, and Ponto Pro Power, you attach the FM receiver directly to the sound processor through the direct audio input (DAI) socket on the sound processor itself. You would not use a Streamer in these cases. FM receivers that can be used together with Ponto, Ponto Pro, and Ponto Pro Power are:
- Oticon Amigo R2BA
- Phonak MLxi BAHA
- Phonak MLx5 BAHA
Keep in mind that you would have to make an FM program with the Ponto Pro. With the Ponto 3, which is the newest generation, you do not need to create an FM program.
A single FM receiver connected to the Ponto Streamer transmits to both Ponto sound processors at the same time; it is a binaural solution. Again, you only need one FM receiver. If you have a child that is binaural on a Softband or using a binaural abutment, you have the ability to have the FM signal sent to both sides. It also allows for better connectivity in the classroom. Attending classes is often not just a matter of listening to the teacher's voice. Sometimes students also need to listen to sound from computers or listen to TV programs or music.
There are benefits to using the Streamer for parents as well. Parents may find it beneficial that their child can connect the Ponto Streamer to their cell phone. In other cases outside of school, it may be useful for a child to use the Ponto Streamer when he or she is watching TV, listening to music, using Skype, etc.
ConnectLine Products
ConnecLine is a series of devices that helps users connect to a wide variety of communication and entertainment options when paired with the Ponto Streamer. You may be familiar with ConnectLine if you use Oticon products. The ConnectLine products are not Oticon Medical branded. The products include a TV adapter, a phone adapter, and a remote mic.
ConnectLine TV Adapter
The ConnectLine TV adapter is connected to the TV and transmits the sound directly to the Ponto Plus sound processor through the Ponto Streamer. To listen to the TV, all you have to do is push the TV button on the Ponto Streamer. It transmits up to 100 feet, or 30 meters. I refer to the TV adapter as a "marriage saver" because we often hear complaints from families that the person with hearing loss watches TV at too loud a volume. Using the TV adapter, they can watch TV at a volume that is comfortable by streaming it to their sound processor, while setting the TV volume at a low setting that doesn't disturb others in the room.
ConnectLine Phone Adapter
The ConnectLine phone adapter makes it possible to use the Ponto Streamer with a traditional analog landline phone. The solution supports both incoming and outgoing phone calls. During a phone call, the sound processor is used as a headset and the microphone on the body-worn Streamer enables hands-free operation. It has a transmission range of 100 feet (30 meters).
ConnectLine Remote Mic
The remote mic is a discreet microphone worn by the conversation partner and connects wirelessly to the Ponto Streamer. It allows the patient to hear the conversation partner's voice directly in their Ponto Plus sound processor. The remote mic allows for a direct signal when you have patients that struggle to hear and understand in noisy settings. It has a transmission range up to 50 feet and a great sound quality. It is also an option for parents whose children do not use FM. It gives them a way to communicate in larger spaces or in noisy situations.
ConnectLine with Single Sided Deafness (SSD)
With ConnectLine, the Streamer Pro can be used as a remote control. Also, the remote mic is a great option for situations like while riding in a car or conversation in restaurants to improve the signal-to-noise ratio. The Streamer allows hands-free phone calls to Ponto Plus, to keep the good ear open while talking on the phone. If a patient is not interested in using a Streamer, you have the option to give them an extra year warranty instead.
Oticon Medical Streamer and ConnectLine App
The ConnectLine App will allow your patient to have some control of the Streamer, and it can be helpful for parents also. It will automatically show the external devices that are connected to the Streamer (none will display if none are connected). It also enables changes to volume, programs, and gives patients the ability to mute. iOS 7 or later is required to install the ConnectLine App. It is compatible with iPhone, iPad, and iPod touch. The ConnectLine App for Android smartphones and tablets works with Android 4.x. (Ice Cream Sandwich) or later.
Using the App, you can change the functionality of the Streamer. In the Streamer & ConnectLine section of the App, the functionality can be adjusted and customized. For example, for iPhone users, it gives the patient some options as to how they want the Streamer and their phone to function together. They can customize things like last number, redial, voice dial, transfer call, reject call, and automatic connections. They can have a separate ringtone for landline and for a cell phone in the Streamer so that they'll know where the sound is coming from. If they're home and they have a landline and a cell phone, and the landline rings, they'll know it's the landline based on the ring through the Streamer.
You can add and remove programs through the App. You can also adjust the streaming volume level for connected devices. It gives the patient options to manipulate the volume level for different uses like TV, music, T-coil, and FM.
To determine if a Streamer can be used with the ConnectLine App, look at the serial number on the bottom of the Oticon Medical Streamer and ensure the last two digits are A3. Current Streamers will work with the ConnectLine App as well as any Streamers that have A3 as the last two digits of the serial number.
Summary
The Streamer provides access and many options to your patients. Because it uses NFMI, it provides a more consistent sound. It does not use any power from the sound processor, so battery drain of the device is not affected by the use of the Streamer. The Streamer was designed to provide easy access to patients so they don't have to worry about their battery dying or having connection issues during critical moments.
In summary, not all wireless connections and hearing devices are the same. Oticon Medical strives to provide you with a flexible way to transmit wirelessly and still provide superior sound quality. We take a lot of pride in our platform. Our Streamer allows patients to connect wirelessly to multiple options, and connecting an FM is very simple. I hope you found this course helpful in understanding the process so that you can efficiently fit your patients and enable them to enjoy all the benefits of the Ponto system.
Citation
Simone, G. (2018). Wireless technology: How to connect FM and other accessories wirelessly to the Ponto device. AudiologyOnline, Article 24041. Retrieved from www.audiologyonline.com