Learning Outcomes
After this course, participants will be able to:
- Explain the latest product advancements associated with Audioscan hearing instrument fitting systems that facilitate fast and seamless integration into the modern dispensing practice.
- Discuss how to more effectively incorporate hearing instrument fitting and verification into an office workflow and workspace using Audioscan products.
- Describe how to connect Audioscan equipment to a basic small-office network.
Introduction
Chris Stokes-Rees: This course will cover methods for efficiently integrating hearing instrument verification into the modern dispensing practice using Audioscan hearing instrument fitting systems. Audioscan products have always benefited from the fact that they are standalone systems. In other words, they contain their own processors and do not rely on third-party hardware, software, or operating systems. While this gives the benefits of stability and reliability, users sometimes do not take advantage of the methods in place for integrating these systems into existing office infrastructure.
Not everyone has the short-term goal of a paperless office in sight, but that is the direction in which we are moving. In this connected world, it makes sense to make the most of the digital technology that surrounds us if it means potential increases in efficiency.
Managing Data Flow
Efficient integration in a clinic means managing data flow. We have various types of data at different points in the hearing management process, and the goal is to use the tools available to best handle the data collection, transmission, sharing and storage. Assessment data is stored in conjunction with the patient records, whether that be in NOAH or an office management system. At the fitting, we have the fitting data which can be PC-based, but then we also have verification records. Ensuring that your verification system is also connected to your computer will help you to harmonize this data collection and move towards a more efficient practice.
Networks
The standard method of data exchange between PCs and other connected components is the network. Networks have become so ubiquitous that many people do not even realize they have one. This portion of the presentation is not intended to be training for IT professionals, however a quick overview of the basics of a network will be helpful for this discussion. For more information regarding network setup specific to the Verifit2, readers are invited to view our networking support video.
The basic function of most networks is the sharing of data, data storage, and sharing of resources. A typical small office will have a network in place to allow multiple computers to share one printer, one internet connection, and often one patient database such as Noah. The device that handles all the connections is a router. Each device on the network requires some sort of connection to that router. This connection can be wired or through WiFi.
If you imagine the information traveling through the network as mail, then the router is the post office. Similar to mail, each device on the network needs to have its own unique address. No two devices can use the same one. You will see in Figure 1 that the two computers, one printer, and a Verifit2 are on the same local network, and that they share the same first three numbers, or octets, and have a different fourth one. These numbers can be assigned in two ways: automatically by the router (known as DHCP), or manually by an IT administrator (referred to as “static”). Generally, most small offices will choose the automatic option.
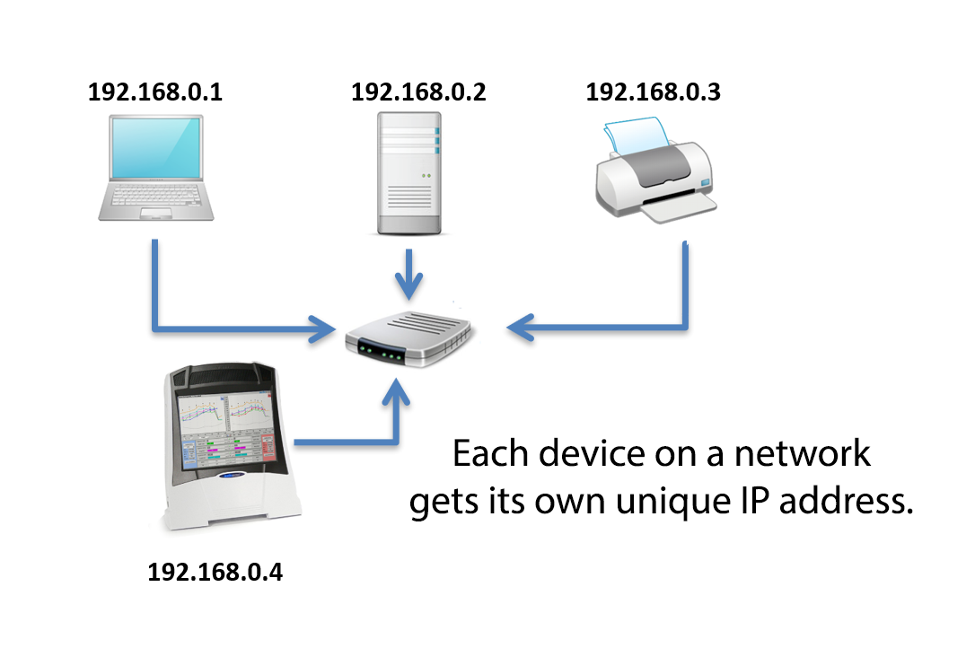
Figure 1. Example of addresses for devices that share the same network.
When connecting an Audioscan device to the network, we can break down the existing networks into two main categories. Number one is the hospital, large clinic, or large institution. These networks are very much hidden, and you only ever see the jacks in the walls. They are usually highly secured and controlled. IT staff manage these networks and an Audioscan user, or even installer is not permitted to make changes. It is usually best to talk to the IT staff long before an Audioscan product install to ensure everything is ready in advance. They usually want to assign the IP address statically, and this is usually done ahead of time.
The second category is the small practice or clinic. The router may still be hidden in a closet somewhere and connected to jacks in the wall, but it is easily accessible. In this case, a connection is simply made to this router and the IP address assigned automatically.
Wired connections are possible on all Audioscan equipment as all Verifits, RM500SLs, and Axioms have an Ethernet port. Wired connections simply need a cable from the back of the Audioscan to an empty jack on the router. Even wireless routers usually have a few Ethernet jacks as well. If the router is physically located at a distance from the Audioscan and there is only one connection in the wall, this jack can be split into multiples with the addition of an inexpensive Ethernet switch. The switch allows a PC and the Audioscan to share one router port.
In the Audioscan Setup, choose Wired, or for older models simply enable the network. Note that DHCP is checked by default (Figure 2). This allows automatic assignment of the IP address. Click “test connection” to obtain the IP. You can now see your Audioscan's address on the network.
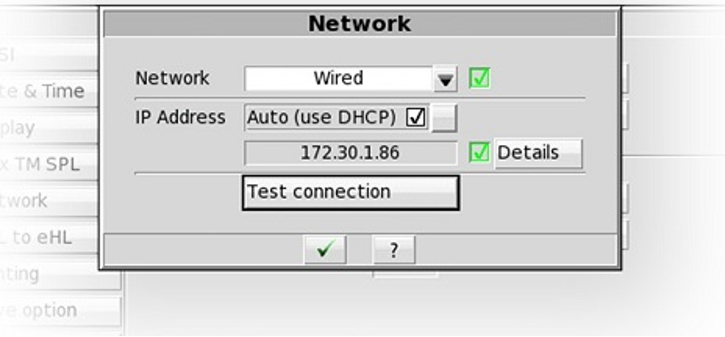
Figure 2. Wired set up on Audioscan devices.
Wireless Connections
With the relative ease of setup, WiFi has become a popular way to set up a network in a small office or clinic. A small network router will typically only have about four wired connections but can be used to network many wireless devices including laptops, printers, tablets and now your Verifit2 or Axiom as well. It should be noted that a wired connection will always be faster and more secure, but if cabling will be a challenge you may choose to use Wifi.
The setup for wireless is similar (Figure 3) to that described earlier for wired networking. This time we choose Wireless, then we need to set up the login information, similar to what you do on your laptop or tablet. Note that you will still have to click Test connection to get the IP address through DHCP.
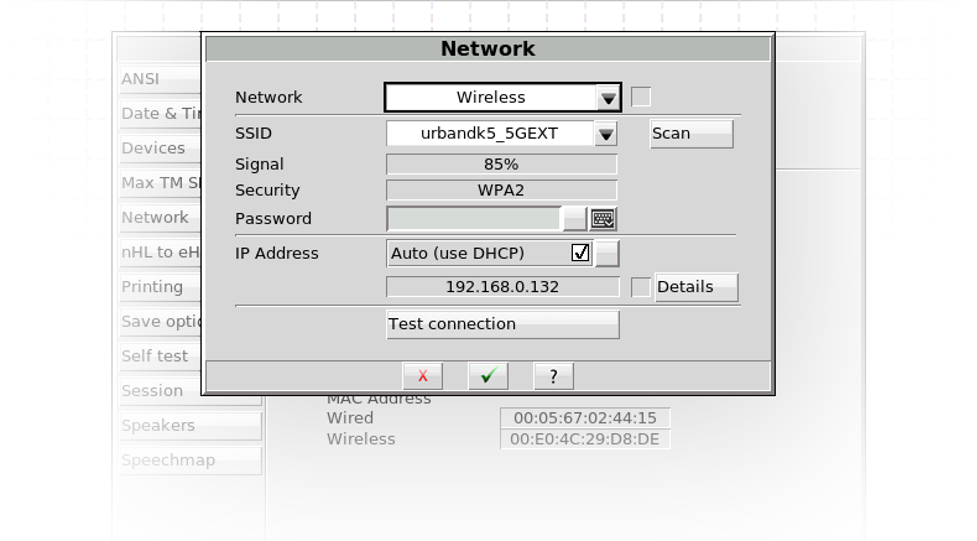
Figure 3. Wireless setup on Audioscan devices.
Audioscan NOAH Module
The most common integration option that utilizes the network is the optional Audioscan NOAH module. The same module works for all Audioscan products, except for the black legacy RM500 model from years ago.
The main functions of this module are to send the audiogram from NOAH into the Audioscan equipment prior to testing and to capture and send the test results from the Audioscan screen to the NOAH patient database for later viewing and even printing. We also allow the sharing of public assessment data from our equipment to other companies’ modules, where applicable, such as the real-ear-to-coupler difference (RECD) values. With module version 2.20 and later, previously-measured Speechmap test data can be re-loaded into a Verifit2 and used as comparison curves for re-testing.
After the module is first installed, click the connect button and enter the IP address of the Audioscan product you are using. On Verifit2 this will be displayed at the bottom of the main menu. On other products, go to Setup and select Network. Click connect and you should see the picture of the Audioscan product and its serial number (Figure 4). If you do not know the IP address, you can also click the scanner button. This will run an automated search of the network for any connected Audioscan equipment.
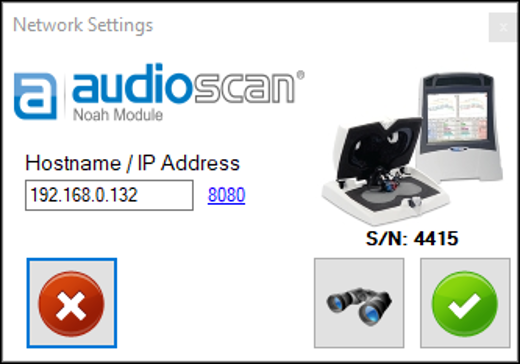
Figure 4. Noah module connecting to Verifit2.
After connecting, at the top of the module is a list of any previously stored actions. Select one of the stored actions in the list to send the associated assessment data to the equipment (Figure 5). Note that once an action is selected, you will see a table populated with all of the available public data values. Click the bold left arrow button (pointing toward the equipment picture) at the top of the module to send that data to the Audioscan equipment.
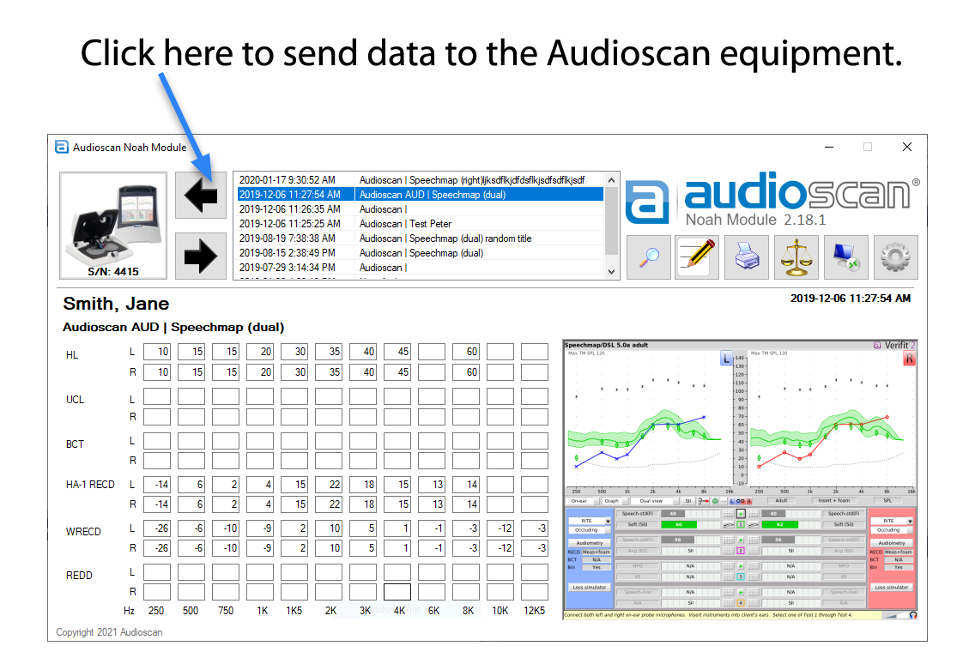
Figure 5. Audioscan NOAH module screen.
After testing, select the bold right arrow button (pointing away from the equipment picture) to capture the results. A small preview screen will pop up (Figure 6). This allows you to type in a title as well as add notes if applicable. These notes can also be added or edited later by clicking the button with the pencil icon. The two checkmarks in the lower left allow you to select whether or not the audiogram and/or the RECD are stored as public actions, i.e. made available to other modules.
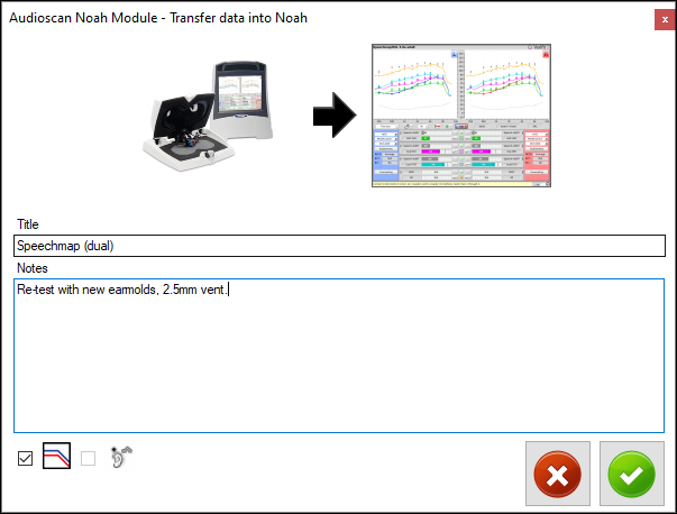
Figure 6. Download data screen in the Audioscan.
Selecting any stored Audioscan action in the module action list will show you a small preview of the stored results (Figure 7). Click the magnifying glass button to show the stored screen shot in full screen mode. Click print to send the screen shot to the default PC printer or to export electronically as a PDF document.
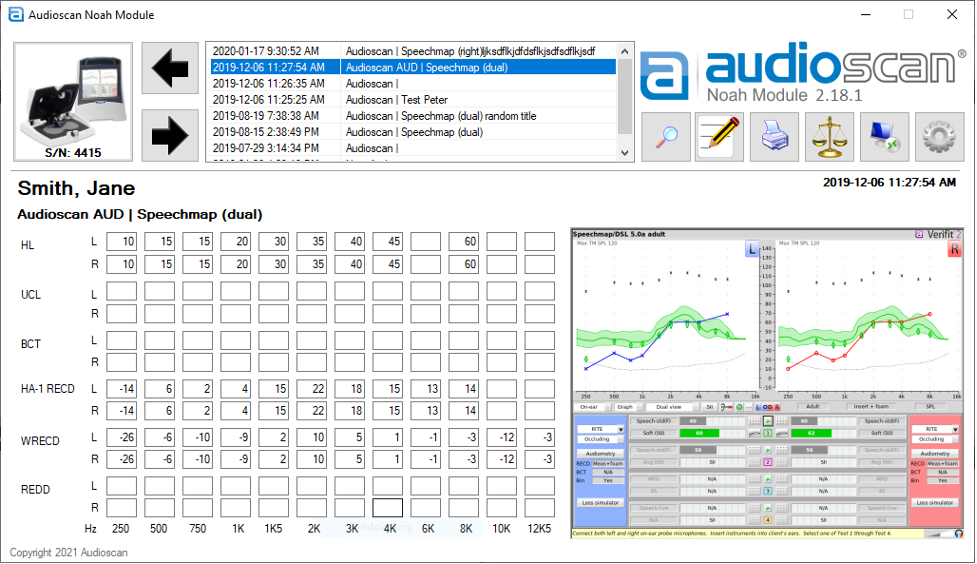
Figure 7. Audioscan actions in the NOAH module.
Clicking the scales icon allows you to compare the selected stored screen shot side by side with the currently visible screen on your Audioscan equipment, without saving anything new. This is helpful if you are trying to adjust a new hearing instrument to match previous results. Clicking the monitor button (second from right) will launch the Audioscan Remote Console. The Audioscan Remote Console is an office integration software tool that will be described later in this article (see Remote Operation).
Session Store/Restore
All Audioscan models also have a way to store all the internal data as a .xml file, named with an identifying client ID. This stored data file can be later sent back into the equipment, and all test data and assessment parameters are restored. The stored .xml data file can also be opened in Microsoft Excel for research purposes. Simply connect any USB keyboard to the Audioscan equipment via one of the available USB ports to be able to type in the name or ID number you would like to assign to the file.
To set up session store/restore, go to the Setup screen and choose Session from the choices on the left side of the dialog box (Figure 8). Select “Enable file-based data exchange.” The default storage approach selected will be a USB stick. To store data to a shared folder on your networked PC, choose Network share.
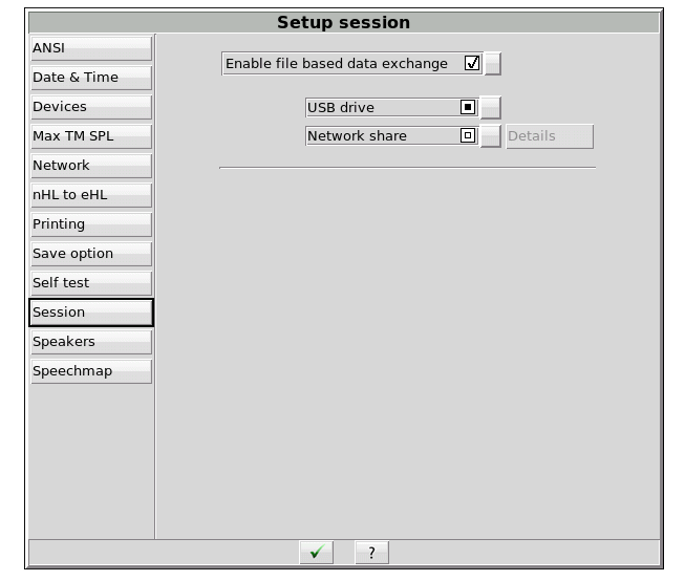
Figure 8. Setting up the session store/restore.
When you click Details next to Network share, the screen will allow you to enter the shared folder parameters - in other words the computer name, share name, login and password that the Audioscan product will need to access that folder.
After selecting your parameters, you will go back into the test screen by clicking the green check mark on the screen(s). From here, right click to bring up the home menu, and select Session (Figure 9). Choose ‘Store session to file’ from the options provided in the drop down box.
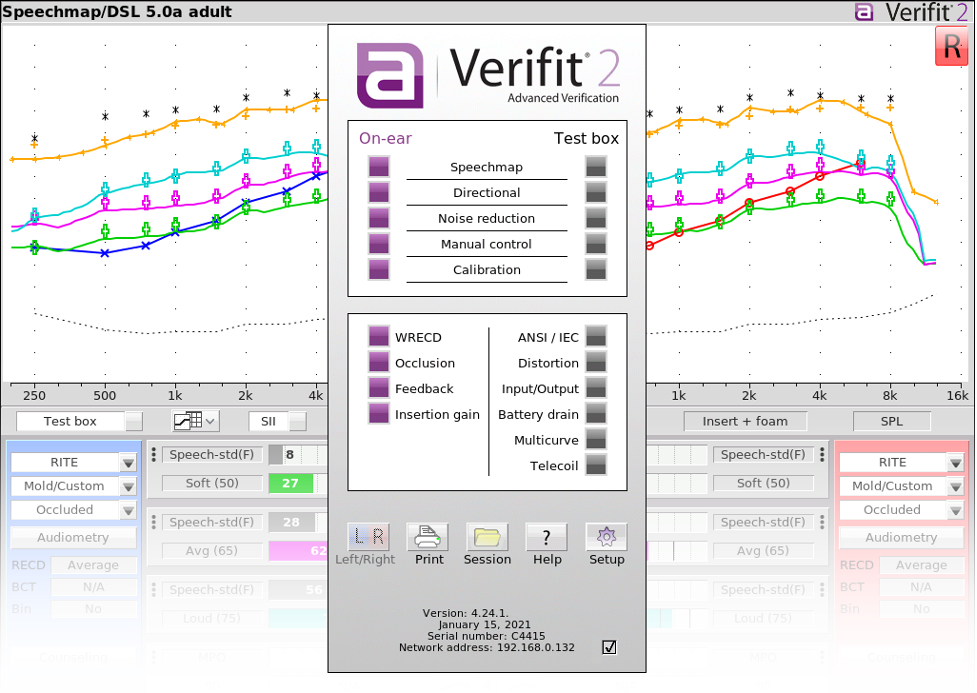
Figure 9. Verifit main menu from the Speechmap screen.
In the Session Data screen, click on the Client ID field and select an existing client (if one is available) or type in a new one. Click the checkmark or Continue button to complete the save (Figure 10).
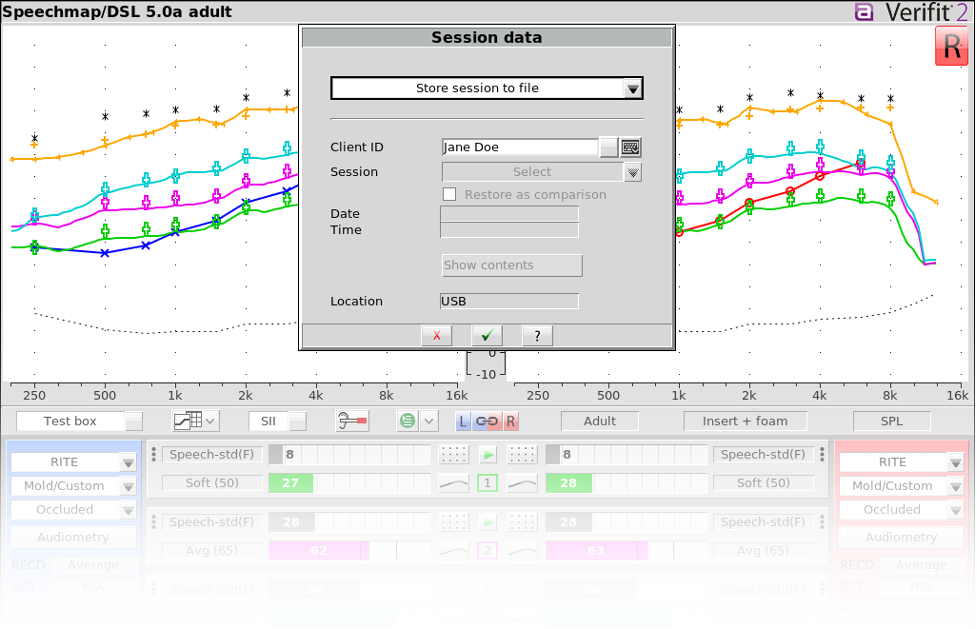
Figure 10. Selecting new or existing patient to store session data.
Restoring data to the Audioscan is similar, but you select ‘Restore session from file’ in the Session data screen (Figure 11). Select the Client ID and then the desired session number from the drop down lists provided. Subsequent session stores to the same client will be numbered automatically. Note that the date and time of the session are displayed for each selected session to assist with identification of the desired data file. Click the Show Contents button to see what type of test data is contained in the session file. Select Restore as comparison to load the Speechmap test curve data in as comparison curves only; these can be viewed in the background while new tests are run.
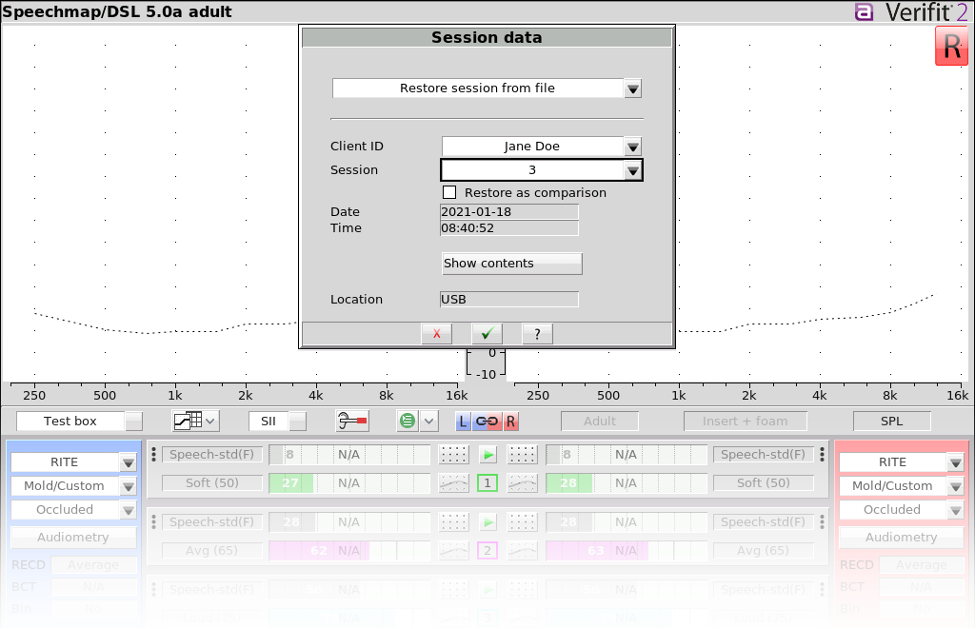
Figure 11. Restore session from file, choosing the patient and session number.
When you press Continue, all data will be restored. Note that the data will be restored not just for the currently displayed test screen, but also for all tests that contained data when the store action was taken.
Remote Operation
Remote operation is new functionality that works only on Axiom and Verifit2 models. This easy-to-use application on your desktop allows you to move all control and display functions to your PC. Originally designed for Telehealth applications, this functionality has become very popular with clinicians who desire the flexibility to operate multiple pieces of equipment and software from one PC screen. Please note that if you are already connecting using the Audioscan Noah module, the Remote Console functionality can also be launched from within the Noah module without installing the separate application.
To set this feature up, download the Audioscan Remote Console from the Audioscan software update website (https://customer.audioscan.com). Extract the contents of the .zip file and run Setup. Double-click the blue ‘a’ Audioscan icon on the desktop to launch the application.
Next, enter the IP address of the Audioscan product and click connect. As with the new NOAH module, there is a scanner if you do not know the IP address. You will be asked for your password and have the option to save it so you can skip this step in future. The default password is “audioscan.”
The Axiom is the only Audioscan model that does not ship with its own display. The majority of new Axiom installs now use this remote application to run the Axiom in a "headless" state, where the fitting computer is also the Axiom monitor (Figure 12). Verifit2 does have its own monitor, but the remote operation application allows for more flexibility in office setup.
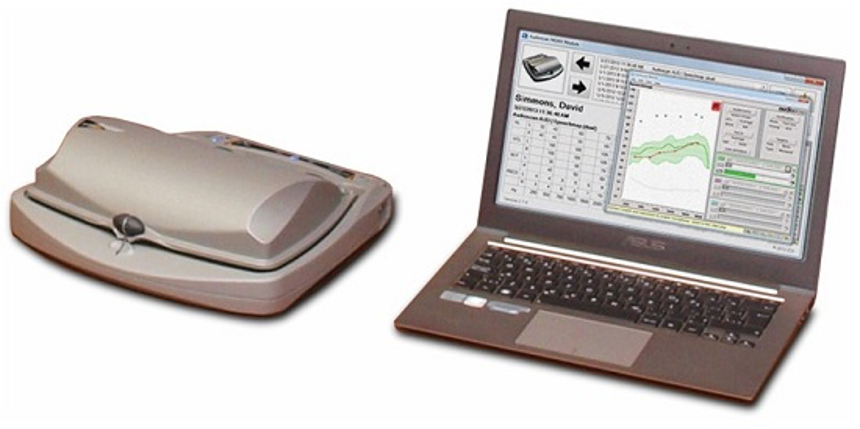
Figure 12. Axiom using a PC for remote operation and display of fitting and verification screens.
Similar functionality can be used to make an iOS or Android device into a remote control as well. Through the VNC app, all control functions move to the tablet screen. This can also be utilized to simply make the tablet a wireless, second monitor.
To setup this functionality, first make sure your tablet is connected to WiFi on the same network as your Verifit 2 or Axiom. The Audioscan can still be using a wired connection, but the tablet will require wireless. From the app store, download and install a VNC client. For Apple, I recommend one called VNC Viewer.
Launch the app and create a new connection. The host will be the IP address of the Verifit 2 or Axiom and the password for remote operation, "audioscan" by default. The VNC app will typically remember these settings, so in future sessions you will be able to connect with one tap.
Printing Options
Many users who require hardcopy versions of their test data choose to print directly from the NOAH module. You can also print to a directly-connected printer via USB. Postscript lasers are supported on all models; the Verifit 2 and Axiom now support approximately 1700 different HP printers. Any compatible printers connected to the same network can also be set as a default print device.
Results can also be printed as graphic files including PDF documents used for many electronic medical record (EMR) systems. These can be stored to a USB stick or to a shared folder on your PC. For users of Blueprint, the Audioscan Noah module can store PDF following a standard naming convention which will automate the import into Blueprint.
Finally, another connectivity trick that works on all networked Audioscan products is the display of the screen through a web browser. Open any web browser such as Internet Explorer, Firefox, or Chrome. In the address bar type HTTP:// then the IP address of the Audioscan, forward slash, screen (for example, https://123.123.123.123/screen). Hit enter and the current screen will be pulled into the browser. A simple print function (CTRL+P) will print this to your PC's default printer. Having the screen on your PC like this is also a great help if you need an image for a report or presentation.
If you drag the little blue 'A' icon from the browser’s address bar to your desktop, you will have a shortcut directly to your Audioscan's screen.
Layout Options
Although not a connectivity issue, the physical system layout has a great impact on the efficiency of verification integration into your practice. The configuration of your Audioscan equipment affects your workflow. Audioscan equipment, and in particular the new Verifit2 provides a number of options to maximize operational efficiency and allow you to tailor Audioscan products to seamlessly fit into the layout and desired workflow of your practice
The traditional Verifit setup has the test box immediately in front of the display unit. This can mean a small footprint and is similar to how many Verifit VF-1 units are used, but alternate setups are available and often advisable.
The offset layout (Figure 13) puts the test box beside the display unit and allows the patient to be much closer to the real-ear speakers. This can improve the reliability of real ear measurements especially when using simultaneous binaural Speechmap. With the addition of an optional long test-box cable, the test box can be positioned even farther away or even be disconnected when real ear is being performed.

Figure 13. Offset layout, where the test box and display are side by side.
The addition of the remote operation via PC allows the clinician to operate the Verifit without requiring access to the built-in display screen (Figure 14).
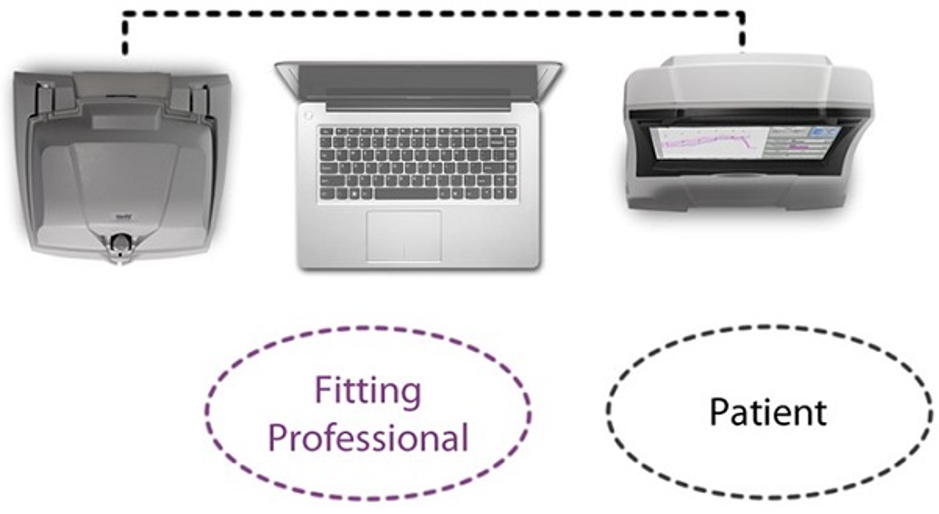
Figure 14. Offset with remote PC setup.
The addition of an external real-ear measurement (REM) speaker allows for the ultimate in patient / clinician placement flexibility. Using this configuration approach, the acoustic space around the patient can be optimized and the clinician has unimpeded access to the display on the Verifit (Figure 15). The addition of an external monitor can aid in the patient counseling experience.

Figure 15. Setup with an external REM speaker.
Finally, the Verifit 2 also includes built-in VESA mounting capability for a standard monitor arm or wall mount. This provides unequalled configuration flexibility in that the Verifit can be removed from the desk top altogether (Figure 16).
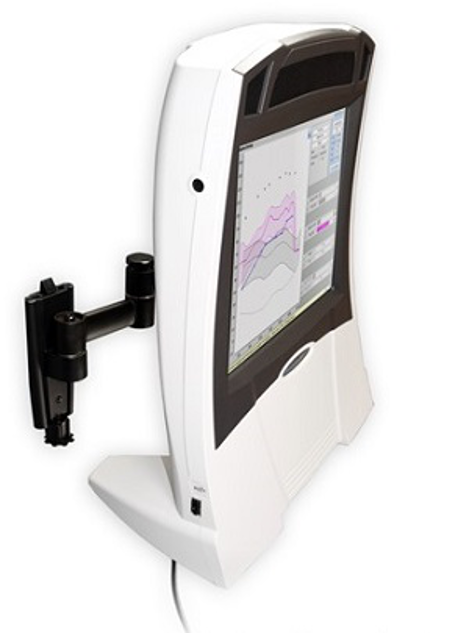
Figure 16. Wall-mount option for Verifit2.
Summary
This course was intended to give an overview of the connectivity options and ways to integrate your verification equipment into your modern office systems, with particular emphasis on approaches associated with Audioscan products. We looked at Networking basics, the NOAH module, session store/restore, remote operation, printing and printing to file options.
For more detailed instructions on any of these topics, please look in our on-line User Guide, available in the Products section of the Audioscan website at www.audioscan.com. You may also contact Audioscan directly at any time for more information via email at: info@audioscan.com
Citation
Stokes-Rees, C. (2021). Office integration - benefits for professionals. AudiologyOnline, Article 27739. Available at www.audiologyonline.com