Learning Objectives
After this course learners will be able to:
- Describe the pros and cons of using stored equalization.
- Describe how the REOR can be used for trouble shooting.
- Describe considerations in REAR85 measures.
Introduction
- Most of the examples will be related to the use of the REAR (real ear aided response) for verification. I know there are still a few if you who use the REIG (real ear insertion gain) for verification, but, for the most part, at least here in the U.S., people use the REAR, which is often referred to as speech mapping. If you use a variety of input levels surrounding the LTASS (long term average speech spectrum), indeed you are mapping the speech signal.
- In some of the case studies we will be fitting to a prescriptive target. For this I will be using the NAL-NL2 prescriptive formula. Certainly, the DSL is also a very good, validated prescriptive method that you can use.
- In some cases, I will refer to using three inputs for verification: 55 dB, 65 dB and 75 dB SPL. Some of you might be using three different inputs; some clinics use 50 rather than 55, and some clinics use 80 rather than 75, and some places use 60 rather than 65 for average inputs. The level of average speech is closer to 60 dB SPL than it is to 65 dB SPL, which is a good argument for using 60 dB. If you’re fitting to a prescriptive target, none of this will matter much, as of course the target will change accordingly. It is important, however, to test for soft, average and loud inputs, not just average.
- Finally, in most cases the input signal that we'll be talking about is the International Speech Test Signal, or ISTS (For review, see AudiologyOnline 20Q article by Inga Holube). This signal has been around for six years or so, and is rapidly becoming the most popular. One nice thing about the ISTS is that it is widely available. If you're using two different pieces of equipment in a large clinic, everyone can use the same input signal. And, if you are seeing a patient who was fitted at another practice, you will be able to directly compare test results—from Pittsburgh to Paris!
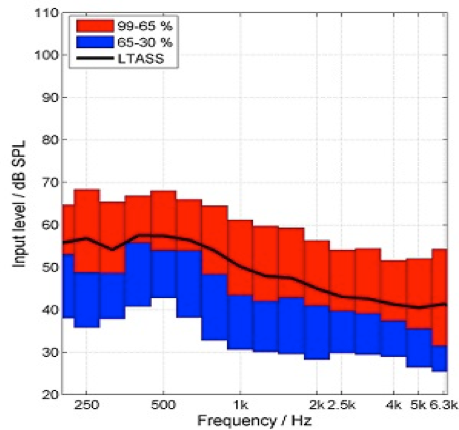
Figure 1 shows a speechmap using the ISTS. Note the LTASS, which is shown as a black line on the figure. The 65th to 99th percentile is shown in red, and the 30th to 66th percentile is shown in blue. That is about a 30 dB range that is displayed. Years ago, when we commonly conducted insertion gain, we equalized the signal across all frequencies. Today, we look at the LTASS, which of course varies considerably across frequencies. With a 65 dB signal, no frequency is actually at 65 dB because the frequencies are added together. Also, consider that in the high frequencies, the signal is only about 45 - 50 dB SPL. You might look at the REAR and think, "Gee, that's only at 65 dB aided, and my input was 65", but consider that an aided LTASS for a 65 input might actually be 20 dB of gain in the high frequencies. So, it's just a different way to think about things and it may be confusing if you were used to looking at an equalized signal in years past.
Puzzling Outcomes and Possible Explanations
I will present several different speech mapping cases today, where the outcomes were puzzling or least, not expected. I will provide possible reasons for the questionable results, along with solutions to address the issues where indicated. Some of the cases I will review today are hearing aid fittings I personally was involved in and others are based on questions I've received at hearing aid workshops I've given over the years.
Case #1: "There are times when I increase gain in the hearing aid fitting software in the higher frequencies to match targets, but I don't see any increase in the real ear aided response output."
Let's say you are conducting speech mapping and you want to get 3 - 4 dB of additional gain to match targets. You go into the fitting software, turn the hearing aid up 3 - 4 dB, run another curve, and the curve looks exactly the same as before you increased gain in the software. You increase gain again by 3 -4 dB, and still no change. What's going on? You might think the fitting software is not working, or there is something going on with the hearing aid.
The most probable reason for this finding is that the fitting is open and you are using the incorrect equalization. This is sort of old news, as Todd Ricketts and I published a paper on this 12 years ago, but I still run into people who haven’t gotten the message. In the past, we've typically used concurrent equalization. Concurrent equalization means that the reference microphone is continually on and has a loop with the output signal. The loops enables it to maintain the output signal at whatever level you set it, and its constant monitoring allows for corrections of minor head movements. This is the default equalization procedure in most, if not all, probe-mic equipment.
There is a second equalization option called stored equalization. With stored equalization, you calibrate everything initially, but then you turn the reference microphone off. While you're conducting your testing, it is not calibrating. With stored equalization, the patient can't move his head at all because you have calibrated it to one specific place. With most probe equipment, since concurrent equalization is the default, you have to actively select something to change to stored equalization. Stored equalization is used with open fittings, so depending on what equipment you use for probe microphone measures, you may have to select "open fitting" or "open" or something similar in the software in order to use stored equalization—check with your manufacturer if you’re not sure how to access this setting.
What happens if you forget to do this and you accidentally use concurrent equalization with a patient using a relatively open fitting? Sound will leak out of the ear and be picked up by the reference microphone which is still active. If you have the hearing aids set to 15 dB of gain or more, which is usually the case, it is very possible that this sound leaking out of the ear is greater than the sound coming out of the loudspeaker. The reference microphone thinks the sound leaking out of the ear is output from the loudspeaker, and automatically reduces the input. You think you are using the input you selected on the screen, when actually the reference mic is actively reducing the input because it's responding to the sound leaking out of the ear. On your screen, the result will be less than the true hearing aid output. The more you turn up the gain, the more sound leaks out of the ear. The more sound that leaks out, the more the reference mic turns down the input.
Several factors will affect the magnitude of this error. The more gain you have in the hearing aid, the greater the likelihood this will happen, and the bigger the mistake. The better your feedback reduction system is in the hearing aid, the more likely this will happen because it will allow you to put in more gain. How open your fitting is will also affect this, because you will see this effect at the residual ear canal resonance of the patient. So, if you have an open fitting, you'll maintain the patient's ear canal resonance, which is typically in the area of 2000 - 3000 Hz, and that's where you will usually see this mistake.
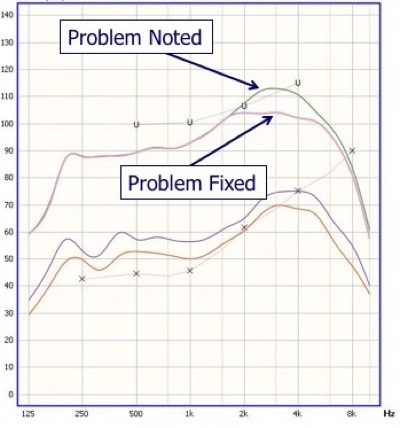
In Figure 2, I show a case where I used both the correct equalization (stored; pink curve) and the incorrect equalization (concurrent; green curve) for an open fitting. As you can see in Figure 2a, with the concurrent equalization, the result was an almost perfect fit to target, except for a 5 dB dip at 3 kHz. Being a prudent target-fitting audiologist, I'm going to start turning up gain to see if I can hit the 3K target. With the equipment still set to concurrent equalization, I raised gain until I nailed my target at 3 kHz. Then, I went in and used the correct equalization - stored equalization - to see the actual output in the ear, shown in Figure 2b. You see by the pink curve in Figure 2b, that using the incorrect equalization would have resulted in a very serious mistake in this case - overshooting the target by about 18 dB. I have heard people say that the NAL-NL2 is too tinny and causes feedback. Well, in many cases, the problem may be that the wrong equalization procedure was used, resulting in 15 to 20 dB more gain or output than what the fitter thought they were getting, and the fitting was nowhere near the NAL-NL2 targets. It is critical to pick the correct equalization, and with open fittings the correct choice is stored equalization. You also can use stored equalization with closed fittings if you want to - just remember that once you have the equalization stored, then the patient can't move his or her head during your measurements.
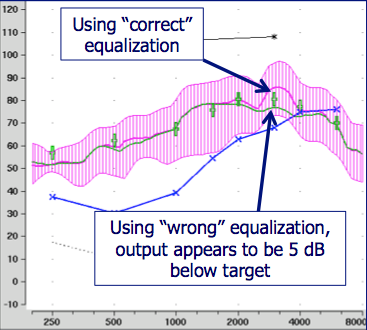
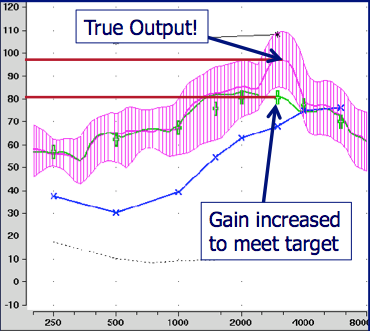
Figure 2a (left) and 2b (right). Using stored equalization (pink curve) and concurrent equalization (green curve) with an open fitting. Using concurrent equalization with an open fitting can result in the erroneous conclusion that the output is below target (Figure 2a, green curve). This error is further confounded if the fitter compensates by increasing gain and overshooting the target (Figure 2b).
Case #1: Take Two! "There are times when I increase gain in the hearing aid fitting software in the higher frequencies to match targets, but I don't see any increase in the real ear aided response (REAR) output."
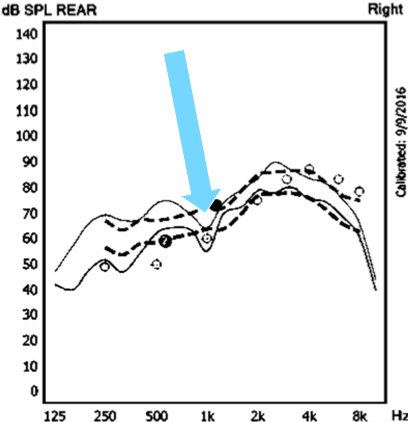
Okay, so what if you are seeing this same problem, but you know it has nothing to do with the type of equalization? Consider the MPO. If increasing gain does not result in a change in the REAR only at the highest input level, which is usually around 75 dB, there is one other possible explanation for the problem. Let’s look at the REAR85. The REAR85 used to be called the RESR (real ear saturation response), but in the most recent ANSI standard it's been changed to the REAR85 (or REAR90 if you use that input level). That is the brown line in Figure 3 and is a swept tone usually conducted at 85 dB SPL.
The white asterisks at the top of the graph connected by the white line are the measured, frequency-specific loudness discomfort levels (LDLs) at 500 Hz, 1500 Hz and 3 kHz. It is important to measure frequency specific LDLs to determine the targets, as the REAR85 should fall 5 dB or so below those levels. Do not use average LDLs as there is a very wide range of "average" and you may well be off the mark for your individual patient. The MPO fitting in Figure 3 is a pretty good match to target (just below measured LDLs). You have multichannel AGC-O, and at 1k Hz, I would take the kneepoint and lower it about 5 dB so that the 85 dB SPL swept tone curve falls below the LDLs about 5 dB all the across the spectrum.
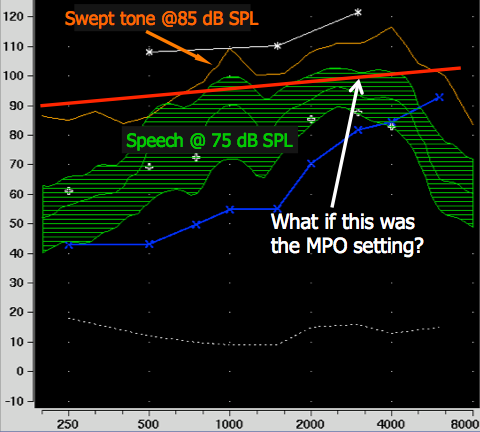
Figure 3. Consider the relationship between the MPO setting and the peaks of speech.
Case #2: There are times in the high frequencies when the fitting targets are actually below the patient's hearing thresholds.
You have all probably noticed this at one time or another when fitting a patient with a downward sloping hearing loss that is significant in the high frequencies (thresholds of 70 dB HL or greater).
In Figure 4, the threshold at 4 kHz is 80 dB HL. Whether you look at NAL-NL2 or DSL targets, they will be below the patient's threshold. You might think, why is the target below the patient’s threshold - even if I achieve the target, the speech still won’t be audible. Is this okay?

- Consider the complete speech spectrum, not just the 'average' LTASS. We normally use the LTASS rather than plot out the whole speech spectrum. In many of these cases if you did look at the whole speech spectrum, you would see that the peaks of speech indeed are audible. It's just the LTASS isn't audible. So, always look at the complete spectrum if you have a question.
- You only have so much loudness to use - use it effectively. Hearing aid users have a level where they want to listen to things, which is their preferred loudness level (PLL). If you increase the gain at a certain region because you think they need more audibility and give them a volume control, they're going to turn down gain—and, they will be turning down gain for ALL frequencies. So, you have to decide where you want your gain, because you only have so much to use.
- There is a point where extra audibility does not equate to increases speech understanding. This is referred to as “effective audibility.” As you keep increasing the gain or the output, you reach a point where adding in more does you no good. In fact, it may even cause problems. This often indirectly relates to the whole issue of cochlear dead regions, which are fairly common in downward sloping hearing losses.
- The overall fitting must be reasonably “comfortable” for patients, or they will turn down gain and reduce audibility for all frequencies. Fortunately, the prescriptive formulas account for this in their targets.
I'll share an analogy, stolen in part from Harvey Dillon, to help you understand the concept of preferred loudness and effective audibility. Imagine you are the coach of a basketball team and your team has nine players of varying ages. Your players consist of a 20-year-old, a 30-year-old, a 40-year-old, a 50-year-old, 60-year-old, 70-year-old, 80-year-old, 90-year-old, and one player who is 100-years-old. These ages are an analogy for thresholds as shown in Figure 5. You're playing against a team that has all 20-year-old players. As a coach, you use the five youngest players for your starting five. Even with your five youngest players, you have a 60-year-old in the game. I hope you see the similarity to a downward sloping hearing loss, where you have areas of better hearing and areas of poorer hearing. At halftime, amazingly your team is only 12 points behind. Not too bad, but your starting five are exhausted. And, the other team has just scored 10 points and has been substituting regularly so their players are fresh. You've had your starting five in the whole first half. What are you going to do in the second half? The youngest player sitting on your bench is 70-years-old. Are you going to substitute all of your players and put in your 80-year-old, your 90-year-old or your 100-year-old? Or, are you better off to keep playing your five youngest players even if they're tired? This is exactly the point of adding in more high frequency gain when you have a downward sloping hearing loss. If you add a lot of gain to try and reach one of those high frequency thresholds (like adding in one of those old players), you're going to have to take something out because relative to hearing aids, the patient is going to turn down gain - which is the equivalent to taking out a 40-year-old player. So, adding in more high frequency gain is like putting in an 80-year-old and taking out a 40-year-old. That doesn't make good basketball sense. The NAL people have extensively researched this over the past 40 years to develop sound, accurate prescriptive targets.
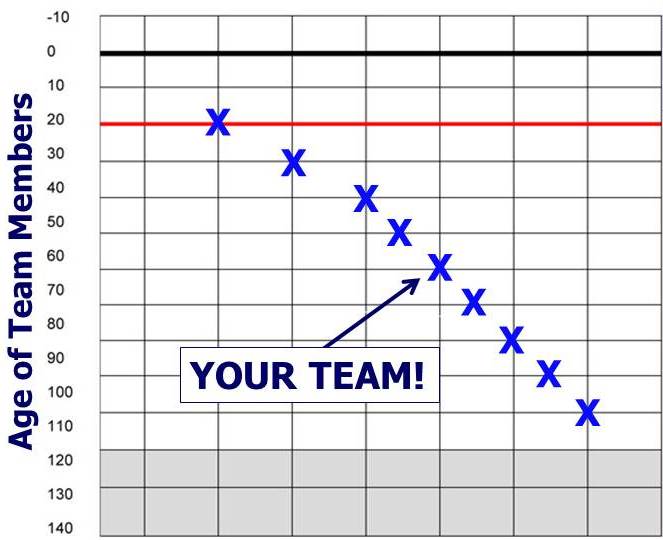
Figure 5. Basketball analogy to illustrate the concept of effective audibility. Hearing thresholds are compared to the ages of players on a basketball team.
Speaking of the prescriptive formulas, I have heard people say that they don't use the NAL or DSL because they have "their own way" of fitting hearing aids. I find it hard to believe anyone could come up with their "own way" that is superior to the prescriptions that have been developed, researched, and enhanced for 30-40 years. Trust that the NAL and DSL people know what they're doing.
Case #3: There are times when the output exceeds target and I notice that the aided Speech Intelligibility Index (SII) is bigger. Isn't a bigger SII better - what SII should I try to achieve?
Most probe-mic equipment will calculate the aided SII following each REAR. What if you happen to overshoot target, and when you do you notice that the SII got bigger. Some audiologist purposely over-shoot target just to see a bigger SII. It might be intuitive to think that a bigger SII is better, but this isn’t always true.
There has been some research by Earl Johnson and Harvey Dillon (2011) relating the SII to prescriptive fittings. They took five different audiograms (flat, upward sloping and three different downward sloping audiograms), and looked at the SII when there was a perfect fit target for four different prescriptive methods. I'm going to focus on their results with the NAL-NL2 and the DSL. Except for the upward sloping audiogram, there was essentially no difference between the SIIs with the DSL versus NAL-NL2. With a perfect fit to target, the SIIs with the NAL-NL2 and DSL ranged from .67 to .75 for average speech. The average SII for average seech for the DSL was .70 and for NAL-NL2 was .69. You might ask, "If I hit all my targets, why shouldn't I get an SII at .8 or .9?" There's a reason why .7 is okay.
Figure 6 directly relates SII to speech intelligibility. The red line in the figure refers to words in isolation, which is the most difficult of these intelligibility tasks. At an SII = 0.7, the percent correct is about 90%. For words in sentences (dotted dark blue blue line) and sentences (dotted green line), it's 100% correct. These data show that an SII of 0.7 really is good enough. Again, keep in mind that you have to keep hearing aid gain and output at comfortable levels; if you simply turn up gain just for the sake of observing a higher SII, the patient may simply turn it back down or may reject using the hearing aids altogether.

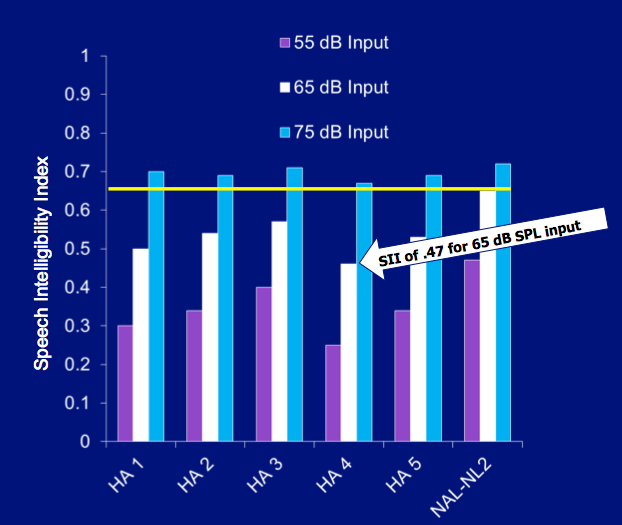
I need to say a few words about the SII and manufacturers’ proprietary targets/fittings. The fact that you are taking this course indicates you are probably conducting speech mapping and not fitting hearing aids using the manufacturers' proprietary fittings. However, just to show you why you have made a wise decision, let's take a look at a study that examined aided SIIs with these proprietary fittings. In this study, we conducted real-ear probe-mic testing with premier hearing aids and software from five leading manufacturers, using their proprietary fittings. In Figure 7, you can see the SIIs that were obtained for soft, medium and loud inputs for these proprietary formulas, compared with what would have been obtained with an NAL-NL2 fitting.
Before we move on, a quick note about the SII for pediatric fittings. Our talk today is related to hearing aid fittings for adults. If you're doing pediatric fittings, the rules change because young infants and children are developing speech and language and need more audibility. The researchers at Western University who developed DSL have done and continue to do all the background work for you. Their pediatric protocol, the UWO PedAMP, is available online on their website. It includes a chart with normative data on SIIs from acceptable DSL fittings with children, so that you can compare your pediatric fittings to see if they fall within that range. If you fit hearing aids to children, this chart can help you monitor them and ensure that they're getting the audibility that they need.
Case #4: Sometimes when I'm doing speech mapping, I have too much gain at a certain region. I then lower gain to the minimum, yet nothing happens with the REAR.
This case brings up a seldom used but important probe mic measure, the Real Ear Occluded Response (REOR).
Here are a few things to know about the REOR:
- The REOR is an REAR with the hearing aid muted or turned off.
- The REOR tells you the impact that the fitting tip, earmold or custom hearing aid has on the sound reaching the ear. This is a combination of the potential loss of the ear canal resonance and concha/pinna effects, and the attenuation caused by the occlusion of the ear canal (e.g., "ear plug" effect).
- If the ear is open, the effect will be minimal (e.g., ear canal resonance mostly maintained, no ear plug effect). If the fitting is closed, the effect can be 20 dB or greater.
The REOR tells you how much the fitting tip, earmold or custom hearing aid is acting as an earplug. If the ear is open you may see that the REOR looks like the REUR (real ear unoccluded response), but if the ear is plugged at all, you will see an immediate reduction in the ear canal resonance, and with more closed fittings, the REOR falls below the input (a negative REOG). As a reminder, the REOR is not a test of the occlusion effect, as that is unrelated to the sound reaching the ear canal in this manner.
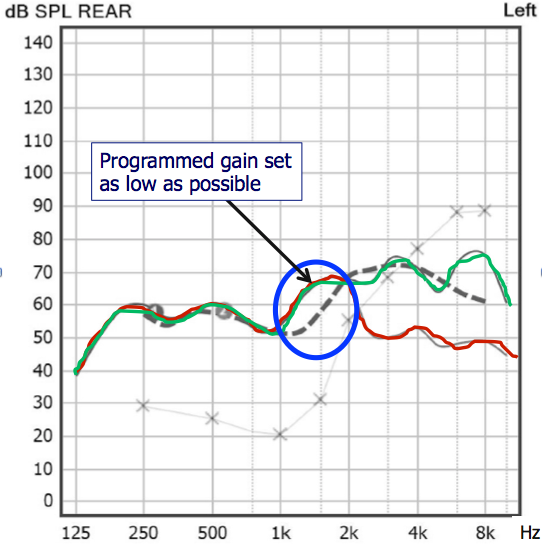
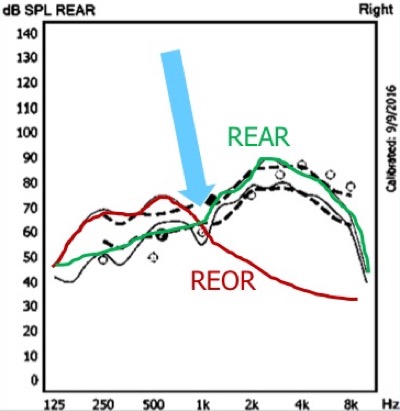
With that background, let's now look at a case where conducting the REOR can help you find the answer to a puzzling outcome. Figure 8 shows the REAR for an open fitting where the audiogram had normal thresholds in the low frequencies. The dashed line in the figure is the target, and the green line is the output of the hearing aid. You can see there is a pretty good match to target, except in the 1500 Hz range, where it appears that there is too much gain and an overshooting of the target. In this case, we went into the fitting software to lower the gain in this region. We decreased the gain until there was no more gain to take out, and yet the REAR curve did not change at all. So, what's going on? You might think that the hearing aid software isn't working, or that some strange resonance is present?
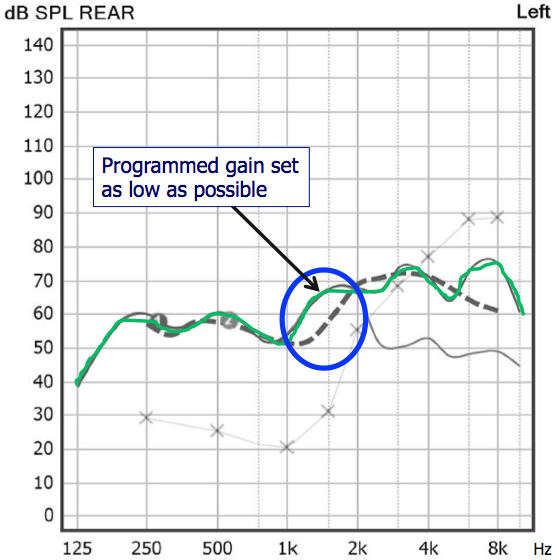
Let's see what's really going on by running an REOR. We muted the hearing aid and conducted an REOR, which is the red line in Figure 9. Now we can see that the reason that we couldn't get rid of the gain at 1500 Hz is because it is there even when the hearing aid is muted; in other words, what we're looking at is the sound that's going directly to the eardrum because of the open fitting. And off course, it makes sense that we couldn't get rid of it by re-programming the hearing aid because it is not coming from the hearing aid. Had we not done an REOR, I'm not sure we would have known that for certain. Lesson learned: When you have a strange result in your speech mapping, mute the hearing aid, run an REOR, and you might find an explanation. Given that you already have the patient set up for probe-mic measures, it only adds an extra 10 seconds or so to your test time.
Case #5: Sometimes when I'm doing REAR85 testing I keep lowering the MPO in the software, but the measured real ear output doesn't change.
You see that the REAR85 is now not too high and not too low. If, after your adjustment, you see that the REAR85 is 10 dB or more below the measured LDLs, then I’d suggest you go back to the software and move things up a bit. There's no reason to set the MPO too low, well below the LDL, which will limit useful headroom.
Here's another situation you may encounter. Let's say you do find that the MPO is too low, and you go in and raise the AGC-O kneepoint. You run another curve and you see the REAR85 didn't change. You move the AGC-O kneepoint up another 5 dB and it still doesn't change. The reason most likely is because your wide dynamic range compression is set too aggressively. Now, you need to go back to "gain for loud sounds" and release some compression. If loud speech then becomes uncomfortable for the patient, you might have to compromise a little by adding back in a little more compression. So, if you're having trouble getting the MPO high enough, it could be because your input compression is too aggressive. This all clearly points out that there is a world of difference between fitting hearing aids and dispensing hearing aids, and why the world needs us!
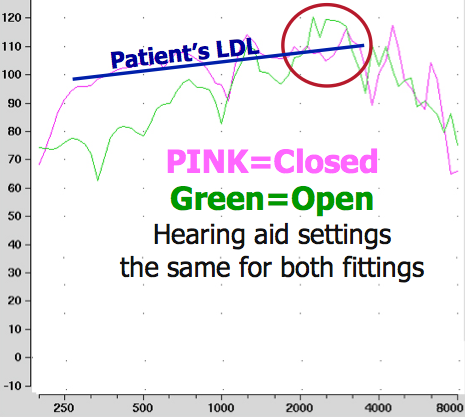
Figure 11 shows another case where the REOR is useful. In this case, we kept turning down the MPO in the fitting software, running another REAR85, and yet we were still exceeding the patient's LDL. The math just didn't add up because we had the MPO set to 98 in the software, and yet the output on the screen is showing 110 dB SPL at 3 kHz. How can that be? There then was an “ah-ha” moment. We muted the hearing aid and ran an REOR, which is the red line in Figure 11. This person had a very open fitting and had a very large ear canal resonance. Notice that the REOR peak is exactly where you would expect to see the peak of his ear canal resonance. In this case the ear canal resonance of at least 20 dB is taking the input signal and moving all the way to 110 dB SPL, which is actually exceeding his LDL. It's interesting that his LDL is exceeded by the input signal even without the hearing aid, and that does happen. Can you fix this when you're fitting the hearing aid? Fitting him with a closed earmold and adjusting the programming would work, but is not a good solution as there probably was a very good reason you selected an open fitting in the first place. My thought is that you simply acknowledge that this result is due to the REOR, and you don't waste time or make the fitting worse by trying to fix something that is not directly related to the fitting in the first place. Knowing when not to make a mouse click is sometimes more important than knowing when you should.

Case #6: Sometimes I get a weird dip in my REAR around 1000 to 1500 Hz which seems to be unrelated to the hearing aid gain programming.
Figure 13 shows almost a perfect match to target, except for a dip at about 1 kHz, and you will see this on occasion. There are a few possible reasons.
The first possible reason is that the dip is some kind of strange anti-resonance in the ear canal. You could troubleshoot by either moving the probe tip, moving the tip of the hearing aid in the ear, or using a different fitting tip. If doing that changes the shape of the curve in the dip region, then you know the cause.
Another possible reason for the dip that some people have suggested is that it is a crossover point in the circuitry of the hearing aid. Maybe it could be a channel crossing for feedback reduction. Some instruments don't have feedback reduction in the lower frequencies, so maybe the dip is occurring at the frequency where feedback reduction begins. If that is the case, then you should see the dip for all patients wearing that model hearing aid, IF, the feedback reduction is active during your testing.
A third possible reason for the dip has to do with the REOR—yes, we’re back talking about the REOR again. Although I didn't test the REOR on this particular patient, I've overlaid some hypothetical curves in Figure 13 to show what it might look like if the REOR was the cause of the dip. The red line in Figure 14 is a very realistic-looking REOR, and the green line is the hearing aid output curve. In this scenario, what we're calling a dip is simply a frequency region where there was no gain from the hearing aid (because it was an open fitting and all the gain was leaking out) and there was no direct input to the ear drum because you see the signal rolling off at 1 kHz. That would be very difficult to fix; if you tried turning up gain in that region, it would leak out of the open ear. It might just be one of those things that you leave alone; even though the curve doesn't look as pretty as you would like, remember that the patient is not hearing a dip. Here is yet another example of where measuring the REOR is very useful.
Case #7: Sometimes when I get a perfect match to target for soft sounds, I can't get a good match for loud sounds - I keep overshooting. The output's too high even after I've turned down gain for loud sounds as much as possible in the fitting software.
This is a common problem, especially if your probe-mic fitting protocol is to fit to soft inputs first. To understand what is happening in this case, we need to review WDRC. You probably learned that a 2:1 compression ratio means that something is cut in half, and that a 3:1 compression ratio means it's cut by two thirds. If you start off with 30 dB, and have 2:1 compression ratio, you should end up with 15 dB. If you start off with 30 dB, and have 3:1 compression ratio, you should end up with 10 dB, right? Well, that is true for pure tones, but it doesn't work that way with real speech.
Earlier I stated that the ISTS we use for probe-mic measures has a 30 dB window. In Figure 15, the compression ratio in the low frequencies is 1.5:1, which should cut things down by about 12 dB or so. However, as you can see indicated by the area between the horizontal lines, there is essentially almost a 30 dB window in the low frequencies even with the 1:5:1 compression ratio. In the high frequencies, there is a 3:1 compression ratio, but there is still a 20 dB window left (area between purple horizontal lines). If it was truly a 3:1 ratio with a 30 dB of input, you should only have 10 dB left. So, the "squash effect" of compression isn't the same with real speech as it is with pure tones.
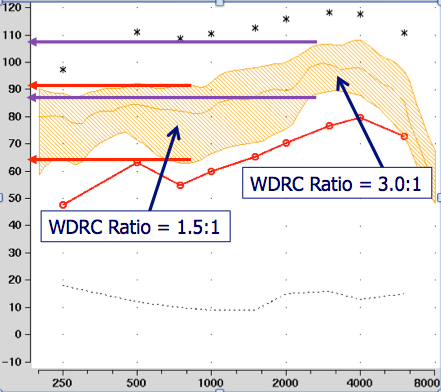
Figure 15. The "squash effect" of compression is not the same with real speech as it is with pure tones.
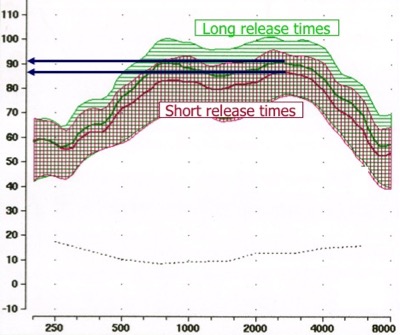
Figure 16 shows results from a product that allows you to change from short release times to long release times. I programmed a 3:1 compression ratio and simply changed the release time from short to long. Notice that there is a sizable difference in the window of amplified speech, which brings me to the point that release times do affect the "squash effect". A faster release time will give you more of the squash effect.
It's important to note that some companies change compression strategies depending on whether select NAL-NL2, DSL or you use their default formula. If you start with the default formula, and then switch to NAL-NL2 (or vice versa) the compression system could change and you will end up having to re-program the compression to match targets. I tested this with a Signia instrument. I had a good match to target for NAL-NL2, and then switched to the default fitting formula in the fitting software. The result was 5 dB overshoot of the target for loud sounds in the high frequencies. This makes sense that the manufacturer would logically assume that if you start your fitting in one formula, you will not switch to another formula, and that if you selected their proprietary formula in the first place, you had no plans on fitting to the NAL or DSL
Practical solutions and/or compromises for Case #7:
- Check with your favorite manufacturer to see if they use different compression strategies and make the best choice.
- Get as close as possible to the target for loud sounds, and check with patient to see if loud speech is okay even though you're overshooting target. Often, 5 dB over target is still Okay with the patient.
- The worst case scenario is that you might have to compromise with overall gain and underamplify gain for soft sounds. In other words, match target for average sounds, and then accept that soft sounds might not be quite loud enough. If you apply less than the prescribed gain for soft sounds, you won't need as much compression for loud sounds. I’m not fond of this choice, because audibility of soft sounds are critical, particularly for people with mild to moderate hearing loss.
Case #8: Sometimes I find that it's easier to obtain a match to NAL-NL1 targets than to NAL-NL2 targets. Is it okay to just keep using NAL-NL1?
Here's an analogy for you to consider. Some of you out there have been using computers for several years. Many of you remember Windows ME, that was launched in 2000? Windows ME was introduced the same time as NAL-NL1. Today, we use Windows 10, which is much improved and incorporates 15+ years of research and development. NAL-NL2 was developed as a result of many years of research, and is an improvement over the prior version. Just as you wouldn't go back to using Windows ME, I can’t think of any reason to go back to older versions of the prescriptions. The NAL and DSL prescriptions are based on years of research and are updated from time to time. Sit back, relax, and trust that the researchers know what they are doing, and don't try to outsmart them.
Questions and Answers from Attendees
When I verify using probe-mic measures, is it okay to start out with the manufacturer's default fitting?
If you are verifying to NAL-NL2, then I would start the fitting by programming the hearing aid to NAL-NL2 as that will get you closest to NAL-NL2 targets. Sometimes the manufacturer's default fitting will change things like compression constants as we discussed in Case #7. If you're verifying to NAL-NL2 you may have to do more adjusting in the fitting software to get there if you start with the manufacturer's default formula. I have heard that some people from various companies have told audiologists that unless you use their default algorithm, their "features won't work correctly." I find this hard to believe, and in fact, when I look at independent research with many of these products, the research was actually conducted by programming everything to NAL-NL2. I might add, that is some cases just the opposite is true. Because the DSL and NAL call for more gain then proprietary fittings, the patient will likely end up with a greater benefit for directional and noise reduction processing.
There are different compression constants that are allowed in Signia instruments even if you're choosing NAL-NL2. The options include dual compression, syllabic compression, and adaptive compression. What do you recommend?
That's a good question. I don't know specifically that the NAL people ever stated what kind of compression to use. There isn't definitive research on whether a quick release time or slow release time is best. The notion of using compression is to maximize intelligibility and listening comfort, while maintaining different inputs at a acceptable loudness, which is only indirectly related to the time constants. Today, the majority of manufacturers default to a slow release time. There are some data to suggest that sound quality may be a little better with a slow release time. Syllabic compression means the release time is that of a syllable, which is about 70-100 msec or so. As I said earlier, if the patient has a relative narrow dynamic range, I think you will probably get a closer match to your loud target by a few dB. Some of you may be willing to sacrifice a few dB and use a slower release time if you think it may help with sound quality. At this point, it's an individual decision.
References
Mueller, H.G., & Ricketts, T.A. (2006) Open-canal fittings: Ten take-home tips. The Hearing Journal, 59(11), 24–39.
Johnson, E.E., & Dillon, H. (2011). A comparison of gain for adults from generic hearing aid prescriptive methods: Impacts on predicted loudness, frequency bandwidth, and speech intelligibility. JAAA, 22(7), 441-59. doi: 10.3766/jaa.22.7.5
Sanders, J., Stoody, T., Weber, J., & Mueller, H.G. (2015). Manufacturers' NAL-NL2 fittings fail real-ear verification. Hearing Review, 21(3), 24.
Citation
Mueller, G. (2018, January). Signia Expert Series: Hearing aid speech mapping verification - some explanations for puzzling outcomes. AudiologyOnline, Article 21062. Retrieved from www.audiologyonline.com