
Editor’s Note: This text course is an edited transcript of a live seminar. Download supplemental course materials.
Introduction
Ravi Sockalingam: I am Ravi Sockalingam, Director of Clinical Research for Oticon Medical, and presenting with me is Justin Pfeiffer, the Vice President of Sales for Oticon Medical. The title of today’s seminar is Audiological Considerations of the Ponto Bone-Anchored Hearing System Before and After Surgery.
I am going to give a brief introduction to bone-anchored hearing systems, and we will touch on presurgical considerations, surgical techniques, and skin responses following surgical implantation. We will also talk about post-surgical considerations in this presentation.
Let me start by asking, “What is a bone-anchored hearing device?” I think a lot of you would be very familiar with a bone-anchored hearing device. It is a well-established hearing solution for conductive and mixed hearing losses and single-sided sensorineural deafness. It is based on two principles: osseointegration and direct bone conduction. Osseointegration is when the titanium implant bonds with the bony tissue. Direct bone conduction is when the sound processor or the bone-anchored hearing aid sends vibrations directly to the bony cochlea. I will touch on this a little more later.
The bone-anchored hearing device is composed of three main parts: a titanium implant, an external abutment, and a sound processor (Figure 1). The sound processor was also called a bone-anchored hearing aid, which is terminology that is still being used in some parts of the world. The sound processor actually behaves like a conventional air-conduction hearing aid. It picks up the sounds from the environment through a microphone, but unlike an air-conduction hearing aid where the sound is transmitted as acoustic energy, this sound is converted into mechanical vibrations and these vibrations are transmitted to the bone through the abutment into the implant which is imbedded in the temporal bone, and the sounds are then transmitted to the cochlea directly. The sound processor attaches to an abutment via the coupling. The abutment is then fixed to the implant by a screw. So the abutment is like a bridge between the sound processor and the titanium implant, which sits in the bone.
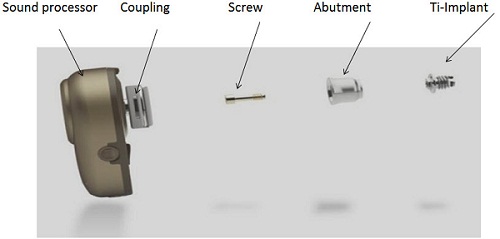
Figure 1. Bone-anchored hearing system including the sound processor, abutment, and titanium implant.
Figure 2 is just another illustration of that. This actually shows how the abutment sits on the head after surgery and what the processor looks like when it is actually attached to the abutment. The implant is actually imbedded in the bone. The implant is often 3 or 4 mm long. The abutment can come in various lengths also. It could be 6 mm long, 9 mm long or even 12 mm long.

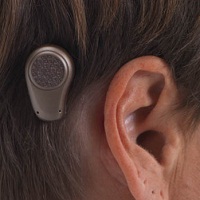
Figure 2. Abutment (left) and bone-anchored processor on the head (right) after completion of surgery.
The sounds vibrations are transmitted to the cochlea, bypassing the outer and middle ear. That is the key to direct bone conduction. Figure 3 is a picture of how the sound processor picks up the sounds and transmits the vibrations through the abutment, through the implant, into the bone, into the skull, and to the cochlea. That is what direct bone conduction is.
There are several advantages with direct bone conduction. First of all, it works independently of the ear canal and middle ear. Because it is direct transmission, the sound is often clearer than the sound you get from a traditional hearing aid. Preoperative testing is possible, and the varying comfort is fairly high compared to a traditional bone-conduction hearing aid. The surgery is straightforward, and it is very safe. Justin Pfeiffer, my colleague, will talk more about surgery a little later.
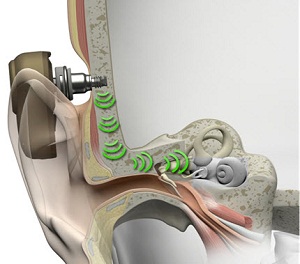
Figure 3. Pathway of direct bone conduction.
Candidacy Criteria
Let me go through some of the candidacy criteria for this solution. I have mentioned this before. It is a solution for conductive and mixed hearing losses and single-sided deafness. Those are the two main groups that this device will be suitable for. As far as mixed and conductive hearing loss goes, this device is approved for people 5 years or older, and the average bone-conduction thresholds should be 45 dB or lower with speech discrimination scores 60% or greater. Symmetric bone conduction thresholds should be there, and are defined as less than 10 dB difference in average or less than 15 dB at individual frequencies of 0.5, 1.0, 2.0 and 4.0 kHz, if the patient has bilateral conductive or mixed hearing loss. That is the bone-anchored hearing system candidacy criteria for mixed and conductive hearing loss.
The typical audiograms that you would see would look like this (Figure 4). You have conductive hearing losses and mixed hearing loss, and this is the kind of audiologic profile this solution is very well-suited for. In Figure 5 we can see that when we have the bone-anchored hearing aid or the sound processor in place, it actually transmits the sound not just to one cochlea, but to both cochleae. When we do that, we actually bypass the external ear and the middle ear. So if someone has an air-bone gap or a conductive element in their hearing loss, you will find that this device will actually help to overcome that air-bone gap. You are getting the sound right to the cochlea, at the inner ear thresholds by bypassing that air-bone gap. When you bypass the middle ear and the external ear, you do not really need a lot of gain when providing amplification that way. In traditional hearing aids, you really have to take into account and overcome the air-bone gap. With this device, you do not need that. You will need much less gain with a bone-anchored hearing aid or bone-anchored sound processor. You also get better sound quality because the sound transmission is direct and the ear canal can remain open. I know that there are hearing aids today that will also keep the ear canals open, but there is no occlusion whatsoever with this one because the sound is directly transmitted to the bone.
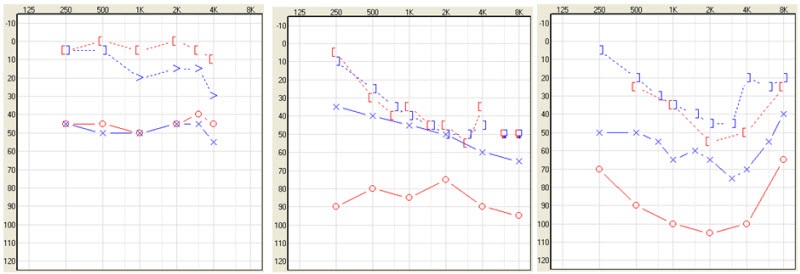
Figure 4. Audiograms of patients who are candidates for bone-anchored technology.
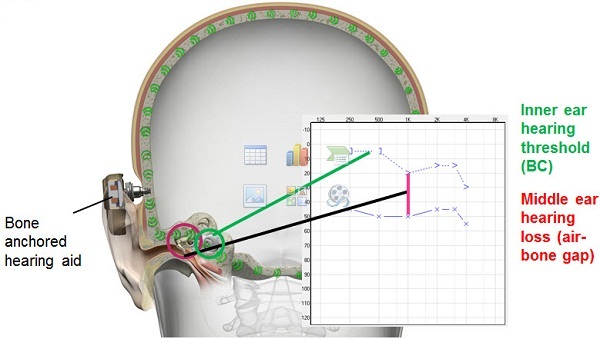
Figure 5. The bone-anchored sound processor bypasses the middle ear and stimulates the cochleae directly, overcoming the audiometric air-bone gap.
Benefits of a Bone-Anchored Hearing System
What are the advantages of a bone-anchored hearing system compared to a conventional bone-conduction device? There is no pressure against the skin and the skull with a bone-anchored hearing aid. There is better sound quality as there is no damping via the skin. With the traditional system, you are still going to get some damping when sound is being transmitted through the skin. The bone-anchored system is much more discreet. It is more comfortable, and with this device today, you get the same advanced technology that you will find in a top-of-the-line hearing aid. Compared to a middle-ear implant, this device also has some advantages. Preoperative testing is possible, and that is not possible with a middle-ear implant. We can predict how well these patients will do preoperatively. The surgery is very simple and straightforward. It can be performed under local anesthesia.
Single-Sided Deafness
The other group of people who will benefit from this solution are people with single-sided deafness. The definition of that is profound, unilateral sensorineural hearing loss. By that, I mean you would have normal hearing of 20 dB or better in one ear with a profound sensorineural hearing loss in the impaired ear. The audiologic profile often looks like this (Figure 6). These are people who have suffered sudden deafness and people who have acoustic neuroma. They may have had the tumors removed and still have the single-sided hearing loss. These are patients who would be very good candidates for a bone-anchored device. Apart from those two conditions, neurological degenerative diseases, genetics, ototoxic treatments, inner ear malformation, and trauma are the other reasons for single-sided deafness.

Figure 6. Audiogram of single-sided deafness.
The clinical aspects of single-sided deafness present as having difficulties communicating in group situations and in noisy situations. Patients will have difficulties localizing sounds. You can very well appreciate that because they have input coming from one cochlea. They may have difficulty understanding a person situated on the deaf side. In children, this can present itself as a major handicap in school. They may not have a lot of difficulty communicating one on one, listening to the TV or the radio, but they will have difficulties communicating in group situations.
These are the indications for single-sided deafness. I should stress these are the Food and Drug Administration (FDA) indications. Candidates must be greater than or equal to 5 years of age. A bone-anchored hearing system is intended to improve speech recognition and is intended for patients with unilateral sensorineural hearing loss when the other ear is normal. That means normal hearing in that ear is defined as equal to or better than 20 dB at 0.5, 1, 2, and 3 kHz. This is for patients who cannot or will not use an air-conduction CROS (contralateral routing of signal) hearing aid. You will see in a minute how this device would function as a transcranial CROS hearing aid. There is transcranial routing of the signal from the implanted side to the side with the good hearing. Because both cochleae are stimulated at the same time, when you implant this device on the side where there is profound sensorineural hearing loss, the transmissions will actually go to the other side via the bone, and the better side will pick up the sound, which is true transcranial routing of the signal. Sounds are picked up and converted to vibrations and the vibrations are transmitted to both sides. It works as a CROS hearing aid in that sense.
Speaking of the rationale that we use in providing gain for conductive and mixed hearing loss, you can see that the device basically provides direct bone conduction (Figure 7). It bypasses the middle ear completely. The gain prescription is going to be based on how much amplification we need to actually provide to the cochlea, and that is not going to be a huge amount of gain. Also, the kind of amplification prescription you are going to use will be based on a linear amplification scheme. You do not need to use compression at all because there is no sensorineural hearing loss here. Of course, if there is a mixed hearing loss, we use the NAL–NL1 prescription formula for that to account for the sensorineural component. Again, there is going to be hardly any compression used in the amplification scheme.
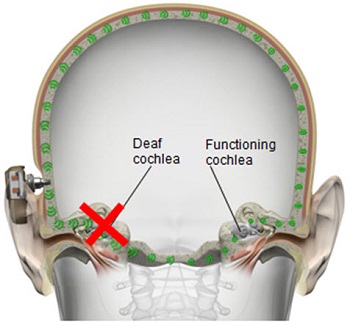
Figure 7. Direct transcranial bone conduction, transmitting sounds to both cochleae.
For single-sided deafness, we have to take into account the bone-conduction thresholds of the better side. Of course, FDA indications state that the better side has to have normal hearing, so you need to take into account the bone-conduction thresholds of that good ear. Clinics are increasingly fitting this device on patients who do have some mild to moderate hearing loss, and they are finding that it is still very beneficial. This device still provides enough gain to compensate for the mild hearing loss on the better hearing side.
For single-sided deafness, another thing we have to take into consideration is the fact that you have a deaf ear on one side and a good ear on the other. We have to take into account the head-shadow effect. We know that when sounds are transmitted to the other side, some of the high frequencies are going to be lost, and we have to compensate for that. So we do provide more high-frequency amplification in single-sided deafness. The low frequencies have a longer wave length and can reach the other ear, so we do not really have to provide much low-frequency amplification. In some cases, we may have to bring down the gain for low frequencies. When we do that, these patients do very well. That is the gain rationale that we use for mixed, conductive and single-sided deafness.
Preoperative Evaluation
Say we have a patient who is going to be evaluated for this bone-anchored device, and the patient is willing to go forward with the surgery. There are a couple of considerations that we will have to make. We have to do an evaluation before surgery, and then we will have to follow-up with the patient quite intensely and soon after implantation. Then there will be regular follow-up appointments depending on the clinic protocol.
There are always questions patients have before surgery. “What will be implanted in my head? Does it hurt? How long will it take until I get my sound processor or the hearing aid? Can you see the sound processor or the hearing aid behind the ear?” The fixture that is implanted in the skull bone is only 3 to 4 mm. An abutment which attaches to the implant can hardly be seen behind the ear. It does not hurt. It takes about 30 to 60 minutes to complete the surgery, and even less for some cases. It can be easily performed under local anesthesia for adults, and the patient can go home after the surgery. As far as fitting the sound processor, which we call loading, there is an approximate three-month waiting period from the time of implantation that will allow the skin to heal and for the implant to integrate with the skull bone. Often in these patients, if the skin responses are good and the patient feels comfortable, a patient can be fitted earlier. In some clinics, they are loading as early as six or eight weeks. You can see the sound processor behind the ear depending upon your hair. If the hair is very short, it will show a little. With longer hair, it does not show much at all.
The preoperative evaluation protocol varies from clinic to clinic, but typically it includes the following. You have to do the basic audiological work-up, including air and bone-conduction thresholds, speech testing, impedance audiometry, tympanometry, stapedial reflexes, and otoacoustic emissions, just to get a good audiological profile of the patient. Then you can see if the patient is a good candidate for a bone-anchored solution. We often do soundfield testing with this device on a headband or soft band. We look at functional gain. This means we will look at aided versus unaided conditions with the device. Soundfield testing could be done using any speech-in-noise test. Adaptive tests are used in some instances. It could be the Hearing in Noise Test (HINT), the QuickSIN or the AzBio test, which is commonly used with cochlear implantations. They are also being increasingly used for bone-anchored solutions.
The audiologist would present treatment choices, as there might be other alternatives to bone-anchored devices. They will work through those choices. They talk about advantages and disadvantages of these different choices they have. They will talk about payment and reimbursement issues, and then they would give the patient a trial. Typically, the patient should try the bone-anchored device and another device to see which one sounds better, which one is more comfortable, and so forth. Patient-centered counseling is very critical. Once the patient makes a decision about the way they want to go, then the audiologist would have to find a device that would suit both the audiologic profile and the needs of the patient.
In terms of the audiologic profile, we have to know what the fitting range is of the different devices that we have out there. For instance, Oticon Medical has the Ponto family of instruments. We have the Ponto, Ponto Pro and Ponto Pro Power. For the Ponto and the Ponto Pro, the bone conduction thresholds would have to be 40 dB or lower, but for the Ponto Pro Power you have an additional 10 dB leeway, so we can actually fit hearing losses up to 55 dB as opposed to 45 dB with the other devices. Figure 8 is the fitting profile for the different devices. If the audiologist is considering a Ponto Pro Power, they should be working with patients with mixed hearing losses. They may have a long history of ear diseases. They are often older. They will have presbycusis along perhaps with chronic otitis media, which means they may have some sensorineural hearing loss. You would need something more powerful to compensate for the sensorineural hearing loss. Even for patients with single-sided deafness and presbycusis on the better hearing side, you might want something more powerful to be able to compensate for the sensorineural component or the declining hearing in the better ear.
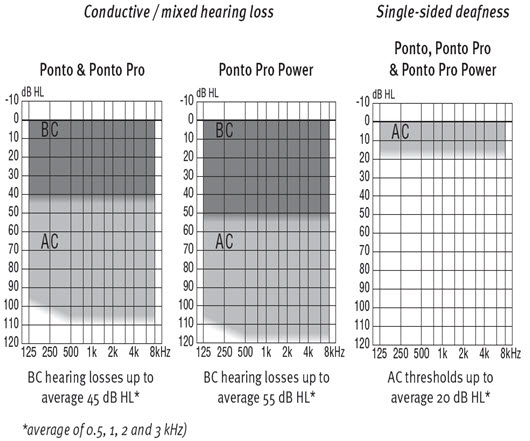
Figure 8. Ponto fitting ranges.
When patients actually try these devices in a headband or a soft band, audiologists often have to be aware of the fact that the sound is being transmitted through the skin. Because this is done through the skin, there is a damping effect and they may have to actually increase the gain by 10 dB at 1 kHz and higher, just to compensate for the loss of energy through the skin, or transcutaneous attenuation. After surgery when they have the abutment, the device actually conducts the sound directly to the bone through the abutment.
Once they have gone through surgery, they will receive follow-up in the clinic. Oftentimes they will come back a week after surgery to see the surgeon and also to see the audiologist. It is very important that the patients come back, whether it is at one week, two weeks, three weeks, or six weeks. They may be seeing the audiologist more often than the surgeon. The surgeon may see them at one week, and if the skin seems to be healing, it will be the audiologist who will be seeing them more often. It is very important that the audiologist understands how the skin heals and if the patient is really taking care of the skin. They have to keep the site clean.
The audiologists also have to be able to counsel patients on the device. At the time of the fitting, patients have to know how to use the device, and there is a session exclusively devoted to using the device. They have to go through things like the warranties, replacement, and also soundfield testing to assess the functional gain now that the patient is fitted. How else can we prove that this aid is actually making the difference that it is designed to make? When we do that, the patient will be happy and will leave with a smile.
Postoperative Fitting and Assessment
There are a few steps in that postoperative evaluation and the fitting process. There are a couple of technical considerations that you have to think about. For example, we have the ability to measure bone-conduction thresholds in-situ now that the patient has an abutment. We can actually measure bone conduction thresholds right off that abutment with the device. The device will actually send a signal, and then it will give the audiologist the ability to measure bone conduction thresholds that way instead of using a traditional B-71 bone conduction vibrator through the audiometer. Measuring bone conduction in the booth will still give you the transcutaneous attenuation issue, because the sound is being transmitted through the skin. By testing bone conduction through the abutment, you do not have this issue at all.
In Figure 9, you can see bone-conduction threshold measurements using both methods: the traditional bone-conduction vibrator method, which is there in gray, and our BC in-situ method in red. Oftentimes there is a difference between the two. For example, here is a case of a man who is 25 years old with atresia (Figure 10). The difference was quite substantial. You can see the traditional bone-conduction threshold curve in gray and the in-situ curve in red. It is much worse in the high frequencies than the traditional curve, because you tend to lose some of that energy when you are presenting the sound through the skin.
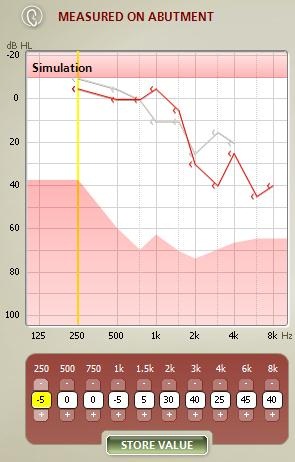
Figure 9. Difference in hearing threshold between traditional bone-conduction (gray) and BC in-situ measures (red).
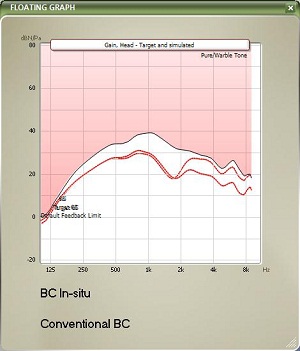
Figure 10. Example of large gain differences prescribed by BC in-situ (red) and conventional audiometry (gray) for a 25 year-old man with aural atresia.
When you do the BC in-situ method, you are usually providing more high-frequency amplification as opposed to using the conventional bone-conduction vibrator method. It does make a difference in some patients. It may not make a difference in other patients. The golden rule is to use the BC in-situ for all patients who have an abutment. This way, you are likely to get more accurate gain targets.
Directionality is another important consideration, because these patients are going to be using this device in different noisy situations, and we have to be cognizant of the fact that there may be situations that they may need directionality and the hearing aid may not provide that. With the Ponto, we have this split-directionality mode, which will provide extra opportunities for them to use the device in directional mode and get the benefit of directionality. Directionality is the only way to actually improve signal-to-noise ratio. If you do not have the split, the patient is going to be in omnidirectional mode, and they are not going to have very good speech intelligibility. Full directionality is really required only about 8% of the time. This is a piece of information that we got from one user through data logging, and it is very typical of many users. By using a device that has split directionality, we may be able to give more opportunities for directionality.
Feedback and feedback limits are other things that we have to be very cognizant of. We all have our own individual feedback limit. When that limit is crossed, the device will feed back, and it is a huge concern, especially when a patient is using a power device. We have to be able to measure the static feedback limit. That is because of the vibrations that come off the skull and enter the microphone, which sets up a gain loop. The individual static feedback limit can be measured with the Ponto system using the software alone. This is very easily done by the audiologist. If you do not want to measure them, there is a default average value built into the software. What that does is set the maximum gain across the frequencies. So any gain that you are going to use is going to fall below that feedback limit.
Once you have measured the feedback limit, the gain is going to be below that limit, and that will minimize, or even take away in some cases, any feedback that the patient will experience with the device. The feedback manager is what enables audiologists to measure individual feedback limits and then to set the gain below that feedback limit so the device does not feed back. They can also turn up the volume control all the way up and they will not experience feedback at all.
There are a couple of other considerations to keep in mind, when you are trialing the device in a soft band or headband, or with very young children under the age of the 5 who are not candidates for surgery by FDA indications. The soft band is a good way of giving them the amplification that they need with bone conduction amplification, but you have to be cognizant of the fact that you are still giving the sound through the skin. You will lose some energy and you have to account for that. There is a box that you have to check in the software when you are using a soft band or headband, and the software will correct the gain accordingly.
Patient Reaction
We have documented some of the reactions that we get with patients after they have been fitted and have been using the device for a while. They will say they think the Ponto is softer or weaker, but almost always they will say that they understand speech better. That is the key thing. They have to be able to understand speech. It may sound softer, but softer does not necessarily equate to worse speech understanding. The key here is to achieve better speech understanding, not whether the device is loud or soft. Of course, it has to be loud enough to be able to provide enough audibility. The patients have to be able to use the device in a variety of difficult and complex listening situations. That is why we really want them to use this device. If they are fitted correctly the first time with the fitting rationale that we have, they often do not require any fine tuning.
Single-sided patients often say it sounds clearer. Sometimes they wonder when you are fitting them in the clinic, whether the instrument is doing anything at all because it does not seem loud enough for them. You should be careful not to increase the low frequencies when they say that, because that can actually make listening worse for them because of the upward spread of masking. You want to keep the low frequencies as soft as possible for this group of patients, but you can increase the high frequencies, which compensates for the transcranial attenuation of sound.
I am now going to hand the mic over to Justin Pfeiffer to go through some implant and surgery-related considerations.
Surgical Considerations
Justin Pfeiffer: From this point on, we are going to talk about surgery-related considerations, the wide-implant advancements that Oticon Medical has come up with recently, and provide an introduction to the surgery, just in case some of you have not seen what the surgery looks like. We will go over the current surgical technique, new surgical techniques that are out there and currently being performed in various sites throughout the country and throughout the world, and then provide a retrospective implant study on the old Oticon Medical Ponto implant.
Wide Implant
We have actually used a new type of cutting technology called the OptiGrip. It is an implant design for improved stability (Figure 11). It starts out with a very small portion of the fixture and then it widens as it goes out in a conical shape, and then it actually comes back in a little bit. So it cuts all the way from the bottom to the top, creating new grooves as it goes through. So it actually cuts further into the bone, which helps it with its initial stability. It is based on proven methods and the surface that we have been using, based on dental technology established for over 30 years. That is the Branemark surface. It is a machined surface. There is a range of surfacing that you can be in for it to be able to osseointegrate well, and if you are inside that range, it does not matter how grooved you are or what your surface machine is. But if you are outside of that range, either too smooth or you are too grooved, that is very bad because a surface that is too grooved will actually cause more bacteria, and the surface that is too smooth will not be able to adhere and osseointegrate to the bone.

Figure 11. OptiGrip implant design for improved stability.
With this technology we also have minimized bone intervention by using a smaller countersink. Instead of using a 4.0 mm countersink, we have actually gone to a 3.75 mm countersink which is only 0.25 mm above what our old one was. We will actually have a smaller countersink hole, creating more bone cutting for the implant, which helps with the bone stability initially after surgery. Another good thing is that we have kept the universal hexagon interface, which is something that is good because we will be backwards compatible with ourselves. So if a patient had an implant two or three years ago and then switched to the new wider implant the surgeon has, we can still use the same abutments going backwards and forwards on either implant.
We have also widened the abutment range. We have a 12 mm abutment that is now available, and that is good, because it will meet more patient needs and it will also respond to new surgical techniques, which we will discuss later in the presentation as well. I think this is going to give simplicity for clinics and for patients. From a surgical aspect, there are not many changes throughout the surgery, but we are providing a better implant. From a patient aspect, the wide abutment range is more stable for more patients and not having to go into surgery if they are having some type of complications with skin as they go forward is beneficial.
One of the good things about the implant is the fact that it is actually fully threaded. In the past technology, and even competitors’ current technology, we initially used microthread technology. We still have one microthread that is right underneath the flange, but to make it fully threaded was a very big consideration, because the more larger threads you have, the better stability and initial osseointegration you are going to get. We now have 72% increase in bone contact surface versus our old Ponto implant, and even 10% over the current competitive implant that is on the market as well. That is something that we have tried to maximize and have done well with our engineering.
Figure 12 shows the Oticon Medical surgical instrumentation. This gives you a look of what is used in surgery. Many of things are not actually even used in the surgery, but this is basically what comes with a surgical kit. We have the same disposable surgical drills, and what we did with our engineering was increase the length of the drill. It is for better vision within the surgery. You want to make sure that the implant and the abutment are 90 degrees to the patient’s skull, and some patients’ skulls are actually shaped a little bit differently. So this extended length gives a good realization of 90 degrees, and it also gives you a little bit better view from a surgeon’s standpoint.
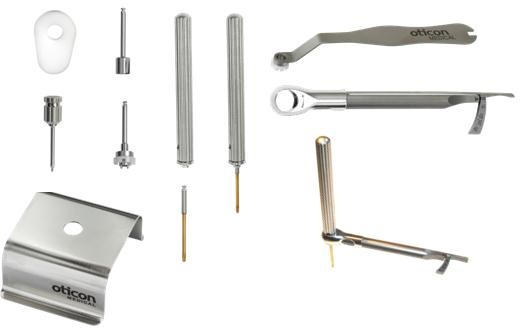
Figure 12. Oticon Medical surgical instrumentation.
We have a 6 mm standard abutment and 6 mm angled abutment. The 6 mm angled abutment is used in certain situations where the surgical site and surrounding structures look good, but as the patient turns their head, maybe a kind of roll is created with their neck and it may clip the device a little bit. When it does that, it causes a little bit of feedback. This abutment actually angles the device away 10 degrees from the problem area, and that will resolve the problem without having to make the patient wear a longer abutment if the surgical site looks very good. We have the 9 mm extended abutment, and we also have the 12 mm extended abutment. We have a wide diameter implant, both 3 and 4 mm, and then we also have a wide healing cap which is 26 mm long to help keep the surgical dressing down postoperatively.
Surgery
We are going to go through the surgical procedure. Figure 13 shows the drill that we currently use and the Ponto indicator that is just used from the surgeon’s standpoint to make sure that the device is not going to touch the pinna and cause any type of feedback. This is based off the dermatome technique (Figure 14). They are making a manual flap in the shape of the dermatome so that you can kind of get a full version of what the skin reduction will be like. As they move the flap up, they take out the subcutaneous tissue (Figure 15). On the right-hand side here, they are going to remove the subcutaneous tissue. What you are looking at there is called periosteum. That is like a skull cap or an inner layer of the subcutaneous tissue. They are going to make a small incision in the periosteum, just enough to make sure that they can use the guide drill counter so they can put the implant in.
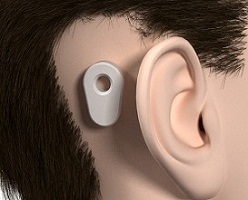
Figure 13. Surgical drill and Ponto processor indicator.
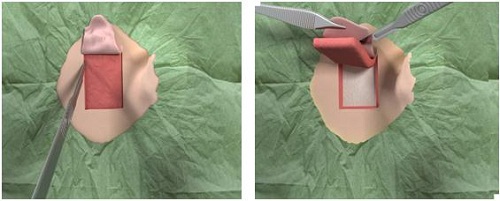
Figure 14. Surgical dermatome procedure with skin flap.
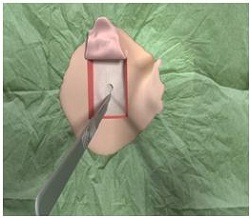
Figure 15. Removal of subcutaneous tissue beneath skin flap, revealing the periosteum underneath.
The next step is doing some tissue reduction (Figure 16) so that the site would actually lie down nicely and be beveled a bit so that the processor can sit in it without touching any other subcutaneous tissue.
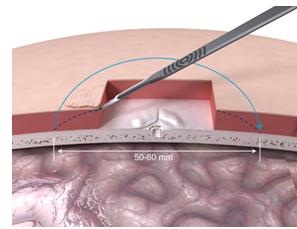
Figure 16. Tissue reduction under skin flap.
What they are doing now is using a guide drill (Figure 17). The guide drill is something that they want to use, as it tests the bone depth. They use a 3 mm guide drill to make sure that the patient has enough bone depth in that scenario. If they take off this cap (Figure 18) which is plastic, it becomes a 4 mm guide drill. Once the surgeon decides on the size they are going to use, they then use a countersink. The countersink widens the hole to make sure that the implant can fit in. The abutment is attached to the implant, which is pretty standard across the bone-anchored world, where you are using an implant with an abutment that is already attached. It makes it a little bit quicker from a surgical standpoint.
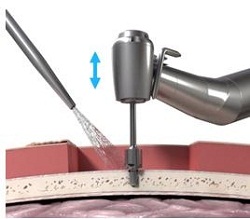
Figure 17. Guide drill.
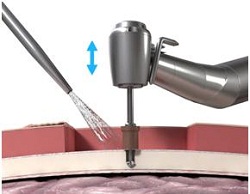
Figure 18. Guide drill with cap, which extends the drill from 3 mm to 4 mm.
Then, at a very slow speed called newton centimeters, at 40 newton centimeters, you are going to implant the implant and the abutment into the bone at the site that has been created. It goes very slow because they want to make sure that the cutting edges are cutting correctly, but they also want to make sure that you do not burn the bone as you are going in. You will also start irrigating at this point once the implant actually gets started into the site.
From here the surgeon will remove the abutment inserter. The implant is obviously in the bone. It should be tight at that point. They put the outer tissue layer over the site, making sure that they do the biopsy punch in the tissue right where the center of the abutment is (Figure 19). Then they will put the skin layer down over the site with the abutment showing through, and then put a healing cap on top. Then they dress the site, and the healing cap will be there to hold on the actual dressing (Figure 20). It will make sure that the patient goes home with something right next to the site, which will help for wound healing.
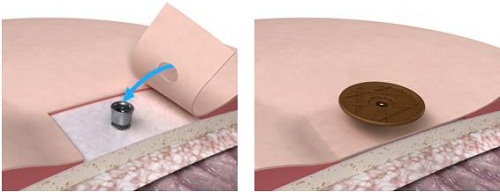
Figure 19. Skin flap with biopsy punch over abutment and healing cap (right).
Figure 20. Healing cap over surgical dressing.
From an implant standpoint, we have stuck with the original design that we have because we feel that it works very well. It is a soft-supporting shoulder which is designed to delay or reduce the skin thickening. As the subcutaneous tissue begins to regenerate or come back, this soft-shoulder will hopefully prevent it from coming up over the top of the abutment and keep it at a height that we need it at for the processor.
We have made that perfectly-matched interface which uses that hexagon interface system that we originally had, which is what originally came with bone-anchored implants and dental implants back in the day. We have made it flush on the side so nothing will actually touch or sit out further on the skin. You do not want any skin being supported by something that is not bone underneath. In the older days, the flange would actually come out a little bit further and the skin would actually be supported by the flange. It would cause that red ring that you would see in a lot of patients right around the abutment site.
We also have a 100% tight conical seal. In the past they have done studies to show where bacteria will come up through the implant and leak out in between the connection of the abutment and the fixture. But we have made it a tight conical seal for prevention of any bacteria leakage between that connection site.
We feel having a 12 mm abutment and now a family of abutments will be able to help patients from not having to go through surgery in the future once they are done post-op. If they have any small problems where a doctor might think that they need to go through surgery or do something different, they can now choose from one of four abutment sizes which might prevent them from going back into surgery to do any type of skin revision.
As I mentioned before, we have a fully backwards compatible connection interface with the abutment to the fixture which is nice. There have been situations where an abutment that is different than the fixture connection and it would cause a problem for the entire office. With the Ponto system, you are not going to have to worry about that. You are basically going to have the same connection, no matter if they have the older implant or the new implant; all the abutments will work with each patient. From a surgical standpoint, there has been no alteration. We have done nothing different other than widen the countersink with our wide implant. If the surgeon was in surgery, they would never really notice the difference between the two.
This is where I get into some pictures. If you are squeamish about surgery and, you might want to look away for a second. For a less-invasive surgery, the surgeon will do a biopsy punch next to the incision site and then put the implant in. Then they will put the skin over the abutment and make the incision site just next to it.
This procedure is with reduced skin thinning. We have noticed over the years that you do not need to have a hairless area around the abutment, so you can allow for patients to have hair growing, or a hair-bearing area, and not cause feedback with the processor. I think the processors are made better. From a Ponto standpoint, we have a feedback management system. Some of those things will help out. I do not think that the hair is as much of an issue, according to most of the surgeons around the world, as they are starting to use these less-invasive surgical techniques.
Placement of the incision is basically up to the surgeon. I have seen many surgeries and I have not seen a difference between placing the implant adjacent to the surgical site or right down the center of the surgical site. I have not seen any real complications with either of them. There is also a new type of incision, which is an alternate. They actually do some skin thinning around that area and then will let the device sit down. But with the 9 mm and 12 mm abutments, we are actually getting into a scenario where they are using many more biopsy-punch type techniques. This is where they just biopsy punch the site in a small spot (Figure 21). They do not really do any suturing. There is not much of a large hole at all. They will let the skin settle at its original height. They would not have an opening on either side, just biopsy punch the center. The surgeon’s thinking is that when the skin is at its original height, it is not going to want to regenerate or create more scar tissue or anything underneath when they take out all the subcutaneous tissue from the old surgery technique. With the right abutment length, this should keep the site very even. We should have fewer tissue complications and less scar tissue, which will cause fewer problems in the future.

Figure 21. Surgical technique without skin thinning. The biopsy punch is made in the center with no incisions on either side of the punch.
You can see in Figure 22 that they have put the implant in. They have only just retracted the tissue on either side, just to make sure that they can see the site very well. Then on the right-hand side, you can see that they only used three sutures to close the site. Also, on the bottom you see they are using the healing cap and the Allevyn dressing.
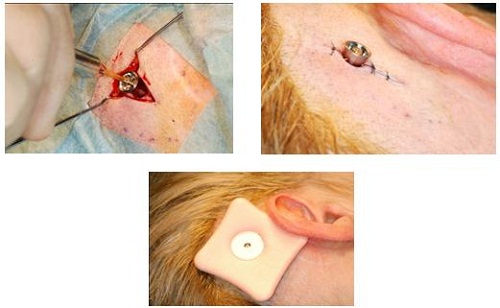
Figure 22. Insertion of the implant through minimally-invasive surgical procedure. Slight skin retractions (left) to view implant site; Insertion of implant with three sutures (right); Healing cap and dressing (bottom).
Going forward, Figure 23 shows one-week postoperative surgery. You can actually see that the skin lies down very well. This is a hair-bearing area, so the patient’s hair will grow back underneath and around the processor and abutment. This is something that more patients and surgeons are shooting for, because it shortens the surgery time and it also shortens the healing time for the patient. They also do not look like they have a large tissue reduction around the area, which is something that has turned off patients in the past. This is something that many surgeons are now using to help patients with the visual aspect of getting a bone-anchored device. They feel that it will benefit them over many other options out there for single-sided deafness, conductive hearing loss or mixed hearing loss.
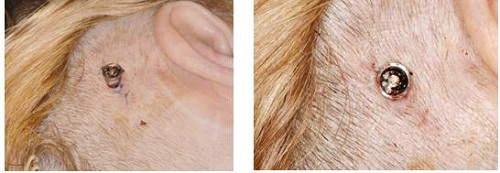
Figure 23. One week post-operative surgical site.
Ponto Implant Study: Retrospective Clinical Study
Lastly, I want to comment on the retrospective implant study we completed before we launched our wide implant (Babu, McKinnon, Fucci, Sockalingam, & Jerby, 2012). There were a total of 98 patients recruited through Arizona Hearing and Balance, Georgia Health Sciences University, and Michigan Ear Institute. The mean age for patients was 51.5 years. The gender distribution was 39% male and 61% female. We were looking for patient demographics, length of the abutment used, and the surgical technique. We wanted to see if they were leaning towards the linear technique versus the old-school dermatome or even a manual flap at that point.
Then we wanted to see the incidence of skin reactions, implant extrusion, and revision surgeries that were needed. There was 0% of implant loss, which is great for the initial implant. We have 0% revision surgeries. Most or 98% of the implants used were 4 mm, and the abutment length at 9 mm, which is what we feel is changing, was 31% versus the standard 6 mm at 69%. People are starting to move towards that 9 mm and above. We saw that 96% of the surgeries were actually performed under linear strategy with minimal tissue reduction, versus the flap or the elliptical approach, which is a manual flap that they make using just a scalpel. One-hundred percent of the surgeries were done in one stage. About 85% of the patients had no skin reactions. In the 15% who did have reactions, all of them were treated and managed through standard care within the clinic. There were no surgical revisions or changes in abutment sizes.
Thank you for attending this course today. I hope it answered your questions on bone-anchored systems and that you find it useful in your work.
References
Babu, S., McKinnon, B., Fucci, M., Sockalingam, R., & Jerby, K.I. (2012). The Ponto bone anchored implant system: A survey of clinical outcomes. Oticon white paper. Retrieved from: https://www.oticonmedical.com/~
Cite this content as:
Sockalingam, R., and Pfeiffer, J. (2013, February). Audiological considerations of the Ponto Bone-anchored Hearing System before and after surgery. AudiologyOnline, Article #11654. Retrieved from https://www.audiologyonline.com.