Editor's note: This article is a transcript of the live e-Seminar. To view the course recording, please register here.
In general terms, evoked potentials are electrical signals generated by the nervous system in response to a stimulus. They are also event-related, which means they are evoked by the onset of the stimulus. These evoked potentials are useful in diagnosing a variety of neurological disorders. Auditory evoked potentials (AEPs) are generated in response to an acoustic stimulus and are measured using electrodes on the surface of the skin or on the eardrum. Trans-tympanic electrodes are used in testing such as electrocochleography, which will be discussed in Part 2 of this series.
Auditory evoked potentials (AEPs) are used to determine the integrity of the auditory system and to make inferences about hearing. This testing is not a direct measurement of hearing sensitivity because we do not know how the patient is using his or her hearing behaviorally, but it gives us some idea of what the status of the hearing is. Auditory brainstem response (ABR) testing is an objective test, evaluating the integrity of the hearing system from the level of the cochlea up through the lower brainstem. The auditory brainstem response is also commonly referred to as an ABR or BAER (brainstem auditory evoked response), depending on the region in which you live.
General ABR Overview
Today's topic will focus primarily on the ABR. The ABR is an early potential, which means it occurs shortly after the onset of the stimulus. There are also middle, late, and cortical potentials, which occur later in the recording epoch and higher up along the auditory pathway; however, these will not be discussed today. The ABR is a far-field recorded potential because the electrodes are placed on the scalp or on the ears, far from the potential generator, the cochlea. There are between three and four electrodes used in the electrode montage. The electrodes are assigned as active (+), reference (-), and ground. We record from a pair of electrodes, typically Cz (high forehead or vertex) to A1 (left ear) or Cz to A2 (right ear).
In the ABR recording, the active (+) is usually the non-inverting electrode and the reference (-) is usually the inverting electrode. To produce a waveform, the voltages at each of the electrodes are subtracted from each other by the amplifier. Electrical activity or noise that is common to both electrodes is canceled out and only the response voltage remains. This is called common mode rejection. The response voltage is then amplified. Low and equal impedance at the electrode sites is essential for common mode rejection to work well. It is also important that the electrodes are cared for properly since this is the medium used to collected very small evoked potential responses.
Preparation
The testing environment is the first thing to consider before testing patients. This is an area in which you can control some things. The pre-amplifier (pre-amp) of the EP equipment should not be placed near the isolation transformer or a large computer monitor. This is less of an issue with the new Chartr EP 200 because the pre-amplifier can be placed close to the patient. We should be cognizant as to where the pre-amp is placed relative to the other equipment in the test suite.
There are a few other helpful hints that will help you to collect quality data. Make sure you turn off any unnecessary computer monitors in your test room. If possible, ensure you are using a designated and grounded electrical outlet. This can help eliminate unwanted noise from your tracings. If the patient is sitting in a chair that can be operated electrically for height and recline, it is probably best if the chair is unplugged. You can try testing in your environment to see how much electrical noise is present in your tracings and adjust the environment accordingly.
It is recommended that cell phones be turned off during ABR testing. When I was practicing, I was testing a baby, getting beautiful responses when all of the sudden the tracings became really noisy. The baby's father was on his cell phone behind us. Cell phones, especially smartphones that transmit data as well as calls, can and do emit noise onto an EP tracing. Make sure they are completely off, not just on silent.
Consider turning off fluorescent lights. Obviously, you want your patient to be quiet and asleep, so turning off the lights helps with that anyway. You want to make they are completely turned off not just in a dim mode.
We use the 10-20 system for electrode placement. For a two channel recording, we use Cz which is the top of the head, (or sometimes FPz, which is high forehead) A1 for the left ear and A2 for the right ear. Earlobe placement is typically used in the clinic. Sometimes you will see M1 and M2 for mastoid placement as well. The left side is the odd number and the right side is the even number.
One thing that we observe in the United States quite a bit is that a lot people are not using true Cz anymore for ABR testing because they do not want to fuss with the hair. However, you will get a much larger response amplitude when using Cz over a high-forehead placement. There can be up to a 15 percent reduction in amplitude by using the high-forehead placement.
To prepare the skin for electrode placement, you should carefully consider your choice of preparation materials. NuPrep is a gel with fine pumice granules to help exfoliate the skin. There are also electrode prep pads which are an alcohol wipe with a little bit of pumice on them. You could use a generic alcohol prep pad and apply some NuPrep to it and scrub. What I do not recommend, however, is scrubbing with NuPrep and then wiping away the pumice with an alcohol wipe because this can sometimes sting. NuPrep can also be applied using cotton pads or Q-tips. Gently clean the electrode site; you do not need to abrade the skin. 10-20 is a good electrode paste for those non-disposable cup electrodes. When using disposable electrodes, you may want to ensure the skin is dry before applying the electrode, as some of these electrodes are not very sticky and can come off easily if the skin is moist.
Electrode placement is very important because it is the way in which you collect data from the patient. The electrodes are like antennas and if they are all separated apart, you can get more noise in your recording. You can braid the electrodes or tape them together as follows: To make a tape sleeve (Figure 1), take a piece of paper tape and fold the tape over on itself a little more than half way, so you still have a small sticky tab. Then place all your electrodes into that non-sticky part, and wrap the tape around to make a semi-tight sleeve, attaching the sticky end of the tape to the outside of the sleeve. You can then adjust the length of your electrodes, depending on how much length you need going towards the ears or the top of the head. This keeps the electrodes close without braiding them, and then they are adjustable for different patients. You can use more than one tape sleeve to keep electrodes neat.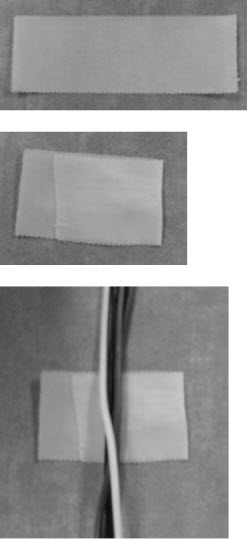
Figure 1. Folding tape to make a tape sleeve for electrodes. The tape sleeve should move freely along the length of the electrodes.
You do not want to mix electrode types; keep gold with gold and disposable with disposable. Try to be consistent and use all the same electrode type. The one exception to that is ECoGs, because you may use a TM-trode with a disposable or non-disposable electrode on the other side.
Do not place ground electrodes near the heart. Typically we use mid-forehead for our ground electrode, but some people who have been trained in newborn screening will use a shoulder on a baby. You want to make sure that it is not located too far down the back or on the front because this may pick up an EKG response.
If you are performing bone-conduction ABR, it is best if the electrode and the oscillator are as far apart as possible. This can be achieved by placing the electrode on the front of the earlobe instead of on the back of the earlobe or mastoid. You want to explain to the patient the process of placing the electrodes. Sometimes we get into the habit of our preparation and we just start scrubbing. Make sure that you explain to the patient or to the parent what you are doing and that they will not feel anything from the electrodes.
If using a true Cz placement, place an alcohol pad on top of the hair while scrubbing the other sites A1, A2 and ground. The alcohol will dissolve the hair products. By the time you have applied the other electrodes, the hair product has dissolved, and you will be able to get better impedance at the Cz site. Use a Q-tip with a small amount of Nu-Prep to prepare this site.
The electrodes on the earlobes or mastoid should be symmetrical in placement. You want them to be even with each other, and all electrode leads should run up towards the top of the patient's head. This is especially important with those unsedated babies because if they wake up, you do not want them pulling the electrodes off by accident. The other reason to do this is so you can keep your electrodes separate from your transducer cable, which will also help reduce stimulus artifact.
A good habit is to turn the equipment on before the patient is connected and off after the electrodes have been removed. It is not recommended to turn equipment on and off with the patient connected to the electrodes. If something happens or becomes disconnected during testing, you do not have to take the electrodes off the patient's head. Simply unplug them from the pre-amp or from the patient cable and then restart your equipment.
Electrodes
Here are some tips for the gold and silver non-disposable electrodes. Obviously, the electrodes should be clean. I have been to many different clinics where the electrodes and paste have been sitting for a couple of days or are left in water soaking for days. This is really not the best care for your non-disposable electrodes. 10-20 is a nice water-soluble electrode paste. It is easy to rinse off and clean before it dries out on the electrode. After you have finished with the patient, take a few minutes and run them under warm water. Use a child-size toothbrush and scrub out the paste, dry completely and then they are ready to go for the next patient. Remember that electrodes do not last forever, and worn out electrodes can lead to noisy tracings and high impedances.
I find that wet prep, such as NuPrep, is best with non-disposable electrodes. You can then prepare the electrodes by adding just a small amount of paste to fill the cup. Apply the electrodes firmly. Most of these electrodes have a little hole on the backside, and what I recommend is pushing the electrode down so a little bit of 10-20 squeezes out that hole. I learned from Betty Kwong at the House Ear Institute to pull off a little bit of cotton from a cotton ball and stick on where the 10-20 squirts through that hole, and believe it or not, it will stick so you do not need to use a lot of tape. This is a great tool if you are dealing with little ears on a baby. It is also helpful when using Cz placement.
Wait a minute for the electrodes to settle. You will see that the impedance will actually improve a little bit over time. If you are using the silver chloride electrodes, be aware that sometimes they do need to be rechlorinated in places where you can see the electrodes have chipped.
Regarding disposable electrodes, I find that wet prep works fine, but dry prep works well, too. If you use a wet prep, make sure you wipe off the excessive residue so it adheres to the skin. If you use a dry prep, you do not have to worry about that. If you are using Hydrogel electrodes versus wet gel electrodes, and for some reason had to rescrub and reapply the same electrode but it is not sticking as well, that Hydrogel can be rehydrated with water or saline.
Patient Comfort
If the patient is tense, you will get more post-auricular muscle artifact and noisier tracings. Have you tried your chair or your table? If you are not comfortable in it, your patient will surely not be comfortable in it for an extended period of time. Sometimes we go into clinics and they have a very narrow ENT table. If you are laying there and the audiologist tells you, "It would be great if you can fall sleep," but you feel like you are going to fall off if you move a little bit, then you will be less relaxed and less likely to fall asleep. You want to have blankets or pillows to assist with comfort. Some of our offices are very cold, and in this environment you have a tendency to tense up. Offer a blanket at the beginning of the test. Pillows will help relax the neck and reduce post-auricular muscle artifact. You can also place pillows under the knees to help support the lower back.
One recommendation is to hook up the electrodes and then send the person to the restroom to make sure they will be comfortable for the duration of the test session. If you are only doing a neurological assessment, chances are you will not need to do this. If you will be doing a full threshold assessment, then send the patient to the restroom.
Make sure you explain the test procedure in detail before placing the earphones in the patient's ear since many patients may have a hearing loss. The patient will be more relaxed if they know what to expect during the test session. Always choose the largest size ear tip to reduce the risk of stimulus leakage. An eartip that is not inserted properly will cause a reduction in dB SPL at the eardrum. Compress the foam ear tip and insert it completely so that no foam spills out into the concha. This is the proper foam tip placement and ensures that the correct dB is delivered to ear. Once it is compressed and you put it in the ear, hold it in place until it has fully expanded.
It is imperative that the electrode leads are completely separated from the transducer cable and tubing (Figure 2). If the electrode leads are placed towards the top of the head, the transducers can be clipped to the front of the body. Do not clip the stimulus transducer box to the patient. It should be separated from the body by physical space, a blanket, or a thick shirt. You want to avoid the stimulus transducer box touching the skin because you are more likely to pick up stimulus artifact when this occurs. Additionally, take care to not let the tubing of the insert ear phones touch the electrode wires. Again, this will cause noise and stimulus artifact in your recordings.
Figure 2. Proper proximity placement of electrodes and stimulus transducer box in both chair and table positions. Note that the electrode wires are not touching the transducers in any position.
For infants, you can use the small, clear tips with the Impedance Adaptor set. Or if you prefer the foam tip, you can trim down the sides of the foam to make the insert smaller in diameter. However, never trim the length of the insert earphone because it will change the insert delay and spectral properties of the stimulus.
Navigating the System
The Chartr EP preamp (Figure 3) has two channels. It has active and reference inputs for both Channel 1 and Channel 2, and ground. All three transducers also plug into the box at different ports. Once the patient is connected, a small display on the front of the box will give you the impedance readings.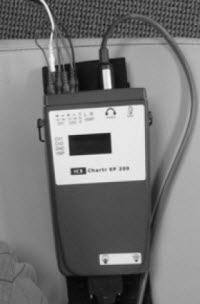
Figure 3. Chartr EP 200 preamp box.
One Channel Recordings
Electrode switching is a feature of the Chartr EP 200. Electrode switching is only available for one channel recordings. Proper electrode placement when electrode switching is enabled is as follows: Channel 1 active-Cz or FPz, Channel 1 reference - left ear, and ground - right ear (Figure 4). With this arrangement, you do not have to physically move the electrodes when the test ear changes. The system knows to use the active and the reference when testing the left ear. When testing the right ear, the software automatically knows to switch the ground and reference electrode. If you are using a one channel protocol with electrode switching off, you will physically have to switch the reference and the ground electrode in the pre-amplifier when you change test ears.
Figure 4. Electrode-switching montage for one-channel recording.
Two Channel Recordings
Two-channel recordings are designed to allow you to record the ipsilateral and contralateral responses simultaneously. In this montage, Cz or FPz is Channel 1 active. A small jumper cable inserts into the preamp that connects Channel 1 active to Channel 2 active. Channel 1 reference is left ear, Channel 2 reference is right ear, and ground is mid-forehead. This is a typical ABR 2 channel montage (Figure 5).
Figure 5. Two-channel montage for auditory evoked potential recordings.
Starting a Test
When you launch the Chartr EP 200 software, the Edit Patient Information window pops up so you are able to enter the relevant patient demographics (Figure 6). Most systems require the birth date and the gender so that ABR responses can be compared to the correct gender- and age-specific normative data.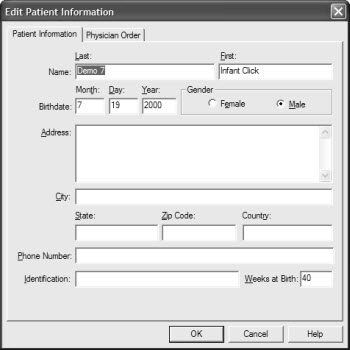
Figure 6. Entering new patient data in software fields.
Once the electrodes have been placed on the patient, select the appropriate test protocol from the New Test Tab and then check impedance. You can click on "Impedance" in the software or press "Impedance" on the remote. Again, the impedance values will display on the preamp, so you will not have to go back to the laptop or the computer to check.
Low (below 5 KOhms) and balanced impedance readings are necessary for obtaining quality waveforms. Remember that the inter-electrode impedance is very important for common mode rejection to work well and it is best when the values are within 2 KOhms of each other (Figure 7). The Chartr EP 200 reads up to 80Khms, which is especially important when using the TM trode with ECoG recordings.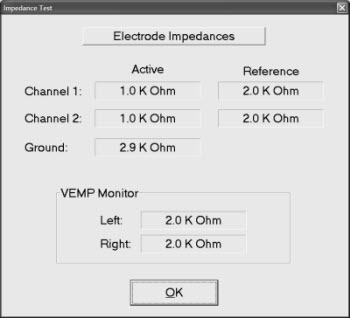
Figure 7. Electrode impedance measurements as seen in the International version of the Chartr EP 200 system.
If the impedance is reading "open" in the software, it will read 99.9 on the preamp. "Open" means the impedance is greater than 80kOhm. This can happen when there is a faulty electrode or simply no electrode plugged into that receptor on the pre-amplifier. You can use the remote control to start collection or go to a new test. It is really handy, especially for pediatric testing where you need to stay close to the patient.
The Chartr EP 200 system has several pre-loaded default protocols including ABR, ECoG, middle and late latency testing, with P300 and ASSR as optional add-ons. Again, VEMP is currently pending FDA approval for the U.S. market. Once you select the protocol, it is very easy to change some settings, such intensity by accessing the Settings Tab.
It is always a good idea to do a listening check on your equipment periodically to ensure your system is calibrated. When performing a listening check, use subjects with hearing thresholds within normal limits and obtain thresholds for click and tone bursts. The stimuli should be audible down to 0 or 5 dB for normal hearing subjects. On average, if the softest level heard is 20 dB, then you have a 20 dB correction factor. This means if your system says you are presenting a 60 dB stimulus, really you are only presenting a 40 dB stimulus. So if you do a listening check and you have a large correction factor is needed such as 20 dB, it is recommended that you contact your local representative or the manufacturer to have the system calibrated.
Click ABR
The ABR represents synchronous electrical activity of many neurons arising firing from areas within the cochlea, 8th nerve and brainstem in response to an auditory stimulus. The ABR pathway consists of the cochlear portion of the 8th cranial nerve, cochlear nucleus, superior olivary complex, lateral lemniscus and inferior colliculus. We typically mark the ABR using Waves I, III, and V. (In some countries, they also use SN10, which is the negative trough after Wave V.) Wave I and Wave II are generated from the 8th nerve and cochlea on the ipsilateral side. Ipsilateral means that the signal is on the same side that you are recording from. Waves III and V are generated from a complex interaction of both contralateral and ipsilateral brainstem anatomy.
How do we determine if a response is present and how do we determine threshold? First, a response must be repeatable with good morphology. That is very important. It must follow the typical pattern when intensity is changed. If intensity is decreased, latency should get longer and amplitude should get smaller. Absolute latency should be appropriate for the patient's age. This is determined by comparing marked responses to age and gender appropriate normative data.
How do we determine whether a response is threshold? The lowest intensity at which a response is present is the threshold. This means there should be no response at an intensity below the determined threshold. An absent response must also be quite low in amplitude, about .02 uV, in a fairly quiet tracing. If there is considerable noise and excess artifact coupled with large amplitudes, the noise may be masking the very small threshold response.
Figure 8 illustrates textbook examples of an ipsilateral and a contralateral response. Notice that although there is no Wave I in the contralateral response, Wave V is enhanced.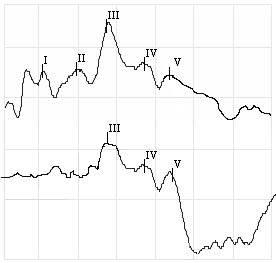
Figure 8. Ipsilateral (top) versus contralateral (bottom) ABR waveforms.
What frequencies are we testing when we perform a click ABR? I was fortunate to have had the opportunity to work with Manny Don at House Ear Institute who taught me a great deal about the ABR and Stacked ABR. The click is a broadband stimulus comprised of many frequencies, not just a narrow frequency range.
Stacked ABR allowed us to isolate discrete frequency regions of the basilar membrane and view the click ABR for that specific frequency region. We found that the typical ABR was dominated by the high frequencies but Wave V was visible even when all the high frequency information was filtered out. Clinically this means that you can record an ABR on a patient that has islands of normal hearing even if there is significant hearing loss at from 2000-4000Hz.
The cochlear microphonic is a pre-neural electrical potential arising from the cochlea that mimics the stimulus waveform. When present, the cochlear microphonic suggests that the outer hair cells are intact. In this case, it makes sense that OAE's are also present since OAE's are also a measure of outer hair cell function.
Patients with auditory neuropathy spectrum disorder typically have abnormal or absent ABRs and present otoacoustic emissions (OAEs). With ANSD, a cochlear microphonic may be present at the beginning of the click recording with no synchronous neural activity such as Waves I, III and V after. The CM will not be visible with alternating polarity clicks.
To evaluate for auditory neuropathy, use a high level click and collect one rarefaction and one condensation run. The cochlear microphonic should be in complete phase cancellation, but the neural responses of Waves I, III, and V should be present in normal patients. (Figure 9). In patient's with ANSD, the entire waveform will invert when the polarity of the signal is changed. In these cases, rule out stimulus artifact as a contaminating signal by completing one run with the earphone tubing pinched or disconnected. No recordable response will ensure stimulus artifact is not present.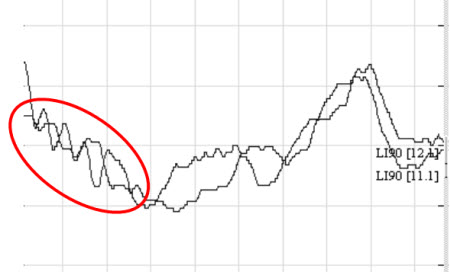
Figure 9. Example of rarefaction and condensation cochlear microphonic on an ABR.
What is the Purpose of an ABR?
The ABR has two main clinical functions: threshold search and neurological assessment. A threshold search using click and toneburst stimuli with air and bone conduction is typically what we are using for pediatrics to estimate hearing sensitivity, For adults, we are typically using ABR for a neurological assessment to evaluate integrity of the auditory system. With this we compare peak latencies and perform a rate study.
When performing a threshold search, we look at many different things. First, we want to confirm or rule out a hearing loss and determine the type and degree of a hearing loss if a deficit is present. We also use the ABR to diagnose auditory neuropathy spectrum disorder. You should be aware that there are different protocols in different countries as to what levels indicate hearing loss. The ABR can also define the configuration of the hearing loss: sloping, flat, rising, and so forth.
Infants who are four to six months or younger can be tested very successfully in a natural sleep state without the need for sedation. Older children may require sedation for the optimal test condition, but if sedation is used, the proper medical procedures and precautions should be followed to ensure a safe sedation.
If you are using the ABR as the primary data by which you will fit a hearing aid, you need to be using a frequency specific stimulus. The air conduction click is a starting point for ABR testing and can rule out ANSD. It cannot solely be used to infer hearing loss configuration or have adequate information for hearing aid fittings. The click air conduction ABR can miss both low and high-frequency hearing losses.
Electrode montage in small children is very important since you are working with smaller structures. In babies, you want to use Cz or high forehead, away from the ground electrode. If the baby has a large fontanel or soft spot, move to the point where the skull starts to fuse, but try to keep it has high as possible. The ground is usually in the center of the forehead, or sometimes above the nose, depending on the size of the forehead and hairline of the baby. Use the earlobes or mastoid for A1 and A2. If you will be using bone conduction, the front of the earlobe is what is recommended to avoid artifact generated by the oscillator. An alternative placement is C7 or the nape of the neck. In a baby, if you record from FPz to C7, you will get a much larger Wave V. Some clinics like to record two channels of data from the same ear, being one going Cz to A1 or A2 and one going Cz to the nape of the neck. If you are having a difficult time pulling Wave V out of the noise and you just want to verify the presence or absence of Wave V, Cz to the nape of the neck is always a good option.
A longer epoch of 20 or 25 milliseconds is recommended when testing infants or any patient that may have neurological issues. If a child was born pre-term, the latencies may be prolonged due to lack of neural maturation. If your epoch is too short, it is possible to miss a response that occurs later in time. Insert earphones are the easiest to use with infants, and most EP software applications, Otometrics included, makes the 0.8 millisecond latency correction for the length of the insert tubing automatically.
Threshold Search For Unsedated Babies
When I practiced clinically, I would typically start at a moderate level, around 60 dBnHL. If Wave V was present, I would decrease my stimulus to something close to where I would expect threshold to occur, maybe around 30 dBnHL. If a response is obtained at this level, it is a good idea to go lower and collect a no-response run so that you can identify a true threshold.
With unsedated babies work as quickly as possible. If the response was not present at 30 dBnHL, then can use a bracketing method. Increase the stimulus up to 40 or 50 dBnHL, depending on what the waveform looked like at 60 dBnHL. If there is no response at 60 to begin with, then I would go up to 80 dBnHL.
The latency-intensity function in the software of the Chartr EP system (Figure 10) can assist in determining the type of hearing loss. If it is conductive, the latencies are usually parallel to the normal range, and if it is sensorineural, latencies will usually be normal at high intensities and then slope upwards and out of the normal range for lower intensities or as you get closer to threshold.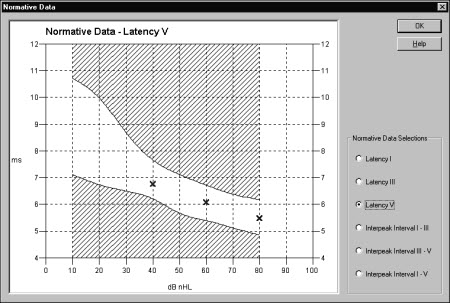
Figure 10. Normal latency-intensity function for ABR as seen in the Chartr EP 200 system.
In the Chartr EP 200 system, the normative data includes a mean and standard deviation. The normative data was obtained from published studies by Dr. Michael Gorga of Boystown National Research Hospital. The age-specific normative data is included within the software. The waveforms must be marked with Wave V so the software can compare patient results to the norms. To access the normative data, click on Normative Data button on the toolbar under the collection screen and you will see your results plotted (Figure 10). When the marks fall within the white range, the responses are within normal limits for latency.
There are a few differences between infant and adult ABR responses. When testing infants, keep in mind that you are evaluating a system that has not yet matured. In an infant ABR, Wave I is typically larger than Wave V and in an adult's ABR Wave V is bigger than Wave I. An infant will also have longer absolute latencies than an adult. Both infant and adult ABRs follow the same general latency-intensity rules; latency increases and amplitude decreases as intensity decreases. As a general rule, replicate threshold in either population.
Neurological Assessment
When we perform a neurological ABR, we are trying to see if neural transmission of the auditory stimuli is intact. The ABR is typically performed at a high intensity (75 dB nHL for infants and 80 to 90 dB nHL for adults) with sometimes a faster repetition rate. We are evaluating the general morphology of the waveforms and the inter-peak latencies. We compare the interaural Wave V absolute latency from the left and the right sides to determine if there is retrocochlear pathology. The interaural Wave V latency should be no more a than 0.2 to 0.4 millisecond difference between ears. Often we are performing these tests because of a behavioral asymmetry that was noted. Be careful to account for asymmetries when interpreting your test results.
The House Ear Institute uses the criterion of 0.2 milliseconds interaural difference which means anything longer than 0.2 ms is abnormal. However, they take a 0.1 ms correction for every 10 dB of hearing loss greater than 50 dB at 4000 Hz. So if the patient had 60 dB thresholds at 4000 Hz, then they would subtract out 0.1 ms and then look at the difference between the two sides. It is important to analyze the interwave latencies of I-III and III-V which should be approximately 2 milliseconds apart. The I-V interval should be approximately 4 milliseconds.
In a rate study, waveforms are collected at faster repetition rates. The latency of Wave V as well as the morphology can be analyzed. An example of a rate study is shown. The click was presented at 80dBnHL at 13.1, 21.1, 55.1 and then 90.1 clicks/second. (Figure 11)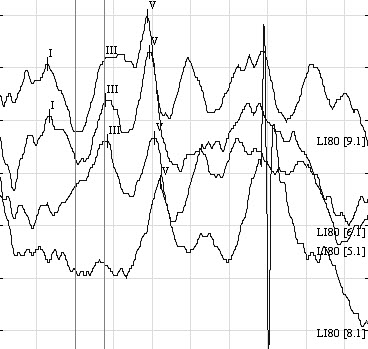
Figure 11. Example of a neurological ABR rate study, from 13.1 (top tracing) to 90.1 (bottom tracing)
Notice that the latency of Wave V shifts out to the right (is delayed) with faster rates. This neurological ABR looks to see if the auditory system handle a faster rate. If you lose the response at a faster rate, is it because you are taxing the auditory system and the neurological components are not functioning properly? A normal ABR should be attainable with a rate of 90.1 in a normal ear.
Post-Auricular Muscle Artifact
Post-auricular muscle artifact (PAM) occurs at 10 to 14 milliseconds and may be present intermittently in the same patient. PAM is caused by muscular tension of the neck or the jaw and can affect latency and will affect amplitude (Figure 12). In some cases, the patient's head may not be centered, so when they fall asleep their head leans over to one side causing extra tension. This is a good reason to have pillows in your room for comfort. Make sure the patient keeps their eyes closed, relaxes their jaw, keeping their teeth unclenched. Moving the electrodes from the mastoid to the earlobes may decrease the artifact to some extent. Patient comfort is key to keeping PAM to a minimum.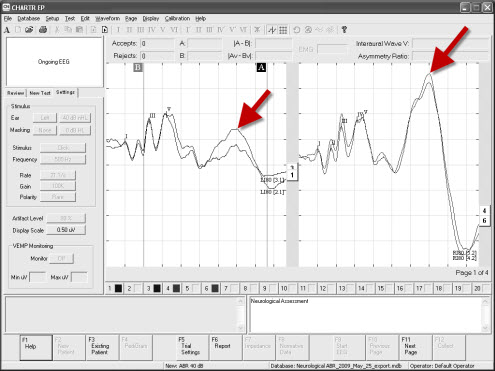
Figure 12. Post-auricular muscle artifact recorded in an ABR at late latencies.
Changing Recording Parameters
Any change to the recording parameters or stimulus will have an effect on the ABR. We have already discussed that as you decrease intensity, Wave V should shift out in time and the response amplitude should become smaller.
Just as in the neurological protocol, as rate increases, the latency also increases. If you have ever wondered why the rate is an odd number such as 13.1 or 17.7, it is so the rate is not a multiple of the main power supply of 50 or 60 Hz. Multiples of the mains can cause noise in the ABR recordings.
When adjusting filter settings, there is a tradeoff. Wider filters give you more fidelity in the recording, but a narrow filter makes the presence of absence of the response more obvious because noise is filtered out. It is common to use wider filter settings for neurological assessment in adults (100 to 3000 Hz), and a narrower filter for pediatric clinicians evaluating babies (100 to 1500 Hz). The most important factor is not to filter out the response you are collecting.
Averaging reduces the amount of noise and extracts the signal by 1, divided by the square root of the total number of sweeps. Basically four times as many sweeps averaged together will reduce the noise by half. The more sweeps you have averaged, the better the response will because you have averaged out noise. Two-thousand sweeps is a pretty generic level to pull the response out of the noise. The number can be increased in the case of excess artifact or a noisy patient. The reverse also applies. In a patient that is quiet and response stable, it is not necessary to continue collecting all 2000 sweeps for every waveform.
To improve the quality of your ABR, there are many things you can do. Increasing the number of sweeps helps reduce the noise in a restless patient. You can increase the stimulus level to verify your response. If you happen to be testing at threshold, increasing the stimulus intensity will provide a larger response. If you are evaluating ECoGs, you can use a TM-trode or a gold foil tiptrode to bring out Wave I because the electrode is closer to the neurological site. If Wave V is obscured, you can always use the nape of the neck if the patient is a baby. If you question the morphology of your waves and are using a faster rate, try slowing the rate to see if the response morphology improves for that patient.
Bone Conduction ABR
Bone conduction ABR using a click stimulus provides a differential diagnosis for the type of hearing loss if air conduction thresholds are elevated. Bone conduction results provide information you need to better counsel the infant's family and make your next step toward intervention. It is one way of diagnosing hearing loss in infants who have cranial-facial anomalies, such as aural atresia. Bone conduction can help confirm the presence of middle ear dysfunction in infants. Tympanometry can be performed on infants six months of age and younger using a 1000-Hz probe tone to confirm middle ear dysfunction, with proper interpretation. Conventional 226-Hz probe tone tympanometry can be performed reliably on infants seven months and older.
The bone oscillator should be placed on the mastoid. Using the forehead placement can reduce the output, especially if the baby has a large fontanel. If you know ahead of time that you will likely have to use bone conduction, consider placing the electrode on the front of the earlobe to give you more space on the mastoid for better recordings. Use alternating polarity for bone conduction to help reduce stimulus artifact that is generated by the oscillator itself.
The placement of the bone oscillator is important and can often be completed using the supplied headband. The headband is ideal because it provides the appropriate amount of force and tension to the mastoid; however, the headband is typically too large for most infants' heads. As an alternative you can hold the oscillator with one-finger pressed against the mastoid. Remove the headband if necessary. A helpful tip: To get an idea of the amount of force you need, put the headband on yourself and feel how tight it is. Then place the oscillator against your head with one finger to imitate the same force. You can then gauge how much pressure is needed. Typically it feels like you can almost move the child's head to the side. Using two fingers can dampen the output to the mastoid. Another option is to use an elastic Velcro band. You put the Velcro on the oscillator, attach that to the elastic band, and then pull it tight around the circumference of the baby's head. Dale Medical Products makes a catheter holder that works well for this with the Velcro band.
Start recording at a moderate level so as not to wake up the baby with the vibrations from the oscillator; around 30 dBnHL. Do not exceed 50 dBnHL because you will overdrive the oscillator and will end up collecting artifact. Decrease in 10 dB steps to find threshold; 20 dBnHL or below is within normal limits.
Toneburst ABR
Unlike click stimuli, tonebursts provide frequency-specific information. You can diagnosis low and high-frequency hearing loss, but it may take several attempts to replicate a waveform, especially at 500 Hz. Some clinicians use a toneburst presented in notched noise, but this option is not widely available from manufacturers. A more common method is using a Blackman envelope with a two millisecond rise and fall time and a zero millisecond plateau.
Remember when testing using a 500 Hz toneburst, you are testing a more basal region of the cochlea. Therefore, a much longer recording window is required to capture the response that occurs at a later latency relative to other frequencies or click. An epoch of at least 20 milliseconds to 25 milliseconds is recommended. Again, 500 Hz can be more difficult to obtain, so you will likely have to collect more data. This is because the cochlea has less synchronous activity in this region of the cochlea.
ABR's using 500 Hz tonebursts can be collected in two ways. You can use an alternating polarity, which gives you a broader, rounded peak, or you can use rarefaction polarity, which gives you a more peaked response. This, again, comes down to personal preference. The response occurs about 4 to 8 milliseconds later than the click. It should be noted that cyclical ringing can occur, which should not be mistaken for a response (Figure 13). The actual response will have the large positive amplitude and low trough. If ringing occurs, use alternating polarity.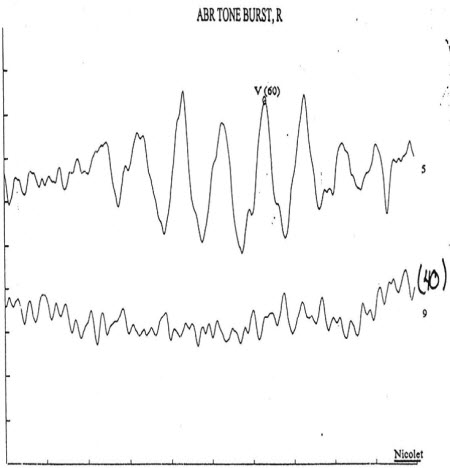
Figure 13. 500 Hz toneburst ABR recording with cyclical ringing in response to high-intensity stimulus. Wave V marked is not an actual ABR response.
The 500 Hz ABR does not have the typical response pattern of a click which has the noticeable I-III-V complex. However, it also may not be one single peak standing out in the waveform. It may look like a flatter response with a downward slope. From from right to left, follow the waveform looking for the trough. Usually, you can often follow that up and find the "peak" to mark Wave V.
If you have never performed toneburst testing, you may want to start with 4000 Hz because it resembles the click response, and you can boost your confidence in interpretation.(Figure 14).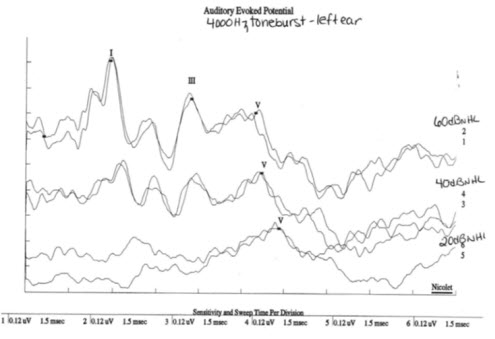
Figure 14. ABR tracings from 4000 Hz toneburst stimuli.
Case Study
When working clinically, I evaluated an infant in 1997. He was a NICU baby with a gestational age of 23 weeks, an Apgar score of 2 at 1 minute and 6 at 5 minutes. He had jaundice and was on phototherapy for four days. He was negative for hepatitis, sepsis and rubella. He left the hospital on oxygen and was discharged at 3 months, 11 days chronological age.
He failed the automated ABR newborn hearing screening in October of 1997 in both ears, and the audiologist who worked at this hospital did a click ABR while he was in the NICU, and the findings suggested severe to profound hearing loss bilaterally. The family came to see me in November of 1997 when he was 3 months, 19 days old.
There was no reponse to the click in either ear at maximum intensity. There was no response to 500 Hz or 4000 Hz tonebursts in either ear. His transient OAEs were absent as well.
What would be your diagnosis and was our evaluation complete? From these test results alone, I may have fit this child with a power hearing aid had I not completed further testing. At this point, I had completed toneburst and click ABR by air conduction. Finally, I did bone conduction ABR to determine the type of hearing loss (Figure 15). What may cause no responses to air conduction and a present response to bone conduction?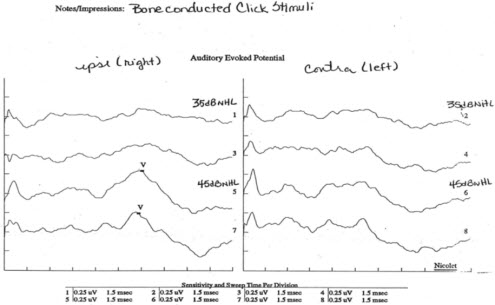
Figure 15. Bone conduction ABR results from case study of an infant with no recordable responses to air-conduction stimuli.
Could this child have had otitis media? Possibly. Could the insert earphones been placed up against the ear canal wall? Maybe. The point is had bone conduction not been completed, this child would have been fit inappropriately with a power hearing aid. The bone conduction responses indicated there was a conductive component to the hearing loss.
The child was referred to the ENT, and the ENT cleared him for hearing aids, but because of the bone conduction findings, we decided to be conservative and wait. He came back in early January of 1998. He was now 5 months, 14 days chronological age, or about 2 months gestational age. We did click ABR and bone conduction ABR. The ABR thresholds were within normal limits. However, latencies were prolonged. Since he had prolonged latencies, we then brought him back for his third visit in February of 1998 and we obtained normal thresholds to click and 4000 Hz. We could not obtain 500 Hz this day due to equipment malfunction, but he did have beautiful OAEs at this time.
Had I not done bone conduction to begin with, I would have misidentified this child. And because I did bone conduction, I decided to continue to test this child and not just move on to a hearing aid fitting. The morale of the story is to integrate all the parts of a clinical battery that make for a thorough and accurate diagnosis, including those paramenters and tools of the ABR.
Conclusion
The Otometrics website is continually updated. Go to www.otometrics.com/knowledge/KnowledgeCenter.aspx to find information on ABR, VNG and other evoked potentials. Check out our Web channel on AudiologyOnline because we are constantly updating information and adding new courses.
Good Practices in Auditory Brainstem Response, Part 1
June 13, 2011
Continued and its subsidiaries provide professional education authored by qualified Subject Matter Experts for continuing education purposes. These materials are intended for educational purposes and do not constitute medical advice or a substitute for individual clinical judgment. Continued is not a clinical healthcare provider; the licensed professional is solely responsible for ensuring that the application of any techniques or information presented is within their legal scope of practice and jurisdictional requirements.
Related Courses
1
https://www.audiologyonline.com/audiology-ceus/course/improving-ehdi-with-caeps-clinical-31492
Improving EHDI with CAEPs: Clinical Assessment of the Cortical Auditory Evoked Potential in Children with Hearing Loss
This course will provide an overview of cortical auditory evoked potentials, current research, benefits and limitations to using CAEPs in a busy clinic, and several case studies.
auditory, textual, visual
129
USD
Subscription
Unlimited COURSE Access for $129/year
OnlineOnly
AudiologyOnline
www.audiologyonline.com
Improving EHDI with CAEPs: Clinical Assessment of the Cortical Auditory Evoked Potential in Children with Hearing Loss
This course will provide an overview of cortical auditory evoked potentials, current research, benefits and limitations to using CAEPs in a busy clinic, and several case studies.
31492
Online
PT60M
Improving EHDI with CAEPs: Clinical Assessment of the Cortical Auditory Evoked Potential in Children with Hearing Loss
Presented by Elizabeth Musgrave, AuD, CCC-A
Course: #31492Level: Intermediate1 Hour
AAA/0.1 Intermediate; ACAud inc HAASA/1.0; BAA/1.0; CAA/1.0; Calif. SLPAB/1.0; IACET/0.1; IHS/1.0; Kansas, LTS-S0035/1.0; NZAS/1.0; SAC/1.0
This course will provide an overview of cortical auditory evoked potentials, current research, benefits and limitations to using CAEPs in a busy clinic, and several case studies.
2
https://www.audiologyonline.com/audiology-ceus/course/cortical-auditory-evoked-potentials-in-39954
Cortical Auditory Evoked Potentials in a Pediatric Practice
This course explores how to use the Cortical Auditory Evoked Potential for verifying hearing technologies on the user, evaluating the severity of Auditory Neuropathy Spectrum Disorder, and evaluating pediatric patients with Auditory Processing Disorders. Real world Cortical tracings and how to apply normative data to them are discussed.
auditory, textual, visual
129
USD
Subscription
Unlimited COURSE Access for $129/year
OnlineOnly
AudiologyOnline
www.audiologyonline.com
Cortical Auditory Evoked Potentials in a Pediatric Practice
This course explores how to use the Cortical Auditory Evoked Potential for verifying hearing technologies on the user, evaluating the severity of Auditory Neuropathy Spectrum Disorder, and evaluating pediatric patients with Auditory Processing Disorders. Real world Cortical tracings and how to apply normative data to them are discussed.
39954
Online
PT60M
Cortical Auditory Evoked Potentials in a Pediatric Practice
Presented by Shanda Brashears, AuD
Course: #39954Level: Advanced1 Hour
AAA/0.1 Advanced; ACAud inc HAASA/1.0; ASHA/0.1 Advanced, Professional; BAA/1.0; CAA/1.0; Calif. SLPAB/1.0; IACET/0.1; IHS/1.0; Kansas, LTS-S0035/1.0; NZAS/1.0; SAC/1.0
This course explores how to use the Cortical Auditory Evoked Potential for verifying hearing technologies on the user, evaluating the severity of Auditory Neuropathy Spectrum Disorder, and evaluating pediatric patients with Auditory Processing Disorders. Real world Cortical tracings and how to apply normative data to them are discussed.
3
https://www.audiologyonline.com/audiology-ceus/course/comprehensive-overview-auditory-brainstem-responses-40228
A Comprehensive Overview of Auditory Brainstem Responses (ABR)
This webinar offers a concise overview of Auditory Brainstem Responses (ABR), focusing on their clinical applications and diagnostic relevance. Key topics include ABR protocols, waveform analysis, and their role in hearing screening, diagnosis, and intraoperative monitoring.
auditory, textual, visual
129
USD
Subscription
Unlimited COURSE Access for $129/year
OnlineOnly
AudiologyOnline
www.audiologyonline.com
A Comprehensive Overview of Auditory Brainstem Responses (ABR)
This webinar offers a concise overview of Auditory Brainstem Responses (ABR), focusing on their clinical applications and diagnostic relevance. Key topics include ABR protocols, waveform analysis, and their role in hearing screening, diagnosis, and intraoperative monitoring.
40228
Online
PT60M
A Comprehensive Overview of Auditory Brainstem Responses (ABR)
Presented by Stavros Hatzopoulos, PhD
Course: #40228Level: Intermediate1 Hour
AAA/0.1 Intermediate; ACAud inc HAASA/1.0; AHIP/1.0; BAA/1.0; CAA/1.0; Calif. SLPAB/1.0; IACET/0.1; IHS/1.0; Kansas, LTS-S0035/1.0; NZAS/1.0; SAC/1.0
This webinar offers a concise overview of Auditory Brainstem Responses (ABR), focusing on their clinical applications and diagnostic relevance. Key topics include ABR protocols, waveform analysis, and their role in hearing screening, diagnosis, and intraoperative monitoring.
4
https://www.audiologyonline.com/audiology-ceus/course/guide-to-bithermal-caloric-testing-815
A Guide to Bithermal Caloric Testing
The purpose of this course is to provide an in-depth discussion of the caloric testing portion of the VNG/ENG test battery. Content will include descriptions of testing procedures, analysis and interpretation of results.
auditory, textual, visual
129
USD
Subscription
Unlimited COURSE Access for $129/year
OnlineOnly
AudiologyOnline
www.audiologyonline.com
A Guide to Bithermal Caloric Testing
The purpose of this course is to provide an in-depth discussion of the caloric testing portion of the VNG/ENG test battery. Content will include descriptions of testing procedures, analysis and interpretation of results.
815
Online
PT60M
A Guide to Bithermal Caloric Testing
Presented by Amanda Cerka Mroz, AuD, FAAA, CCC-A
Course: #815Level: Intermediate1 Hour
No CEUs/Hours Offered
The purpose of this course is to provide an in-depth discussion of the caloric testing portion of the VNG/ENG test battery. Content will include descriptions of testing procedures, analysis and interpretation of results.
5
https://www.audiologyonline.com/audiology-ceus/course/introduction-to-audera-pro-gsi-35661
Introduction to Audera Pro, GSI’s Complete Clinical Evoked Potential System
The GSI Audera Pro™ is the next generation of the highly acclaimed clinical evoked potential and OAE system, the GSI Audera. The Audera Pro offers a comprehensive battery of test types covering evoked potentials (EP) and otoacoustic emissions (OAEs). The Audera Pro generates quick and efficient quality data, providing simple system operation, and utilizes convenient database management.
auditory, textual, visual
129
USD
Subscription
Unlimited COURSE Access for $129/year
OnlineOnly
AudiologyOnline
www.audiologyonline.com
Introduction to Audera Pro, GSI’s Complete Clinical Evoked Potential System
The GSI Audera Pro™ is the next generation of the highly acclaimed clinical evoked potential and OAE system, the GSI Audera. The Audera Pro offers a comprehensive battery of test types covering evoked potentials (EP) and otoacoustic emissions (OAEs). The Audera Pro generates quick and efficient quality data, providing simple system operation, and utilizes convenient database management.
35661
Online
PT60M
Introduction to Audera Pro, GSI’s Complete Clinical Evoked Potential System
Presented by Karen Morris, MS, CCC-A
Course: #35661Level: Introductory1 Hour
AAA/0.1 Introductory; ACAud inc HAASA/1.0; BAA/1.0; CAA/1.0; IACET/0.1; IHS/1.0; Kansas, LTS-S0035/1.0; NZAS/1.0; SAC/1.0
The GSI Audera Pro™ is the next generation of the highly acclaimed clinical evoked potential and OAE system, the GSI Audera. The Audera Pro offers a comprehensive battery of test types covering evoked potentials (EP) and otoacoustic emissions (OAEs). The Audera Pro generates quick and efficient quality data, providing simple system operation, and utilizes convenient database management.