Please note: This text course contains a video demonstration that requires an Internet connection to view.
Learning Objectives
After this course learners will be able to:
- Name the basic features and components of the various Madsen Zodiac systems.
- Explain how to use the Madsen Zodiac system in standalone mode versus via Otosuite software.
- Describe the procedure for creating and accessing user tests.
- Discuss advanced features of the Madsen Zodiac.
Introduction: Madsen Zodiac
Today, we are going to discuss the new Madsen Zodiac. In addition to reviewing the basic features and the components, I'm going to discuss how to use the system, both the Stand-alone version or PC-based using the OTOsuite software. I'll review how to customize and create your own protocols, or modify existing ones. Finally, I'll cover the advanced features of the Madsen Zodiac.
The Stand-alone version can be used with or without the computer (Figure 1). If you're not concerned about having that flexibility, then you can choose the PC-based option, which will require the OTOsuite software to run the equipment. If you are an existing Otometrics user with OTOsuite, running the Zodiac equipment will require OTOsuite Version 4.80 or newer. In addition, if you have recently installed the 4.82 software, be sure to connect your Zodiac to the computer and run a firmware update before you see patients.
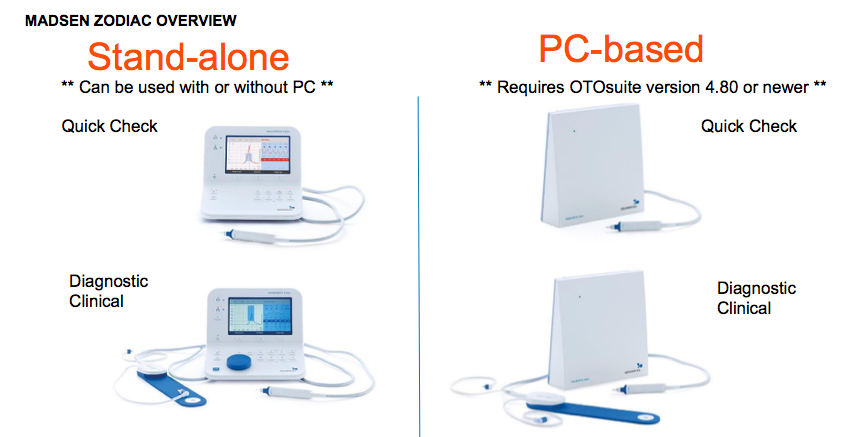
Figure 1. Madsen Zodiac overview: Stand-alone or PC-based.
There are three main versions of the Madsen Zodiac: Quick Check, Diagnostic and Clinical. All three versions are available in either the Stand-alone or computer-based options.
The Quick Check is the simplest of the three versions. Looking at the top left corner of Figure 1, you will notice that the Quick Check Stand-alone version is simplified in that it does not have any external knobs, only a few buttons. Quick Check can be used for tympanometry with a 226 probe tone, and also for reflex screening. On the bottom left of Figure 1, you can see that the Diagnostic and Clinical versions on the Stand-alone have more buttons. With these two versions, you're going to be able to measure reflex thresholds and reflex decay. Depending on whether you are using the Clinical or the Diagnostic, you can conduct specialty tests. You're also going to have access to more probe tones.
The other thing of note is that there are two different probes. The Quick Check only has one option: the Quick Check probe. On the bottom of Figure 1, you can see that the Diagnostic and Clinical versions each offer two probe options: the Quick Check probe and the Diagnostic probe. We're going to discuss those features and the differences between them coming up in the presentation. Additionally, the Stand-alone system is very clean and streamlined. For hygienic purposes, there are no cracks between the buttons and everything is sealed, making it very easy to clean the equipment.
Feature Differentiation
Figure 2 shows a comparison chart, outlining the different features of each version of the Zodiac. As you move from the Quick Check, to the Diagnostic, to the Clinical, you're going to gain more capabilities with each system. The decision of which one is right for your clinic will depend on the types of patients you see and the types of test flexibility you would prefer.
The Quick Check is the simplest of the systems, which only offers tympanometry (auto start), the 226-Hz probe tone, and reflex screening. The Diagnostic version has a few more options than the Quick Check, such as manual or automatic tympanometry, a 226- and 1000-Hz probe tone, and the ability to do reflex screening (RS), reflex thresholds (RT), and reflex decay (RD). Included with the full Clinical version are all the same options as the first two versions, along with four probe tones: 226, 678, 800, and 1000. We're also adding a few specialty tests, such as Eustachian tube dysfunction for a perforated eardrum, an admittance recorder, and the ability to look at B&G tympanograms.
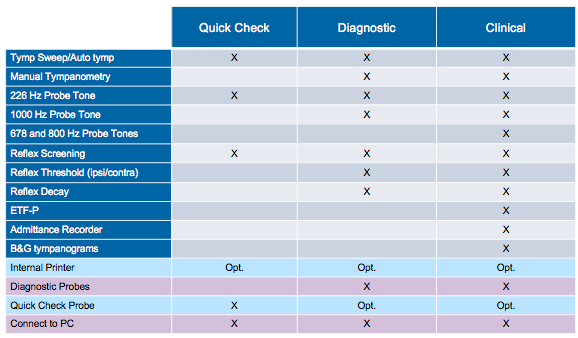
Figure 2. Feature differentiation chart.
On all of these versions, if you are using Stand-Alone, you will have the option to have a thermal printer. If you're using the Stand-Alone, you can also connect it to the computer or use it independently.
After you select and purchase one version of the Zodiac system, if you decide down the road that you should have purchased a different version, you will not be able to upgrade. That's why it's very important to look at those feature differentiations when you are making your decision, to ensure you purchase the version that is right for your clinic at that time.
Probe Overview
There are some options to consider when you are deciding on the probes that are right for you. Looking at the probes in more detail, at the top of Figure 3 is our Quick Check probe. Notice that it is a bit bulkier than the other two options, so that it can easily be held in your hand. This probe has auto start only. The idea is that if you're testing children, you're going to typically want to have more control over the probe. If you're holding this in your hand, you have the ability to hold it closer to the patient to ensure you get a good seal.
The two Diagnostic probe options are Classic and Comfort. The difference between those two is how you hold them. The Classic probe does not really have anywhere to rest your thumb. When you look at the Comfort probe on the bottom, you can see that you have a spot to hold your thumb against, and some people like that better to help position the probe in the ear canal.

Figure 3. Probe overview.
If you've used any of the older versions, like the OTOflex probe, you will notice that there is no longer a filter to change. Also, these probes are very easy to change. If the plastic tip gets cracked, simply turn it 20-degrees, and then replace the tip from your starting supply of replacement probes. The other advantage is that the tips are transparent. If wax does get in there, you're going to be able to see it more efficiently, and you can change the probes quickly and easily, cleaning and reusing them later, if you so choose. Another desirable feature of the probe is that it's very lightweight. The Classic probe and the Comfort probe are about 50% lighter than your more traditional probes (4.7 grams as compared to 10 grams).
One thing to note is that the Quick Check probe is auto-start probe, but the Classic and the Comfort Diagnostic probes will not auto start on seal. However, there is a start and stop button, either on the Stand-Alone device or on the shoulder strap that houses the probe. You will have the option to start that in either location. On a daily basis, before you start seeing patients, I highly recommend performing a quick probe check (I will demonstrate this coming up later in the seminar). With regard to the length of the cord, they are about nine-feet long, so you're going to have good range with your patient. Additionally, they are Kevlar reinforced, so they're going to have good durability.
Dual Probe Option
On the Clinical and the Diagnostic systems, you may have noticed that you have the option to have two probes plugged in simultaneously. You can have a Quick Check probe and a Diagnostic probe plugged into the same system, if you are using the Clinical or the Diagnostic versions. The advantage of this is if you're in a location where you see a variety of patient age populations, with some patients you may want to use the Quick Check probe, and with other patients you might want to use the standard probe. It's going to give you a little bit more flexibility.
Furthermore, you can also have different pump speeds designated for the different probe types. For example, if you want to run a Quick Check probe at a faster speed, you can set that up inside the software. Conversely, if you want it a little bit slower, use that on your Diagnostic probe so that you don't have to think about changing those speeds as often. That gives you the flexibility to use it the way you need to in your practice. As a bonus, it gives you a backup probe in case something happens; it's nice to have that flexibility to switch between them to keep you up and running at all times.
Responsive Probes
Another feature of the probes is that indicator lights directly on the probe show you how the test is proceeding (Figure 4). There is an ear button on both probes. If you were switching between ears, it will indicate whether it's the right ear (red) or the left ear (blue). As the test is running, the light will display green if you have a successful seal, and it will be yellow if there is a leak. If you're seeing the yellow light, you know you need to replace the probe. When the test completes, you'll see it go back to red if you were testing the right ear, and go back to blue if you were testing left ear. You'll also hear an auditory beep at the conclusion of the test; if you look away from your screen, the beep will alert you that the test was accepted.
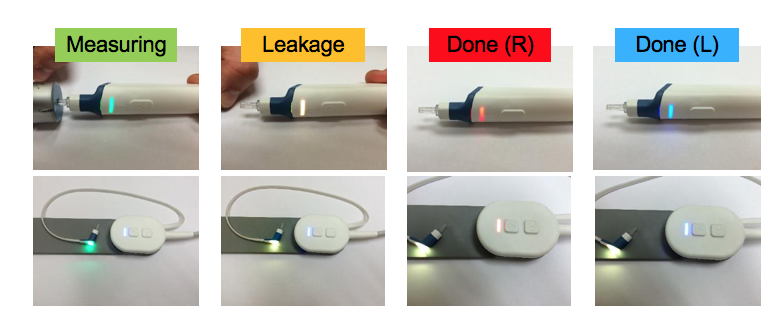
Figure 4. Indicator lights on the probe.
Testing with Zodiac Standalone
As we transition from learning about the basic parts and functionality of the systems, we're going to focus a little bit more on testing with the Stand-Alone version.
Quick Check
In Figure 5, the top left button  is used to create a new session. If you've done a test, and you want to clear out all of this data, press that button to create a new session. A screen will then pop up that verifies if you want to delete the measurements, at which point you will either select "OK" or "cancel." Then you can proceed with the next test, and you'll have a new screen of data. The next button
  is used to send the data to the printer. If you have a thermal printer connected, it will print those out for you. Underneath the print button is the menu button
  that enables you to access any of the features you want to adjust.
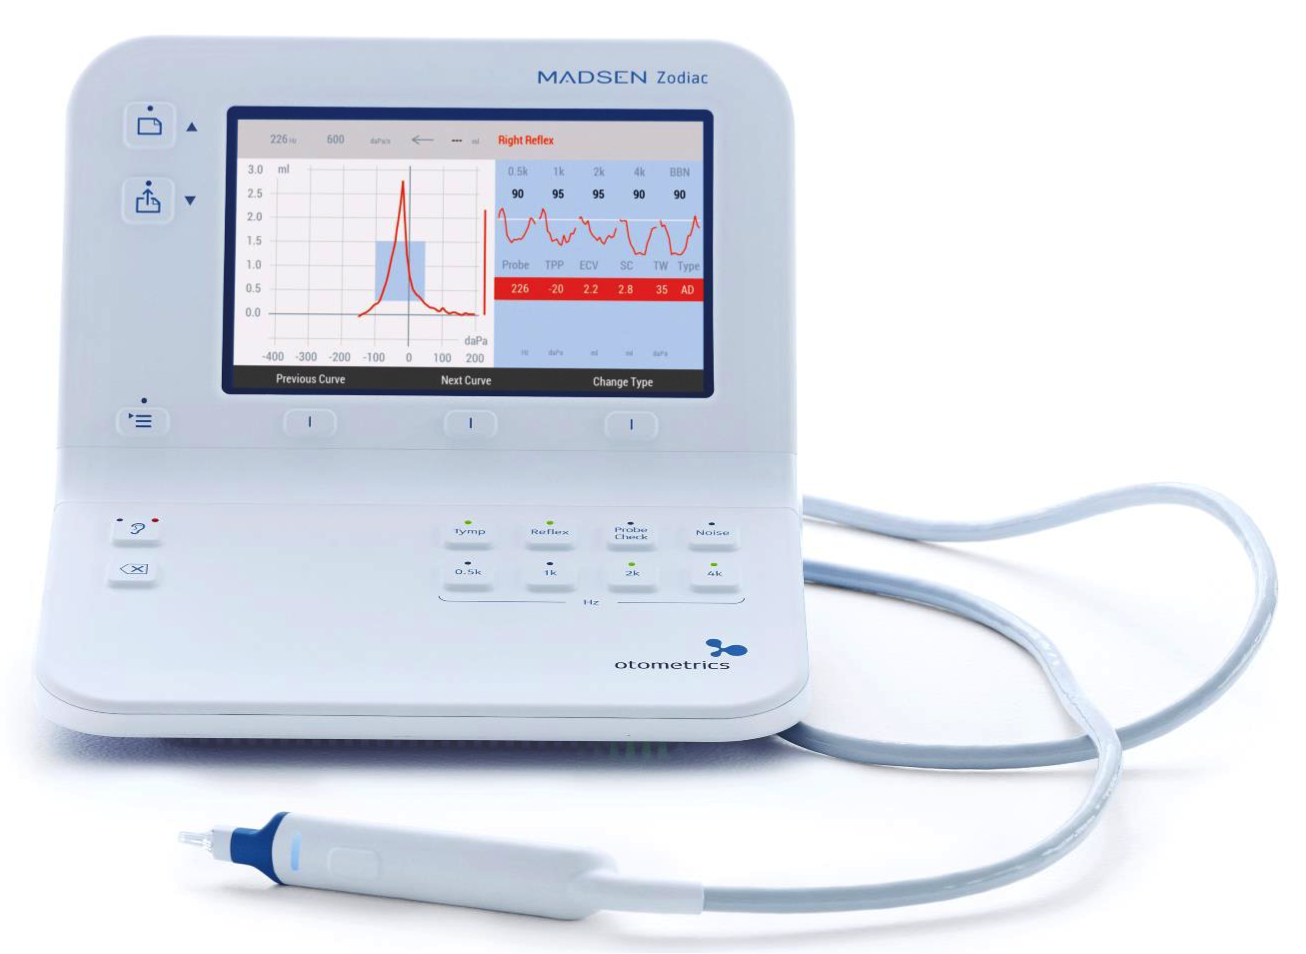
Figure 5. Quick Check button functionality: Create new session, send to printer and menu.
The soft keys, or on-screen selection buttons, are shown in Figure 5 and in Figure 6 (d). You will use those keys to navigate the menu options or make selections on the active test screens.
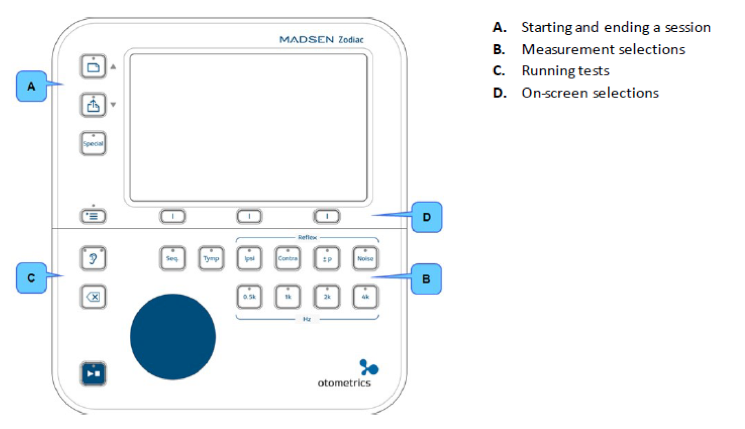
Figure 6. Diagnostic and Clinical front panel.
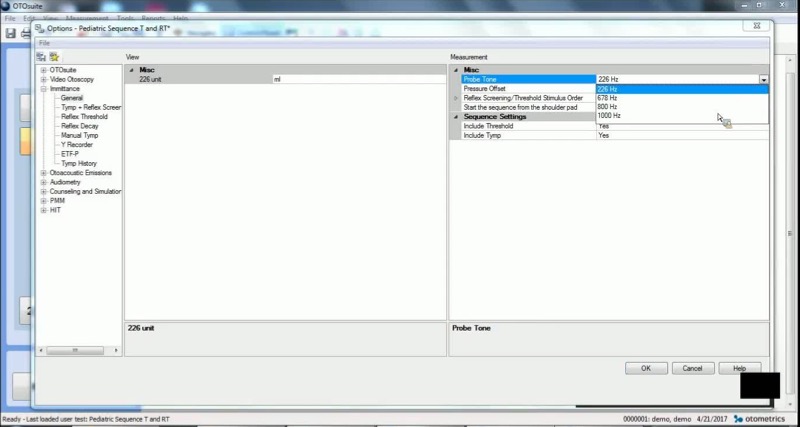
For example, if you want to adjust the sweep direction to go from positive to negative, press the on-screen selection button and then use the up and down arrows to navigate to Sweep Direction (Figure 7). Here you will also see different protocol options. If you are making adjustments to the protocols, you can select which one you want to change, indicate where you want to save it, and then click on "Apply and Exit" with the menu button.
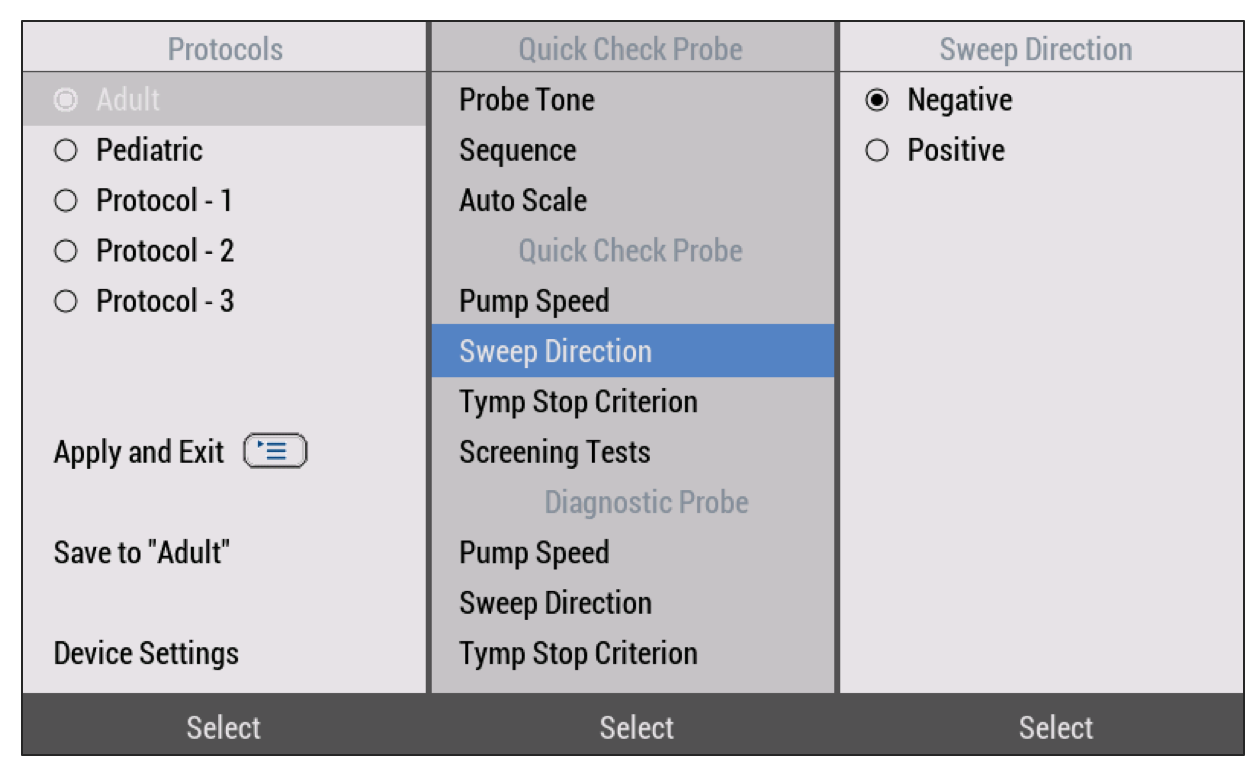
Figure 7. Selecting options in the menu.
While you're running a test, these soft keys allow you to select "Previous Curve" (if you've done multiple tympanograms, for example), "Next Curve", or "Change Type". The Change Type button enables you to change the classification-type scale. The system will automatically code it to the Modified Jerger norms, but in case you want to apply your own clinical judgment, you can change from a C to an A, and vice versa. You have that flexibility before you print it out, so it will appear on your printed report to your preferences and specifications.
The front panel also includes an ear selector button to switch from the right ear to the left ear. The button has an ear icon on it; it can be found on the lower left of the front panel. That same button is also on the probe. The button with the icon that looks like this  will to allow you to delete curves.
With Quick Check, you only have the option to select reflex screening or tympanometry. If you want to do tympanometry, press the "Tymp" button to run only the tympanogram; use the "Reflex" button to do reflex screening. If you want to do tympanometry and reflex screening, you would hit both of those buttons, and then decide which frequencies you want to test (500, 1000, 2000, and 4000 Hz). Use the buttons labeled "Probe Check" and also "Noise," if you want to use noise for your reflex screening.
Diagnostic/Clinical
As we move from the Quick Check to the Diagnostic version, there are more buttons from which to choose (Figure 8) because there are more testing options with the Diagnostic version. Many of the buttons are the same (e.g., the ear selector button, the delete button). However, now we also have the button with the "Play/Stop" icon. As you may recall on the Quick Check version, you only had the ability to use the auto-start Quick Check probe. Now, because you can also use the Diagnostic probe, this one will not auto start on seal. You have the option to manually hit the play button. On the shoulder strap, there is also a "Play/Stop" button, as well as an ear selector button.
With Diagnostic/Clinical, you have the same options that you had with the Quick Check, and also a "Special" button. The special button allows you to access reflex decay and manual tympanometry; if you have the more advanced versions, you can access Eustachian tube dysfunction for a perforated eardrum, the Y recorder, and also the probe check on the Clinical or the Diagnostic version.
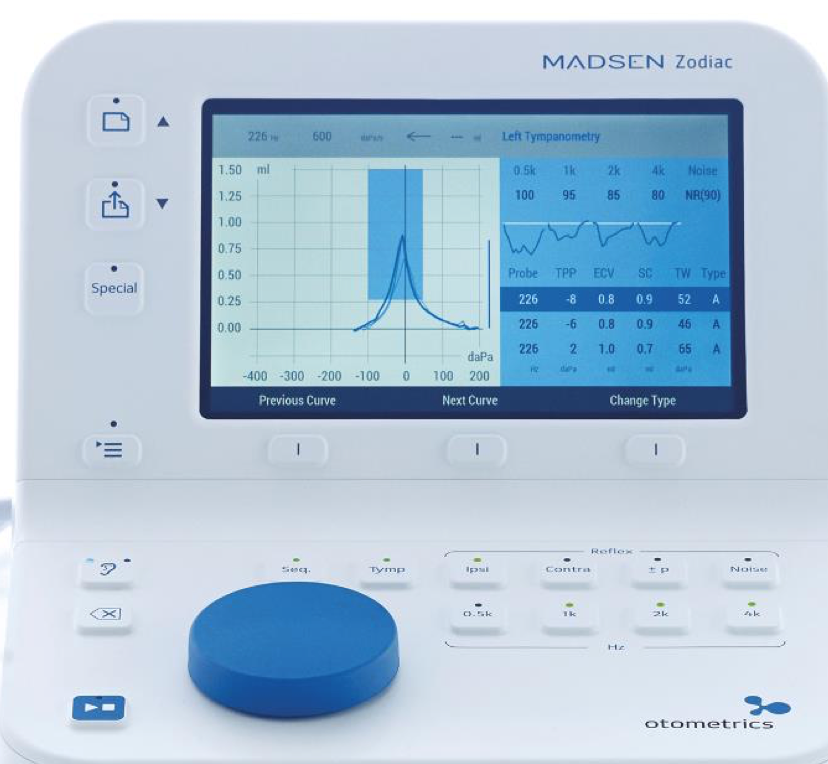
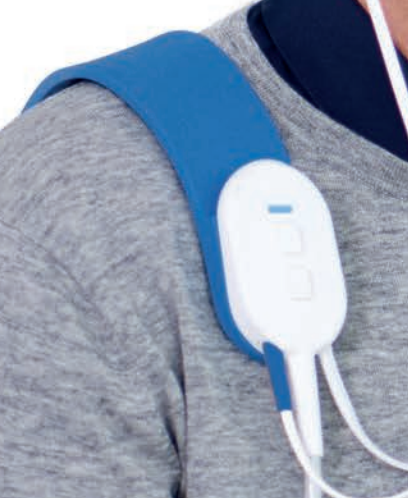
Figure 8. Testing with Zodiac: Diagnostic/Clinical.
As shown in Figure 8, the Diagnostic/Clinical version has the same soft keys as the Quick Check to navigate the menu options or the active test screens. Additionally, you also have the option to sequence your testing. With the Quick Check, you can only select tympanometry or reflex screening one at a time; with Diagnostic/Clinical, you're able to select multiple tests in succession. If you want to do tymps and then go right into reflex threshold testing, you would press the button labeled "Seq." and then select the different test options you want to perform. If you wanted tympanometry ("Tymp") and then ipsilateral ("Ipsi") and contralateral ("Contra") reflexes, you would choose all of the testing Y types that you would want to use.
The other feature that is included on the Diagnostic and the Clinical version is the +/- P button. This will help you with those hypercompliant eardrums, where you're going to have a pressure offset that you can use while you're doing your reflex thresholds, to help make it a little bit more stable.
Finally, you'll also see that you have the blue wheel, which will allow you to adjust the pressure manually when you're using manual tympanometry. You can also use that wheel to scroll through some of your options.
Front Panel Close Up/Menu Selection Options
The left image in Figure 9 shows a close-up view of the Diagnostic and Clinical front panel, along with a comparison of the Quick Check front panel (Figure 9, bottom right).

Figure 9. Close up of Diagnostic and Clinical front panel compared to Quick Check measurement selections.
Printing
If you have the Stand-Alone option, and you don't want to have it connected to the computer, but you do want it to print, there is an optional integrated thermal printer on the back of the device. It prints quickly, and the paper is very easy to change. If you know you're going to be connected to a computer, or if you don't need to print, you can opt to not have the thermal printer.
Testing with Zodiac in OTOsuite: Video Demonstration
The following video demonstration shows how to work with the Zodiac in OTOsuite.
Advantages of Zodiac in OTOsuite
- Efficient, accurate and convenient
- User-friendly navigation through all tests and allows for customized test protocols
- Optimized for touch screen; can be used with stylus
- OTOsuite is shared interface for the entire audiological workflow with single entry point for entire client journey (Audiometry, OAE, Video otoscopy, Hearing Instrument Fitting)
- Allows for customized reporting, combining data from various modules
- Integrates with NOAH and EHR/EMR applications
If you use the Clinical version, you are going to gain access to a few specialty options that you cannot access in either the Diagnostic or the Quick Check.
- Admittance Recorder (Y-Recorder): If you want to have the ability to use the admittance recorder to assess some of those specialty areas, (e.g., CI patients, C tinnitus patients), and you want to be able to evaluate some of the objective pulsatile tinnitus, you will be required to have the Clinical version.
- ETF-P (Eustachian Tube Function – Perforated Eardrum): If you are in a more medical-based practice, you may need to assess patients with ETF-P.
- B&G Tympanograms: Useful with patients that have certain medical issues, such as ossicular discontinuity; you may need to use the 678-probe tone to help you with differential diagnosis when comparing it to your 226 tympanogram.
Note: If you are doing Eustachian tube dysfunction with an intact eardrum, you're going to do that off your regular tympanometry screen. You will need to do multiple tympanograms, and have the patient either Valsalva or use other methods to assess functionality of the Eustachian tube.
Troubleshooting Tips
When using Madsen Zodiac, keep these useful troubleshooting tips handy:
Probe Tips (Always Perform Probe check if unsure of probe status; otherwise perform daily):
- Ensure proper fit of eartip and that it is inserted properly into ear canal
- Check for probe tip blockage from ear canal wall
- Check for cerumen or debris in probe tip; may be cleaned or changed if needed
- Check for blockage/interference in ear canal from patient (cerumen/hair)
- Ensure that eartip is not worn out or hardened; recommended for single use only
Power to Zodiac/Connection to PC
- Check power connection to wall and Zodiac device
- Check USB connection to PC.
- Check USB settings on PC to ensure they are not “enabled”
The key to immittance is getting a good seal. If you have a good seal, your test is going to run much more efficiently. Furthermore, using a good, clean probe is essential. To ensure better seals when using the Quick Check probe, it is recommended to use a slightly larger tip because you're going to be holding that against the patient's ear, which will give you a more consistent and accurate seal. When you're using the Diagnostic Comfort or Classic probe, it's recommended to use a slightly smaller tip, allowing you to get the tip a little bit deeper into the ear canal, so that you don't have to maintain holding the probe to achieve that seal. If you're using different probe types, keep in mind that sizing is going to be slightly different whether you're using the Quick Check or the Diagnostic probe.
There are physical elements that may impact the ability to achieve a proper seal. It's very important to check that the probe tip isn't blocked with debris, or that you're not hitting up against that patient's ear canal wall. With patients that have curvy or bendy ear canals, it may require pulling on that pinna a little bit more to straighten out the ear canal to be able to get an accurate reading. Also, make sure there's not too much cerumen in the patient's ear, as that will not only block up the tip, but it will also block the probe from getting a reading. You may need to either clean the patient's ear, and/or clean the tip, or momentarily replace it and use one of the other probe tips that come in the kit. Furthermore, with some of our older male patients, you may have to put on your barber cap, as they may have hair inside their ear. You may have hair removal equipment in your clinic or office; if not, the patient might need to visit their barber and come back later to complete the testing.
The tips we use are recommended for single use only. Depending on your facility and/or state regulations, there is some leniency with regard to being able to disinfect and reuse the tips. In some states, if it is labeled for single use only, you are only going to be able to use it one time. If you are sanitizing and reusing the tips, make certain that they aren't getting worn or hardened, because over time they're going to lose their ability to expand to the ear canal properly and achieve a proper seal.
Check the power connection. Zodiac has two connections for power: one at the device itself, and one that plugs into the wall/outlet. Make sure that the plug is securely in the outlet, or if you have it on a power strip, that the power strip is turned on. Also, check your USB connection to make sure that it didn't get unplugged from the computer. If it's not finding the Zodiac when you plug into the computer, then make sure that that USB connection is still plugged in, either on the back of the Zodiac or into your computer. Another factor to consider is the power setting on your computer. Depending on the facility, they'll often want to try to conserve power on those USB settings. They may enable those USB ports to save power. You can go into your advanced settings on your power options and expand your USB power settings, and you can change it from enabled to disabled. We definitely recommend that if you're using any USB-powered equipment to always disable your USB suspend power settings; that way you can ensure a consistent and reliable connection to your USB and your device.
Follow these steps to disable USB suspend power settings:
- Go to the Control Panel on your PC, and click on "Power Options."
- See if you are using the Balanced or the Maximum performance; whichever one you're using, click on "Change Plan Settings."
- Go to "Change Advanced Power Settings," and then scroll down until you find USB settings; click on the little plus (+) sign to expand it.
- Click the + sign to expand the "Selective Suspend" setting. If you're using a desktop, you're only going to see one option ("Plugged In"). If you are using a laptop, it will display two options: "On Battery" and "Plugged In." Make sure you change those to "Disabled."
- Click "Apply," and then "OK."
Depending on your facility, you may need administration rights to do this, or you may have to reach out to your IT department to take care of that for you.
Reporting with Zodiac
Some advantages to reporting with Zodiac include the ability to:
- Use pre-loaded templates or customize with OTOsuite reports
- Create your own standardized reports with OTOsuite reports
- Combine data from all test modules in OTOsuite
- Use the easy customization tool (can add company logo)
On an OTOsuite report, you can include counseling messages for your patients. For example, on an immittance report, you could include things like types of middle ear pathology. You could include explanations about what it means when someone has middle ear effusion, cerumen impaction, or tympanic membrane perforation. You can provide counseling and additional information for the patient in a meaningful way that they can understand. You can also combine data from different test modules in OTOsuite. The professional and patient-facing design will set your practice apart from the others.
Questions and Answers
If you forget to change the ear label, is there a way to edit it?
There is way to edit from right ear to left ear. You just right-click on the graph on which one you want to change and then you hit "swap ear." You can do this on the Stand-Alone version as well.
Can you change the criterion line for the reflex threshold?
Yes. If you go back to Tools and Options, you'll see that the reflex criterion option is changeable. As far as the tympanogram type, changing from an A, to a B, to a C, like I said, that does come off the Modified Jerger Scale. You could manually change it after the test has run, but you can't change the classification for Modified Jerger.
Would a pediatric patient find the larger probe more threatening or intimidating?
I've seen a lot of pediatric clinics using it, and I haven't heard of anyone expressing that concern. But with young children, you never know what's going to be that trigger.
Explain again why you'd want to disable the USB.
Let me explain using a scenario. Let's say you go to lunch, and you have your computer turned on and the USB is plugged into it. Your computer can sense that it hasn't been used in a while, and it will try to save some power to those USB settings and put it to sleep. When you come back from lunch and try to use the Zodiac, the computer will indicate that it can't find it in the software. All of a sudden you're trying to run it, and it can't connect, and it can't find it. If you disable the selective suspend setting, your computer won't give itself a time out, and it won't go to sleep. If you don't change that setting, the only way to wake it back up again is to unplug the USB from the computer and plug it back in. The advantage of disabling it is so that in the middle of your work day, you won't be inconvenienced by being unable to connect to your computer or your device. You will be able to run Zodiac, or any other USB equipment.
Is disabled the default?
In most systems, the default is to enable the power saving capabilities. This is especially true in larger practices, like hospitals or government services, because they want to control the devices. Typically, if you have your own system, it will not be the default. If you order computers from us with your equipment, we always disable that as a default.
Citation
Fitzke, J. (2017, October). Madsen Zodiac - what's new in immittance! AudiologyOnline, Article 20977. Retrieved from www.audiologyonline.com