
Editor’s Note: This text course is an edited transcript of a live webinar. Download supplemental course materials.
Learning Objectives
Michele Hurley: Our objectives for this course today are that you will be able to list key steps in taking successful ear impressions, be able to identify the various types of ear impression materials that are currently on the market, and be able to discuss the benefits of establishing a professional ear impression protocol within your practice.
Many things that were commonplace not that many years ago, such as penmanship, letter writing, the art of conversation and noodle making have become somewhat of a dying art. In the era of receiver-in-the-canal (RIC) hearing aids, is the art and skill of taking ear impressions becoming a dying art as well?
There is a need to be skilled at taking impressions for a number of reasons. One of those is the opportunity that lies in being able to be proficient at making ear impressions. The opportunity to provide custom solutions for your patient in a non-custom world is one of the key benefits of being skilled and proficient at making ear impressions. The opportunity to demonstrate your professionalism through the care and effort that it takes to provide the best impression of anatomy, ear texture, and desired product are essential. Although we may be fitting primarily non-custom technology, there are a lot of other options where we might need an impression. We need to be able to maintain those skills.
We often hear references to the MarkeTrak studies and the concept of patient delight. One of the most frequent components of “delight” in those studies is you, the professional. As hearing professionals, we need to view the skill of impression taking as a critical one that can impact our potential to delight our patients.
Roles of the Ear Impression
There are a number of different roles of the ear impression itself. It was designed to create a three-dimensional image of the ear, whether that was for the fabrication of custom hearing aids, the fabrication of a custom ear mold for behind-the-ear (BTE) technology or RIC instruments, custom ear monitors, hearing protection, or swim molds. These types of products are great revenue opportunities for us in practice. We tend to think about hearing aids as the main source of our revenue in a hearing aid practice, but very often these ancillary products can be beneficial and require custom ear molds.
A survey done a number of years ago by a group of doctoral students at Pennsylvania College of Optometry looked at the concept of impression taking and whether there is any sort of consistency across manufacturers who build custom types of products. In a series of phone interviews, they gathered data from 34 manufacturers on:
- Recommended Material/Viscosity?
- Silicone or Powder/Liquid?
- Jaw movement or not?
- Use of syringe or injector?
- Same technique and material for all devices?
The survey said that most of the companies had no official policy in regard to impression taking techniques that they were able to convey if someone posed those questions. Most recommended the use of silicone material over powder and liquid, citing its better shape stability and less shrinkage than that powder and liquid material. Most respondents did not see any need for different impression taking techniques for different products. If the impression showed 2 mm past the canal second bend, it was considered satisfactory to build any product.
If more specific advice was offered, most labs preferred a closed jaw impression. Those that cited chewing as preferred indicated that it helped get a better seal at the bony portion of the canal. At times, an open jaw impression was recommended if excessive jaw movement had been observed during otoscopy. Other labs suggested both an open and a closed impression to be able to assess the difference. The reps were quick to add that when 2 mm impressions were received, the open jaw was most often used. Of the manufacturers polled, there was a high degree of variability across answers. That leaves you, the professional, wondering what you should do now.
Making a good impression involves science, because we need to be able to understand the different material applications and anatomy, as well as artistry that goes into creating that perfect impression to suit your patient’s needs.
Components for Success
There are a number of components that I believe are critical for success in being a good ear impression maker. We need to understand, first and foremost, that a protocol should be created for our practice in this regard. It needs to include an impression-specific history, making sure we have the appropriate tools and materials at our fingertips to use during the course of making the impression, a proper otoscopic examination, and a post-impression evaluation, because there is not only a before, there is an after that is critical to the success of a good impression.
Impression-Specific History
If you know the history, you will know how to approach the patient for a safe and accurate impression. We need to find out if there is any risk for infection with this particular patient. Are they being treated for diabetes? Do they have any immunocompromised issues? Are they at risk for bleeding? Are they taking blood thinning medication or do they have a condition that lends itself to being a bleeding risk? If they do, it means we need to take extra care when we are working in the ear.
As we examine their ear and make some movements with the ear canal, are we getting any sort of coughing reflex or do we see some sort of indication of vagus nerve activity as we are working in that space? That will impact our impression taking capability. We need to inquire if the patient has had any sort of surgery in the ear canal. Sometimes it is obvious on a visual examination that there has been a mastoidectomy or tubes; however, sometimes there are other things that may be a little less obvious. We also want to know if they have an active infection, and whether it is bacterial or fungal. It is always good to ask because we may not always see it upon visual examination.
Their hearing levels will be important as we determine what type of impression and the depth at which we want to make that impression. Do we observe any congenital malformations within the ear canal space or pinna that we need to note. While these questions may go above and beyond a traditional case history, they are an important part of the patient process.
Patient Hearing Aid History
The type of hearing aid that our patient has worn factors into the history as well. If we ask them to bring those devices with them to the evaluation, do we see any sort of evidence of buildup that can indicate that they have a more challenging ear to try and fit, and if so, where does that buildup occur on the older device? What type of venting was utilized? Is there some evidence that the vent was opened up? That may indicate that they deal with occlusion, and we need to factor into our decision-making process.
If you see evidence of modifications, it is an indication that some things had to be changed either due to poor fit or preference changes. Those are things that can help guide us as we make our future decisions. Battery size is critical as well, because it can affect acceptance. It is also important in discussing now what is most suitable for our patient now as they go forward, taking into consideration dexterity or visual limitations that may have changed from when they were fit the last time.
Supplies
It is very important to make sure that we have tools at our fingertips that we will need for the course of the impression.
We should have things such as disinfecting wipes, appropriate types and sizes of otoblocks or dams, syringes or a gun, as well as the impression material and the type of cannula and cartridges that may go along with the particular type of material that we are using. We also need to have a box handy for the impressions once we remove them from the ear. It is wise to have that already prepared prior to starting the impression.
Tools of the Trade
Let’s talk about some of the other tools of the trade that we need to have in place. Proper seating is something that I think is undervalued. We will touch on this in depth in a moment. Lighting and magnification are critical when we are working with a small ear space. You want to ensure that you have the best quality lighting and particularly a good handheld optical or video otoscope to be able to make an impression. You also want to have a bright ear light, especially one that narrows so you can get down very deep in the ear canal and have good illumination in that space as you are working. Some other things that may come in handy are forceps and curettes. Forceps can help you remove little flaky scales of wax in the ear canal, if that is within your scope of practice and state licensure, and curettes can be helpful in the same manner.
Being able to be at eye level is critical. Figure 1 shows an audiologist positioned in an awkward way to access the patient’s ear. This is not good for us, and our potential to shoot the best impression is marginalized. It is important to assess your work environment and make sure that you have the ability to be seated at eye level with the ear so that you can work most comfortably, most successfully and most accurately for your patient.
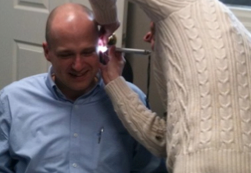
Figure 1. Taking an impression when standing, not at ear level, forces us into awkward, unsteady positions.
Impressions
In the student survey, one of the common requests from manufacturers was the desire to have an impression that went down to the second bend, which provides a good length with which to work. We can also include a full impression with the bowl and helix, which gives them a lot of information about all aspects and landmarks of the ear. Very often, professionals will attempt to save money on impression material by only shooting the minimum of what they want built. If they want just a canal instrument, they might not extend up in to the helix area. If you do that, you are inviting a request for an impression with additional detail or the possibility of the need for a remake if the product does not fit properly.
If we need to shoot another impression to be able to ensure that the manufacturer has everything they need to build the best product possible, there is nothing wrong with asking the patient to shoot another impression. Your patient will appreciate your thoroughness on the front end, rather than having to come back for a remake or a poorly fitted product.
Otoblock
The otoblock is the next most important part of our impression. There are two different options: cotton and foam. Cotton is more easily modified, and they provide the greatest information of the anatomy of the ear canal. They can be tugged at to reduce the size if necessary for a smaller ear, and they can also be flattened out to better fill the entire canal space. Foam does not allow us to do that as easily, as it is quite dense and rigid. It takes up a great deal more space in the ear canal, and it can also be more abrasive. This is important to keep in mind when you are making deeper canal impressions. When we get down into that bony portion of the ear canal, it is extra sensitive, and foam can occupy a lot of space there and compromise getting more information, and it can also be less comfortable for our patient.
Figure 2 is a good visual example of the space differences between foam and cotton otoblocks. If we look at these impressions, you can see on the amount of space that the foam otoblock is taking up in the ear canal on the left. Shooting that same impression with cotton (on the right) made it much easier to get that block around the second bend and provide that information for the manufacturer.
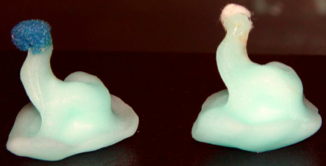
Figure 2. Foam (left) versus cotton (right) otoblocks.
Aim
Aim is a very important part of the process as well. We need to keep that in mind when we are aiming that syringe into the ear canal. In Figure 3, there are two impressions - A and B. In impression A, the syringe is pointed and aiming more towards the canal wall, which will very likely leave a gap, between the syringe tip and the otoblock, not filling that entire space.
With impression B, where we ensured that we had the tip directed into a larger opening, we can see that we were able to more successfully fill that ear space and provide a better impression.
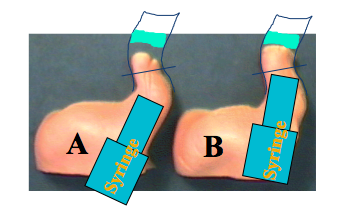
Figure 3. Considerations of aim on impression making; two pictures show differences in the outcomes of impressions depending on where the tip of the syringe is pointed in the canal.
Leaving a gap between the ear and otoblock when you remove an impression may be immediately considered a remake by a manufacturer. So make sure the impression is well done and complete before you send it off.
Sometimes there are challenging ears. Every ear, just like snowflakes, is different. We may see some canals that are very curvy; some are very straight. Those all impact how we need to shoot the impression. When you see a very curved ear canal, keep in mind that sound direction is going to be very important in the end product. We need to not only shoot for giving our manufacturer the depth and the angles of those curves, but we also need to keep in mind that sometimes we will need to do some modifications for good retention, as well as comfort with those sharp curves.
Sometimes a straight canal is not always an easy thing for us to work with, either. Retention is challenging. We need to make sure that our impressions extend into the concha bowl so that we have the maximum information for that manufacturer to provide good retention. This is a place where it might be important to consider having a good tragal impression for the manufacturers to work with. If you look at the ear canal and you see any sort of bony growths, it is important to note the positioning of the tympanic membrane (TM) in relation to those growths, and also you may want to mark those on the completed impression so the manufacturer has as much detail as possible.
One of the most challenging ears known to the dispensing professional is one that has had a mastoidectomy. It is critical when you are working with an ear that has had a mastoidectomy that you take extra care in terms of your otoscopic examination. Then, as you are shooting the impressions, we need to make sure that we have used a number of otoblocks sufficient to fill that cavity accurately. Not only do we know where the TM is located, but we make note of that on the completed impression for the manufacturers as well. If you have a couple of blocks in there, how do you know which one might find the TM located by it? That is an important detail. If we use care, there is no reason we cannot make good impressions of these ears. It is important to make sure that you take a good look before and after, and use extra caution in terms of how you place otoblocks in the space.
Materials
There are a number of different materials currently at our disposal. Common materials on the market are powder and liquid, silicone, and a very intriguing option of ear scanning.
Powder/Liquid
Methyl methacrylate is another name for powder and liquid material. It has long been in use in our industry. It requires the mixing of a monomer and a polymer component, which are then injected via syringe. This methyl methacrylate or powder and liquid material sets up rapidly. This requires good practice in being able to mix, insert into the syringe, and inject in a timely manner prior to set up. This material has a relatively short shelf life due to the shrinkage component and continuing hardening.
This type of material, within a normal weather environment, will set up and reach a point of being too hard with too much shrinkage within about a week’s span of time. That will be accelerated if you are in hot, tropical climates. It is important to be aware of where you live and how you might want to make these impressions, not only for the availability to have them over a longer period of time, but also for the shipping aspect. You will need to make sure that that impression will get to your manufacturer within about a week.
While it is the least expensive material found on the market and is very soft and comfortable to flow into the ear, it is also a messier to mix up. It also has a low stability in a short period of time. It requires that we be cautious about how we pack this impression before we ship it in. In particular, if we live in a warmer client, the methyl methacrylate can melt and distort quite easily in hotter weather. If you are sending these impressions by mail, I would recommend, regardless of the climate, that you stabilize them by gluing them to the bottom of the box and tucking some tissue in around them. That is essential in a warmer climate so that those do not get distorted as they are in transit.
Silicone
Silicone impression material is readily available in the marketplace today, and there are a few different types. Not only do these materials differ in terms of mixing procedures, but also a number of other different factors such as viscosity, contraction, and after-cure, hardness-shore value. The two types of silicone material that you can see on the market today are condensation cure silicone, which arrives as a set of putty and a tube of activator, or addition cure silicone (Vinylpolysiloxane) which is two putties that are blended together at a 1:1 ratio. Either you have two tubs of two different color materials that you scoop and mix in 1:1 ratios, or the cartridges that are used in the pistol injectors which blend the material as it spins through the cannula of the injector.
We need to keep in mind that silicone material shrinks a lot less than the powder and liquid. The typical shrinkage is 0.1% to 0.7% in seven days. A rate of 0.3% is considered acceptable in terms of maintaining accuracy in fitting. We want to not have those impressions sit around very long, but they can remain on your shelf longer than the powder and liquid and still maintain good accuracy.
Something else you need to keep in mind is that trying to cut corners with impression taking material, either for cost or time, is not a good idea. Sometimes people will try to alter the mixing ratio by adding a component to try to slow the polymerization process. This is done sometimes to make the material easier to flow from the syringe into the ear or to lessen the stretching of the ear tissue. This shrinkage that may occur is going to exceed the acceptable amounts that we just discussed. Cutting corners should be avoided.
Silicone is much neater and cleaner to work with than the powder and liquid, especially if you are using the injector gun. It does have more stability over time and is easier to work with in many ways, but it does have a higher cost depending on the type of mixing component. If you are new to using the pistol types of injectors, it takes a little practice to accomplish that skill.
Viscosity and Shore Value
Are viscosity and shore value the same? When choosing impression materials, it is not just a matter of the type of material. One of the things we have to recall is that silicone material also differs in terms of viscosity and shore value, and these terms are not synonymous. Viscosity is defined as the measure of the material consistency before polymerization. This is kind of the quality of the before aspect of the impression material and as the quality of silicone material. This is not something that is referenced in terms of that methyl methacrylate material.
Viscosity
As you recall, when the student study was done, it indicated that most of the manufacturers did not have a specific recommendation about viscosity or shore value. How would I know when I should use a different type of viscosity? When would I want to use a lower viscosity? A lower viscosity has a softer consistency compared to a higher viscosity, which is more firm as it flows in to the ear canal.
We should consider using a softer viscosity when we are shooting a deep canal impression, but it is also applicable for losses at a more moderate level. What about higher viscosity? It can be helpful when you are making an impression for a more severe hearing loss where you need a snug fit with a good seal, as this material is a more likely to expand the ear tissue somewhat when injected and curing due to its density.
Shore Value
Shore value relates to the after-cure hardness of the impression material. Numerous studies have found that there is no correlation between a lower shore value and ease of removal of an ear impression. The shore value has been a factor that has been deemed irrelevant in most cases. Viscosity is the most critical of those approaches.
Ear Scanning
Let’s talk about the future and ear scanning. There are a number of ear scanners in development with several different manufacturers, but nothing that is available today. Digital ear scanning offers many benefits. Obviously, this much less invasive than shooting an impression. It has a very high-tech component to it, which is impressive for our patients. It allows us to automate the order process, which can speed up delivery to our patients.
One disadvantage is that it will cost quite a bit to obtain this type of equipment, with greater up-front cost than traditional impression materials. There is also going to be a significant learning curve for the professional in getting used to this technology. This is an exciting possibility, but is likely the next step to what we will see in the fabrication of custom hearing technology, whether it is ear molds or custom hearing aids in and of themselves. Right now, we are looking at one to three years before there is widespread availability of ear scanning technology.
Ear Impression Protocol
This protocol is something that could be suitable for any type of product or patient condition. We need to not only have our tools and materials ready, but we also need to make sure that our patient is ready before we dive into that process. We will talk about all these steps as we move into the next part of the presentation.
Infection Control
Infection control is an important part of any clinical protocol. Regardless of the type of impression that we are going to be making, infection control and appropriate hygiene procedures are important, especially in the context of deep canal impressions.
Infection control also becomes important if the patient presents with some sort of health risk, such as the ones we outlined a little earlier. We need to protect not only ourselves, but also our patients by adopting a good infection control policy and adhering to it every time. We need to be consistent in how we do this with every patient, not on a case-by-case basis.
Making the Patient a Part of the Process
Patients are going to be more comfortable if they know what to expect during the impression taking process. Keeping them engaged in the process and fully informed is essential. We do need to make sure that they understand what the experience is supposed to be like, what type of sensations they might expect to feel, and the curing time for the impression so that they are not getting impatient as we wait for that to harden. It is also important that before you start plugging up their ear that you give them any sort of special instructions - jaw open or closed, or if you are insert a bite block. Those types of things are important for them to know before we give them a temporary hearing loss by plugging up their ear canal.
Otoscopy
For otoscopy relative to the ear impression, make sure that you take a deep look at the ear canal and TM and note any sort of abnormalities that you see, whether in the canal or on the TM itself. If it is within your scope of practice to remove cerumen or foreign objects and you are comfortable with that, you can proceed before making the impression. We need to be looking for any sort of inflammation, infection or drainage. Those may be situations that require a referral to a physician prior to any sort of impression taking. There is no point in trying to be the hero. If you feel it might be in the patient’s best interest to wait, they will appreciate that approach much more. Only proceed if you feel that it is safe to do so.
If we take a closer look at the ear in Figure 4, we can see a small hematoma. If we were trying to shoot a deep canal impression, we would need to be looking for that. In this case, it was a result of the impression being attempted, so it happened after, but we need to be looking for these types of things before as well.

Figure 4. Small hematoma located in the ear canal.
We also need pay attention to the narrowing of the canal. Does the ear canal narrow and then funnel back out? This will impact the placement of the cotton block and how we can remove a cured impression.
Evaluate the presence of exostoses and osteomas (Figure 5), which will affect how custom products can sit in the canal. You do not want to try to position an otoblock behind those obstructions, because the impression and the instrument when made will not be comfortable for your patient. This may impact the type of device that is suited for your patients. It is important to have conversations with your patient if you observe these types of obstructions in the ear canal.
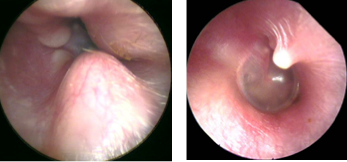
Figure 5. Exostoses and osteoma.
The ear shown in Figure 6 has a small piece of wax at the 12 to 1 o’clock position. If we could remove this easily, it would be fantastic. However, if it is at a depth that is unfavorable, it should not preclude us from taking that impression.
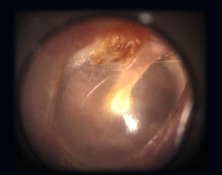
Figure 6. Small wax debris.
In Figure 7, we see a large perforation. This would be a case on which we would likely hold off making the impression until we have medical clearance to do so. If that is that case, you would absolutely have to take care to provide sufficient packing so that the material does not flow behind into the middle ear space.
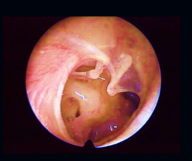
Figure 7. TM with a large perforation.
Figure 8 is fluid behind the ear drum. In this case, we can observe tympanometry and see if a medical referral is necessary for that patient at that point in time. Depending on the case and our objective, we may be able to shoot an impression with a little fluid behind the ear drum.
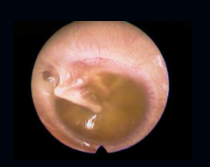
Figure 8. Fluid behind the TM.
What do you suspect is wrong with the ear in Figure 9? If you look closely, it is not an ear at all, but the planet Mars! An audiologist was looking across the breakfast table at his wife who was reading the newspaper. He saw this image in the newspaper and asked his wife, “What is wrong with that ear?” She, also an audiologist, said, “You need to stop thinking about ears all the time. This is the planet Mars.” What we need to take away from this is that a fresh look is required for every ear we see. Take a careful inspection, left and right, and be familiar with the ear canal and what is normal and abnormal prior to making impressions. There is high variability across ears.

Figure 9. What is happening in this ear? (Nothing. It is the planet Mars.)
Otoblock
After we have done otoscopy and have determined that we are ready to proceed with our impression, the next step is to prepare the otoblock. As I said earlier, cotton is the preferred material, one of the reasons being that it is more malleable. Flattening out the block allows it to take up less space in the ear canal, and this gives more room for a deeper impression. It will allow the material to easily fill the ear canal and eliminate gaps that might result in a blow-by by having that surface flat and broad.
You may choose to lubricate the block with oto-ease or other water-based product, which helps compact the cotton. It prevents adhesion to a sensitive canal wall or the ear drum, if we are in that proximity. It also makes the impression removal more comfortable for the patient.
Some cotton otoblocks have ventilation tubes in them. Those can be very advantageous for deep impressions to relieve the pressure, but they are not required to make a good, comfortable, deep impression. One of the things to keep in mind is that vented otoblocks are designed specifically for deep insertion impressions, and they might not always be large enough to adequately fill the ear canal if you are making a less deep impression, even when flattened.
To position the otoblock, use a curette or some sort of ear light with a non-sharp tip. We want to go as deep as we comfortably can for the patient. Ideally, we want to get beyond the second bend and as close to the ear drum as possible. Regardless of whether we are making a deep impression, that is the best choice for us. It always gives the manufacturer more with which to work. We need to take another look with the otoscope and make sure that the otoblock is placed correctly before we continue.
I know that some audiologists and dispensers do not feel that it is appropriate to use an otoblock every time, but I cannot imagine taking an impression without one.
Sometimes you may find that you want to use a bite block or styrofoam prop to make an impression with an open jaw. They key to this is informing your patient about the bite block prior to placing the material in the canal. The block needs to remain in position the entire curing time, Ideally, you want to have the block in the front of the teeth as opposed to back in the jaw, because that will maintain a more natural jaw position when our mouth is open than the back of the jaw. While a nice addition to your toolkit, it might not be necessary with every impression.
Begin to inject once you have your block in position and are comfortable with it. If you are working with a syringe, be sure that the material begins to cover the syringe tip to a depth of about 3 mm and continue filling the ear; then gradually withdraw the syringe, keeping the tip in the material as you pull back. If you back out too quickly, there may be air pockets or voids.
If you are using a gun, you want to start withdrawing the tip from the canal just before the material starts to touch that cannula. If the cannula becomes covered in that instance, it can result in air pockets or voids. We need to approach the technique differently if we are using a syringe versus the gun. In either case, completely fill the ear and make sure that you are using a safe technique where the hand is braced against the head so that if the patient moves, we are not risking their health.
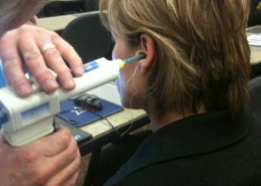
Figure 10. Making an ear impression without proper bracing.
Curing and Removal
Materials take about four to six minutes to cure, but that is dependent on the manufacturer. Take care not to press on the material as it is curing as this could expand the ear and distort your impression. Let it cure naturally. Make sure it has set completely before you start to manipulate the impression.
Gently palpate to make sure that it is set. Then you can start to manipulate the ear and have the patient open their jaw to break the seal. We want to start to manipulate slowly; there is no need to rush. Gently rotate it toward the nose to continue to release the impression from the ear; that it is usually more comfortable than pulling it straight backward. That is where that lubricated ear dam can make the process more comfortable for our patient, and it also makes the removal easier for you.
Take a Second Look
Once the impression is removed, we need to take another look in the ear canal. We need to query our patient about the experience and make sure that they are still okay. We need to take a close look at our impression before we ship it off.
In taking a close look at the impression, we need to note if there are any voids or imperfections that would require another impression, and we need to make note of what the impression looks like and how that relates to our patient’s expectations. The impressions pictured in Figure 11 have some very sharp bends, and this could create some challenges in terms of insertion and comfort if the patient has chosen a hard-shell custom device. If we see something that might impact the choice the patient has made, show them what you are talking about and discuss their options so that they can keep realistic expectations as you move forward.
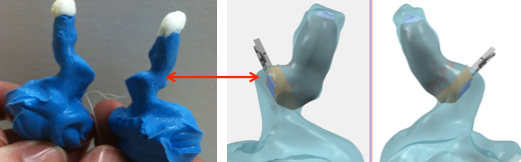
Figure 11. Inspect the impressions to evaluate the anatomy and recommendations for the patient.
Poor impressions can lead to poor fittings, often with accompanying feedback. Feedback cancellation is a big part of our hearing aid programming, but a well-fitted physical product is still critical to be feedback free. To ensure that the impression will allow a tight end product, it should not display any sort of gaps or air pockets. It should fully illustrate both bends of the ear canal and give us a good reflection of the softness of the ear canal and the cartilaginous portion of the ear canal space. That is where we determine what type of material we should be using, whether it has a higher or lower viscosity in relation to the softness of the ear canal and we should note that for our manufacturer to understand.
Also, if we have taken open- and closed-jaw impressions, we need to note which one is which for the manufacturer. Just because we have fantastic feedback cancellation technology available via programming does not mean that we do not need to use some good skill when we are shooting our impressions.
Do and Do Not
Let’s look at a couple of do nots. Figure 12 shows a pink and a blue impression. The pink impression shows a blow-by. If you look closer, you will see a void in the helix area. The blue impression shows a minimal helix area, and the length of the canal is rather short. This could be because a foam block was used and it rolled on its side, which takes up even more space in the canal. This is something that would have been caught during otoscopic examination prior to shooting the impression.
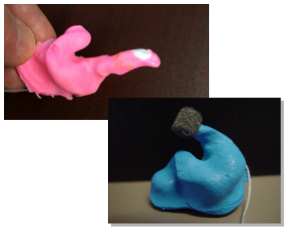
Figure 12. The pink impression shows a blow-by and void in the helix, while the blue impression shows a short canal, void in the helix and otoblock turned on its side.
Figure 13 is a cautionary tale for taking an impression. An attempt at a deep canal impression on an Au.D. student was made. By close inspection, we can see that there was a blow-by. You will also see that the canal narrows and then widens. Trying to remove that impression through that narrow opening was very painful for the student, and this image was taken after the impression had been removed in the emergency room. One final issue that made this very painful was that a low viscosity material was used. While typically we would recommend that for a deep canal impression, with the funnel shape configuration of this ear canal, the impression flexed and twisted at its narrowest point when the removal was attempted, and this made it next to impossible to remove. It also made it incredibly uncomfortable for this student.
Figure 13. Example of poor impression that resulted in removal in the emergency room.
The point of this tale is to recognize that during the otoscopic examination, we should have seen that the canal narrowed and then widened. This would have been a contraindication for a deep canal impression or device, if that was what the patient desired. A shallow impression that did not move into the expanded space would have been recommended, and would have helped us determine what material to use. It is important to take a number of otoscopic looks at different angles before you proceed and make a decision about discussing those contraindications with the patient.
Common Sense Precautions
Here are a couple of common sense notes to keep in mind. Always use the proper tools for the impression material with which you are working. It is important that we know the anatomy of our patient’s ear and the history of that ear as well. We need to be prepared in our infection control practices, and we need to use those practices consistently across all patients. It is also important as we are making impressions using a proper bracing technique so that we can prevent injury to our patient.
This is probably the most invasive aspect of our practices. We need to make sure that we are prepared and that we use good techniques. That is not a suggestion; it is a requirement.
It is our responsibility to give the lab the best representation of the ear canal as possible, with all the information and documentation that they need to build that product successfully.
In the survey by the Au.D. students to various manufacturers, there was little agreement between the labs about materials and techniques. The common denominator in all of that was the professional. Striving to be as thorough in your approach and detailed in the execution is the most important thing that you can do to make successful impressions, which extends to successful products for your patient. An impression that you toss in a box because you think it is good enough is rarely good enough. Ensure that the finished product that you send is full, lengthy, and gives the lab more than they need to build the best earmold, hearing aid, or custom product for that particular patient. Your patients will thank you for that level of care long-term.
There is room for both art and science in the process of making good ear impressions. Better understanding of the science of the types of material choices that are available to you, coupled with the desire for detailed artistry and practice making those skills real, will help you make great impressions.
Citation
Hurley, M. (2015, December). Making a good (ear) impression: Setting up a successful impression-taking protocol. AudiologyOnline, Article 15855. Retrieved from https://www.audiologyonline.com