This is a transcript of an AudiologyOnline live webinar. While some of the slides from the live webinar have been incorporated into this transcript, it is recommended that you download the course handout, which includes all of the slides, and will enable you to get the most out of this text course.
Today we will focus on cerumen management fundamentals as they relate specifically to mechanical removal. Since the time frame is short, it is not realistic to address every aspect of mechanical removal. However, if you have not been involved in this procedure clinically, this presentation will serve as a foundation to build upon as you prepare to move forward with this service to your patient population.
For those of you who have experience with cerumen management, this presentation will review what I consider to be critical aspects specific to mechanical removal, including key factors associated with proper technique that are beneficial to review and refresh in our minds. There is a handout associated with this presentation. Bear in mind I do use a lot of animation, so the handout that you download is not necessarily going to reflect all the animation, but it will provide you with the essential information that you need in the event you want to take notes.
Prior to diving into the mechanical removal of cerumen, it makes sense for us to define what we actually mean, first and foremost, by cerumen management. Cerumen management refers to the strategies, procedures and tools used for the purposes of removing cerumen from the external auditory canal and/or the management of patients with impacted cerumen. The term cerumen management was not coined or intended to provide a sophisticated way to simply say, "cerumen removal." Rather, it is a patient management process whereby we, as audiologists, must make a decision, but then continually assess and reassess our situation, including what is going on with the cerumen impaction and the patient, in order to make yet another decision as to whether or not to proceed, as well as the most effective means of how to proceed.
When faced with a cerumen accumulation, it is important to recognize that the mere presence of cerumen should not dictate the automatic decision to begin cerumen removal. Similarly, just because the cerumen removal process was initiated does not mean it has to be completed. The case history and potential otoscopic contraindications, some that are non-negotiable and will require immediate medical referral, as well as potential contraindications that are influenced by the experience and comfort level of the clinician, must dictate whether or not you are going to proceed with cerumen removal.
There will probably be many instances where the cerumen management process will involve the straightforward and successful removal of cerumen. However, there will be other times where cerumen removal may be contraindicated regardless of the experience level of the clinician. For example, if you come across someone who has otitis externa or who is presenting with ear drainage, you stop, do not proceed, and an appropriate medical referral needs to be made. There will be other occasions where initial inspection of the accumulation seems to be consistent with a straightforward removal, only to be complicated by circumstances that become evident during the actual removal process, requiring one to immediately stop the procedure and appropriately refer.
When it comes to cerumen management, the decision to proceed or not to proceed is influenced by many different factors and can change on a dime. We must continually access and reassess the situation in order to make the most informed decision as to whether or not to proceed with the procedure.
Now let's dive a little bit further into actual cerumen removal techniques or procedures. Cerumen may be extracted from the external auditory canal in one of three ways, or by using any combination of the three. First, cerumen may be removed mechanically from the external auditory canal using a hand-held instrument, such as a curette or a loop. Second, it can also be suctioned out of the ear with the use of specialized equipment in the form of a suction pump. The suction pump is equipped with a rubber tube that connects to a suction tube, which is basically the component that is going to be inserted into the ear in order to suck out the cerumen. Third, cerumen may also be removed by irrigation. Irrigation procedures involve the introduction of water into the ear canal for the purposes of washing the cerumen out of the ear. The goal of irrigation is to introduce a stream of water into the ear in such a way that it is directed to blow behind the cerumen plug, thereby creating the necessary turbulence or back force to push that cerumen out of the ear canal.
So while there are three distinct cerumen removal procedures, today's presentation will specifically focus on mechanical removal. I have a preferential affinity towards mechanical removal over the other procedures that I think are important to recognize. First and foremost, mechanical removal requires minimal equipment investment. For example, you can spend as little as $10.00 and, essentially, have exactly what you need to remove cerumen from a patient's ear. In contrast, you will need to spend at least $30.00, although more realistically, closer to about $100.00, to invest in the basic irrigation equipment needed to remove cerumen, and at least $350.00 to have the minimum equipment necessary to remove cerumen via suction.
Secondly, given the small size, mechanical instruments are much more portable compared to the equipment associated with suction or irrigation. For the most part, suction pumps are heavy and somewhat bulky, and, therefore, they traditionally reside in one location for that very reason. Irrigation equipment may be slightly more portable, but this procedure requires so many different equipment accessories, as well as access to water, that it actually poses some challenges from the perspective of practical portability. Finally, of all the three procedures, mechanical removal, in my opinion, is a much more patient-friendly procedure. The use of suction can be uncomfortable for the patient from the perspective that the suction and action of the tube in the ear canal can become fairly loud. Irrigation techniques require the introduction of water into the ear canal and, you know, no one really enjoys having water squirted in their ears, and this procedure makes most patients more anxious.
Now that we have a better appreciation of what mechanical removal has to offer us as clinicians, the objectives of this presentation are as follows: First and foremost, to review instrumentation that is most often used to remove cerumen mechanically; to outline key aspects related to executing mechanical removal techniques, efficiently and effectively, while minimizing the risk of injury or discomfort to the patient; to briefly introduce the array of light source and magnification options available for facilitating effective cerumen removal; to address critical infection control requirements as they directly pertain to cerumen removal; finally, to briefly evaluate the cost analysis of implementing cerumen management procedures in order to make informed decisions about equipment investment. I will spend more time on the first two points, followed by a much quicker overview of the last three points.
Review of Instrumentation
Mechanical removal of cerumen involves the use of either sterile reusable instruments or disposable instruments that do not attach to any secondary source. Rather, they are simply held by the hand and used to extract cerumen from the ear canal. There are many different instruments available, ranging from curettes, loops, hooks and forceps. Keep in mind that it is not necessary to invest in every single instrument available. Over the next several slides, some of the more popular instruments are going to be reviewed, followed by suggestions as to the minimum instruments to have on hand for mechanical cerumen removal. Some of the names of the instruments will seem a little strange, but that is because they are typically named after the individual who designed the instrument.
The first instrument that I am going to show is my personal favorite, and it is called the Buck Curette (Figure 1), which is essentially a metal rod with a tip that resembles the letter "O." This instrument is available in a variety of sizes, with the size of the instrument determined of the diameter of the tip's lumen or, essentially, how big of an "O" resides at the tip of the instrument. The smallest size starts at 00, followed by 0, then 1, 2 and then size 3. Usually the size of the instrument is etched along the rod itself, but not always.

Figure 1. Various sizes of buck curettes.
The Buck Curette is available with either a straight tip or an angled tip, which is shown at the very bottom of Figure 1. Since the goal of mechanical removal is to place the tip of the instrument just behind or as close to the back of the cerumen plug as possible, an angled Buck Curette is a much better choice than a straight tip, because the 45-degree angle of the angled tip naturally orients the instrument in the most ideal position for effective cerumen removal. If you are going to invest in a Buck Curette, my suggestion is that you invest in an angled Buck Curette. When deciding the size in which you want to invest, for adults, size 2 is a very versatile. Obviously, the smaller the ear canal, the smaller you want the size to be, but a size 2 angled Buck Curette is a perfect starting point.
Figure 2 is the Shapleigh Ear Curette, which basically resembles a Buck Curette but with a tip that is flattened out. It still has an "O" shape, but it is more of an oval "O" with a thicker outer dimension. In addition, the tip of the Shapleigh Ear Curette contains serrated edges. These are designed to provide traction when coming in contact with cerumen for purposes of facilitating its removal. The Shapleigh Ear Curette is available in either a small size, which is a size 1, or a large size, which is a size 2. I have always seen adults in my clinical practice, and I tend to lean towards the larger size or the size 2.
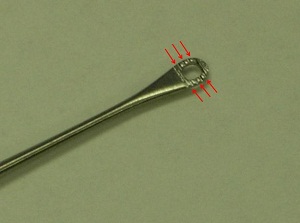
Figure 2. Shapleigh curette.
Figure 3 shows the Billeau Ear Loop, which is an instrument that has a wire loop at its end. The Billeau Ear Loop is available in either small, medium or large. And, again, it is not necessary to invest in all three sizes. But if this instrument is appealing to you, the middle-of-the-road medium size, in my opinion, is a great choice.
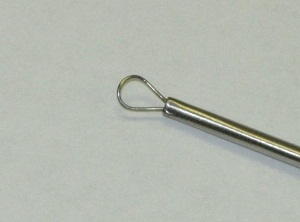
Figure 3. Billeau loop.
There are several hooks available that vary by name due to some subtle differences in their design, but they are often put in the same category of right-angled hooks, because their tips basically maintain a 90-degree angle. Figure 4 shows two right-angled hooks. On the left, we have what is referred to as the Lucae Hook, which has a 90-degree angled tip. The difference is it has a little ball-shaped protrusion on its end. In contrast, we have the Day Hook on the right, which is also a right-angled hook. But unlike the Lucae Hook, its tip is very, very thin. It is extremely delicate. Which instrument to use is mainly going to be a matter of preference; however, there are some exceptions. The importance of integrating a Day Hook, specifically, into your arsenal of tools for cerumen removal will soon become evident.
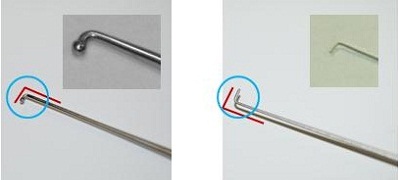
Figure 4. Lucae hook (left) and Day hook (right).
I want to talk to you about forceps. Forceps are used in a variety of applications in the medical field, including cerumen removal. We can see two different types of forceps in Figure 5. We have the Alligator Forceps that are seen on the left, as well as the Hartman Dressing Forceps on the right. Both forceps resemble a pair of scissors; however, the blades of the Alligator Forceps are located at the very end of the forceps, resulting in the opening and closing of the blades only at the very tip of the instrument. In contrast, the Hartman Forceps are designed with blades that open along the entire proximity of its length, which offers a much wider extension of the blade.
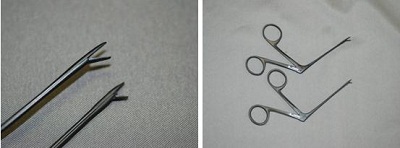
Figure 5. Alligator forceps (left) and Hartman forceps (right).
The Hartman Forceps were actually designed to remove dressing, and they may not be the best choice for cerumen removal because the diameter of the ear canal, along with the extent to which the blades can open and close, makes this an extremely cumbersome instrument to use in cerumen removal. I am not saying that you cannot use it, I am just saying that if you had to choose, a better choice is the Alligator Forceps.
Alligator Forceps are also available whereby the steep instrument has actually been treated with a black powder coating. The nice thing about this black coating is that it is non-reflective, and it absorbs any light that is emitted from your light source during cerumen removal procedures. Alligator Forceps are available in various sizes. The tip of the blades are also available in a straight or pointed model, which is what is shown in Figure 5. There is also a cupped version where the end of the blade actually resembles shallow bowls. These cupped blades are effective, but I will tell you that they require more cleaning after cerumen removal because the cerumen can get imbedded on the bottom of the cupped portion of the tip. In my mind, since the cupped version of the forceps does not really provide any definitive advantage over the straight or the pointed, my suggestion is to invest in the straight or pointed forceps, if that is going to be one of your instruments of choice.
A different-looking type of forceps is what is referred to as the Lucae Bayonet forceps (Figure 6). This instrument resembles a pair of long tweezers that actually has an "S" shaped curve. The advantage of this design is that the curve allows the clinician to hold the instrument in such a way that when it is inserted in the ear canal, the hand holding the instrument falls below the line of sight, allowing the clinician to manipulate the instrument without his or her hand obstructing the view of the ear canal. This is a very nice option to consider in your arsenal of tools.

Figure 6. Lucae Bayonet forceps.
Now, in addition to the reusable steel instruments, there are a wide range of disposable instruments available that resemble many of the steel hand-held instruments. Disposable instruments are essentially comprised of less-expensive materials, and, as the name suggests, they are intended for one-time use only. Now, as we shall soon see, not all disposable instruments and not all steel instruments are equal.
There are key characteristics associated with instrumentation that are important to recognize in order to make the most informed decision as to what you may eventually want to invest in. Mechanical instruments used for cerumen removal will fall into one of two general categories. We have reusable as well as disposable instruments. Reusable instruments will be comprised of steel, whereas disposable instruments will be comprised of either plastic, or more recently, carbon-filled nylon. With regard to reusable instruments, the quality of an instrument will be influenced by several factors, including the grade of steel that is used to make the tool.
Steel instruments may be comprised of either stainless steel or economy-grade steel. There are several classes of stainless steel. Of all the stainless steel classes available, German stainless steel represents the highest quality of metal. So although two steel instruments may look identical, when you compare them in price there is actually a huge difference. Why is that? Well, the reason is because German stainless steel possesses a higher titanium count compared to economy-grade steel, which allows the instrument to be buffed to a much higher gloss during the manufacturing process. Buffing an instrument to a higher gloss basically makes it resistant to corrosion.
In addition to the grade of steel, where an instrument is made is also going to influence price. Instruments that are handcrafted in Germany have historically been recognized as superior. Steel instruments handcrafted in Pakistan have an established reputation of excellent craftsmanship and high quality. So expect to pay more for stainless steel instruments that have been handcrafted in Germany or Pakistan, compared to economy-grade instruments that were crafted elsewhere.
Keep in mind you do not necessarily have to pay the highest price to invest in a high-quality reusable instrument. For example, the previously mentioned Alligator forceps that were treated in a black coating (Figure 5) are made of high-grade stainless steel, but they are actually crafted in New Zealand. The instrument is reliable and of high quality, but available at a lower price that German stainless steel instruments. Ultimately, what instrument you purchase will be a personal decision, with the understanding that you will pay more for higher quality steel and for craftsmanship, and those two things significantly influence quality. So, again, while you may pay considerably less for an economy-grade instrument, you will most likely be replacing that instrument more often than the stainless steel instrument, since the economy-grade instruments are very susceptible to corrosion.
Disposable instruments are also comprised of different types of material that can influence the effect of the instrument in removing cerumen. Many disposable instruments are made of plastic. Plastic is fine, and there are many good plastic disposable instruments available; however, it is really important to inspect the tips by manipulating them and bending them with your fingers so that you get a feel of the sturdiness of the instrument's tip. In my opinion, the plastic tips of some disposable instruments are relatively thin, making the tips way too flimsy. This is a problem because there is a tendency – even to the experienced clinician – to overcorrect and to apply more pressure or force along the ear canal while removing cerumen, to compensate for the flimsy tip, which is actually a perfect storm for potentially introducing iatrogenic injury. It is like trying to cut a tough steak with a plastic knife; it just not that effective.
For disposable instruments, particularly those made of plastic, play around with the tip to get a better feel for the strength of the tip. A flexible tip is fine, but you do not want it to be so flexible that it makes cerumen removal difficult. You should, if you have the opportunity, try the disposable instruments that are comprised of nylon-filled fiber. The material provides a much more rigid tip, and it makes the instrument feel more like a steel instrument, but at the price of plastic. In many cases, it is actually less than plastic instruments.
Mechanical Technique
Now that you have a better understanding of the various instruments that are available and what characteristics influence instrument quality, a logical question at this point is, "Which instrument should I use to remove cerumen mechanically?" This is where the line between instrumentation and technique starts to get a little bit blurred, so we will now move on to the second objective of this presentation, which is the discussion of actual mechanical technique. Which instrument to use is highly dictated by personal preference. Quite frankly, if there was only one instrument available to remove cerumen mechanically, we would all learn how to use that one instrument. Having said that, there are some key factors that will influence the use of one specific instrument over the other.
The first factor is going to be the consistency of the cerumen. Moist cerumen will be more effectively removed with a curette, a loop or a right-angled hook with a substantial tip such as a Lucae Hook than a pair of forceps. If you try to remove moist cerumen with a pair of forceps, you are going to be chipping away at that cerumen accumulation all day long, because the forceps will only be able to pull out cerumen that actually makes contact between the two blades. In contrast, dry cerumen will be more effectively removed with forceps. Latching on to a portion of dry cerumen with forceps allows the clinician to remove a larger mass of that cerumen out of the ear canal than what resides between the blades due to the nature of the cerumen's consistency. Think of it as using a pair of tweezers to pick up a big hairball or a dust bunny in your house. The accumulation of debris, because of its dry nature, tends to stick together and it is much easier to use forceps to move that mass, rather than a curette or a loop.
Beyond cerumen consistency, the degree of the cerumen impaction will also dictate what instrument to use. The general rule of thumb is the larger the occlusion, the smaller the surface area of the instrument's tip. In the presence of a partial occlusion, any instrument can be used, keeping in mind what the consistency of the cerumen is. For example, with a partial occlusion you can use a Buck Curette, a Shapleigh Curette, a Billeau Loop— it really does not matter. In the event of a complete occlusion, you need to use an instrument that has an extremely thin tip, specifically the Day Hook. You may ask, “Why?” The Day Hook's tip is so thin, it will offer the least amount of resistance to the cerumen plug, enabling you to readily break through the weakest portion of the cerumen plug, while minimizing the potential of moving the plug further back into the external auditory canal. If you use an instrument with a larger surface area than that of a Day Hook, you are increasing the chances of pushing the cerumen plug further back into the ear canal, and that is the very last thing that you want to do. Once you create the necessary hole with the Day Hook within the cerumen plug, you can then switch to an instrument that has a much more substantial tip such as a Buck Curette.
Again, there are a number of instruments available to remove cerumen mechanically, and in my opinion, having three is key. For cerumen that is of moist consistency, pick one of your favorite instruments from any number of instruments that are available, whether it is the Billeau Loop, the Shapleigh Curette or, my favorite, the angled Buck Curette. In addition, you will also want to pick a favorite type of instrument for removing dry cerumen. Pick one of the forceps that are available, including the Lucae Bayonet Forceps or possible the NeoZoline Alligator Forceps. In addition, be prepared for those instances where you come across a complete occlusion where you have to create a hole using an instrument that has the thinnest tip. This is where the Day Hook comes in handy. The Day Hook, as I mentioned, has such a thin tip, it offers the least amount of resistance to the cerumen plug, allowing you to create the necessary hole in the cerumen plug without pushing the cerumen impaction further down the ear canal. So, again, pick one instrument to manage moist cerumen, pick another one to manage to manage dry cerumen, and then invest in that critical Day Hook in those instances where you come across a complete occlusion.
Cerumen Removal Techniques
With instrumentation figured out, let's dive further into cerumen removal techniques. There are two important principles associated with proper cerumen removal techniques, and they include initiating the process at the weakest link and ensuring that there is no leveraging of instruments along the canal walls during the removal process. Let's begin with the weakest link and assume that we are dealing with cerumen that is of moist consistency. The weakest link of a cerumen accumulation will vary, depending on whether the cerumen impaction is a partial or complete occlusion. With a partial occlusion, the weakest link is very straightforward and represents any opening in the cerumen plug that will allow passage of a mechanical instrument. Approach the cerumen over the top or bottom, depending on where the opening is (Figure 7). Insert your curette in the ear canal and then beyond the cerumen accumulation, such that you can position the tip of the instrument directly behind the accumulation.

Figure 7. Cross-section of ear with cerumen accumulation in the canal. Note the angle of the curette, positioned for insertion above the accumulation. (Courtesy Sam Kelso, Au.D.)
As seen in this cross section of Figure 7, in the presence of a partial occlusion, our goal is to position the tip of our instrument beyond the accumulation as close to the back end of the cerumen plug as possible. The tip of the Buck Curette is ideally positioned at the back of the cerumen accumulation (Figure 8) in preparation for properly moving the cerumen accumulation toward the opening of the external auditory canal and out of the ear.
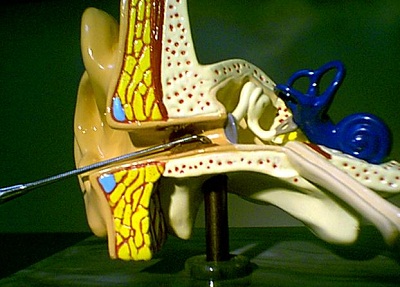
Figure 8. Buck curette placed at the back of the cerumen accumulation through the superior aspect of the ear canal. (Courtesy Sam Kelso, Au.D.)
In the event of a complete occlusion, there is no opening in the cerumen through which to pass an instrument, and it may not be as obvious as to where the weakest link may be in this situation. Due to gravity, cerumen tends to build from the bottom up. Consequently, cerumen that has been in the ear canal the least amount of time and is, therefore, the weakest, will typically be located at the top. Based on this gravity theory, it makes sense to initiate cerumen removal in the event of a complete occlusion at the superior aspect of the accumulation.
However, there are a couple things related to neural innervation patterns at the external auditory canal that we need to take into consideration in terms of more precisely pinpointing where cerumen removal procedures should be initiated. The anterior wall is that part of the external auditory canal located closest to the cheek or the front of the face. The anterior wall of the external auditory canal receives afferent innervation or sensory innervation from cranial nerve V, the trigeminal nerve. This nerve not only moves the chewing muscles, but it also provides feeling to the anterior wall of the external auditory canal. In the event contact is made with this part of the wall with an instrument, the patient is going to respond with a big, "Ouch! You just hurt me."
If I hypothetically remove the anterior wall, you would now see the superior wall or the ceiling in the external auditory canal. The ceiling of the external auditory canal receives the same afferent innervation by the auriculotemporal branch of the trigeminal nerve. So when contact is made with a mechanical instrument at the level of the ceiling of the external auditory canal, the patient is going to respond once again with "Ouch!"
Since the anterior and superior walls are extremely sensitive to touch, in the event of a complete occlusion the weakest link of the cerumen impaction will still be at the superior aspect based on our gravity theory. However, to minimize potential discomfort during the initial removal, once at the top of the cerumen accumulation, orient the instrument tip posteriorly. This will enable you to still access the most vulnerable or weakest portion of the cerumen impaction, but at an ear canal location that is less sensitive to touch or pain.
To put this all together, let's view what needs to occur by looking at the cross-sectional perspective again. With a complete impaction (Figure 9), we want to use an instrument that maintains a very small surface area at its tip in order to avoid pushing the cerumen plug further down the ear canal. As you see in Figure 9, the removal procedure is being initiated with the ever most-critical Day Hook. The impacted cerumen is being approached superiorly with the tool angled towards the posterior wall. At this point, the goal is to work the Day Hook through the cerumen impaction to the back of the cerumen accumulation without worrying about what is going on with cerumen located along the floor of the external auditory canal.
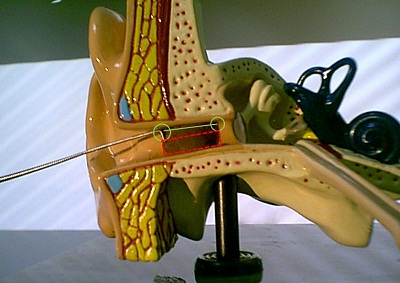
Figure 9. Complete cerumen impaction with the Day Hook positioned on the superior aspect of the accumulation. (Courtesy Sam Kelso, Au.D.)
As we initiate these procedures, our job is to take the Day Hook and simply progress along the superior/posterior aspect of the external auditory canal and try to get to the end of the accumulation (Figure 10). Once again, do not worry too much about the cerumen impaction on the floor of the external auditory canal, but focus on getting that tip at the end. Once we have reached the back of the cerumen accumulation we can now put away the Day Hook and use a different instrument with a more substantial tip, like the Buck curette.
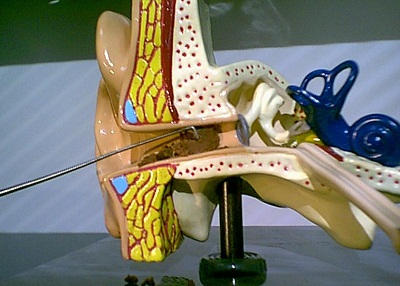
Figure 10. Using a Day Hook to work through the superior portion of the accumulation. (Courtesy Sam Kelso, Au.D.)
No Leveraging
The first principle we talked about was the weakest link in the cerumen accumulation. The second principle critical to mechanical cerumen removal is that of no leveraging. To understand the importance of this principle, we need to remind ourselves of the anatomy of the ear canal. Both the anterior and superior walls of the canal are extremely sensitive to touch and can easily feel pain due to the neural innervation of the afferent portion of the trigeminal nerve. The inferior and posterior walls do not maintain the same afferent innervation and may not be as sensitive; however, these two walls are not numb, and they do feel pain. Unlike other skin surfaces, the skin of the auditory canal adheres directly to the periosteum so it lacks the subcutaneous layer of fat. In the absence of this fat, the lining of the external auditory canal is extremely thin, making it not only sensitive to touch and pressure, but very vulnerable to scratching, bruising, laceration, and, given the ear canal’s profuse blood supply, susceptible to bleeding. Therefore, it is critical to refrain from making forceful contact with the ear canal, even with a blunt instrument at the posterior or inferior walls.
Furthermore, the inferior canal wall receives afferent innervation from cranial nerve X, or the Vagus nerve. This nerve conducts visceral sensations from the thoracic and abnormal viscera while providing motor innervation to the pharynx and the larynx. So if you leverage an instrument with enough pressure against or along the inferior wall, it may not only cause pain, but also a cough reflex where the patient will physically cough or experience a tickling sensation in the throat or a feeling that they need to sneeze. In addition, because of the connection with the Vagus nerve, the application of enough pressure can affect the patient’s blood pressure and you can potentially cause them to faint. Similarly, the posterior wall also receives afferent innervation by the auricular branch of the Vagus nerve. Manipulation along that wall can also cause an individual to cough.
No leveraging means no sweeping, no scraping, and no application of pressure along any side of the canal walls. Cerumen removal is not like “rotor-rootering” a clogged pipe. Rather, it is a sophisticated game of Operation. Although touching any of the canal walls will not cause the patient’s nose to light up or resonate a buzzing noise, it can result in pain, laceration, bleeding and potential infection.
So, now that we have looked at some figures to demonstrate the ideal tip location, now let’s focus on what is actually is happening to the instrument tip as we are removing the cerumen.
If you refer back to Figure 7, you can see that we are approaching a partial accumulation with a Buck Curette. Our goal is to get the tip to the back of the accumulation. With this tip position, I want you to notice the position of the tip in relation to the floor of the auditory canal. There is a definite space between the tip of the curette and the floor of the EAC. As we are moving the curette toward the opening of the ear canal and removing the cerumen, once again, the space between the tip and the floor of the canal is still maintained. This is something that is continues throughout the entire process. This is what I mean by not leveraging the instrument along any of the canal walls.
To put this all together, in the event of a partial occlusion, we want to place the tip over the top of the cerumen and position the tip of the instrument behind the accumulation. Once properly positioned, we move the instrument along, making sure we do not leverage our instrument along the floor or any of the walls of the external auditory canal. With a complete occlusion, we want to strategically initiate removal at the weakest and least vulnerable link, which is the superior-posterior aspect of the accumulation. You will create a hole in the superior-posterior aspect with a Day Hook (Figure 9) , and then once you have made a sufficient hole, you can proceed with a more substantial instrument (Figure 10). Once again, you have to make sure that you are not leveraging the curette along the floor or canal walls of the canal.
Light and Magnification Sources
Now that we have spent the majority of our time on the two most important topics, I want to make a couple of comments about light source and magnification considerations. There are a variety of light sources from which to choose, from a pocket lamp with a wire loop to a much more expensive head light. It is much more critical to be able to see what you are doing, so for cerumen near the opening of the ear canal, a pen light with a wire loop might be sufficient. But if you are dealing with an impaction deep in the ear, it is important that you consider a light source with magnification so that you can make sure you can see what it is you need to see.
The Bionix lighted instrument (Figure 11) is available in five different styles, ranging from a loop, a scoop to a Buck curette. A magnification lens attaches to the neck of the light source, which does provide sufficient magnification for the lower-hanging types of accumulation. The disposable curette interfaces with an LED light source, which provides illumination along the entire length of the curette. So once you put that curette in, it lights up the entire ear canal. If you have a choice, you should try this out because it is pretty amazing. It is packaged in boxes of 50 tips with one light source. It runs about $80 a box.
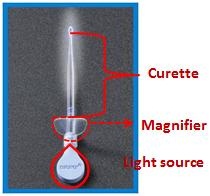
Figure 11. Bionix lighted curette with magnification lens.
The same company, Bionix, also recently came out with a lighted forceps (Figure 12). It looks a little funny, but it functions the same as any other forceps. It comes packaged with 10 tips and one light source for around $100.
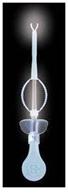
Figure 12. Bionix lighted forceps.
Another popular light source is the otoscope. People like it because they usually already have an otoscope, and in addition to light, it also provides magnification. There are many different ones to choose from. There is the operating-head otoscope (Figure 13), which is one of my favorite things to use for light and magnification when removing cerumen from the ear canal. It is going to be a matter of preference. There are a variety of video otoscopes including the Dino Lite (Figure 14) and the Welch Allyn digital MacroView video otoscope (Figure 15). The MD Scope is a hybrid video-otoscope (Figure 17), although it might not be a good choice because the LED screen is so large that it makes it difficult for you to pass an instrument into the ear canal and see what you are doing at the same time. Otoscopes can be used, but you just have to be sure to try them out before seeing a patient.
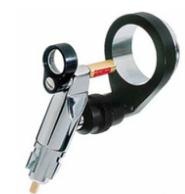
Figure 13. Operating head otoscope.
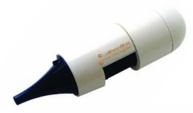
Figure 14. Dino Lite video otoscope.
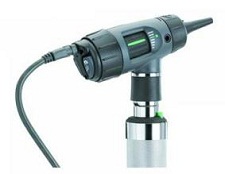
Figure 15. Welch Allyn MacroView video otoscope.
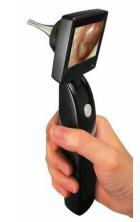
Figure 16. MD Scope handheld video otoscope with LED screen.
There are a variety of headlamps that are available as well. There is a tremendous benefit to using a headlamp, in that it does provide hands-free illumination. With the light on the head and the hands free, it is much easier to manipulate the ear and remove the cerumen than it is with a hand-held light source, such as an otoscope. There are a variety of headlamps available and they do vary widely in price. The bottom line is that you get what you pay for.
For example, the Megaview Loupe LED headlight (Figure 17) is about $120 compared to the $800 Welch Allyn Solid State procedure headlight (Figure 18). The Heine Loupe LED headlight runs about $2500, so obviously you can see that there are stark price differences there.
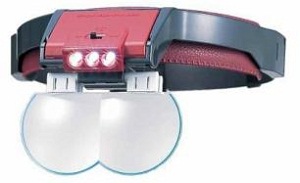
Figure 17. Megaview Loupe headlight.
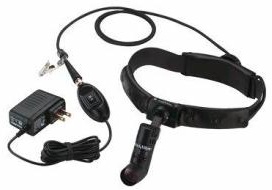
Figure 18. Welch Allyn Solid State procedure headlight.
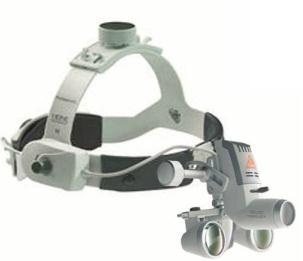
Figure 19. Heine Loupe and LED headlight.
With the $120 headlamp, the light source is not as robust, and the magnification is not as great. In contrast, the Heine lamp (Figure 19) provides an unbelievable 3D view of the ear canal. It is as if you are looking at an ear under a microscope.
When investing in a headlamp, remember that all headlamps will offer a light source, but not all offer magnification. When it comes to cerumen management, if you are investing in a headlamp, you want to make sure that the headlamp provides both illumination and magnification. For example, the Welch Allyn Solid State headlight (Figure 18) provides illumination but not magnification.
Sometimes the question is asked, “Which should I use for cerumen removal- an otoscope or a headlamp?” My response is that it depends. First and foremost, you need to choose the correct light and magnification source to allow you to perform cerumen removal in a safe and consistent fashion. One of the things you need to ensure you can do properly is brace the patient’s head. When you are making a decision as to what you want to use for a proper magnification and light source, you need to choose something that will allow you to properly brace the patient’s head.
When mastering proper bracing, there are two things you need to realize. First, patients have two ears. Often the mistake is made that clinicians only practice on one side of the patient’s head. For example if you want to use an otoscope for your light source, you want to make sure that you can properly brace the mechanical instrument that you are going to be handling. If you are a clinician and your dominant hand is the right hand, and you are going to be working on the right ear, Figure 20 shows proper bracing. If you want to use an otoscope, you need to pull up and back with your non-dominant, or left hand (Figure 21). An easy way to do that is to position the pinna at the level of the helix between the pinky and ring fingers, pull up and back, and then place the otoscope in the left hand and hold it there. Make sure you can hold the otoscope and properly brace the patient. If you can do this, so far, so good, but do not celebrate just yet. If you cannot do this, you cannot use an otoscope as your light source.
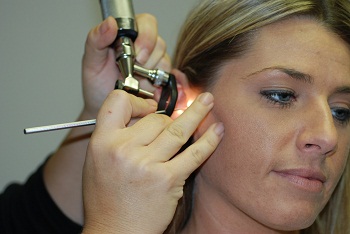
Figure 20. Proper bracing on the right ear when using an otoscope as the light source.
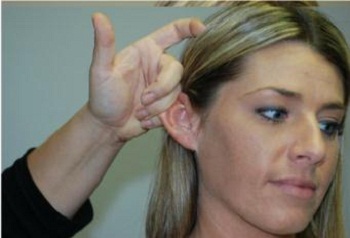
Figure 21. Proper hold of the right pinna when attempting to use an otoscope as the light source for cerumen removal.
When your dominant hand is the right hand and you are working with the right ear, it is very easy. The real test is working on the opposite side of the head of your dominant hand. In this situation (Figure 22), I am holding the instrument in the patient’s ear with my right hand and bracing behind the pinna on the mastoid. In order to pull up and back, I still have to use my left hand, but given the fact that I am on the opposite side of my dominant hand, the hand position becomes a little awkward. It takes practice to learn how to hold the otoscope. If you cannot do this initially and properly brace, practice. If this technique does not come to you relatively quickly, you are not going to be able to use the otoscope. You need to invest in a headlamp.

Figure 22. Proper bracing for right-handed cerumen removal on the left ear.
Infection Control
Infection control is the conscious management of the environment for purposes of minimizing or eliminating the potential spread of disease (Bankaitis & Kemp, 2003; 2004). It is based on five standard precautions that many are familiar with. However, when it comes to cerumen removal, the one precaution that becomes most important is that critical instruments must be sterilized. A critical instrument is one that is directly introduced into the bloodstream, comes in contact with mucous membranes or bodily substances, or can easily penetrate skin from use of misuse. Any reusable instrument that is used for mechanical removal of cerumen is considered a critical instrument, and you will be required to clean and sterilize it prior to use.
Cleaning means that you first remove any gross contamination that you can see. It does not necessarily mean that germs are killed. Sterilization is the process whereby all germs are killed, and you have to use specific products to kill the germs. Sterilization is performed on anything that you intend to reuse for cerumen removal. Do not confuse sterilization with disinfection. Disinfection does not involve a process where all germs are killed; it may involve a process where some germs are killed.
So how do you sterilize? If you have access to an autoclave, great. If you do not, you will need to perform cold sterilization, which requires investing in a tray and specific products. These products are required to have at least 7.5% of hydrogen peroxide as an active ingredient, as in the product Sporox, or at least 2% of glutaraldehyde, as does Wavicide. You need to read the instructions, because you are required to soak the instruments for a certain period of time to achieve sterilization, and it varies between products. Also, the number of days you can use and reuse the products are different, and you need to know when to dispose of the solution and replace it. Read the instructions.
Cost Analysis
People ask, “Should I use reusable or disposable instruments?” This is going to be based on a number of factors, one of them being cost analysis. If you assume that you will have 250 business days out of the year where you are doing two removals a day, that means you are performing cerumen removal on 500 patients annually. When you start adding up the cost of what you are going to need, you can compare that it costs $350 in the first year for reusable products and $500 for disposable products. The next year, because you have already invested in the reusable products that you will not need to buy again, the cost will be significantly less than the disposable products for which you will pay the same amount every year (Figure 23). If you do not remove as often, maybe only once a week, you will still have to look at the breakdown of cost and investment.
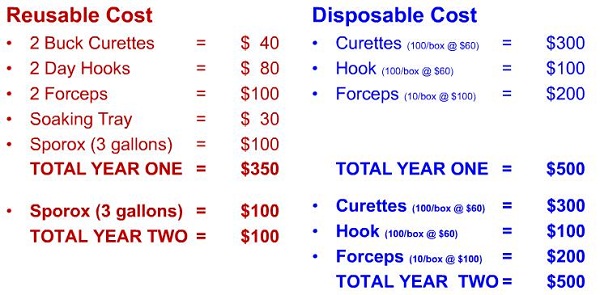
Figure 23. Cost analysis of reusable versus disposable products for two years, assuming that 500 patients are seen for removal annually.
Summary
When it comes to mechanical removal, remember that it offers advantages over other techniques that I discussed. You need to make sure you invest in the necessary instruments, which is mostly a matter of preference, but there may be some other contributing factors as well. In terms of technique, remember to start at the weakest link of the accumulation and do not leverage your instruments. Use a proper light and magnification source. Brace properly. Sterilize reusable instruments. Lastly, use your resources, one of which is my blog ([email protected]). There is a section there on cerumen management to which you can subscribe and receive information and notifications. Thank you for your attention today.
Question & Answer
What is the general shelf life of a cold sterilant?
Most of these products have a long shelf life unopened, but once you open it, the expectation is that you will use it within six months.
What is the status of cerumen management as it relates to scope of practice?
About 5 years ago, there were a handful of states, such as Pennsylvania, that said audiologists could not remove cerumen. However, most states that have audiology licensure say that if it is within your scope of practice and you have experience doing it, then you can proceed. That is something you will need to look at individually in your own state.
Is there anything we can use quickly to clean the instruments?
You can basically use a Kleenex to clean it if you are going to be using it on the same patient, but if you are going to use that instrument on another patient, you have to sterilize it. Recall that cleaning and sterilizing are not the same thing.
Do you have any recommendations for cerumen softening drops for the various types of cerumen?
Yes. I would tell you to invest in whichever cerumen softening product costs the least, because they all have the same active ingredients. Quite frankly, Audiologist’s Choice is the least expensive I have seen from what is out there.
What should you use if the ear canal starts to bleed?
Hopefully, with the technique I reviewed that will not happen, but if it does, use an ear dam or a long Q-tip and have a bottle of Afrin. In the event of a bleeder, spray the Afrin on the ear dam or Q-tip and let it sit in the ear canal for about 30 seconds.
References
Bankaitis, A. U. & Kemp, R. J. (2003). Infection control in the hearing aid clinic. Boulder, CO: Auban.
Bankaitis, A.U. & Kemp, R.J. (2004). Infection control in the audiology clinic. Boulder, CO: Auban.
Cite this content as:
Bankaitis, A.U. (2013, January). Mechanical removal of cerumen. AudiologyOnline, Article 11446. Retrieved from https://www.audiologyonline.com/