
Editor’s Note: This text course is an edited transcript of a live webinar. Download supplemental course materials.
Learning Objectives
- Participants will be able to describe the advantages and disadvantages of the different types of surgical ear reconstruction for Microtia.
- Participants will be able to explain the timing and options for Microtia surgery and bone anchored hearing devices.
- Participants will be able to describe the technique of combining ear reconstruction and a bone anchored device in a single outpatient surgery.
Introduction
Dr. Sheryl Lewin: Today we are going to discuss microtia ear surgery and bone anchored hearing devices. A non-traditional path led me to where I am today, and it does influence my take on this topic. I studied architecture and art in college and planned to get a master’s degree. Towards the end of college, I decided to switch courses and go to medical school. That required extra training, but ultimately, as a medical student at Stanford I discovered what plastic surgery is all about.
We treat every type of congenital facial deformity such as cleft lip, birthmark, microtia, et cetera. When I saw these conditions, I knew I wanted to do craniofacial surgery with a specialty in microtia surgery. Plastic surgeons are not often the ones putting in the bone anchored systems. However, it came to my attention that it would be convenient to place the bone anchored hearing system during the microtia reconstruction surgery, combining both into one surgery and saving an anesthetic for a child. I am not specially trained in hearing, but my craniofacial training makes me familiar with bony surgery and soft tissue surgery of the face and head.
There are three ways that we can approach microtia. All the options should be on the table for each family, and we are very respectful of the decision a family makes after careful evaluation. One option is no treatment, and that is an option for everyone. The next is prosthesis, and the third is surgery. As for hearing options in unilateral microtia and atresia, there is an option for no treatment, bone anchored processor on a softband, implanted bone anchored hearing devices, and then canal surgery, commonly known as atresia repair. Today we will discuss prosthesis, surgical options and bone anchored hearing devices.
Microtia
Microtia is a fairly rare condition, although it is the bulk of what I do. Those of you who are audiologists may have less than a handful of these patients. Microtia means small ear. Figure 1 shows a progression in microtia severity from the top left corner to the bottom right corner.
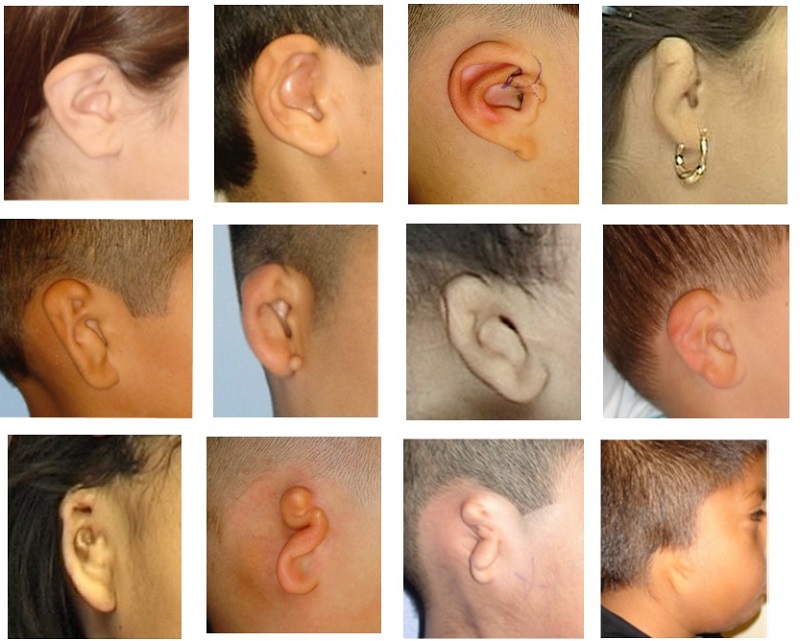
Figure 1. Progression of microtia severity.
The cause of microtia is still a mystery. We do not understand what components are genetic and what components are influenced by the environment. In the literature, 3% to 34% of patients have a genetic component. The number of babies born with microtia is estimated to be between 1 in 2,500 to 1 in 12,000, depending on several factors. Certain areas have a higher incidence such as Asia and parts of Latin America, especially Ecuador. We do see it more commonly in boys than girls, and on the right side more than the left. A smaller component of children have bilateral microtia. In that case, the Softband is required. Those patients can do extremely well with conductive hearing aids. More than 90% of patients with microtia and aural atresia have a conductive hearing loss.
Microtia occurs in conjunction with certain syndromes as well. The three most common are Treacher-Collins syndrome, hemifacial microsomia, and Goldenhar syndrome or Oculoauriculovertebral (OAV) syndrome. Not all ears are created equally, and even what is considered a “normal ear” has high variability. The surgeon has to take that into account. Ultimately, we are going for the best symmetry possible. If you have one unaffected ear, we want to match it. Similarly, all microtia ears have variability. It is critical to analyze the specific anatomy preoperatively and in the operating room to get the best possible result. I spend a great deal of time focusing on these anatomic differences.
Microtia Grading
The microtia grading system is a way that physicians or clinical healthcare workers can discuss the level of severity (Figure 2). Grade 1 is a small but almost normal ear. Grade 2 is almost like half an ear. The lower 50% is close to normal, but the upper half is not. Grade 3 has a very small rudiment of soft tissue. This is used as the ear lobe, and having one makes for a much better reconstruction. If you have no ear canal and no remnant of a pinna, it is Grade 4, which is the most severe.
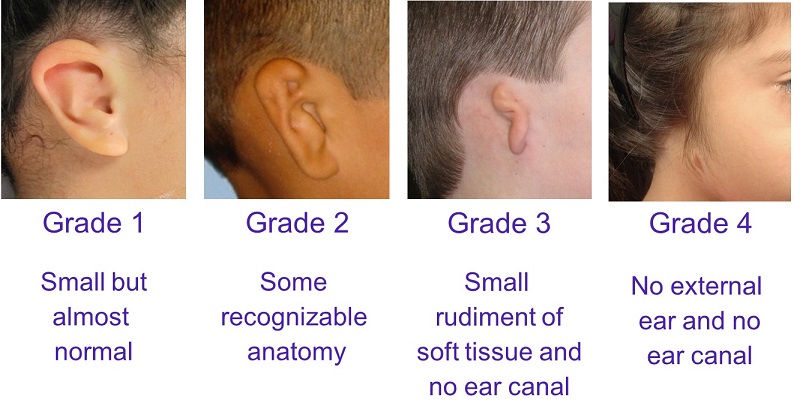
Figure 2. Microtia grading system.
Figure 3 is a picture of a typical ear. From a surgeon’s standpoint, the ear is a complex, three-dimensional structure. When we have two normally formed ears, we do not think how challenging it would be to try to make one from essentially nothing. What is required surgically is structural support and soft tissue coverage. We will go over how we do that in the operating room.
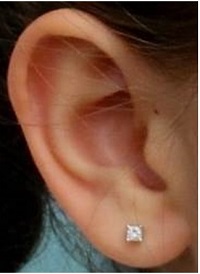
Figure 3. An example of a normal ear.
Most plastic surgeons would agree that ear reconstruction is an extremely technically difficult surgery. My background in art and architecture and sculpting played into my desire to create these ears for my patients. To me, the psychosocial concerns of being born without an ear and hearing restoration cannot be underestimated. My respect for hearing restoration is what pushed me to try bone anchored systems.
Ear Prosthetics
A prosthesis is something that an anaplastologist will develop. It is silicone, almost like a sculpture or model that matches the opposite ear. When the prosthesis attaches without surgery, we call it an adhesive retained prosthesis. A surgical prosthesis is an implant-retained prosthesis. It is almost identical to the bone anchored hearing implant. A post is implanted into the skull and allowed to osseointegrate. Then a magnet on the prosthesis will click into place on that. Figure 4 shows both implant and adhesive retained prostheses.
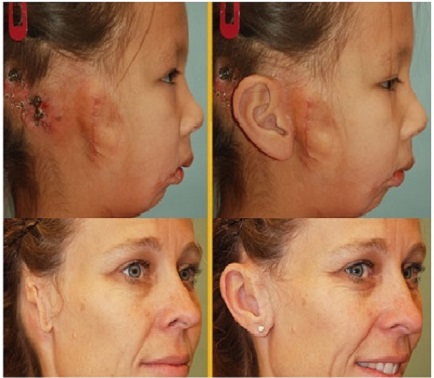
Figure 4. Implant retained (top) and adhesive retained (bottom) ear prostheses.
Surgical Reconstruction
As for the surgical reconstruction for microtia, there are two basic techniques: the rib cartilage or rib graft technique and the Medpor technique, which is the one that I practice. Figure 5 shows an example of the prosthesis, rib cartilage and Medpor outcomes.
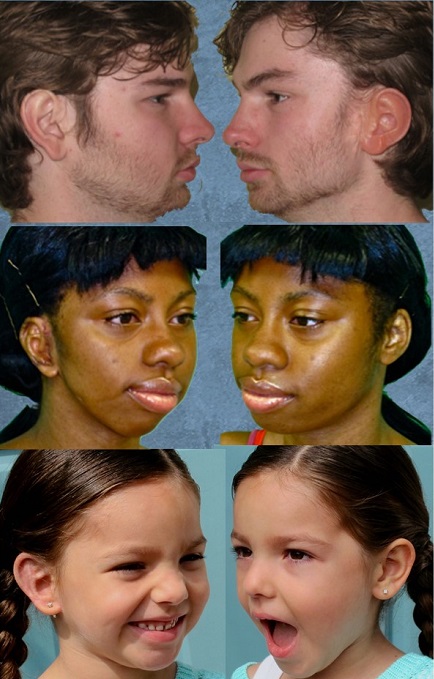
Figure 5. Comparison of prosthetic (top), rib cartilage (middle), and Medpor (bottom) outcomes.
The top photograph in Figure 4 is the implant retained ear. The form and appearance of the ear is quite beautiful, and there is no surgery to date that can do this. However, if you look at the left sided-picture, which is when the implant is not on the patient, you can see that there are some issues with this magnet and prosthesis causing irritation and redness. You can also see that she has a bone anchored implant above and behind her implant required for the prosthesis.
Advantages
There have been some nice advancements in the adhesive retained prosthetics, and I appreciate that these patients do not have to undergo surgery. There is nothing that cannot be reversed, because nothing is removed. The advantages of the prosthesis is that it has a very realistic appearance. It does not add scars on other parts of the body, unlike surgical microtia, which does scar when skin grafts are required. It is particularly good for a failed ear surgery where a patient has exhausted all of their options and has excess scar tissue.
Figure 6 shows one of my patients. This is a surgical prosthesis. Although independently it is a beautiful ear, you can see some differences right away, the first one being the color. The skin on the ear, like every other part of your body exposed to sun, will change with the seasons based on exposure and climate. The white arrows point to the area where the prosthesis is connected to the skin. It is a little more obvious in person than on the photograph, however, many people can use their hair to minimize this, although that is easier for women than men.
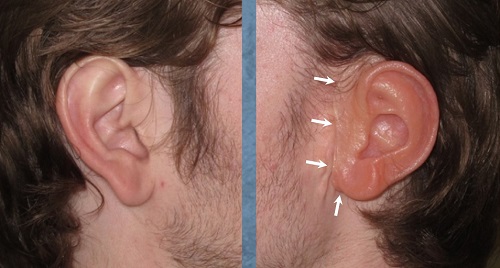
Figure 6. Prosthetic (right) versus normal ear (left). White arrows indicate connection to the skin.
At the end of the day, the patient is still reminded that they do not have an ear. The prosthesis is taken off and it has to be cleaned and maintained. The scar tissue, implant posts or bare skin are again visible. Although it is a wonderful solution in many ways, I think there are certain issues with it that bear understanding.
Disadvantages
Even with the surgical abutment, which is a much stronger attachment than the adhesive, the ear can fall off for anyone, which would be very distressing. Much like surgery, the outcome depends on the skills of the anaplastologist. Daily care of the prosthesis is necessary. There is a time limit to how long these last; two to five years is typical. They can get lost, damaged or destroyed. Skin tones, as we discussed, can vary, and there can be issues with wound healing in the surgical options.
Rib Cartilage Surgery
Rib cartilage surgery is the traditional surgical method that has been used for over 50 years. In this technique, you take a portion of the rib cartilage to make the ear and place the framework (Figure 7) under a pocket of skin that is in the scalp. The important thing to understand is that it uses the patient’s own tissues.
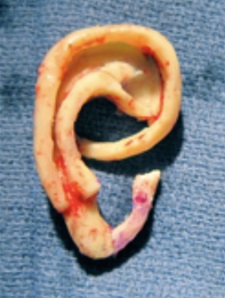
Figure 7. Rib cartilage framework.
Figure 8 shows a grade 3 microtia with cartilage and lobular remnants. The picture on the right is our drawing for this young woman, who was 14 at the time of surgery.
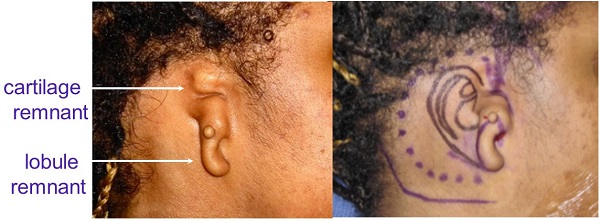
Figure 8. Microtia patient who will undergo rib cartilage surgery; the preoperative drawing is shown on the right.
Figure 9 is a drawing of the rib cage and the incision line that we use to harvest the rib cartilage between ribs six, seven and eight.
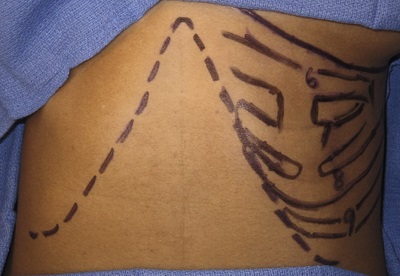
Figure 9. Preoperative drawing of the rib cage and ribs from which cartilage will be harvested.
Figure 10 shows the removed cartilage and the design framework for how the cartilage will be utilized. There is a layering technique, almost like a three-dimensional puzzle, to get the final form of the ear (Figure 11).
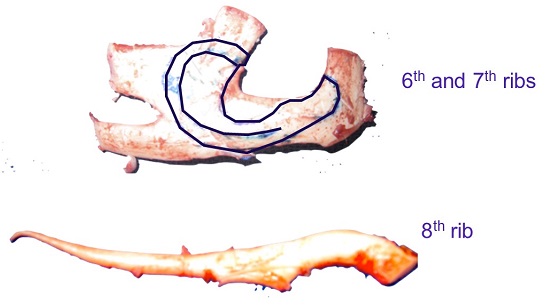
Figure 10. Framework as to how the cartilage will be used for the ear.
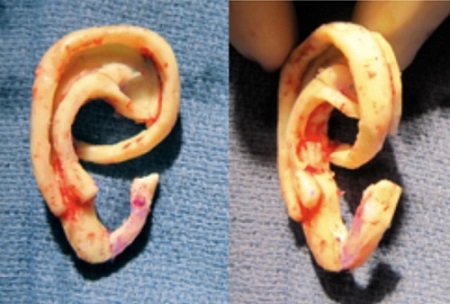
Figure 11. Final shape of the ear from the rib cartilage.
Both ear cartilage and rib cartilage are considered cartilage, however, they are not the same and have very different purposes. One is delicate and thin for the purposes of funneling sound waves into the ear, whereas the other is quite hard in order to protect the lungs from being punctured. These differences become apparent in the reconstruction.
Figure 12 shows the preoperative design on the left with the rib cartilage placed on the right. A drain will suction the skin down around this form, with the postoperative result shown in Figure 13. It is flat to the head with decent definition, but it is two-dimensional and will require other surgeries to improve the overall appearance.

Figure 12. Rib cartilage framework placed under the skin.
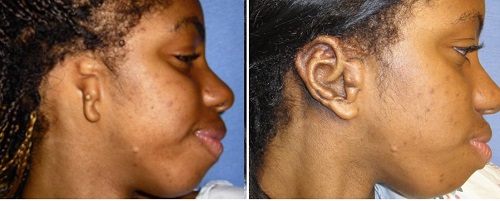
Figure 13. Before and after the first rib cartilage surgery.
Here she is three weeks after having her third surgery (Figure 14).
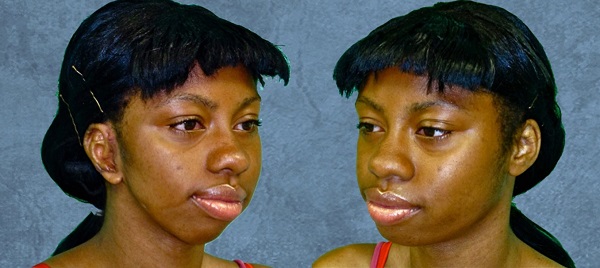
Figure 14. Three weeks postoperative after the third surgery.
Advantages
This technique is very well established. It uses the patient’s own tissue, and you can get good results from experienced people who do this surgery as their career. It should last a lifetime. These are stable structures for at least 50 years’ time.
Disadvantages
The disadvantages are that the results are not as realistic as I would like, and you have to delay the surgery until a child is six or older so that the rib cage is large enough to make an adult-sized ear to match the opposite side.
This surgery does require inpatient hospitalization. It can be painful for these patients, so they require either pain pumps or epidurals to treat the pain of the chest wall. It takes a minimum of two surgeries, but up to four in certain techniques, and requires technical expertise for consistent results.
Medpor Implant
My goal with microtia surgery is to create a realistic appearing ear, as symmetric as possible to their other side, which can be reconstructed at a young age with fewer surgeries in a less invasive way with minimal pain. Although we are not meeting all those criteria perfectly, I feel like the technique I use does accomplish these goals.
Figure 15 is a picture of what the Medpor implant looks like today. It is a one-piece frame, not a plastic rib framework. It sits on top of the scalp, is three-dimensional, and uses the patient’s own tissue.
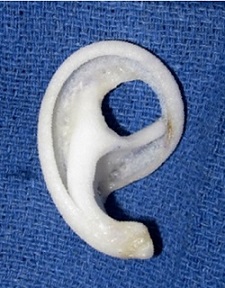
Figure 15. Medpor ear prosthetic.
The material is porous polyethylene. It has holes that create a lightweight but strong implant. These pores are 100 microns big, which allows the body’s tissue that is used to cover the implant to grow into it.
A common concern is how we do this on three-year-olds if the ear continues to grow. We have studied extensively how the ear grows and many studies have shown that a three-year-old has 80% of a full grown adult ear, and a seven-year-old has about 90%. We simply do a three-year-old knowing that the ear is going to grow 20% and we adjust for that in our design.
The Medpor can be done at three years, but the rib cartilage cannot be done until six years, and even ten years in some circumstances when the child’s rib cage is not large enough. This is where I think early reconstruction has a psychological advantage.
The Medpor Technique
The following video shows how the Medpor surgery is performed. This is of a classic patient with grade 3 microtia and aural atresia on the left side. Again, we look at the unaffected ear and get an idea how the reconstructed ear should look. The implant comes in two pieces before they have been modified. We draw the opposite ear and then we sculpt the implant in the operating room. We weld with heat the two pieces together to make them strong.
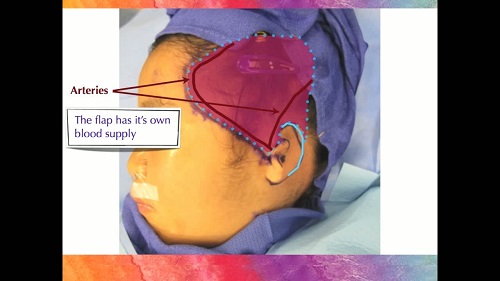
We use a very small incision, and through this incision, we can retrieve a membrane from under the scalp called the TPF flap. This thin membrane has its own arteries, veins, and nerves. The outline of the flap is drawn on the scalp, but it sits under the hair, skin, and fat. That living membrane is then used to cover the implant once it is in place. When we put suction on the flap, the flap pulls down over the implant and creates the ear. That ear can then be covered with skin grafts.
You saw the progression of healing from the day of surgery through three months. By two months, we have better definition and appearance of the ear, and the color of the skin grafts will continue to improve for many months.
Medpor Surgical Results
I want to show you some of my patients’ results. Figure 16 is a three-year-old boy before and after surgery. You should notice that the right ear that was reconstructed looks larger than his opposite ear. That is taking into account the 20% predicted growth.
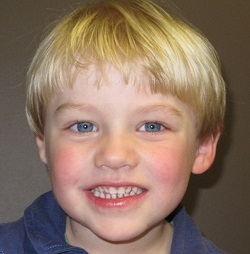
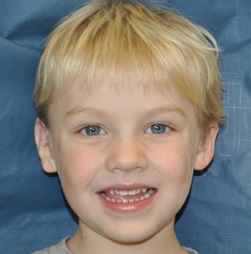
Figure 16. Before and after of three-year-old boy with Medpor on the right ear.
Another view of the surgical ear and unaffected ear are shown in Figure 17 as the boy has aged.
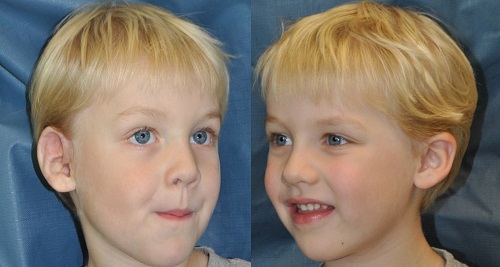
Figure 17. Medpor surcial ear (left panel) compared to the unaffected ear (right panel).
Figure 18 shows a 3-year-old girl with the affected ear and unaffected ears for comparison. Figure 19 shows her after the Medpor procedure.
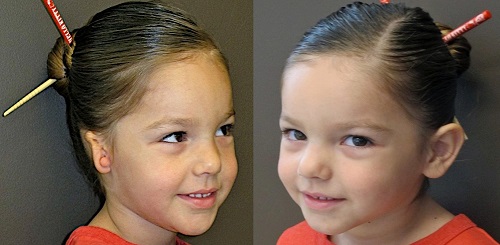
Figure 18. Three-year-old girl before surgery.
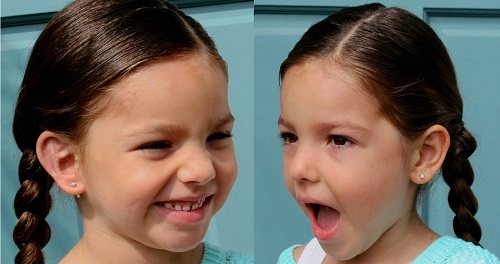
Figure 19. Three-year-old girl after surgery (left panel), compared to unaffected ear (right panel).
This little girl is famous on our website by being in a video for children that has helped teach them about the surgical process (www.microtiaearsurgery.com).
Figure 20 is another little boy who is also grade 3, with before and after pictures. He did also have a canal surgery behind his remnant.
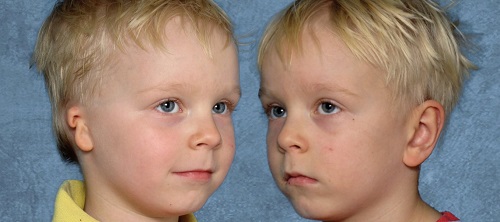
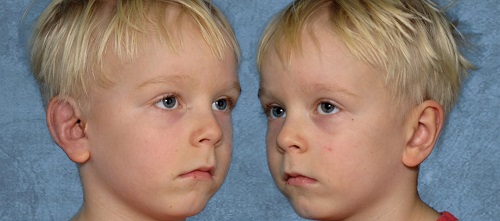
Figure 20. Grade 3 microtia patient, before (top) and after (bottom).
Sometimes we have children who have a prominent ear, like the boy in Figure 21, and we can pin the prominent ear back a little bit and create a symmetric ear on the affected side as well. This boy has grade 2 microtia on the right ear.
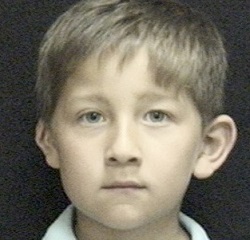
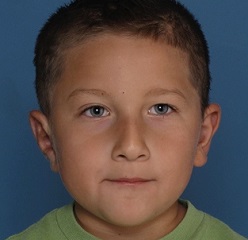
Figure 21. Prominent ear and microtia, where the prominent ear was pinned back and the Medpor technique was performed on the right ear.
This boy is a bilateral patient (Figure 22). He has grade 3 microtia, but the ears are a little different on the two sides. He has had one operation on each side, and we did the bone anchored implant at the same time.
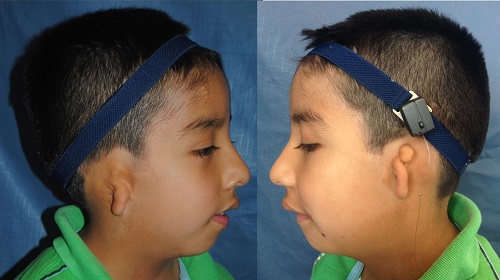
Figure 22. Bilateral microtia patient before and after.
Advantages
I want to give you my admittedly biased views about this technique. I believe that this is a more realistic outcome. Additionally, we can create symmetry in just one outpatient surgery (Figure 23). No time is spent in the hospital because it is relatively pain free.

Figure 23. Teenage girl with right-ear Medpor.
I love that the surgery can be done as young as three years. I truly believe that this decreases anxiety and teasing when surgery can be done early. This technique is also excellent for adults.
Another advantage is that there is very little pain involved with this surgery. There is some soreness afterward. I usually tell families that there will about three days of a fussy, unhappy child, although the younger you are, the quicker they recover.
Modifications to the technique over the last ten years have reduced scarring so that it is very minimal now. In 2006, I developed a technique to make that small incision behind the ear to do the whole reconstruction. This little boy who wears a very short haircut, both pre-op and post-operatively, has no scalp scars (Figure 24).

Figure 24. Side views showing no visible scars.
Disadvantages
There are disadvantages to this procedure as well. One of them that this a synthetic material. It does not behave the same as cartilage in the same situation. Natural cartilage does heal an open wound better than Medpor.
In addition, the first Medpor was done in 1991. Beyond that 23-year time span, we do not know the longitudinal outcomes. However, the nonporous form of Medpor has been used for many years beyond that.
If the Medpor becomes exposed it will not heal the way a rib cartilage ear will heal. That is critical. You have to understand there is always that risk, and it is challenging sometimes to treat those children if you do not have a lot of experience.
There are complications with any surgery. All surgeries have bleeding and infection, but the rate of complication is very small in this particular population of patients. Exposure is a hole, meaning that the implant is visible; this is not the body rejecting the implant. I cannot stress enough that when you get an exposure, it has nothing to do with the Medpor; it has to do with the flap in that spot. The flap has to be healthy. If there is a spot that is not healthy or does not have good blood supply or is sitting too thin, then it will not support the skin graft above it, and it will not be able to heal. We had an issue with fractures, particularly in 2010 and 2011. The new implant style has dramatically made that fracture issue go away. Failure is rare, but is a risk. Personally, it has been years since I have had a failure.
Options for Aural Atresia: Bone Anchored Devices
I want to talk about the options for aural atresia. If it is unilateral, you may choose no treatment, but parents usually are considering whether or not to do a bone conduction hearing device or atresia repair.
The hearing loss in these cases involves the outer and/or middle ear. With grade 2 microtia, you can have normal hearing, but most of those patients have a conductive hearing loss where the bone conduction is normal, but air conduction is not.
Bone anchored devices convert sound into mechanical vibrations. This creates the driving force, allowing us to bypass the ear canal and middle ear, allowing the processor to go through the bone directly to the cochlea.
Advantages and Disadvantages
One advantage is that we have better sound conduction. To me, these devices are very low risk and high reward in comparison to atresia surgery or canal reconstruction, which is a complex surgery that can have a good reward but is less reliable. I consider canal surgery higher risk and harder to determine reward. Bone anchored hearing devices allow for better sound localization, if we can get both ears hearing within a close decibel range.
The disadvantage is that bone anchored hearing systems require a surgery. There can be wound issues and/or infection, as well as the appearance.
Direct Drive versus Skin Drive
Drive refers to the driving force or the processor, or its vibration. Direct drive means the vibration is in direct contact with the bone. That is where the implant has been osseointegrated and the processor is directly stimulating the bone through the titanium implant. Skin drive is where the vibrating processor is sitting on the skin; it is not in direct contact with the bone.
Direct drive is clearly the most efficient route for bone conduction and will have the best fitting range. Understandably, skin drive has a loss a transmission of at least 10 dB as compared to direct drive. This limits the fitting range.
In terms of direct drive devices, there are transcutaneous implanted transducers, bone conduction implants (BCI) and the Bonebridge. These are not commercially available in the United States, and I have never participated in these procedures. There is also percutaneous solutions with the Oticon Medical Ponto and the Cochlear BAHA Connect. Those are the devices that I offer my patients.
In addition, we can do skin drive. This includes implanted magnets, such as the BAHA Attract and Sophono products. The one most commonly used on our under-five-year-old demographic is the processor on a Softband. There are still some using headbands as well.
Components
The parts for the hearing device (Figure 25) are the titanium implant, which is surgically implanted into the skull. The second part is the abutment, which connects the implant to the outside world through the processor, which is the third part.
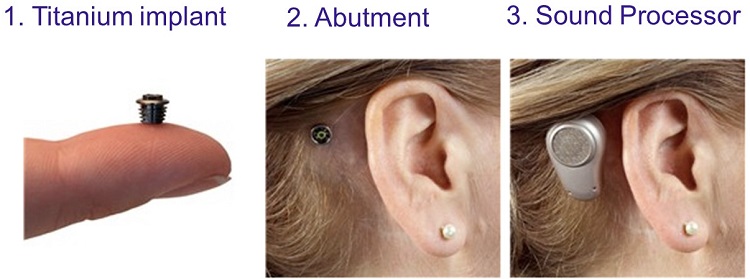
Figure 25. Three parts of a bone anchored system (Oticon Medical Ponto Plus).
To perform the surgery percutaneously, you determine placement based on a 50 to 55 mm distance from the patient’s ear canal. Then you create a 2 to 4 cm incision in front of that area and place the implant, and attach the processor.
The transcutaneous system such as the Sophono and the Cochlear Attract require a larger incision because the magnet is 27 mm across, maybe a little smaller than a quarter. To get that area, you have to make a semicircular scar, which is usually covered in the hair line.
When a bone anchored hearing device is combined with a first stage Medpor ear, I am able to use a scarless technique for both of these systems. It has to do with how my surgery is done to create the Medpor ear. It is incredibly convenient to put in the bone anchored device at the same time. Figure 26 is a photo of a six-year-old patient who received bilateral Medpor ears combined with bilateral bone anchored implants.

Figure 26. Combined Medpor surgery and bone anchored implants.
In this case, I have to determine the location of the canal because he does not have one. That is something we can feel anatomically with our fingers where it should go. I design my flap where the dots are (Figure 26) and the artery that supplies that flap. The purple outline on the scalp is the flap margins, although they are all taken from the small incision behind. The two dots in the hairline are where I place a sleeper, especially in boys, so that if anything happens to one implant, you have another one and it does not require general anesthesia again.
Figure 27 is the exact same view showing the sleeper and the implant in their positions, as well as the location of the canal. I lift up a flap of soft tissue with one of these instruments; this is what I call a two-stage bone anchored implant. If the bone is too soft or the child is too young and we do not have a likelihood of strong osseointegration, I will perform the surgery in two stages as opposed to one.
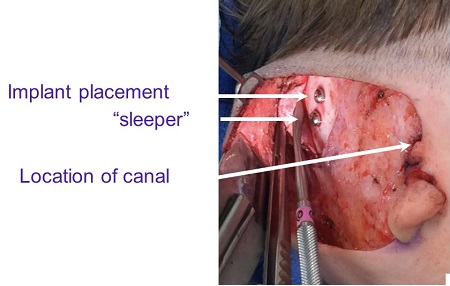
Figure 27. Surgical placement of implant and sleeper under soft tissue flap.
The site is covered, and then the implant can be brought out later under local anesthesia. Figure 28 is the same child at the end of surgery with the implant and sleeper underneath with no scars.
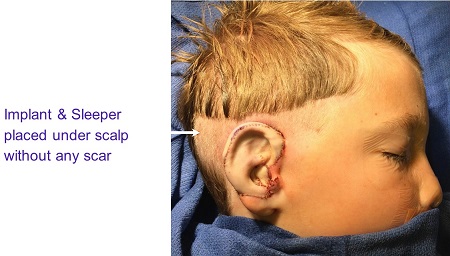
Figure 28. Post-operative Medpor and bone conduction implant and sleeper with no scars.
Aside from the cosmetic benefit of the Medpor, this patient’s mother said that his bilateral Pontos have given him essentially normal hearing, which is a significant improvement over the Softband that he had been wearing up until his surgery.
For after care, a healing cap and gauze is placed around the abutment. We are trying to promote the skin to heal well around the abutment. The parent or patient is not asked to do anything specifically in after care, except show up seven to ten days later for a check. Depending on what the skin looks like when I see them back, we either put the healing cap on for a while more or we take it off completely and begin doing daily gentle cleaning. After several weeks, we can do more aggressive cleaning. Depending on whether it is an adult or child, we can put the processor on in two to three months after surgery for the percutaneous system and one month for the transcutaneous system.
Ideal Timing of Surgery and Bone Anchored Devices
There is something to timing of the different options for microtia reconstruction relative to bone anchored devices. In the United States, the Food and Drug Administration (FDA) has mandated that a child must be at least five years old before a bone anchored device can be implanted.
As there is no surgery for an adhesive retained prosthesis, timing does not matter. However, if you do the bone anchored device on a patient with an adhesive prosthesis and they change their mind later, it may be a little tricky, but is nothing we cannot overcome.
The next option is the surgically retained prosthesis. In my opinion, that should be done at the same time as the bone anchored implant so that the patient does not have to undergo two separate surgeries.
In terms of the rib cartilage surgery, the FDA is very adamant that there is no surgery done before the rib cartilage reconstruction is completed. You are completely dependent on the skin of that auricular area to be scar-free so that it can tolerate the rib graft sitting underneath it. The skin gets somewhat stressed from suction over this two-dimensional framework. We do not like to do the bone anchored implant until after the rib cartilage surgery.
Lastly, my recommendation for the Medpor surgery is to do that and the bone conduction implant at the same time if the child is at least five years old. That is the ideal. Afterwards, the bone conduction implant can be done by anyone because the Medpor ear is very healthy. We would wait a minimum of three months after the Medpor surgery before doing a bone anchored device separately.
Earicles: Miracles for Ears
In knowing that you may have patients that have this condition, we started our nonprofit two years ago called Earicles: Miracles for Ears. We are completely dedicated to microtia and aural atresia patients. Our goal is to promote education and advocacy as well as research and surgery for these patients. This nonprofit is specific to children under 18 years of age, but in terms of the educational component, we want all patients to understand all their options.
Our conferences include experts from around the country who speak on aural atresia surgery, rib cartilage surgery, Medpor, audiological aspects and treatment, psychological components, and hemifacial microsomia and jaw surgery. All of these perspectives give a very comprehensive overview.
A child with failed ear reconstructions was our inspiration for Earicles. Our foundation, along with help from other foundations like Ear Community, brought a young child with over 17 surgeries to Los Angeles and provided her two surgeries to create a new ear. If you have any of these patients, I highly encourage you to send them our way for Earicles.
One of the most rewarding things for me is how much her parents have described her personality changing when we used the Medpor technique to help this failed ear reconstruction. It is why I do what I do.
Questions and Answers
How can we get you to come to Europe to perform these surgeries? Many patients here need you!
That is very kind of you. I have not made it to Europe yet. I have been asked to come to many countries to perform surgeries, and the difficulty for me is that I spend a great deal of time caring for children after the surgery. I see them every week and even sometimes more than once a week. I would feel very irresponsible to operate on children and not be there to care for them afterwards. I would need to ensure that a partner or a system was in place to make sure those children got great care after surgery.
What is your website?
It is www.microtiaearsurgery.com. Our Facebook page (Facebook.com/SherylLewinMD) is very interactive and patients find each other through our Facebook. We post a lot of upcoming informational things about technology, education, and all of our new videos there. It is a good way for us educate people on the latest advancements.
How many doctors are doing the Medpor procedure?
There are maybe a handful in the United States. Part of the problem is that it requires so much practice and technical expertise with the flap to be successful. Unless you have a constant supply of patients in a training institution, it is not practical for the average craniofacial surgeon to do. It is not something you want to be doing once a month or less. We advise all of our patients who are looking into these options that they may have to travel to get the care they want. I think your chances of having a successful outcome are much higher if you can travel.
Cite this Content as:
Lewin, S. (2015, March). Microtia ear surgery and bone anchored hearing devices. AudiologyOnline, Article 13726. Retrieved from https://www.audiologyonline.com.