
Editor’s Note: This text course is an edited transcript of a live webinar. Download supplemental course materials.
Rebecca Cihocki: Welcome to our course today. My goal is for you to leave this presentation understanding the new Ponto Plus and how it works with the Ponto Streamer as well as the ConnectLine accessories that work with the Streamer. I will get into why we are offering wireless options and for which candidates they are most appropriate, but I hope you will feel comfortable working hands-on with these products and be motivated to recommend them to your patients.
Why Wireless?
Why did we decide to go wireless for Ponto Plus? Simply stated, it was time. Traditional hearing aids have had wireless options for almost a decade now. When we look at the MarkeTrak report, Kochkin (2007) states that when consumers are satisfied with their ability to function in many listening situations, their overall satisfaction is very high. When they are only satisfied in a few situations, the satisfaction is very low. Data compiled from the same MarkeTrak survey regarding conventional hearing aid users’ opinions on specific listening environments indicates that the worst listening environment is large groups. That is often the case with normal hearing or hearing-impaired people, but these hearing aid users also indicated that they had significant difficulty on the phone, in a restaurant, in a car, and in the classroom.
Clearly, there are many situations where people still need additional help. Although these were people with traditional hearing aids, we think the situational difficulties are similar for users of bone-anchored technology. Oticon Medical believes situations such as leisure activities, listening to music, listening in the classroom or workplace, understanding in the car, place of worship or at a movie, on the phone or even in a restaurant can all be helped with the use of a wireless or assistive device.
Connectivity
The Ponto Streamer and the ConnectLine were specifically developed as solutions to the listening problems that bone-anchored patients have in these situations. The Streamer alone is useful for many of those environments that we just discussed. There are additional items that can be purchased either from Oticon Medical or Oticon for use with the ConnectLine. They work with the Streamer and the Ponto Plus to improve the signal-to-noise ratio in even more situations than I mentioned. The Streamer is the primary device. It is included at no charge with every Ponto Plus order. When we say that these products grow with the user, we mean that the user will get the Ponto Streamer to start, because there is one feature that they are excited about, such as the remote control function. Later, they will use it for more features and maybe add some of the ConnectLine accessories.
The Streamer and the ConnectLine communicate on the 2.4 GHz signal via Bluetooth. As a company, we still offer all of our RISE platform processors: the Ponto, Ponto Pro, and Ponto Pro Power. However, it is only the Plus devices on the Inium platform that are compatible with the wireless devices.
It was important for us to offer a device that included wireless connectivity. It was also important that we improve upon the technology that we already offered, and that is where the Plus came from. It is everything you know and hopefully love about the Ponto Pro, plus more. Our focus has been to develop a better hearing solution, not just bring wireless capability to bone-anchored technology.
Ponto Plus
The Ponto Plus has taken three steps forward. We have launched a stronger device with the new transducer. We have improved feedback handling, although many people would say we did not have a feedback problem to begin with. We have added the Oticon Alta Inium processor, and we have brought wireless to the bone-anchored device users. It is a great advancement to have this wireless capability with the Streamer, but also to have this new transducer. To be honest, I would say all bone-anchored devices are inherently weak. Truly, every new processor should be stronger than the previous generation. It takes a lot of power to vibrate the skull. The stronger your transducer, the larger it typically is and the more battery power it requires. Our engineers are very proud to launch this product that is no larger than our previous processor, has a more powerful transducer, and has less battery drain. You get, on average, about 10 extra hours compared to the Ponto Pro.
What does it mean to say we have a stronger transducer? It is not the thresholds or the fitting range of the audiogram that is going to change. Bone-anchored devices are measured in units of force, not power. For the user, the benefit of increased maximum force output (MFO) is noticeable in loud situations. Our design has been focused to give more output in the mid to high-frequency range, which are the areas that matter most for speech understanding. This improvement lies within the design optimization of the transducer. Even though it is stronger, the size and power consumption are still the same as the previous Ponto Pro, but with great improvements in regard to efficiency, which is how we achieve less battery drain. The MFO curve in Figure 1 shows the improvement in the mid to high frequencies compared to the Ponto Pro. For your information, the same is true with our Ponto Plus Power. There is an average of 3 to 4 dB more gain in the mid and high frequencies compared to the Pro Power.
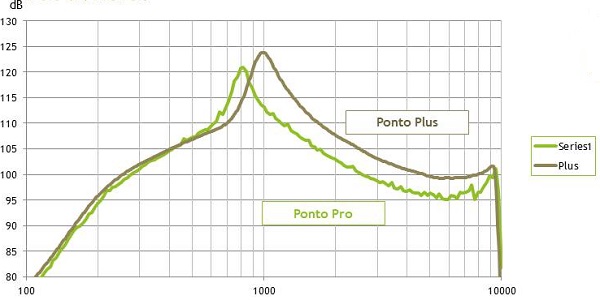
Figure 1. Comparison of maximum force output (MFO) between the Ponto Pro (green) and Ponto Plus (brown) processors.
The graph in Figure 2 shows how patients can benefit from this stronger transducer. Average speech is about 65 dB and will be somewhat higher in background noise; there is a range from someone whispering to someone shouting. The average noise range for different environments is shown by the brown bars; sound varies between these different situations and even within a single situation. It is these variations that put the demand on the sound processor.
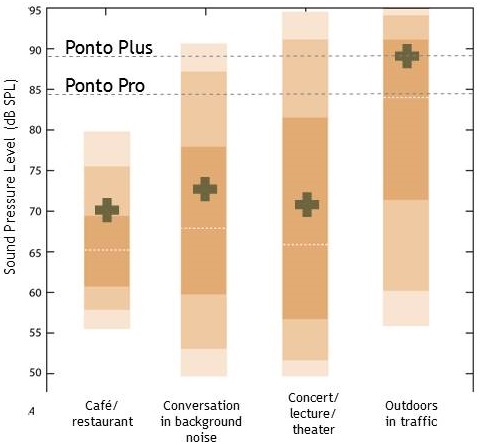
Figure 2. Varying loudness for different environments (brown bars) and the output ceiling for the Ponto Pro and Ponto Plus processors (dotted lines). The plus symbol indicates the average intensity for each situation.
The first dotted line (Figure 2) shows an example of where the sound from a Ponto Pro user would reach the ceiling and become distorted. The speakers saturate after about 79 dB, and that is true with virtually every bone-anchored device on the market until we came out with the Ponto Plus. Users can cope in many situations, but when the environment gets very loud, the speaker starts to saturate. A stronger processor can follow and produce higher sound levels. The upper dotted line shows how the increased power from the Ponto Plus makes more of the variety of sounds available to the user, allowing users to enjoy more of the everyday sounds.
Ponto Streamer and ConnectLine
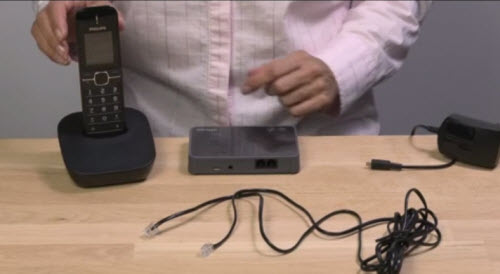
What is a Ponto Streamer? If you are familiar with the Oticon Streamer Pro, then you are about 90% familiar with the Ponto Streamer (Figure 3). At its most basic function, the Streamer is a remote control for your Ponto Plus. It will change programs, adjust the volume and allow you to mute the device. It is Oticon Medical branded, meaning the Ponto Streamer will only work with the Ponto Plus and the Ponto Plus Power. While it looks and acts much like the Oticon Streamer Pro, they are not the same and are not interchangeable. The neckloop is an integral part of the system, and should always be used for the best possible performance. Other manufacturers offer wireless solutions that do not use a neck loop. However, Oticon Medical felt it was important to have a wireless device that uses very little power from the actual processor. While the Streamer has up to 10 hours of constant use, it does not draw power from the battery that is used in the Ponto Plus ear-level device.
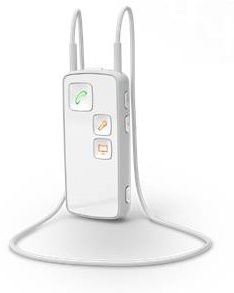
Figure 3. Oticon Medical Ponto Streamer.
The Ponto Streamer is open; that means you do not need to link it to the sound processor before you use it. From the factory, every Streamer will send signals to every Ponto Plus instrument within one meter, or about three feet. If you want to link it specifically to your sound processor, then you can do it in Genie Medical 2013.1., but you do not have to link it.
Why did we do this? It is my personal belief that it is less of an annoyance for customers. In many other companies, if the patient’s hearing aids go in for repair, the manufacturer does not physically repair them; rather, they are replaced them with a new serial number, which then does not respond to the previous wireless connection. The audiologist cannot just load the patient’s last settings and have the patient pick them up at the front desk. They have to make an appointment for the patient to come in with their wireless device or streamer so it can be re-paired to the hearing aids. I think that Oticon Medical is the guinea pig to the market of what happens if every Streamer works with an intended wireless device right out-of-the-box.
The downside could be if you have two Ponto users sitting side-by-side, but because of the neck loop, it sets up a shoulder-width range. In theory, one user could control the second user’s Ponto volume and programs. The remote control option will work from three feet away or an arm’s distance. However, they would not be picking up another person’s phone call or music or anything is actually streaming unless they were practically lying on top of another. I think the ideas is that it is faster to dispense and easier to use.
Finally, a telecoil is included, which is great, because you do not have to attach anything to the outside of the processor. With the previous devices you had to buy a telecoil adapter, which is as long as a toothpick, and you plugged it into the bottom of the sound processor. The telecoil is now integrated into the streamer. It is activated by a long press of the auxiliary button.
Using the Streamer without the Neck Loop
The Ponto Streamer can be used without the neck loop. Cochlear has a remote control and a cell phone device, but it does not hang around the neck. Ours can be converted to that as well. If you plan to allow your patient to use the Streamer without the neck loop, then you must link it to get the most consistent function. I will show you in the software how to change it from open to linked. Once you have linked the Streamer, it will work as a remote control with or without the neckloop.
Patients can also hear whatever they are streaming, such as music or a phone call. Remember, however, that the microphone is on the top of the Streamer; this is important when patients use it to take a phone call. No one will hear them if the Streamer is in their pocket. If they want to use it as a hands-free device, to me, it makes more sense to use the neck loop. The connection is stronger. The microphone is going to be in the ideal location, and then they are truly hands-free. However, if they insist on not having the neck loop, it will work. Personally, I feel patients are going to be more apt to lose it if they take it off the neck loop. Also, the battery usage goes from about 10 hours to 5 hours of talk time.
Linking the Streamer
If you want to link the Streamer, you plug the Streamer into the computer. This is really the only time that you ever have to plug it in. Open the ConnectLine settings tool, and from here, you can change the status from open to linked. Once you have done that, it will prompt you to enter the serial number; this has to be typed manually. We have a laminated one-page sheet that walks you through these steps. Because you are only going to do this on rare occasions, you can call customer service and they will send it to you if you do not already have it. I believe it ships with the new software. If you link it so that it will work without the neck loop, it still needs to remain no more than one meter from the Ponto. We have optional belt clips that can be ordered as well. All of this is covered in the Ponto Streamer User Manual (Figure 4).
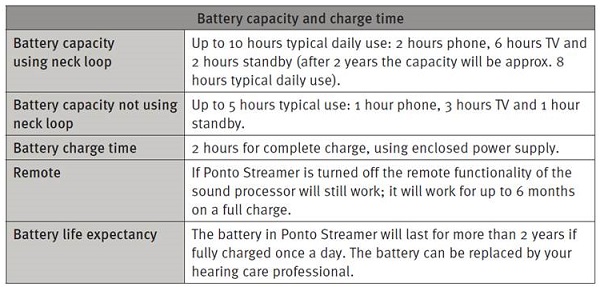
Figure 4. Battery capacity and charge instructions from the Ponto Plus user manual.
Demo Streamers are available; they will be clearly marked on the back of the unit. Demo units cannot be linked. In fact, if you connect the Streamer to Genie, you will not even see the box to switch from open to linked.
Because our Streamer is open and Oticon’s is not, the internal platforms are different. The Ponto Streamer cannot be used with Oticon hearing aids, and the Streamer Pro cannot be used with the Ponto Plus sound processors at the moment. The Ponto Streamer can be used with the cell phone, tele loop, music, computer and remote without any extra accessories. The Streamer alone will allow wireless connection to the cell phone. Some people have MP3s or an older computer that does not have Bluetooth. We do include a minijack cable so you can hardwire the Streamer to the computer with the headphone jack. It also comes with a splitter cable so you can use it for Skype and FaceTime. While the Streamer will communicate with the Ponto Plus right out of the box, it does still need to be paired to your mobile phone. When you pair the Streamer to the cell phone, the code for the streamer is 0000; that is included in the Ponto Streamer User Manual.
Figure 5 shows all the opportunities that are handled directly from the Ponto Streamer in the top row; the second row shows the additional solutions that can be purchased as accessories.
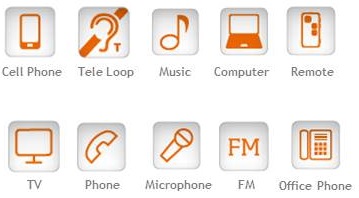
Figure 5. Wireless connectivity options; the bottom row of options require additional accessories.
Buttons and Plugs
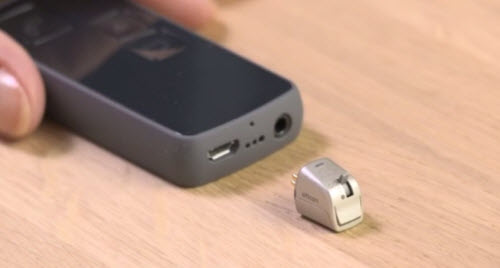
I will quickly go over the buttons and the parts on the Streamer (Figure 6). On the top, you have the on-off button, and on either side of the button are indicator lights. These tell you that the power is on, or it flashes if it is in pairing mode. The light on the other side tells you if the battery is low or if you are connected to one of the ConnectLine accessories. The bottom of the Streamer has ports for the charger, an FM receiver, and a minijack to hardwire to your computer or your MP3 player. One side of the Streamer has no buttons, and the other side has three. The top two buttons on the side will work as a volume up and a volume down with a short press of either the top or the bottom. If you long press either of the buttons, it will scroll through the manual programs, if you have made any manual programs. Then, if you press and hold both the up and down together for about two seconds, you will hear the beep-beep, and it will mute the device. The bottom button on the side is the auxiliary selector. A long press on the bottom button will activate the telecoil. A short press will connect you to music.
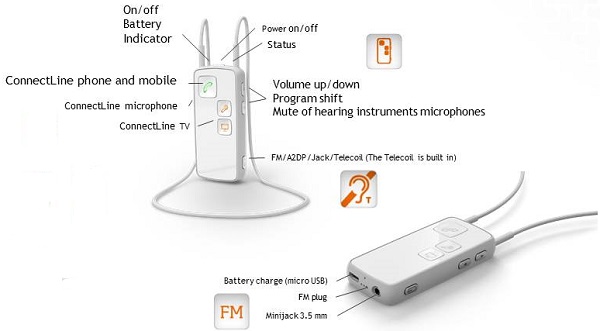
Figure 6. Buttons and ports on the Ponto Streamer.
To stream music from a cell phone, you have to push the auxiliary button on the side of the Streamer. Have the patient try this out in the office before they leave to make sure they are able to hear the music from their phone. The same thing goes for an FM receiver connected to the bottom. You would push the auxiliary button and that receiver would automatically connect to the transmitter. This is going to make life so much easier for professionals working in the school system.
Previously putting an FM in the bottom of the Ponto did not mean you had access to the FM. You had to manually make an FM program, and then the student either had to change into that program or the audiologist had to change the programming in the software so that the Ponto was always in the FM-plus-Microphone mode. It is almost impossible for the school audiologist to figure out which, if any, of those options have been chosen. Now the FM plugs directly into the bottom of the Streamer. You push the auxiliary button on the side, and that is it. On the top of the Streamer next to that power button is an orange light that will be on so you can visually tell that the FM is linked up.
Each Streamer is going to ship with two neck loops: medium and long. We do have a short neck loop that you can request. These neck loops are interchangeable with the neck loops that are used with the Oticon Streamer Pro, and they do pull out from both sides. The belt clip and the charger base are additional items that are available for purchase.
ConnectLine
Now let’s get into the ConnectLine. Remember these can be ordered either through Oticon Medical or Oticon. ConnectLine is a variety of additional items for purchase that will assist your patients with specific challenging environments. We say these devices are plug-and-play, but when you first turn them on, they do need to be paired, just once, to the Streamer. These ConnectLine products are the exact same products from Oticon. The options are the TV adapter, the ConnectLine microphone, ConnectLine phone adapter, FM, and office phone kit.
TV
The ConnectLine TV adapter is a great solution for watching TV. Once you have connected the adapter to the TV and paired it to your Streamer, you will have direct streaming of the TV sound, from the TV to the Ponto Plus via the Streamer that you are wearing. Even if you leave the room for a moment, you will still hear the TV. The range of communication is about 30 meters, or approximately 100 feet.
Let's watch a video of how to set up the ConnectLine TV. These videos have been copied from Genie Medical software. There is no audio on any video. You will be just watching.
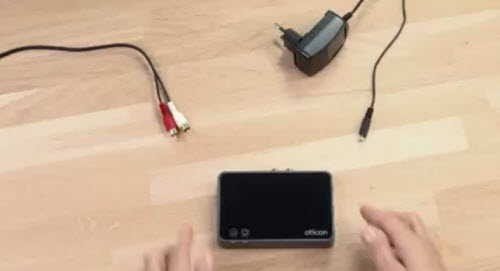
When you open up the ConnectLine TV box, there is going to be the black connection box. There is a splitter right and left cable seen in the video. Then there is a power supply that plugs into the wall and three other connectors/adapters for use with different TVs. Instructions are included, of course. This video showed one option. In this case, the white is left and goes into the white socket. Red is right and goes into the red socket. When you get to the back of the TV, you match the red with the red, white with the white, and that is it.
The next video I want you to watch is using the TV adapter with the Streamer. What you do not see in this video is the pairing. All you do is you put the Streamer into discovery mode by holding down the power button for about five seconds. Then the Streamer’s blue light starts flashing fast; put the Streamer near the ConnectLine TV box or right on top of it. In about 30 seconds, they find each other. Once you have done that pairing, you will see a light on the box and on the Streamer; you do not have to pair again after that. Every time going forward, you do what they are doing in this video. You power on the Streamer and the TV. Push TV icon button on the front of the Streamer. That light starts flashing to indicate that it is starting to connect. The light on the ConnectLineTV box will also flash orange, and then will change to steady blue. On the Streamer, the TV icon is lit up, and the indicator light is steady orange.

Microphone
The ConnectLine microphone is paired to the Ponto Streamer through Bluetooth. It is a small clip-on microphone that is worn by the person to whom you want to listen. Their speech can be sent directly to the sound processor via the Ponto Streamer. However, I will caution you about using this as a replacement for FM in children.. Remember that all mini mics or companion mics, regardless of which manufacturer you are using, will have a narrow bandwidth similar to the cutoff of cell phones, typically somewhere between 4000 and 6000 Hz. An FM system will have the frequency response of the hearing aid or the bone-anchored processor. Since we know that extended bandwidth is important for children acquiring language, I would recommend the investment in FM transmitters and receivers whenever possible.
The ConnectLine microphone is certainly an excellent option for reducing the signal-to-noise ratio in a noisy environment or when distance to the speaker is a factor. This is a nice accessory for challenging situations such as noisy restaurants with your companion or when you are participating in a lecture and listening to the speaker's voice while sitting at a distance. I know a lot of people who like it when they are driving in a car and are talking with a companion that they cannot see. Another idea with the ConnectLine microphone is to put the microphone near the speaker of the TV, similar to the ConnectLine TV. When you leave and go somewhere else, you can take it with you. Connecting these two devices is simple, as you will see in the next video.
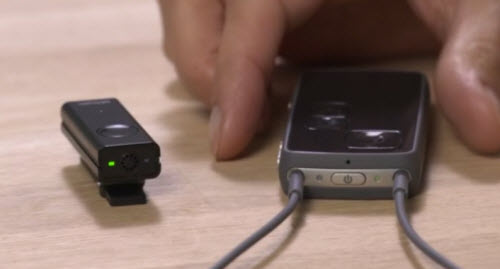
Here, you will put the Streamer into discovery mode by holding the power button for five seconds until the blue light starts flashing. Take the Companion Mic, and push the only button on the Companion Mic and hold it. Then the orange light will start flashing. This goes on for a bit longer than you think it should, and once they both have found each other, the lights become solid. You have to wait it out till they find each other and connect. I also think it is worthwhile to watch this video about proper orientation of the microphone itself, because I did not realize the proper way of wearing it. It twists when it comes out of the box. You want the microphone about six inches from the user’s mouth. You also saw how not to wear the microphone.

Phone Adapter
The ConnectLine phone adapter makes it possible to use the Ponto Streamer with a traditional analog landline phone. No more running for the phone and missing the call. Wireless and Bluetooth are fantastic, but most landline home phones do not have Bluetooth as an option. Patients who have started using Bluetooth wirelessly with their Streamer and their cell phone love this, and they start wanting to use their cell phones, even when they are home. However, if you are like me, your home is not the best environment for your cell phone as far as connectivity and reception. The ConnectLine phone adapter turns a landline into a wireless line. Transmission is about 100 feet. This is also very easy to set up, but let's go through this video.
I think this woman makes it look harder than it is. She takes the power cord out of the phone, and that is because this whole thing can be powered by the phone adapter that you have bought. You do take the phone line out of the back of the phone and plug it into the IN box on the ConnectLine device connector on the back. Then you plug the tele-cord that is included in the box into the OUT. The other end plugs back into the other end of your landline phone. Then you plug the power supply into the wall.
On the Ponto Plus and the Ponto Plus Power, there is not a connection socket on the sound processor; we discontinued the three prongs at the bottom of the device. This cuts down on the battery drain that you see when FM is plugged directly into the Ponto. It also allows us to now use the newest FM technology, such as the Phonak Roger. These new dynamic FMs require the use of a Euro pin socket, and the Ponto Streamer has a Euro pin socket. Receivers that we know to work are the Oticon Amigo R2 and R1, the Phonak MLxi universal receiver, and the Roger X. Widex has a universal receiver, as does Comfort Audio, the DT20.
If you have a patient for whom wearing a neck loop is not appropriate, we have not discontinued the Ponto Pro and the Ponto Pro Power. These patients can still have ear-level FM with these devices. They do have to have the special FM receivers, the Oticon Amigo R2BA and the Phonak BAHA FM. There are a lot of students currently wearing Ponto Pro.
Connecting an FM Receiver to Ponto Plus
I will take a couple minutes and review your options for setting up an FM program. If you have the previous-generation Ponto Pro or Ponto because you do not want somebody wearing a Streamer around their neck, you will use the Oticon Amigo R2BA (BA for bone anchored) or either of the Phonak BAHA FM receivers (MLxi or Roger X). I think it is worthwhile since there are so many children out there wearing Pontos and Ponto Pros, to explain how to make a program with the previous system.
I want to simulate a Ponto Pro, so in Genie, go into the Program Manager screen, from the Selection tab; if you are in fitting, you will also see the program manager. From there, add an FM or an FM-plus-M program, if this is a child or an adult that is capable of scrolling through their programs. You do not do this with the new Ponto Plus. In fact with the new Ponto Plus, you will not even see the telecoil, DAI (direct audio input) or FM options in the software, because all of that is in the Streamer.
When you manually add a program for previous technology, if this is a young child, you likely do not want them to have access to their push button at all. You want to disable the push button, in which case, you have to decide which of these three programs that you just made that you want them in all the time. From there, go to end fitting, buttons and beeps, and find “program switch.” From there, you can disable the program button. For children, you want to put it in FM-plus-M mode to make sure that their microphone is always on. That way if they are at school and the FM is connected, it will work. However, when they leave school and disconnect the receiver/transmitters, then the microphone of the Ponto is on. While it looks like you have three programs in the fitting screen, this child only has access to the FM-plus-M program in P3, because you have deactivated the push button. They cannot accidentally get into these other two programs unless you change back to the option that says “use program push button.”
FM Solutions with Ponto Plus
One great advantage to connecting FM to the Streamer is the cost. Patients who have bilateral Pontos will now only need one FM receiver. I had questions about using headsets on the computers in the classroom with the previous model. You cannot put headphones over a Ponto. It needs to vibrate freely. With these students, we would have them purchase the audio adapter that plugs into the three prongs at the bottom of that Ponto, and then into the headphone jack of the computer. In order to do that, you had to take the FM receiver out and plug the adapter in. Then where is that tiny little FM receiver? The children would often lose it. The new Streamer comes with a 3 mm jack that they can plug directly into the headphone jack, and it sits nicely right next to the FM.
Another benefit we found with the Streamer is that parents are happy that they can reach their children via cell phone if they need to. Outside of the school, Bluetooth features of the Streamer or the included jacks can help the students use Skype, watch videos on an iPad or laptop or listen to music.
A noticeable improvement is battery drain. An FM plugged right into the bottom of a bone-anchored device cuts the battery life down by days. This is not the case with the Streamer. You can get about 10 hours of constant streaming before you have to recharge the Streamer. The life of the battery inside that Ponto is virtually unaffected. We do find that some children can reliably turn the FM on and off on their own much more easily when this is activated by the button on the Streamer than the button on the processor.
Finally, with the euro pin being in the Streamer and not the processor, our patients have a much wider selection of receivers from which to choose. The major one that I hear about is the Phonak Roger. I think it is great that these students with bone-anchored technology can now benefit from this dynamic FM.
This last video goes over the switches on the Oticon FM. Oticon’s FM is a little bit different than Phonak’s FM. If you put that FM into the Streamer, then the switch is going to work side to side, not up and down. Additionally, it will not fit flush into the Streamer.
This shows how you can change the orientation of the receiver before you put it into the Euro plug. If you are looking on the FM, there is a tiny little button next to the Oticon that you would push, allowing the unit to twist sideways.
Accessories
Let me quickly discuss the last of the ConnectLine options. Please know that there is a solution for patients having difficulty using the phone at work. Offices often use these multi-line digital phones that will not work with the ConnectLine phone adapter, because the phone is not analog. If you use the Ponto Streamer together with the Sennheiser communication box, then you have a wired solution. The patient's Streamer will be hardwired into the phone, so they only have so much mobility, but they are still wireless. If you use the Ponto Streamer together with the Sennheiser communication box and the phone adapter, then you can use it as a wireless solution.
Genie Medical 2013.1
As of summer 2014, the newest software you need to fit Ponto Plus is Genie Medical 2013.1. There are new tools in Genie Medical that are only for Ponto Plus and the Ponto Streamer, and there are new tools available for all your Ponto processors. The videos we have seen are all new and available in Genie Medical. Some new things are the ConnectLine and Streamer setting tools, as well as new dynamic feedback canceler and how to find the MFO control.
On the selection screen of the software, you detect the device. You have to plug it in the correct side. We make Right and Left specific. If you are trying to demo a right-sided device on the left side of the head, I would recommend flipping it upside down, or just deactivate your directional microphone. Put it in surround sound, and then the side really does not matter. In the selection screen, mark single-sided deafness or soft band. If you do not, it is assuming that you had a titanium post implanted in your head, and that this is a conductive hearing loss. By marking single-sided deafness, you are saying that the algorithm that we use is based on the bone conduction scores, and these bone conduction scores are on the other side of the head. If you mark soft band, in addition to or separately, you are telling the computer that there is no titanium post. The processor has to go through some hair and fatty tissue, so the algorithm has to account for that.
The instruction videos are in the Fitting tab. You can see those regardless of whether you have a Ponto Plus or a Ponto Pro. All bone-anchored devices are inherently on the weak side, but we have given you an MFO control now, which is new. Maybe for a bilateral conductive patient that has never been amplified would you decrease this, but for the most part, you are going to leave that that as it is.
Program Manager
You are going to find if you add a program different from before, you are only adding acoustic programs. You have lost your telecoil, DAI and FM because this is all on the Streamer. Bone conduction in-situ audiometry is still the same. You always want to do it. Take the time to do all 10 frequencies when it is on their head, whether it is on a soft band or on the titanium post. You want to know how much force it is going to take to stimulate that cochlea.
Feedback Manager
We do have something new in the feedback manager. It used to be merely a checkmark on the digital phase canceler (DFC). It was checked on or off. On meant that you had a phase inverter, and off meant you did not have one. The downside of a phase inverter is that you can get entrainment, which is where the microwave goes ‘ding,’ and the Ponto goes ding ding, and that is because the feedback canceler thought that the microwave was feedback. It sent an out-of-phase signal to cancel it. It really was not feedback, and now that tone is audible.
Oticon’s feedback canceler employs frequency shift. The frequency shift is fast. It happens right when the device thinks it is about to go into feedback, and it shifts the whole signal by about 9 Hz. This avoids a potential feedback loop. It shifts the frequency a little bit so that those tones do not lie on top of each other and multiply. Depending on the audiogram, you are going to see this DFC. It will not be off; it will either be set at medium or maximum. Medium is exactly what you have always known; it is the phase inverter. Maximum is the phase inverter plus frequency shift. In our software, it depends on the bone conduction scores as to whether you are on medium or maximum. You have no access to this in the Oticon software; everyone is on maximum. The reason we are not is because people with perfect cochleae can perceive a frequency shift of about 7 Hz. Since this one changes at 9 Hz, if your bone thresholds are normal or near normal, the software will not apply the maximum setting. If there is any type of mixed component or cochlear hearing loss, there is no risk that the listener will perceive this frequency shift, in which case, the setting will be placed at maximum.
All the automatics are still the same as far as directionality and noise reduction.
Verification Tool
Most clinicians may not have the verification tool for bone anchored devices called the Affinity system available from our sister company, Interacoustics. It iprovides frequency output curves in the same way a . 2-cc coupler with BTE (behind-the-ear) and CIC (completely-in-the-canal) couplers give you a frequency output curve. Interacoustics make a skull simulator so you can snap on a bone-anchored processor and get a frequency response curve.
Analyzer
In the analyzer screen, which is the data logging, you now have a view of Streamer usage. For the phone, were they using the telecoil oras a child activating the FM by accident? That is new in the analyzer screen.
End Fitting
In the end fitting screen, remember you do not have to connect the Streamer, but if you want to adjust anything in the ConnectLine, you have to tell the software that you have a Streamer. That is when the ConnectLine will open up. You can change mic balance for any of the devices. If someone is on the phone and they say, “When I am on the phone, what is coming through the Ponto is really distracting, and I want to hear more of what is going on through the phone.” Click ‘phone’ and turn the up Streamer level, and turn down the Ponto microphone level.
Power base is going to give you an enhancement of lower-frequency sounds also. If you wanted to link your Streamer, this is where you have to have your Streamer connected to the computer. You would change it from open to linked and gain access to all the advanced functions.
EXPRESSlink
The EXPRESSlink from Oticon programs much faster and works for all the Ponto devices. It is an alternate programming device to the HiPro and NearLink.
Single-Sided Deafness
I have had some people ask why we would use Bluetooth or wireless for patients that have single-sided deafness because they are likely going to hold up the phone or listen to music with their better hearing ear. I have found they can simply use the Streamer as a remote control. They can adjust the volume and not have to risk feedback from the device. Patients with single-sided deafness continue to struggle in noisy environments. I tell patients, whether they get a CROS hearing aid or any type of bone-anchored device, that they will still struggle when it is noisy. In the past, the best solution was also the most expensive. After they get this device, you then try to add on FM. Now, for a couple hundred dollars, not thousands of dollars, a companion mic can significantly improve the signal-to-noise ratio of a crowded room.
The third situation is hands-free. Most states require drivers to use a hands-free headset when driving and talking on the phone. People with one hearing ear are reluctant to put anything into that only hearing ear. The Streamer allows them to hear telephone calls through the Ponto and the normal hearing ear.
Figure 7 shows a standard order form. The Streamer is included at no charge, but you do want to mark whether you want a white one or a black one at the bottom of the form. If you do not want a Streamer at all, you can choose the additional year of repair warranty. I have heard customers tell me that the go-to color should be black, because makeup and dirt show easily on the white one.
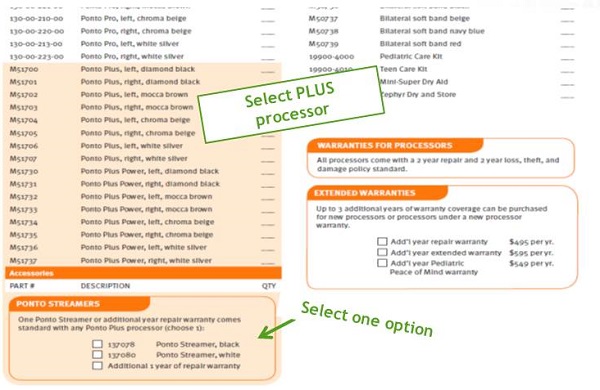
Figure 7. Order form for Ponto Plus, including Streamer selection.
In summary, the Streamer and ConnectLine were designed to help Ponto users maximize their hearing and listening in challenging listening environments. The fitting procedure is very similar to the procedure that you already know. The Streamer comes out-of-the-box ready to use with the Ponto Plus. It is possible to fine-tune the Streamer in the Ponto's Streamer settings tool, and everyone gets one unless they want an extra year of warranty. Figure 8 shows a breakdown of our list pricing, as well as what we would charge a patient if they called us directly.
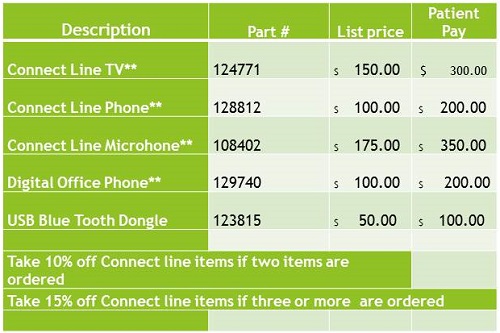
Figure 8. List pricing and price to customers calling Oticon Medical.
Lastly, who has the tattoo in the picture (Figure 9)? If you follow us on Twitter or Facebook, then you have probably seen this father who tattooed a Ponto Pro Power like his son’s on his head. You can follow us on social media, including Pinterest.
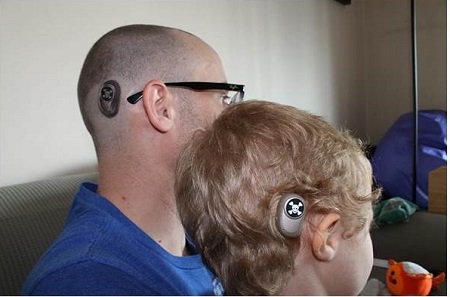
Figure 9. Who has the tattoo?
Questions and Answers
What is the significance of the orientation of the microphone on the ConnectLine microphone?
The ConnectLine microphone is a directional microphone. You want it pointing up towards your mouth. If you did not twist it when it came out of the box, it would point to the left or the right when you clipped it on your shirt. That ConnectLine microphone has a directional microphone embedded in it.
References
Kochkin, S. (2007). MarkeTrak VII: Obstacles to adult non-user adoption of hearing aids. The Hearing Journal, 60(4), 27-43.
Cite this content as:
Cihocki, R. (2014, August). Wireless connectivity in our daily lives: Enhancing the Ponto Plus experience. AudiologyOnline, Article 12875. Retrieved from: https://www.audiologyonline.com